According to the Internet, just about any engine can be swapped into just about any car on just about any weekend. Maybe it’s no coincidence that the Internet is also clogged with uncompleted swaps for sale.
These transplant operations aren’t easy, but proper planning and fabrication can separate a cool, running project from garage art on permanent exhibit. The right throttle linkages, ample cooling systems and functioning fuel delivery may not sound as exciting as the promise of a weekend swap, but these kinds of details will lead to a drivable car.
Instead of shoving a bigger, badder engine into a Miata, we’re going to upgrade a classic 1967 MGB GT with Miata power.
Step 1: Plan, Plan, Plan

Why did we decide to swap a Miata’s inline-four engine into an MGB instead of a V8 or V6? Well, first of all, we thought the Miata twin-cam better fit the spirit of the car. After all, the MGB was one of the inspirations for the Miata, and MG had experimented with twin-overhead
cams in the MGA.
More importantly, the Miata engine simply has some great attributes: It’s robust, makes good power in stock form, has great aftermarket support, and can be had for very reasonable money. Further, it’s mated to one of the nicest five-speed gearboxes ever made–and has gearbox ratios similar to those found in an overdrive-equipped MGB.
Finally, we wanted this one to have fuel injection, something many MGB V8 and V6 swaps lack. We knew it wouldn’t be too hard to use the stock Miata engine wiring and ECU for the swap.
We bought a very beat-up 1994 Miata for a donor. Though we could have pieced the swap together from junkyard and Craigslist parts, we’ve found that starting with a complete car is usually the easiest and most cost-effective approach. We can typically part out the car’s remains to recoup most or all of its purchase price.
Step 2: Match the Engine to the Chassis
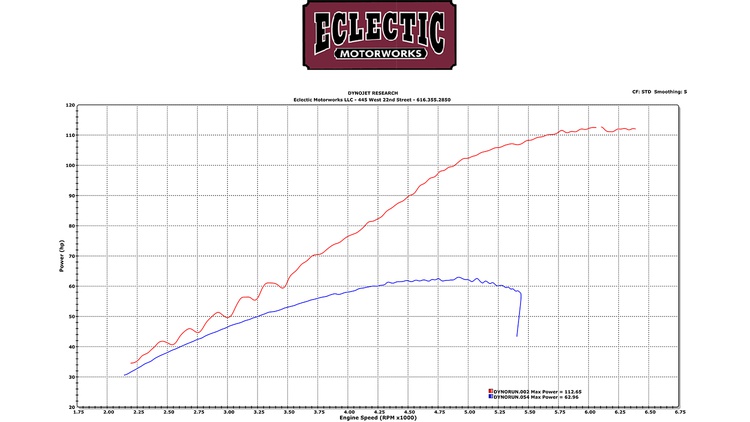
Another reason we chose the Miata twin-cam is that its power curve is a nice fit for the car. As the dyno graph shows, the stock 1.8-liter MGB engine makes roughly the same amount of power as the Miata engine until about 3500 rpm. That’s when the Miata engine’s breathing gets better and its curve starts rising much faster than the MGB’s. It also has nearly 2000 more usable rpm at the top end.
Sure, other swaps can make more power, but the 1.8-liter Miata engine offers plenty and is still docile enough that other driveline modifications aren’t necessary to handle the power and keep the tires planted.
Step 3: Follow the Single-Donor Plan

We pulled the engine, gearbox, wiring harness and ECU from the Miata. The clutch master cylinder, throttle cable and driveshaft would come in handy later, so we set them aside. We decided not to part out anything from the engine bay until we were finished with the transplant. We prefer our swaps to be single-donor as much as possible, so we’ll source most of our brackets, mounts, clips or other sundries from this car.
Step 4: Measure Twice, Cut Once

Some time with a tape measure told us that our MGB was going to need some initial surgery before we could set the Miata engine in place. We used a reciprocating saw to quickly cut off the factory engine mounts, then followed with a cutoff wheel and grinder to make it look like the mounts were never there.
Step 5:Follow The Factory

The Miata engine wasn’t going to clear the MGB radiator, but fortunately we weren’t sailing into unchartered waters. Since 1977-’80 MGBs came with radiators mounted farther forward, we decided to use those same parts to create more space in our engine bay. (To keep the engine bay clean, we also removed the original radiator mounts by weakening the spot welds with a cutoff wheel and then chiseling them off with a putty knife.)
To fit this later radiator setup, we just had to cut down the radiator duct panel. We cut it back with a cutoff wheel in a die grinder. Later we’ll finish it off with a new end cap.
Step 6: Making Space

We’ve done this swap before, so we knew that the Miata oil pan would be too deep for our car’s stock crossmember. For the pan to clear it, the crossmember would have to be notched. We also knew that either the front pulley would need to be cut down or the steering rack moved–again, another crossmember issue.
We’ve made these modifications in the past, but this time we opted to create the necessary clearance with factory parts. The later crossmember used on the rubber-bumper MGBs offers more clearance for the oil pan, front pulley and steering rack.
Nothing comes without compromise, though, and this crossmember is no exception: It raises the ride height. Still, we’d rather lower the ride height with suspension modifications than modify the original crossmember.
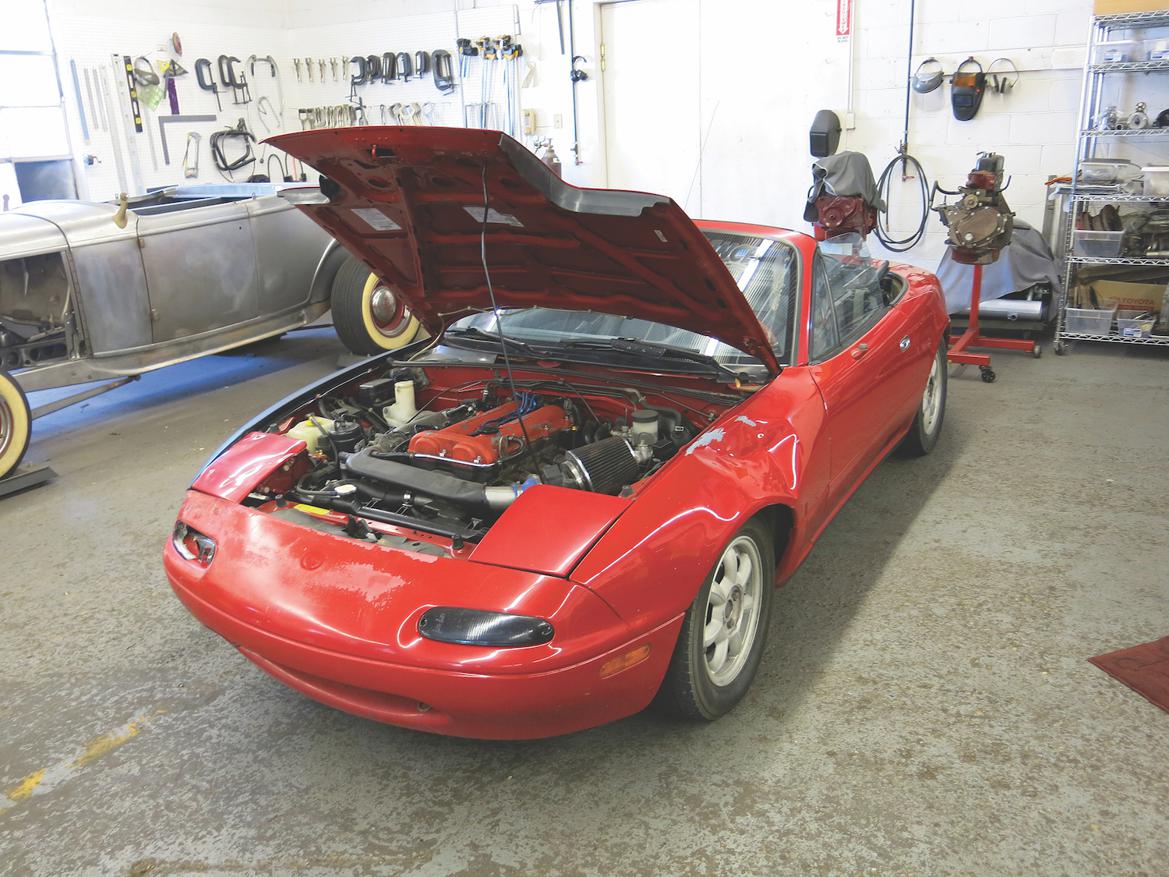
Step 7: Time to Test-Fit

Now that we had the right amount of room in the engine bay, we lowered in the Miata engine and gearbox for the first test fitting. We wanted about half an inch of clearance between the oil pan and the crossmember, so we set the engine on a half-inch piece of plywood.
Step 8: Mock Up Mounts

To hold the rear of the driveline, we made a temporary gearbox crossmember by replacing the stock part with a piece of angle iron.
Step 9: Center Fit

Now that the engine was roughly placed in its new home, we started to plan its exact location. For a reference point, we strung a line through the car’s centerline. Since the MGB gearbox tunnel is not symmetrical, we ended up with the engine slightly offset toward the passenger side of the car.
Off-center is acceptable, but crooked is a different story: The driveshaft’s U-joints need to be parallel to each other to operate properly. We used our line to make sure the engine was positioned properly, with the rear gearbox flange parallel to the differential flange.
Step 10: Level the Engine, Too

The MGB engine sits at a 3-degree angle, and we wanted to duplicate that with our Miata engine. This would retain the original pinion angle and ensure that the U-joints work on parallel planes.
To accomplish this, first we shimmed the car to make sure it was level. Then we shimmed the engine and transmission to be level side-to-side and slope 3 degrees front to back.
Step 11: Set the Engine Low and Far Back

To help with weight distribution, we wanted to set the engine as low and as far back in the chassis as possible. We also wanted to keep the shifter close to its original location and avoid cutting the heater shelf –the underhood support that holds the heater unit.
We maneuvered the engine and gearbox to a position that nearly met these goals. However, we couldn’t line up the Miata shifter with the hole for the original. We had two options: Cut the tunnel or modify the shifter itself. We chose to cut the tunnel since this car isn’t going to have a center console. If it were, we’d have to fabricate an offset shifter.
To make the puzzle pieces fit, we made a rough cut. Later we’ll go back and add a rear flange to the new shifter hole.
Step 12: One Last Test Fit

We wanted our swap to fit under the stock bonnet, so we double-checked the fit once the engine was in place.
Step 13: Plan Now For Later Service

An often overlooked step in an engine swap is leaving room to perform service in the future. We made sure we could remove and replace the oil filter, starter and several other components while the new engine was in position. We’ve seen swaps where these tasks aren’t possible without unbolting or otherwise moving the engine. Why turn a swap into a headache?
Step 14: Make Some Mounts

We checked and rechecked all of our measurements, clearances, angles, component removal spaces, shifter placement and so on. Now that we’re satisfied the engine is in the right place, in the next installment we’ll start making our new mounts.
Not only will we show you how we pattern, cut and piece together these new mounts, but we’ll also discuss the math we use to choose the size and thickness of our pieces.
Remember, it’s these details that separate a fun, finished engine swap project from one that clogs up your garage.
Read The Whole Swap Science Series:
- Swap Science: 14 Steps Before You Swap That Engine
- Swap Science: How To Build Custom Engine Mounts From Scratch
- Swap Science: How To Make Transmission Mounts
- Swap Science: How To Get Your Clutch Setup Just Right
- Swap Science: How To Make A Functional Gas Pedal
- Swap Science: How To Hang An Alternator
- Swap Science: Engine, Steering, and Exhaust Fitment
- Swap Science: Keeping Things Cool by Building a Cooling System


 Photography by Carl Heideman and Alan Dalman