


Burns Stainless LLC
burnsstainless.com
DynoTronics
dynotronicstuning.com
Laivins Race Cars
laivins.com
MagnaFlow Exhaust Products
magnaflow.com
Mazda Motorsports Development
mazdamotorsports.com
UpRev, LLC
uprev.com

 Photography by Andy Hollis
[Editor's Note: This article originally ran in the June 2013 issue of Grassroots Motorsports.]
New cars are great. They take advantage of all the latest technology to squeeze out maximum performance, all while providing the appropriate street driving experience for the intended market.
In the case of econoboxes, that usually means great mileage, good handling and a quiet cabin—but only adequate power. To correct this compromise, you can give up the quiet cabin and gain some forward motivation through a performance exhaust. When prepping our Mazda2 for Street Touring FWD autocross, we ran into a little issue and needed to design an exhaust from scratch.

Like most modern cars, this Mazda2 uses two catalytic converters, including one directly in the manifold. This puts the cat closer to the cylinder head, which reduces cold-start emissions. The manifold runners must be quite short as a result, and that tends to hurt midrange punch. Additionally, the exhaust is at its highest velocity close to the head, so any restriction will have a more dramatic effect than one farther down the piping.
SCCA’s Street Touring classes allow for a single cat to replace multiples, and the replacement can be located up to 6 inches past the outlet of the second original cat. This makes more room for header tubing as well as reduces flow loss both by removing a cat and placing it farther downstream. But we hoped for even bigger gains from a long-tube header design—one that would improve torque for when we accelerated out of turns.
The performance aftermarket usually takes some time to develop application-specific parts for most new cars, so we had to blaze our own trail at least part of the way. Based on experience with our Street Touring Civic’s similar-sized engine—grab the December 2010 issue of GRM or search our online archives to learn more—we had a pretty good idea of what to use for a muffler, high-flow cat and exhaust pipe size.


After consulting the Internet, we turned to Burns Stainless for better advice on how to build our header. With their specs in hand, we asked Laivins Race Cars to build it.
As a first step, we fabbed a 2.25-inch, cat-back, in-the-tunnel exhaust, which eliminated the second cat and nearby resonator. We replaced the restrictive stock muffler with a lightweight Burns Stainless piece leftover from a previous project.
This was a huge step forward: It added some motivation, removed 25 pounds, and allowed our Mazda2 to finally register on the sound meter at national events—the OE system would not budge the needle.
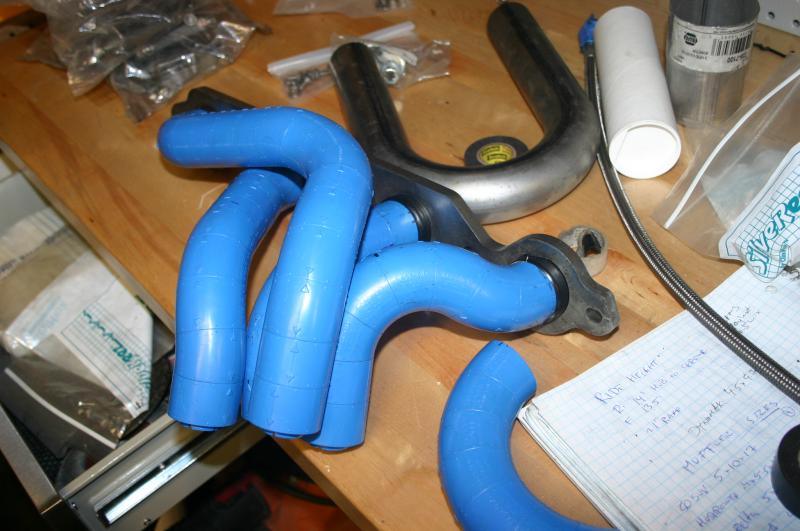
With that done, we needed to complete the system—but sourcing a long-tube header in the aftermarket proved impossible. We had to make our own, which included choosing critical tubing dimensions.
We found plenty of Internet sites and software that would spit out tubing lengths based on engine parameters, but they didn’t always agree on the answers. So we returned to Burns Stainless for advice. Burns is well known for its merge collectors, which serve as the basis for high-end custom headers around the world.
In addition to providing parts, Burns also consults on a selection of merge criteria, including tubing size, angle and lengths. Further, they will design the specs for your entire header if you source the parts from them. This software-driven process is called X-Design, and it requires some key engine parameters to generate the dimensions.
Filling out the online X-Design parameters form based on our factory service manual, we found that we lacked a critical piece of information: cam specs. What to do? We called Mazdaspeed Motorsports and got cam specs within a week. We also told Burns we were interested in increasing the area under the torque curve, but not so much the top-end power. Burns plugged in all that and came back with the answers we needed.
Burns could’ve built the header for us, but they needed the car on hand to package the product correctly. We were 1400 miles away. Fortunately, Laivins Race Cars was nearby. They do all the prep work for the CJ Wilson race team, which races Miatas in the Grand-Am Continental Tire Challenge and the Playboy MX-5 Cup.

Street Touring FWD class rules allow us to replace two catalytic converters with a single, and move it farther downstream. This allowed us to build the long-tube header we needed. We saved a lot of weight compared with the stock exhaust by having it dump right underneath the car.
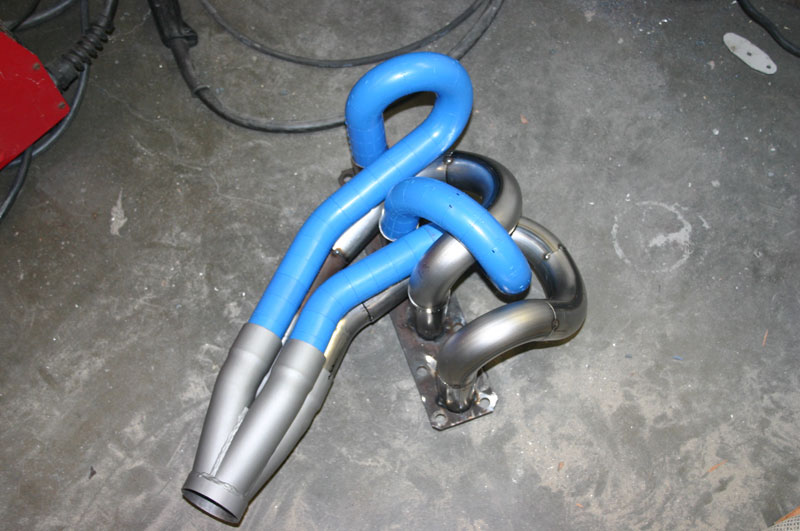
Our car rested at the race shop for several weeks as the parts arrived and the crew built our header between their other projects. We spent some time there splicing in extra wiring to extend the oxygen sensor wiring harnesses. We also had the Laivins crew put together the remainder of the exhaust, including installing a pair of Burns’s rounded, stainless O2 sensor bungs on the MagnaFlow Spun-Cat.
The end product is well built, beautiful and fits perfectly, so we headed to UpRev’s dyno to see how it performed. UpRev is primarily a Nissan shop with its own line of ECU software and performance products, but it also has an in-house DynoJet. The UpRev team will gladly test and tune any car.
Testing was not without its own adventures, though, as it took a while to figure out how to keep the Mazda2’s ABS and stability control happy when it sensed that only the front wheels were spinning under power. The answer was to pull the fuse that controls those functions.
The test pulls were done a couple days apart, with similar weather conditions each time. Results? We got what we paid for: more area under the curve exactly where it was needed.
The stock Mazda2 rev limiter is 6300 rpm, which is 58 mph with our 195/50R15 competition tires mounted. We bumped that to 7200 rpm (66 mph) by using DynoTronics’s tuning software. The extra range is mainly useful for keeping us in the powerband, as the revs drop by 3200 rpm between first and second. It’s also useful on some courses that have faster sections, as we can avoid shifting to third.
But most of our acceleration happens when we’re coming off turns from 35 to 40 mph, with max speeds of 60—at 6500 rpm. So we traded off a little power at the top end for a nice 2-to-4 horsepower bump across the board up until that point.

These upgrades along with careful tuning netted a gain of 2 to 4 horsepower across the range less than 6500 rpm.
Interestingly, this shows just how efficient the OE exhaust manifold is on the Mazda2. It appears that we gained nothing with the cat swap, even when using a high-flow replacement. The change in the torque curve can be attributed primarily to elongating the primary tubes from the short 7 inches of the OE piece to a lengthy 33 inches for the custom header.
The parts for this job totaled around $800, while the fabrication set us back $1200. (Keep in mind, though, that once the exhaust is made, it can be replicated for much cheaper. At that point, the shape can be digitized and the bends won’t have to be spliced together by hand.)
While we had hoped to see gains across the board, in the end, we got them where they’d do the most good. How’s that song go? “You can’t always get what you want, but if you try sometimes, you might find you get what you need.”
Like what you're reading? We rely on your financial support. For as little as $3, you can support Grassroots Motorsports by becoming a Patron today.

I am working on this very same thing right now!
I also like how the mazda2 is rated at 100hp but dynos at 95whp+

I'm in process of making some exhaust for my car right now, so when I read the title for this article:
I got excited, looking for some meaningful tech tip. But I leave disappointed that the extend of tech tips begins and ends with this phrase from the article:
"Our car rested at the race shop for several weeks as the parts arrived and the crew built our header between their other projects."
sigh.

Best tech tip? Get some header lego like the stuff from Iceengineworks. It'll let you build stuff like this.

There are stl files out there so you can 3D print your own, but make sure that each segment is equivalent to 1" of tube length and has indexing marks - some of the ones I've seen miss out on these important factors.
Less extreme. This one was heavily space-constrained so equal length runners weren't going to happen.


At the typical RPM used on the street there will be almost zero impact in power output.
If you build it for racing you might gain 4% at near peak RPM. But you can quickly kill even that with mufflers and Catalytic converters.
The Biggest gains are typically reserved for V. Engines. V6-8 where there is room to put pulses out 180 from each other.
Frenchy, no. You need to spend some time on a dyno.
Here's that first header I showed in a straight A/B test against an off-the-shelf Racing Beat part on an inline 4 cylinder with a muffler and cat.
In reply to Keith Tanner :
How much power did it gain at 2000 rpm?
300 hp.

If you can't afford to buy or borrow the ICE stuff (which is amazing!) you can use vacuum hose (like for a vacuum) and zip tie welding rod to the outside to get it to hold shape to match your mandrel bends. I have found this method to work "well enough" and you can cut the hose ahead of time to get equal length sections to then try different configurations without cutting into your pile of $ tubing.

What i did: bought a set of used headers. Cut them apart to make them mandrel bends and straight pieces.
Took some 3/8 plate and a lot of time to make flanges for the headers based on exhaust gaskets.
Placed mu collector in the car which was a piece of exhaust tubing.
Bolted the flange to the head. Started connecting the two with the mose cramped tube run. I held the pieces of tubing together during mockups woth painters tape. When i got happy, tacked everything and test fit repeatedly. Adjusted as necessary, numbered and witness marked all the peixes, welded together.
Displaying 1-10 of 24 commentsView all comments on the GRM forums
You'll need to log in to post.


