


Part 1: Preparation, Preparation, Preparation
Part 2: Creating a Perfect Surface for Final Paint
Part 3: Spraying Those Topcoats


Painting a car at home sounds so easy. You paint it, enjoy it, and then go about your merry way. The reality, though, is more involved–way more involved. So while readers keep asking us for a real “paint your car at home” story, to be honest, we’ve struggled a bit to come up with one.
Why? Because modern paints are a dichotomy. They’re better than ever, giving terrific results and making them very accessible for amateur painters, but they need to be used exactly as intended. They’re also not inexpensive, which creates a price barrier for amateur painters. Add in the need for some specialized equipment and various regulations at the federal, state and local level, and it simply becomes difficult to write a story about painting at home.
Nonetheless, this is GRM, and we can’t let you down. We’ve been painting at home for about 30 years. Lately we’ve been using the professionals a bit more, but we’ve also kept up with the times and still do some work at home. While the days of $200 at-home paint jobs are long gone, it’s still possible to put down some professional-quality paintwork for less than $1000 in materials and around $500 in equipment.
Of course, paint is only the frosting. The metalwork, bodywork and prep are the cake, so we’re breaking this down into three stories. In this first one, we’ll cover how to assess the car, strip bad work, and apply filler. Next we’ll get into priming, block sanding and fine-tuning the bodywork. Finally, we’ll lay some modern basecoat/clearcoat paint, wet sand it, and buff it out.
We’ll be performing all the work on the S52-swapped, E30-chassis BMW that was the subject of our High School Hotrod series. This is how we made it pretty on a budget.

One of the first things to be done is to decide whether to paint over the existing finish, or strip the car to bare metal. Our car had issues: It had already been repainted at least once, the finish was peeling away, and we had ripples everywhere.

Past experience has taught us that when the paint and bodywork are this bad, it’s usually best to strip the car to bare metal. That step adds a lot of time and some cost to the job, however: Not only does stripping the paint take 10 to 20 hours, but usually some bodywork will also be required. Nonetheless, we didn’t want to do all of this work on a poor foundation, so we went back to bare metal.
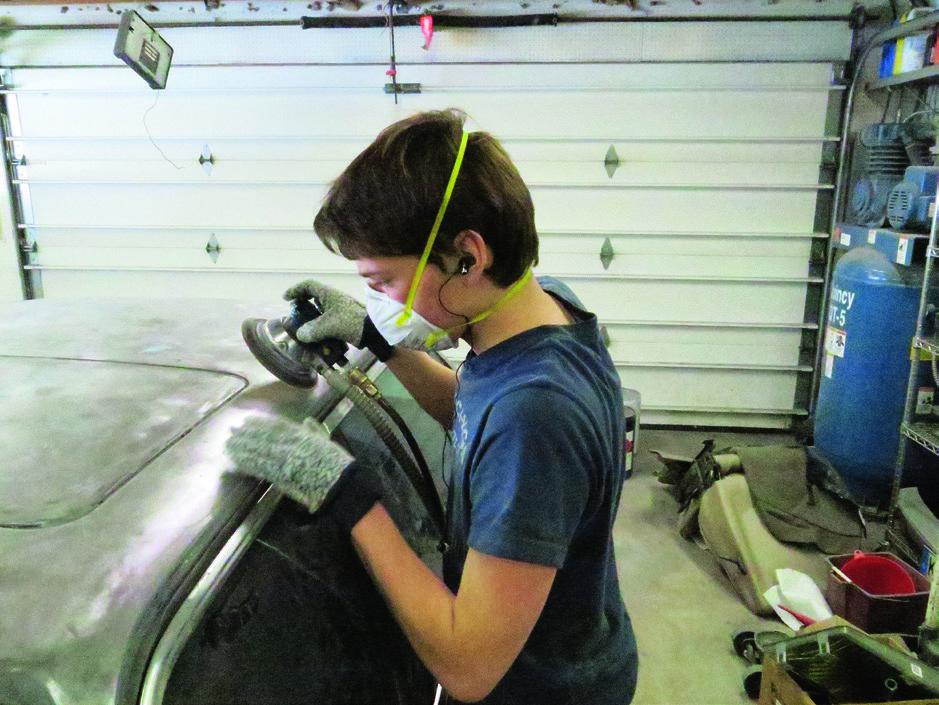
We chose to strip this car with 36-grit, sticky-back sandpaper mounted on an air-powered, dual-action sander. Everyone has opinions regarding paint stripping methods. Here are ours:
Like most 30-plus-year-old cars, our E30 had its share of road rash. The left-rear quarter panel had a light crease below the body ridge plus a small dent above it.

After stripping away the paint, we used a body hammer and backing dolly to lightly bring the crease and dent closer to the proper shape. The 15 minutes spent on this step probably saved us about an hour of extra time on filler work.

This also helped to keep the filler thickness to a minimum, reducing the chance of long-term issues like shrinking and cracking.

Now it’s time to share our opinions and methods regarding filler. We’re expecting some e-mails and rants with alternatives, which is fine. These methods have worked well for us in countless repairs. Before we mix up any filler, we prep a spreader by giving it a clean, semi-sharp edge with 600-grit sandpaper.

We use a quality, name-brand filler. We prefer the lightweight fillers, as they just seem easier to spread and sand. We’ll mix that filler with a paint stick on a piece of cardboard–usually about 6×6 inches. Make sure that both are extremely clean. There is nothing more frustrating than running into some hardened filler because a dirty tool contaminated the mixture.
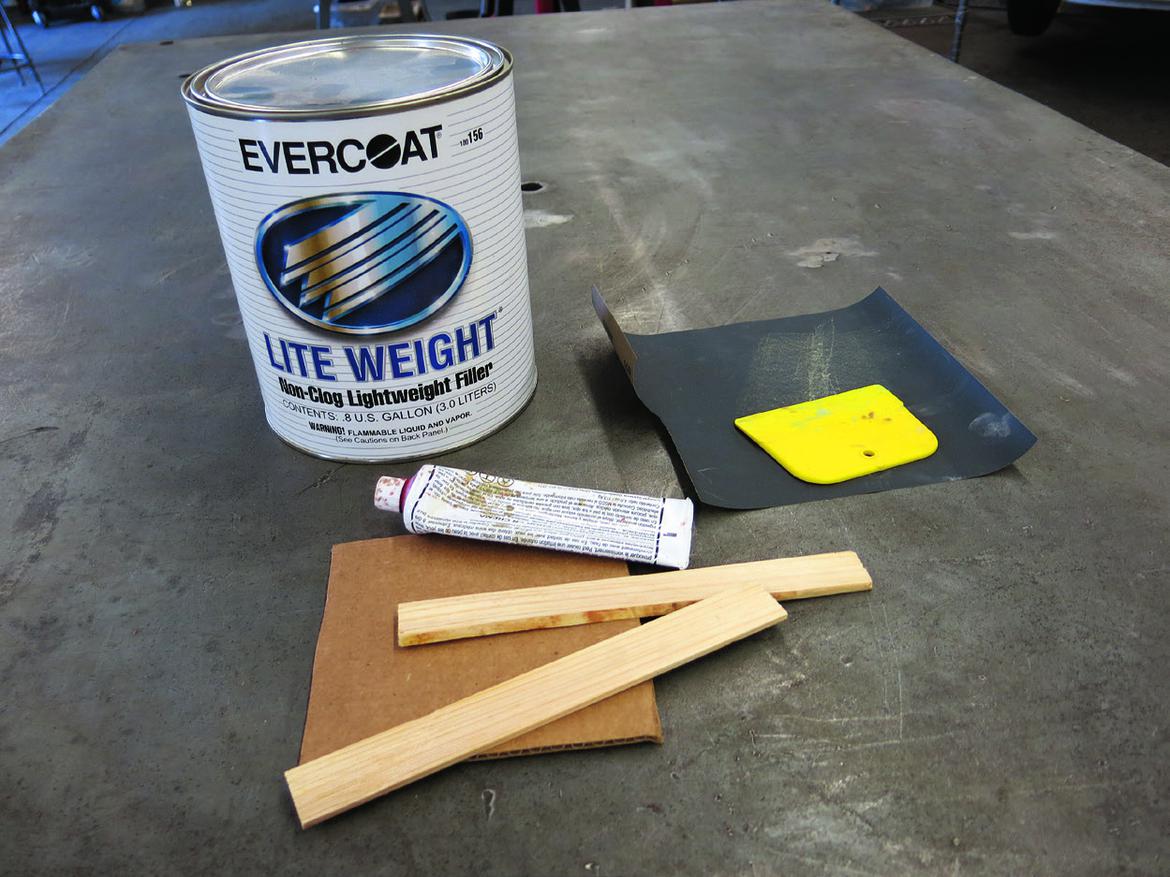
We use a separate paint stick to mix the uncatalyzed filler in the can. We never use a stick that has been near catalyst, as it could contaminate the raw filler. We then use the same stick to put a few dollops of filler onto the cardboard.

We then lay a bead of catalyst on the raw filler, following the mixing directions on the label.
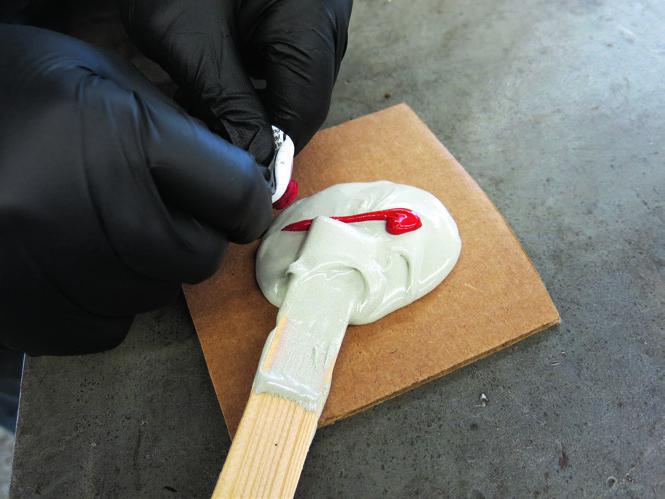
Using another paint stick, we thoroughly mix together the raw filler and catalyst–about 2 minutes should do it.

We then use our prepared spreader to apply the filler to the car in long, smooth strokes. We attempt to get the shape very close to the final profile needed. This saves us a lot of time sanding and re-applying filler.

We usually get about 10 minutes before the filler “kicks.” As soon as we’re done spreading filler, we clean our mixing stick and spreader with a paper towel to remove as much filler as possible. While this may seem overly compulsive, we do it to avoid having pieces of hardened filler flake off during the next application. We also tune up the spreader again with 600-grit sandpaper. After it has “kicked,” the filler looks like this and is ready to sand.

We start with an 80-grit disc on our dual-action sander. The first pass or two will quickly clog and dull the disc, so we’ll install a fresh one before we continue. We change discs fairly frequently, feeling them to get a true read on their condition: A sanding disc will sometimes look usable, but will feel dull. Sharp abrasives cut the high spots and help flatten the panel. Dull abrasives just follow the high spots and don’t do much cutting. End result? Ripples in a panel that should be fairly flat.

We only use the dual-action sander for rough finishing. Then we’ll move to a sanding block. The longer the block, the better. For this panel, a 12-inch block with 80-grit paper was the best fit. We used some crosshatch sanding patterns to identify low spots that would need more filler.

After about four cycles of “rinse, lather, repeat’–reapplying filler and then sanding it back–we ended up with a panel that was ready for the next step: high-build primer.

Multitasking: While the filler is hardening, we’ll continue to disassemble the car. We prefer to remove parts rather than tape them off.

Given that our windshield was cracked and its seals were weathered and dry-rotted, we decided to pull the glass. Since we weren’t reusing the seals, we cut them away to make the job easy for one person.

We went around the whole car repairing dings and minor dents until we had it ready for primer. To keep out the dust, we taped off the interior and engine bay.


Can't wait to see what materials equipment and methods used to apply sealer and color and topcoat clear. I have a 1992 325i cabriolet that I'm fitting a mtech2 body kit to (eventually) and need to venture into the body work and finishing. I have already welded in place a new core support and repaired minor rust and welded closed rocker moulding mounting holes. Looking forward to this series. Thanks.
My limited experience is that the metal (body) from most OEMs from the late 50s or early 60s on was dipped in some sort of metal prep /passivating that had the effect of preventing flash rust. Once this is removed by sanding or other mechanical means, the bare metal has a tendency to flash rust. I had my 61 Falcon plastic stripped to bare metal and did not get around to laying on an epoxy primer for about a 1/4 year. The bare metal did not have any flash rust except in the lower corners of the doors where I sandblasted around some pencil sized rust thru. On the sandblasted surfaces, the metal ended up with a very thick coating of rust. The owner of the plastic strip business at the time had stripped one half of some generic 10 yr old car from center line of the car (bare metal, no clear coat on one side of the car) and was using it as a summer daily driver.
Looking forward to part 3 - and how you deal with the paint fumes (how you avoid annoying the neighbors (if any)). I live in a major metro area and struggle with how to paint and not have someone report me.

We are doing a grandpa/father/daughter project on a 1987 Porsche 924S as her first car, and part of this process is to paint the car. We have acquired the car and will start on mechanical restoration/rebuild soon, with paint coming along with the car basically disassembled. We are looking forward to the entire process, which will take us about a year of weekends.
Can't wait until the next installment!
KRD

Wondering what would be different for prep and painting a fiberglass hardtop?
if you strip by sanding, be careful not to build up too much heat, i did a 87 pontiac that way and got the hood full of ripples, also i have seen some body guys thin out their "bondo" with laquer thinner and apply a thin coat to the entire body so nothing gets missed. I like you are taking everything off before doing the job!

Hours and hours of prep. 15 minutes of actually spraying.
And as a bonus, if you screw up the prep, your paint is screwed up as well.
That's why I seldom paint cars.

I got a quote from a good local body shop for my track car after changing to a fiberglass front end and a trunk lid - $3000. Instead, I had a 60 gallon air compressor already so I ordered a Starting Line DeVilbiss gun kit - 3 nozzles and a line pressure gauge (required for accurate pressure at the gun) from Eastwood and 2-part paint from a local body shop supply house. I built a quick spray booth from poly, furnace filters and a box fan for ventilation, and painted. It turned out great for a guy with no experience painting a car.
I used microbead/resin for filler on the fiberglass parts.
'66 Sprite


My 3 p's are procrastinate, procrastinate, PAINT!

In reply to Carl Heideman :
I love lacquer paint. It dries so fast. It's pretty benign, not requiring a lot of safety gear. And because it dries so fast it's easy to sand runs and drips off.
Finally the depth of lacquer paint cannot be duplicated by the plastic look of clear coats.
regarding durability of Lacquer, if you follow your prep guidelines you should have a really durable paint job. My first paint job has lasted since 1974. 47 years.
Displaying 1-9 of 9 commentsView all comments on the GRM forums
You'll need to log in to post.


