


dude! this is so frick'n awesome! I'm going to be watching this closely!
future turbo plans maybe?
dude! this is so frick'n awesome! I'm going to be watching this closely!
future turbo plans maybe?
In reply to ejs262 :
I built it in such a way that I left that door open...for remote turbos only though...it would be a couple of Aerochargers hanging in place of mufflers if I did go that route.
I did get around to installing my Marshall Blueline SCX gauges though...wired the option to change from amber to white backlighting to a toggle...amber is easier on the eyes if you are driving at night and tired.


Down waiting on parts right now...so I converted the slide-out ashtray into a drop-down hideaway gauge pod for the AFR gauge.

Finished building my console(that rabbit hole was all about switch panel locations). Now I am back to cleaning up wiring and running the rest of the interior circuits.


Found a garbage hood locally for $25...just for the purpose of cutting up to see what I actually need for a scoop. I have a couple options here:
1. Buy a 3" fiberglass cowl hood....this should theoretically fit even after I get some air filters(even then it will be close), and call it a day.
2. Repair this hood well enough to use it as a plug for a mold and make my own fiberglass hood with a cowl/scoop I know for a fact will fit.
3. Buy a steel hood and make a cowl from steel(somewhat appealing because I can keep stock hinge springs and not have a prop rod)
4. Do something crazy like buy a steel(or fiberglass) flat hood and make a transparent cowl from plexi-glass or lexan to show off stacks for no good reason other than my own amusement so I can see the engine shaking at idle.
5. Some combination(multiple hoods) of the above.

Thunderbolt?

Everything is looking great. I love the unmolested radio hole.
In reply to wheelsmithy (Joe-with-an-L) :
While the thunderbolt hood would "probably" fit I have never really been a fan of it on a car that has every other exterior line straight and sharp...besides, I suspect it narrows too much at the back to clear.
The plan for the radio is to use a stock-ish radio case with upgraded internals:

In reply to Wicked93gs :
Very cool on the radio, and if I'm honest, the Thunderbolt looks good on the fastback, but funny on the coupe.
Regardless, excellent work. With all this talk of the strut bars, I figure you're doing a stockish suspension? Shelby drop and 5 lugs?
Love the build. How about a bolt on Mach 1 style scoop. Keeps the Mustang theme going. I think CJ Pony Parts, or any Mustang aftermarket supplier, may have something. Keep up the good work.
In reply to wheelsmithy (Joe-with-an-L) :
Actually, next week I am going to order Street Or Track's coilover system(I guess that is stock-ish, at least based on the stock setup)
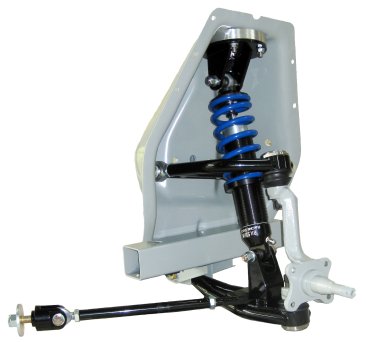
But yes, I have the Shelby/Arning drop and some v8 5-lug spindles waiting to go on. Out back currently I just have a 5-lug 8" rear sitting on 4.5 leaf 1" drop leaf springs...will see if that is enough for me later before I decide whether or not to opt for a coil-over rear as well.

Something like a Mopar "dust pan" style scoop made of Lexan turned backwards so it's a vent towards the windshield instead of a ram scoop trying to pressurize the engine bay? Love seeing this thread get new content.
In reply to pres589 (djronnebaum) :
I would post up more, but mostly I have been doing boring things lately while saving for the front suspension like wiring...endless wiring. Not very interesting viewing how to make a courtesy light circuit(yes, I decided I was going to re-wire the entire car from scratch...not my brightest idea). I wish I could say the car will be on the road soon...but I know realistically I have at least 6 months more work before then...mainly because now that I am putting it back together everything gets more expensive and the amount of detail for the work to look correct increase the man-hours exponentially.

I'll throw in my vote for the clear plexiglass scoop. Those intakes look wicked, and it will be cool to chow off that its a 6

How about a modified variant of this style hood?

Or make your air box a shaker hood?
In reply to QuasiMofo (John Brown) :
This is mostly likely what is going to happen...a shaker-type air box protruding through the hood(no scoops, just the box).
And so in that vein:
The lower airbox....rather a complex shape to clear all the things, this will be made out of fiberglass(or maybe carbon fiber if I get ambitious).
And this plug will be for the upper air box...plexi/polycarbonate/whatever. The 2 air boxes will bolt together, the plexiglass will stick through the hood exposing the stacks in a shaker-type assembly. I do have to shave down the height of the lower airbox about 1/2" or so for a good fit under the hood(right now it has 1/8" clearance, which means zero when I lay the fiberglass). No matter how I do this I don't think I am going to be 100% happy with the result...but function is most important.
p.s. Yes, I know the passenger side of the airbox plug is all messed up, my circular saw got bound up on that cut. No big deal, I will straighten it out after laying the fiberglass, I can afford for the wall of the airbox to be a bit thicker there. I calculated the volume of the upper and lower airbox together to be right at 30 liters....far more than I need to account for sudden atmospheric changes for the ITBs when the throttle is blipped.
Some slow progress on the fiberglass work for the lower portion of the airbox.
For the radio I used one from retro sound behind the stock radio face and positioned the knobs in the stock location. I'm happy with it.

The outer portion of the lower airbox is finished, now to start working the inside into something resembling a presentable shape. I now have 4 different sanders(and a flap wheel on a grinder) I am using trying to get at all the crazy nooks and crannies....was wanting to avoid hand sanding as much as I could, but will have to give in for some areas of this thing.
Now this lower air box is finally starting to take something resembling a final shape(well, once I get around to glassing the inlet on anyway.
Looking forward to hearing your conclusion on how hard the megasquirt setup was. This engine is a solid contender for my tvr project now.
In reply to CoolHandMoss :
Well, it idles on ITB mode, which is a hybrid Alpha-N/Speed density setup, but I haven't gotten back to tuning and hooking up the cam sensors and phasers to get serious about it...sidetracked by this airbox and I recently ordered a coilover front suspension that is going in soon, but to be honest, the biggest holdup is how miserable the heat and humidity is making it to work on the car(luckily only another month before it starts cooling off again).
Making a flange setup here to connect the upper and lower portions of the airbox. The idea is to cross-bolt the tubing horizontally to the walls of the airbox, and veritically to the roof, while using 3M marine adhesive between the tubing and the walls to prevent any vacuum leaks...the top of the "flange" I will just use RTV to seal since I doubt a gasket is going to stay in place well anyway.
Excellent. Sounds like you've gotten a decent portion of the hardest part out of the way.
Nothing much here, just mocking up the stacks to check bellmouth-to-wall clearance for the plug I am making to form the polycarbonate "bubble shaker" thingie

Wicked93gs said:
Stellar
You'll need to log in to post.


