
JoeTR6
Reader
12/22/14 7:51 a.m.
TeamEvil wrote:
Considering the original green color and the condition of the body shell.
Considering that the shell is made up of 3 different cars (4 if you count the BMH fenders), there is no original color. Unless you consider the 1972 title I'm using, and that makes the factory color Magenta. Bright purple would be a hard sell nowadays. I agree though, that green with a beige interior would be nice.
TeamEvil wrote:
If you wanna play there are a TON of other cars that would yield a better result and have no value as a stocker.
Since I already own a pretty nice TR6, this project doesn't really make sense. It just fell into my lap. Depending upon how it turns out, I may sell the other and keep this one. One project I've been wanting to do for 20 years or more is a reproduction Capri RS2600 with a modern Ford drivetrain (Ecoboost maybe?). But finding a solid early 70's Capri is nearly impossible.
JoeTR6 wrote:
If it wasn't so heavy, a VW VR6 motor would be interesting. It's basically a shorter (in length) I6. There are adapter plates available for an Audi Quattro trans, but a standard RWD gearbox may be harder to adapt
Whatever happens, I'm reinforcing the differential mounts like crazy
just in case.
There is a kit to adapt a TDI to a Samurai 5speed that may hook a VR6 up. The Samurai transmission uses a divorced transfer case, so it works in a RWD configuration. How about the blasphemy of a TDI in there? Torque, and mpg.
JoeTR6
Reader
2/14/15 4:44 p.m.
After about 12 hours of chipping, scraping, and melting, I'm about half way through removing the tar undercoating. I found three places where this crap caused a rust pocket, so decided it had to come off. When I'm done, my forearms will look much more like Popeye's.
The last time I did this, it was summer. I used a propane torch to heat the stuff up but the stench was pretty bad. This time I bought a heat gun which makes it easier to control the amount of heat. Wiping down with kerosene after the majority of the undercoating is removed cleans up the rest. Also, I find alcohol helps. At least to dull the pain of an entire day doing this.
I've also read about using dry ice to chill the goo and make it brittle enough to shatter into pieces that break loose when massaged with a rubber mallet.
Isn't that a lot of power for a type 9?
JoeTR6
Reader
2/15/15 6:10 p.m.
I've heard of using dry ice. Hell, just leaving it outside tonight would probably do the job. That trick works pretty well for the sound deadening mats, but it's hard to get the surface consistently cold enough to be effective in a wheel arch where some of the undercoat is underneath. I've started the front wheel arches now, so the worst part is done. Plus, using a heat gun in a cold shop is actually kinda nice.
So the tub is almost ready for stripping. I have a little welding to do on the frame and both go to get media blasted. No way I'm doing that myself out in the cold. I'm thinking of having the tub primed in epoxy primer. But then what? If it sits for very long without paint, doesn't the whole thing need to be sanded (or at least scuffed) before painting? In any event, it seems better to just paint the tub ASAP after being primed. Everything else will be painted separately, so that can wait. It would be nice to assemble stuff onto the frame without the tub in place, and that may take some time. OTOH, I'd rather not rent more space just to store the tub.
I'd better pick a color soon. Right now the candidates are Sapphire Blue or Damson (sort of a purplish merlot color).

Don49
HalfDork
2/15/15 9:01 p.m.
If you leave it in epoxy prime it will need to be cleaned and scuffed before paint. I would do all the paint at the same time to assure consistent color.
The undercoating is almost all gone. The sides are done (cleaned up well with kerosene) with only the differential well and floor bottoms to clean up. I did find more rust lurking under this stuff and had to weld a patch between the B-post and rear wheel well. I was thinking that for an autocross car, a $5000+ paint job may not be the best idea. R-comps are going to throw a ton of stuff and re-strip the wheel arches. I suppose rubberised undercoat may prevent that, but the front valence will also take a beating. It crossed my mind to paint just the tub and vinyl wrap all of the exterior panels. This would be cheaper and easier to undo. But overall, it will end up looking worse (I think).
JoeTR6
HalfDork
3/15/15 9:56 p.m.
Well that wasn't fun. The undercoating is gone and all of the small welding jobs on the tub are finished. I saved cleaning and welding the floor pans for last. Scraping/wire brushing undercoat from below was about the dirtiest job I've ever done. Also, I set my sweatshirt on fire while welding. Welding above your head when you can't really avoid being below it sucks. With that, the tub is done. The seat mounts on a TR6 are pretty weak with just a nut spot welded to a small plate spot welded to the 22 gauge floor pan. I added a bead to either side of the mountings and fixed a couple of cracks in the floor pan. Now on to the frame for some minor reinforcement. After that I will do as much powder coating as possible before we move to a different shop.
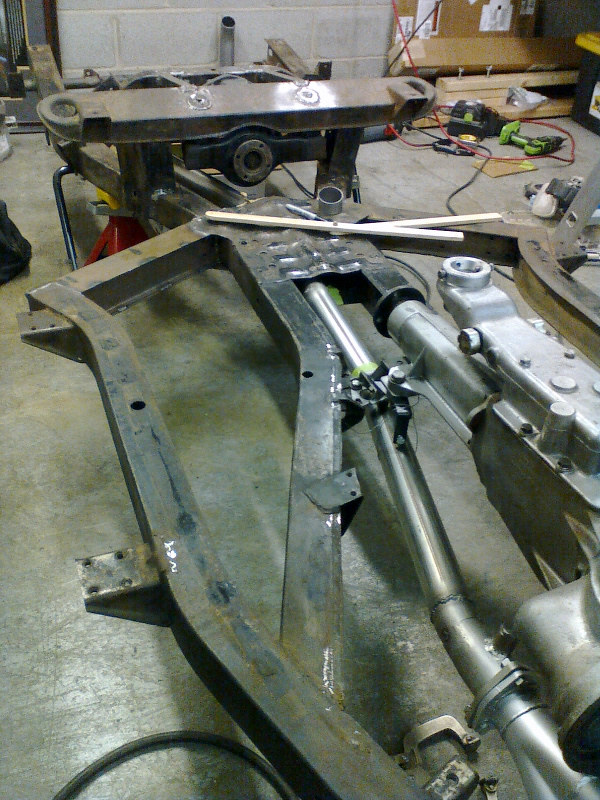
I took a day off to take care of some car stuff. The important part was getting started on my frame. I managed to lift the body and swap a spare frame under the tub. This left the better frame sitting on the floor.
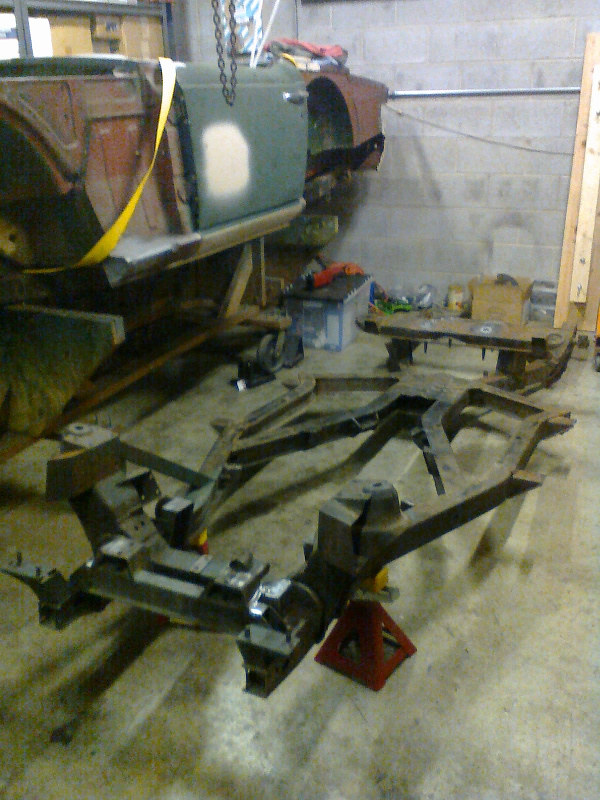
Once there, I made some quick checks of the frame for twisting and skew. It certainly looks straight by my eyeballs, and a camber gauge laid across the outside frame rails at several points showed less than 0.1 degree of change front to back. I measured a few diagonals, and that came up good. So it looks like I have something worth using. The other frame is a different story.
The front driver's corner is pushed up at least 1/2 an inch, maybe more. That, and it's definitely not lining up with the body mount holes. So it's now 180 pounds of scrap, but still good enough to support the body during transport. I may add some casters and use it as a paint dolly. I've wire brushed the frame to check for cracks and prepare for media blasting. Two areas are getting a little reinforcement. First is the front suspension mounts. I'm going to bridge the front mount to the steering rack mount. There are no visible cracks, but I'm going to weld a doubling plate on the face of the mounts. These can sometimes stress fracture and fail.
The diff mounts have already been boxed in, but only one of the mount pins has been reinforced. I may as well fix this now. I had considered boxing in the diff bridges, but that makes a closed cavity that may be more susceptible to rusting. The towers and bridge pieces are in good enough shape, and I'm not planning on more than 150 hp. If I ever do an engine swap, the extra welding can be done from below. I'll keep it closer to stock for SCCA FSP rules, although technically the frame has already been reinforced.
JoeTR6
HalfDork
4/4/15 9:54 p.m.
Most of the frame welding is done. Added big washers with plug welding around the diff mounts. I also firmed up the front suspension mounts. Welding on a frame is much easier than bodywork as you can just crank up the voltage and get decent penetration. I guess the next step is to order more parts so I can fab up an exhaust before sending the frame out for powder coating. I'm really looking forward to turning the wrenches around and bolting stuff back on the chassis. The header I'm looking at ordering (from Richard Good) has a 2.5 inch output flange. From what I've heard, a 2.5 inch exhaust may be too big for a TR6 without a full race motor. Should I put a reducer down to 2.25 inch after the header and run 2.25 inch pipe to the muffler?
If it's backpressure you're interested in, maybe you could put a resonator directly (or at least "soon") after the header and then run without a muffler altogether? Get a bit of that SRT4-style exhaust sound.
JoeTR6
Reader
4/6/15 7:13 p.m.
ssswitch wrote:
If it's backpressure you're interested in, maybe you could put a resonator directly (or at least "soon") after the header and then run without a muffler altogether? Get a bit of that SRT4-style exhaust sound.
I like the sound of a TR6 as much as anyone, but that may be a bit too much. Besides the volume, there's also the tight fit of the pipes snaking past the gearbox to consider. We have a Monza exhaust on another TR6 that uses twin pipes and has a resonator on each pipe where it crosses under the half-shafts. That's about as close as you could get to the header. Even with mufflers, the Monza is a little noisy for early morning launches from the neighborhood.
Summit has a header reducer from 2.5" to 2.25" that also includes an O2 sensor bung. I'll probably install a wide-band sensor for tuning and potential fuel injection (later).
JoeTR6
HalfDork
5/31/15 7:01 p.m.
We began an epic shop move at the beginning of April, and it's basically done. After the move itself, there was a lot of electrical work to do (mostly adding many 110v circuits). I actually worked on the TR6 for the first time in two months today. Hopefully I can get the frame welding done before it gets much hotter. There's still some work left on the rear diff mounts and front suspension mounts. After that, I'm putting the block, head, gearbox, and diff in the bare frame so I can fab up a custom 2 1/4" exhaust before sending the frame out for powder coating.
Here's a picture of the new home.

JoeTR6
Reader
6/12/15 8:03 p.m.
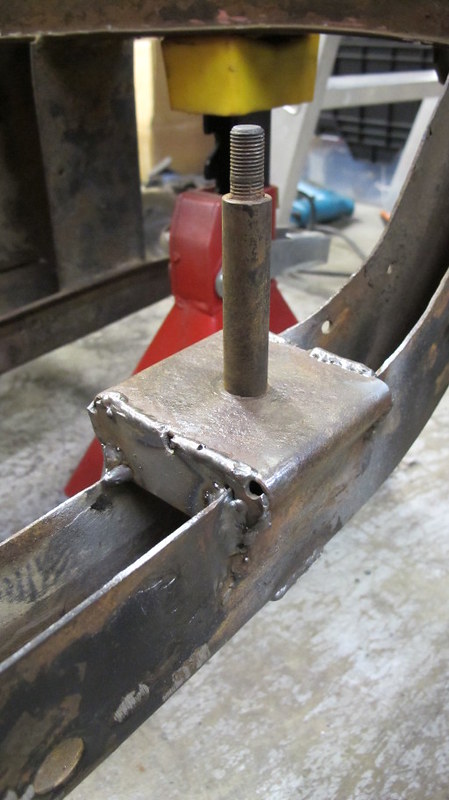
I took some time off from work today to work on this. I welded the front suspension mount reinforcement plates (they weld inside the boxes that the wishbones bolt to). I made up and welded some reinforcement for the rear diff mounts. This was a bit of an experiment that I'd never done before. In my experience, the rear mounts don't break like the front ones. But just in case I go insane and double the engine power (some day), I wanted to beef things up now. I'll take a picture and post it, because this turned out pretty well.
I'm debating adding some welds to the rear crossmembers, especially where they attach to the frame. The factory welds are pretty underwhelming, and in some cases don't even run to the end of the seam. I added several beads in the front where the factory welds missed the mark a bit. The last thing I'm considering doing is bridging the front and rear differential crossmembers with some square tubing. I've seen some V8 conversions that did this, and it would brace the rear crossmember if I do a tube shock conversion.
JoeTR6
HalfDork
6/14/15 7:43 p.m.
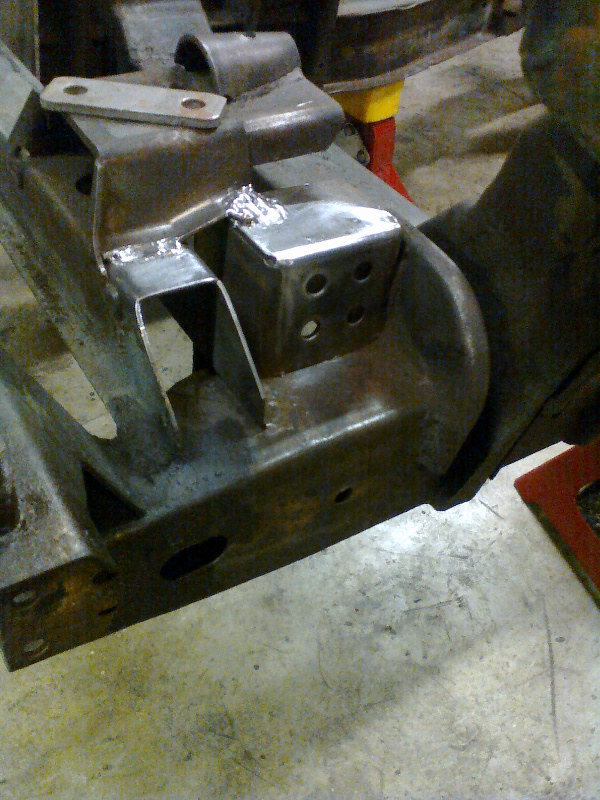
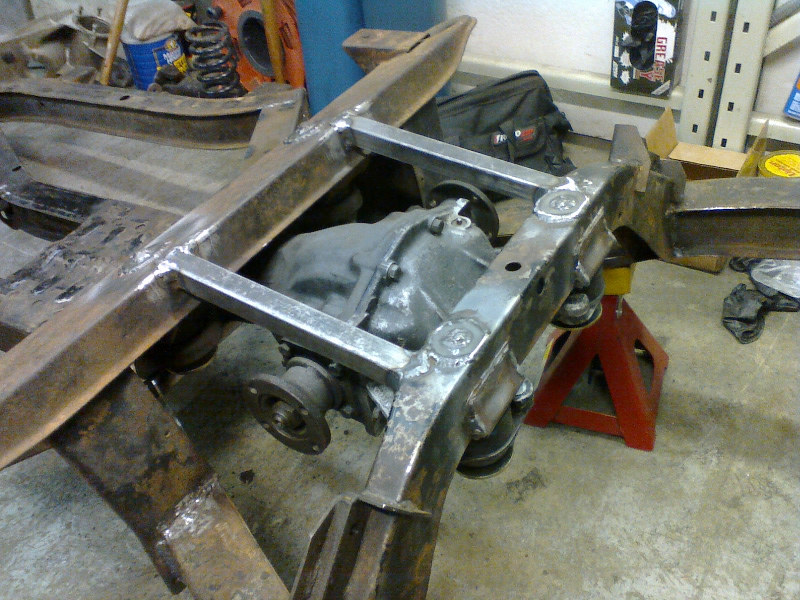
Here are the differential mounts.
Details of the rear mount.
I could box in the crossmember, but this seems like overkill. Maybe if the engine power were over 200 hp, I'd do it. Worst case, I can always drop the pumpkin and do it later. I fitted the trailing arms temporarily so that the rear anti-sway bar can be located. For some reason, this bar (from Richard Good) is 1/2" wider than an older bar from the same source. It's splaying the links a bit, so I need to play around some with the mounts. Worst case, I'll weld up something to relocate the mounts on the trailing arm. This is with the trailing arm at or beyond full droop which moves the mount point inward somewhat.
JoeTR6
HalfDork
6/29/15 4:43 p.m.
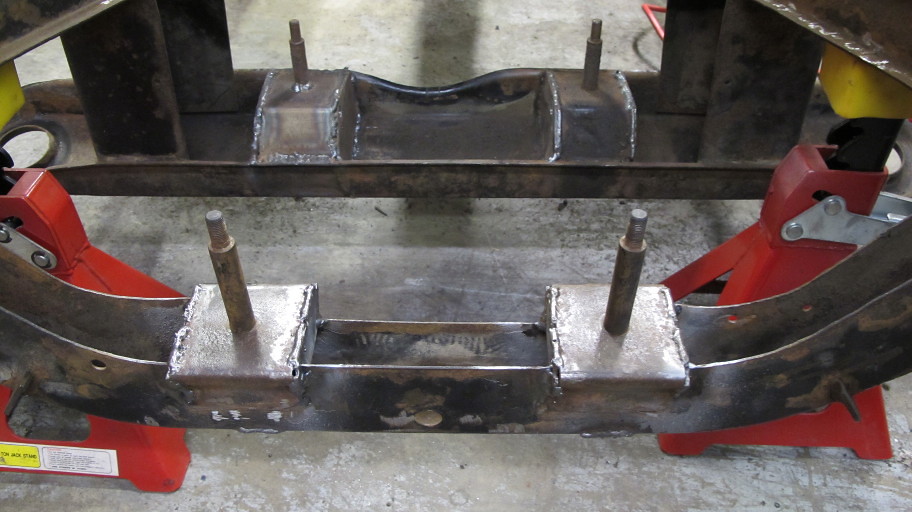
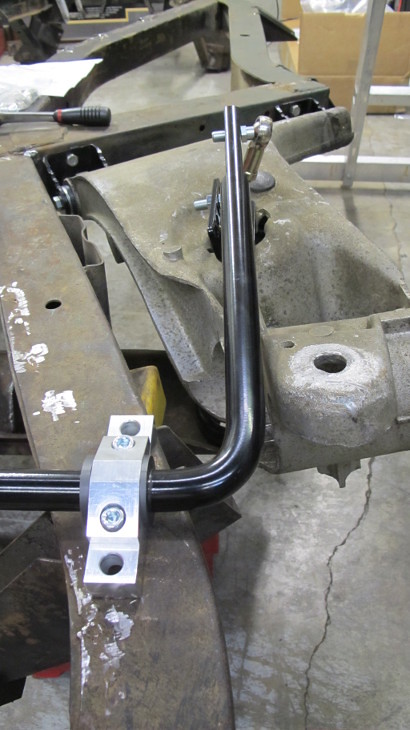
So I figured out the sway bar issue. I had the inside trailing arm mounts upside-down and this really dorked up the trailing arm position. The bar is still a little wide, but I can add a spacer to push the upper link out. Holes have been drilled for the mountings.
I added some welds around the base of the differential bridges. I also added some bracing between the two bridges. Here's how it looks now.
With that, I'm done with the frame. Now on to fitting enough stuff so I can weld up an exhaust. The plan is for 2 1/4" stainless pipe to a single Borla XS muffler. I've heard this muffler on a Miata, and it sounds pretty nice.
JoeTR6
Reader
7/4/15 9:15 p.m.
An engine block mated to a gearbox is in the frame. This should have been easy, but I started getting tired and stupid. I couldn't find the bag with all of the engine mounting bolts, so made do with random hardware to bolt the engine and gearbox together. As I was scrambling around bolting up the engine mounts, I didn't duck low enough and head-butted the engine hoist. Good thing I have a hard skull. Then I scrapped my leg on the shifter (that I should have removed) when bolting in the rear gearbox mounting. Just one of those days.
I ordered a header reducer to mate the 2.5" header to the 2.25" exhaust, but it's more of a step-down (and not stainless steel). It's not that much of a taper, so rather than source a stainless adapter, I'll play around with making my own from 2.5" pipe. This will also allow me to put the wide-band sensor bung where it needs to be.
In the mean time, our bead blast cabinet has a new vacuum motor, door seal, and gloves. So there's lots of powder coating in my near future starting with the front suspension pieces.
JoeTR6
HalfDork
7/5/15 8:54 p.m.
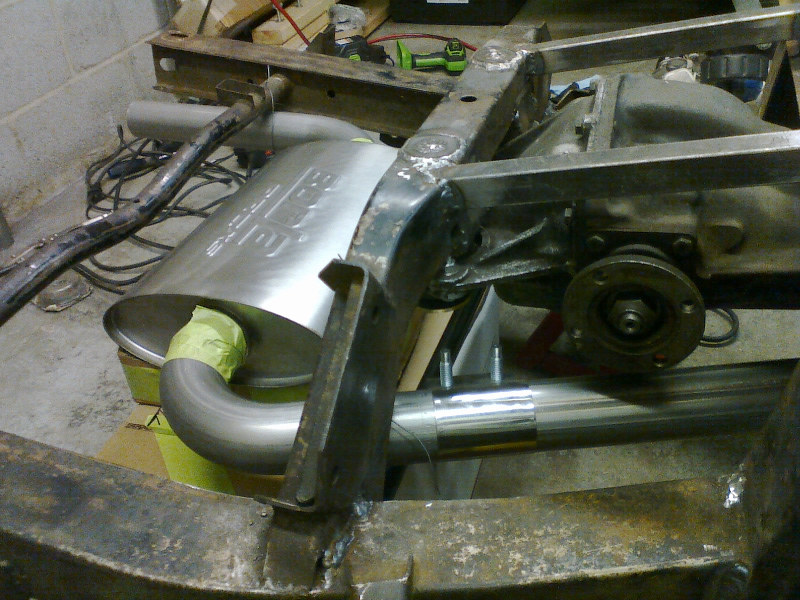
The Richard Good headers fit great. The wide-band sensor is going to be a little far from the exhaust ports. I can always plug it if it's too far, but I really wanted a wide-band for tuning. Especially if I go with triple Webers. Also, I may Megasquirt this car some day.
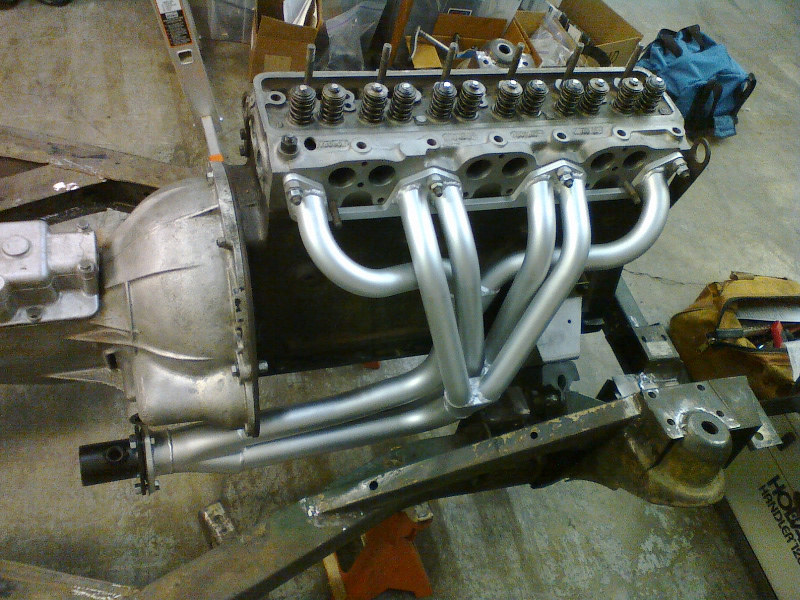
Now on to the exhaust.
JoeTR6
Reader
7/11/15 9:07 p.m.
Today I managed to fabricate the header-to-exhaust adapter in stainless with an O2 sensor bung. I also smashed my thumb with a rubber mallet while adjusting some pipe. Damn that hurts.
I'm hoping to fit the Borla muffler sideways where the stock muffler goes. I'm not certain the mandrel bends I have are sharp enough to clear the frame rails, so may need to get creative or run it straight towards the back. This would drop it down an inch or two.
It occurred to me that I might want a Class 1 hitch to pull a tire trailer or mount a bike rack. This may require welding some brackets onto the frame, so I'd better consider this in the exhaust routing.
JoeTR6 wrote:
I also smashed my thumb with a rubber mallet while adjusting some pipe. Damn that hurts.
Good thing you didn't hit it with a hammer.
JoeTR6
HalfDork
7/14/15 7:18 p.m.
More progress. All of the exhaust pipe is cut and tacked/taped into place. If the Borla muffler is too loud, I should be able to reduce the pipe down to 1-7/8" and use something closer to the stock muffler.
JoeTR6
HalfDork
8/9/15 8:35 p.m.
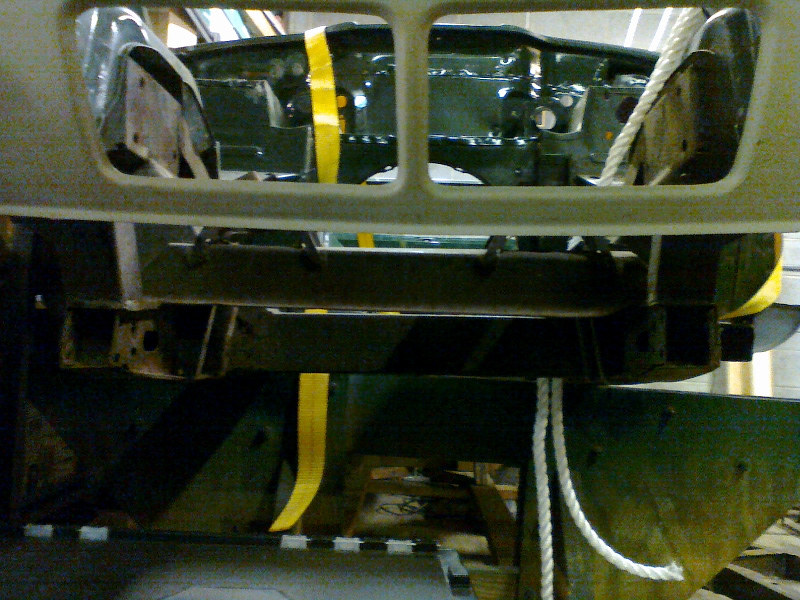
With the exhaust more-or-less done, I've been working on a tow hitch. Here's what I came up with.
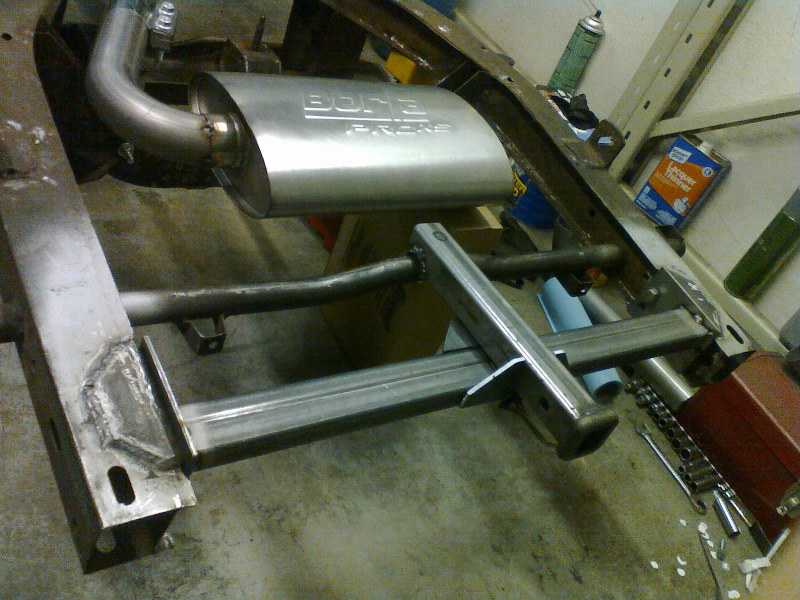
The frame is upside down here. At first, I was thinking of using the bumper bracket holes to bolt some mounting plates to the frame. I eventually decided just to weld some plates to the inside of the frame rails and weld reinforcement plates top and bottom. There are plates bolted to those, and the crossbar is welded to those plates so that it can be removed. The receiver tube also bolts to the existing round tube through the trunk floor, but this is just to help steady the receiver tube. I'll wait to weld the receiver tube and safety chain loop on until the tub is back on the frame in case any adjustments are necessary. This should be adequate for a small tire trailer or bike rack.
The only issue is clearance for the muffler outlet pipe. It's going to need an extra little bend to clear the crossbar. So with that, the frame is ready for powdercoating.
JoeTR6
Reader
8/16/15 8:36 p.m.
Today I routed the muffler outlet pipe around the hitch. Apparently stainless tubing is hard on band saw blades. My recently new band saw blade just got too dull to cut, so I resorted to a cutoff wheel. That really slowed things down. I forgot to take a picture, but the new pipe angles down a bit more and makes a slight bend to exit the rear basically level. The tail pipe is cut but I'll wait until the body is on for final welding.
While inspecting the frame for any other issues, I noticed that the original trailing arm section has a suspicious bulge on the back side next the the outer bracket holes. Triumph left a second, unused set of holes there. They do a great job of letting dirt and water into that part of the frame. The other side was replaced over 20 years ago, so I'm going to replace the questionable one. The worst thing about this repair is that the cruciform plates act as gussets for the trailing arm sections. The bottom plate is banged up, so I'll just replace it. The top one (at least the original) turns down in the back for added strength and has some difficult to access welds. The current reproductions don't do this, so I may leave most of that one in place and just cut away the corners where I need to weld. I'll definitely need to take care to heat the frame evenly when welding these parts. I'll also brace the frame laterally (temporarily) to keep it flat.
Sadly, the bent frame I have has absolutely perfect trailing arm sections. The new repair pieces are actually better, with thicker gauge steel, wider cross section, and stiffer internal reinforcement. Not that it matters at this point, but I wonder if this counts as "reinforcing the frame" by SCCA rules? I believe you're allowed to perform repairs with better parts if that's all that are available.
How did I miss that Joe had a build thread on GRM?


