1 2 3 4 5 6 ... 8
Hungary Bill (Forum Supporter)
Hungary Bill (Forum Supporter) GRM+ Memberand PowerDork
12/22/21 11:10 a.m.
COUGAR said:

As APEowner mentioned, the K frame with the rubber isolated K member B bodies ('73-79) is the same for all V8s.   
It is also the interchangeable for all the B bodies in that range, which makes finding a replacement a bit easier (but in your case probably still bloody difficult.).     Cordoba, Magnum, Fury, Coronet, Satellite and 300 are all fair game, as long as they are B body and V8.   And TBH,a Slant Six K Frame will work in a pinch, as long as you are a decent welder, as it is just a matter of relocating the engine mounts on the K member.    I know 'Murican Iron is really rare out your way, but this might even the odds, if only a little.   When and if you get another K member, don't buy new rubber bushings for it- there are much better ways to go.


And before all that, Woody's point may prove to be pretty valid.   I see an awful lot of structural rust, and I still haven't seen all the Usual Suspects for B/E Body rust areas yet.   I would take a real close look at the rear subframes... or lack thereof.   Especially where the rear shackles like to pop through the trunk pan like a bad impression of Jack Nicholson in The Shining.  

Your words scare Bill crying

I've got my eye on a set of aluminum K-Frame bushings in Vancouver, WA for $250.  But looking at the things, are they anything more than just round aluminum chunks?  Seems like these could be turned on a lathe pretty easily.  That oval bump though might take some hand work to get just right...


As far as the structure goes, I'll get under the car when things warm up a bit outside and start taking pictures.  This wont be a show piece, and it wont be a collector's car so I'm not above adding (or subtracting) metal anywhere I have to.  wink

Hungary Bill (Forum Supporter)
Hungary Bill (Forum Supporter) GRM+ Memberand PowerDork
12/22/21 11:12 a.m.
COUGAR said:

More later, but if the car is sitting outside (or even if it isn't) root around in the cowl vent area, and make sure ALL the leaves, pine needles and dead animal nests are cleared out.   The rust I see on the firewall tells me water has been standing in there for quite a while.

Copy that, and will do.  I'll get the shop vac out the next time I've got a few spare minutes.

Hungary Bill (Forum Supporter)
Hungary Bill (Forum Supporter) GRM+ Memberand PowerDork
12/22/21 11:14 a.m.
Gzwg said:

Finally found the thread.

This looks incredible - and very scary.

Let me know if you need help with the german rulebook!


oh man!  Yes sir!  We still need to get together for coffee, eh!  My schedule should free up drastically around April or so.  I know it's a long way off but to be fair, I didn't know you lived in the area when I made all my plans laugh

Hungary Bill (Forum Supporter)
Hungary Bill (Forum Supporter) GRM+ Memberand PowerDork
12/22/21 11:23 a.m.
DjGreggieP said:

In to see how this goes, almost had a charger of this vintage as a first car. 

Went to look at it after seeing the ad in the paper, had the money to buy it with me and went with a friend. Looked solid, brown over brown, 360, auto, started and ran beautifully. It couldn't drive because of a transmission issue but came with a replacement transmission in the trunk. Offered to pay for it right there ($600) and I'd be back on the weekend with a trailer. He told me to pay on the weekend.

Weekend came and I was getting everything organized when he called me to tell me the car was picked up the night before, something about welfare and making additional money or something, I only remember it because it was so weird. 

Looking forward to seeing how this turns out, and the house too!

Man, I've been there before and I 100% can't stand it when people do that. angry

But speaking of "The House", here's where we're at:


Pictured above is the inside, Future Kitchen (far) and dining area (near), entry way (mud room) will be to the left about halfway down that wall.  Both doors you see will be filled and moved

The trench you see in the above picture is from a foundation reinforcement.  The load bearing wall (left) was sagging in the middle where a chimney used to be.  We dug down and called in a mining company to pump concrete underneath.  The all-thread you see is to pull the wall (far side) back in.  It was pulling out and away from the load bearing wall where they meet at a "T".


I'm standing in the future master bedroom when I took this.  The living room will be on the far side.  It'll be an open concept floor plan that will join the living room to the dining room.

We're adding a second floor to add two more bed rooms for the kids, as well as an upstairs WC, and an upstairs sitting room.  I've got it all cleared out but no work started there yet.  We're on hold for cold weather.  No one wants to pour concrete in the freezing weather we've been having so we can't lay the foundation for the new addition or walls yet.

The outside looks like this:

The yard is narrow, but goes back a ways.  Those grape vines you see are about half of what we have.  The first year we made about 200-liters of wine and didn't even pick all the grapes laugh.  In total it's about a third of an acre and had 13 fruit trees (3 mature pears, 1 mature cherry, one mature plum, and lots of young peach trees that are all infected with fungus).  It's where Mrs. Hungary and I get to pretend we're farmers.

Good times wink

Hungary Bill (Forum Supporter)
Hungary Bill (Forum Supporter) GRM+ Memberand PowerDork
12/22/21 11:37 a.m.

So still not much going on with the car (yet).  It currently looks like this:


Rock auto is awesome though, and all of the bolts and speed nuts (nut clips) I ordered have already arrived!


Beyond that, I searched locally but couldn't get the SAE hardware.  Instead my buddy Gergo hooked me up with some M8 nut clips in case the RockAuto ones didn't work out:


I think the bag in the picture might have 100 or so nut clips in it.  Not really sure if I want to deal with the headache of replacing the SAE hardware with metric stuff though.  I'd rather keep things one-way or the other, but not do both.  The problem is, that metric stuff was stupid cheap on the local market...

Anyhoo, enough mail stuff.  I did get a day in "The Grosh" to play with my welder.  I was supposed to be doing other things, but finished early so I set about welding up that square tube into something that resembled the frame I had envisioned:


I get that from a "forum magic" perspective that looks like a "welder go 'brrrrr' and frame is made", but holy crap that took me a LOT of time!

Getting rid of all that millscale with my flappy wheel took me way longer than I expected and the prep on this TIG is redonkulous!  But that part is done and I don't hate it.  I don't think I'm ready to weld up a space frame for a GT40 Scratchbuild (yet), but it's "square enough" and it should hold whatever I hang inside of it.

Next will be the legs the wheels attach to, and then I'll see if I want to add some eyelets to make panel hanging simple.

Fair being fair though, I feel like I should show you one of my crap welds:


That was the last one I did.  I was tired, I was in a bit of a hurry, and the wind picked up and was bugging the heck out of my welder (I had to tack between gusts laugh).  But that's about where I stopped.  Mostly because I was running low on Argon  (are-gone?):


The Eastwood TIG is amazing, and I love it for what it is.  But it's post flow setting leaves a bit to be desired...

Good times.

Hungary Bill (Forum Supporter)
Hungary Bill (Forum Supporter) GRM+ Memberand PowerDork
12/22/21 11:48 a.m.

In my spare time, I've been torturing myself with shopping that I shouldn't be doing:


First on Summit where I was humoring ideas of slapping a 4-barrel on this 318 just to have the car running when the time came:


I really do refuse to start that engine with that tiny Carter carburetor on it, but did I miss something?  When did American V8 carbs and manifolds start costing $800????  Crap man, my last three-fiddy found its Edelbrock manifold at a yard sale (basically still new, for $80) and the carb was $200 new (this was in 2005 dollars)...  Ouch!

So yeah.  For $800 I got to thinking:  "Self!  Certainly you could find a 440 on craigslist for that much"


And sure enough there was a 440 for sale!  The problem is, it's in BFE Oregon but I have an absolute hankerin for the dang thing:


Unfortunately shipping it to the Budapest shippers warehouse in LA from there looks to be about $600 (which would kill 100% of my bank account) and that wont be replenished until the house is finished (a couple years from now).  Then shipping from LA to BP is an additional $400-$500, and then when it got here I would have to pay VAT on the price of the engine and the cost to ship across the pond.)


No worries though because I shouldn't even be thinking about such things right now anyways  (I am open to suggestions though if anyone has any.  Buy it once with the 440 or take baby steps and uprate the 318?  Both have their plusses and minuses)

Good times.

Hungary Bill (Forum Supporter)
Hungary Bill (Forum Supporter) GRM+ Memberand PowerDork
12/22/21 11:52 a.m.

Aptly timed, Mr. Freiburger:


COUGAR
COUGAR PowerDork
12/22/21 1:49 p.m.
Hungary Bill (Forum Supporter) said:
COUGAR said:

~SNIP~   When and if you get another K member, don't buy new rubber bushings for it- there are much better ways to go.


~'nother SNIP~ the rear shackles like to pop through the trunk pan like a bad impression of Jack Nicholson in The Shining.  

Your words scare Bill crying

I've got my eye on a set of aluminum K-Frame bushings in Vancouver, WA for $250.  But looking at the things, are they anything more than just round aluminum chunks?  Seems like these could be turned on a lathe pretty easily.  That oval bump though might take some hand work to get just right...


As far as the structure goes, I'll get under the car when things warm up a bit outside and start taking pictures.  This wont be a show piece, and it wont be a collector's car so I'm not above adding (or subtracting) metal anywhere I have to.  wink

No need to be afraid, but I would rather you know and be pleasantly surprised if I'm wrong than be unpleasantly surprised and not know in advance.    I had a friend with a '70 Coronet convertible back in the '80s that at one time (before he bought it) had a combination of milk crates and scrap wedged between the rear of the springs and the trunk lid.  It was "repaired" before he bought it, but the repair wasn't much better than the milk crates.   I am sure your work will be much better when/if you find issues back there.


There used to be "severe duty" cast steel isolators from MoPar in the past and a couple of MoPar forum members (CudaZappa, for one) used to make machined aluminum pucks, but  Firm Feel aluminum isolators are the only game in town right now as far as solid K member mounts unless you get lucky on eBay and find a used/NOS set- part number 4419942. (F/M/J body are the same as late B body, but the fronts are swapped with the rears)     However,  you can easily "roll your own" from aluminum or steel.


(These are early FF measured on an FMJ body site, so it's likely front and rear are reversed from B body positions)

More measurements from ForFMJBodiesOnly


  They don't even have to be that shape, aside from the indexing oval on the bottom.      Circle track guy will simply weld the K-member to the unibody subframe with some steel, but that is semi-permanent, and presents other issues.


(Source on MoParts)

Hungary Bill (Forum Supporter)
Hungary Bill (Forum Supporter) GRM+ Memberand PowerDork
12/22/21 3:25 p.m.

In reply to COUGAR :

That is GOLD, thank you!!!!!

Wally (Forum Supporter)
Wally (Forum Supporter) GRM+ Memberand MegaDork
12/31/21 12:13 a.m.
Woody (Forum Supportum) said:

Before you get too deep (deeper?) into this thing, have you considered just hanging the body panels over an existing tube frame chassis?
 

It would probably get you on the track sooner, and possibly with a little more safetyishness. 

I am late to this, but was thinking the same thing.  For the $5K a crossmember would cost we could probably find a roller to box up and send.  

I can't wait to see where how this goes.  Stockcars at LeMans was a fun bit of history.  Especially since it wasn't big money teams making the trip. 


Hungary Bill (Forum Supporter)
Hungary Bill (Forum Supporter) GRM+ Memberand PowerDork
1/4/22 5:42 a.m.
Wally (Forum Supporter) said:
Woody (Forum Supportum) said:

Before you get too deep (deeper?) into this thing, have you considered just hanging the body panels over an existing tube frame chassis?
 

It would probably get you on the track sooner, and possibly with a little more safetyishness. 

I am late to this, but was thinking the same thing.  For the $5K a crossmember would cost we could probably find a roller to box up and send.  

I can't wait to see where how this goes.  Stockcars at LeMans was a fun bit of history.  Especially since it wasn't big money teams making the trip. 


What if we built one?

I mean, even if we found one stateside shipping is a HUGE pain (or at least it was when I sent my cars home with me circa 2013).  But there has to be plans for these things out there, right?  What if we found 1973-ish NASCAR tube frame blueprints and tried it that way?

edit:  I stepped away and spent exactly 3-seconds on google.  This might be easier than I thought...

jh36
jh36 Dork
1/4/22 5:57 a.m.
Hungary Bill (Forum Supporter) said:
Wally (Forum Supporter) said:
Woody (Forum Supportum) said:

Before you get too deep (deeper?) into this thing, have you considered just hanging the body panels over an existing tube frame chassis?
 

It would probably get you on the track sooner, and possibly with a little more safetyishness. 

I am late to this, but was thinking the same thing.  For the $5K a crossmember would cost we could probably find a roller to box up and send.  

I can't wait to see where how this goes.  Stockcars at LeMans was a fun bit of history.  Especially since it wasn't big money teams making the trip. 


What if we built one?

I mean, even if we found one stateside shipping is a HUGE pain (or at least it was when I sent my cars home with me circa 2013).  But there has to be plans for these things out there, right?  What if we found 1973-ish NASCAR tube frame blueprints and tried it that way?

edit:  I stepped away and spent exactly 3-seconds on google.  This might be easier than I thought...

You're knocking on my door. I support this notion. And, although shipping is expensive now, it might still be worth it. But to scratch build a tube frame would be a great adventure. Here's my version of your idea. 
https://grassrootsmotorsports.com/forum/build-projects-and-project-cars/gen-1-camaroasa-stock-car-build/177739/page1/

Hungary Bill (Forum Supporter)
Hungary Bill (Forum Supporter) GRM+ Memberand PowerDork
1/4/22 6:01 a.m.

I caught a break on New Year's eve and stole a few minutes in the garage while Mrs. Hungary and the kiddo's had company over.  I didn't get a chance to use it yet, but it was nice to finish off the year on a good note and with an action shot:


Most of the welds on that is me going "start stop" with the foot pedal and the results are good enough for what I'm doing, but in the spirit of continuous improvement I gave cup-walking a try.  I've watched a few videos on the internet and while I'm not quite "there yet",  I wasn't unhappy with the results.  As long as I keep getting better with the welder, I'm confident I can keep things moving on the project (even if it is at a snails pace).


For reference, this is where I was at with my welding when we started 2021 (This was a mid-pipe I was making for my Mazda RX-8):


It doesn't take much to remind me that I can still make welds like that bottom photo, but it's nice to know I can make some like the photo above it too cheeky


Good times and Happy New Year, everyone!


Hungary Bill (Forum Supporter)
Hungary Bill (Forum Supporter) GRM+ Memberand PowerDork
1/4/22 6:25 a.m.

Fast forward to this morning and winter break is over and I'm back on day shift.  Day shift is a breath of fresh air when it comes to my car projects because it tends to be 100% "guilt free, me time".  I leave for work at 6am (just as the rest of the house is waking up) but if I set my alarm for 4:00, I can usually get an hour and maybe a half in before the day starts.  It's important to note that this is a "guilt free" hour and a half, as it's not really practical or possible to go work on the other house at this time of day.

This morning was mostly spent cleaning and head scratching.

Cleaning because I needed to get my Toyota stuff out of the way, and head scratching because after I got the panel hung, it took me a while to figure out how I was going to go about attacking it.  Mostly because the center of gravity was so skewed, it hung like this:


That gives me excellent access to the rail that bolts underneath the hood, and great access to the underside, but awful access to the outer skin.  I played with a couple ways to hang it to get things where the outer skin access was easier, but everything I tried changed the shape of the fender and I really didn't trust that if I was going to be making and welding repair sections in.

Ultimately I decide that the underside and the under-hood rail areas are the best areas to have access to right now as they're:

1) the most in need of work

2) the hardest to access while on the car (Let's face it, the outer skin is the outer skin.  I can spray that anytime!)

So we move on.

I pick a spot that looks like a good "starter", wire whip it, and start penciling in an idea of what I'm going to do to fix it:


The underside still needs whipped as well, but I kind of ran out of time (I get kind of lost in head scratching, sorry).  Honestly, this section wasn't super high on the "oh mah god, this needs to be fixed" list (and I could have filled it with kitty hair and been just as happy), but I figured if I was going to start learning somewhere I might as well "Test this product on an inconspicuous spot" as they say. wink

I'll need to find something "gentle" to cut that section out with (not my danger wheel), and then we'll find out what it takes to

1) Cut a damaged area from the vehicle

2) cut and form a repair section from flat steel stock

3) match the repair section to the car

4) weld and grind/sand to hide the fact that I performed said repair.

And of course there's probably stuff underneath that needs repaired as well, so I'm sure we'll repeat steps 1-4 there before the part we can see gets fixed.  If all goes well then we'll keep trying more challenging sections.  If it kicks my butt six ways from Sunday, then...  well... I guess we'll need to start looking at other options  laugh

Good times.
 

Hungary Bill (Forum Supporter)
Hungary Bill (Forum Supporter) GRM+ Memberand PowerDork
1/4/22 6:32 a.m.
jh36 said:
Hungary Bill (Forum Supporter) said:
Wally (Forum Supporter) said:
Woody (Forum Supportum) said:

Before you get too deep (deeper?) into this thing, have you considered just hanging the body panels over an existing tube frame chassis?
 

It would probably get you on the track sooner, and possibly with a little more safetyishness. 

I am late to this, but was thinking the same thing.  For the $5K a crossmember would cost we could probably find a roller to box up and send.  

I can't wait to see where how this goes.  Stockcars at LeMans was a fun bit of history.  Especially since it wasn't big money teams making the trip. 


What if we built one?

I mean, even if we found one stateside shipping is a HUGE pain (or at least it was when I sent my cars home with me circa 2013).  But there has to be plans for these things out there, right?  What if we found 1973-ish NASCAR tube frame blueprints and tried it that way?

edit:  I stepped away and spent exactly 3-seconds on google.  This might be easier than I thought...

You're knocking on my door. I support this notion. And, although shipping is expensive now, it might still be worth it. But to scratch build a tube frame would be a great adventure. Here's my version of your idea. 
https://grassrootsmotorsports.com/forum/build-projects-and-project-cars/gen-1-camaroasa-stock-car-build/177739/page1/

I'm going to need you to call my boss and explain things please.  You've just killed productivity at the office for the entire MONTH! surprise

I'm half-way serious about the tube-frame though.  If we can get me to figure out how to bend and notch tubes... get the measurements right...  I mean this isn't something I exactly plan on having done tomorrow or anything!  The body work alone is going to take me over a year (probably more).   We've got looooooots of time to explain things to Bill using very small words.

jh36
jh36 Dork
1/4/22 7:20 a.m.

In reply to Hungary Bill (Forum Supporter) :

Ha!  Well, I have a bender, a notcher and a welder...but I am a hack. I obviously started with a complete frame which simplified things considerably. But with the talent in this community, this sounds feasible. Or even do a hybrid and keep your main frame rails and build to it with an endoskeletal tube frame? 
I have a deep aversion to rust and rot, so the thought of having a clean, strong platform excites me. I love your journey!  

Hungary Bill (Forum Supporter)
Hungary Bill (Forum Supporter) GRM+ Memberand PowerDork
1/10/22 4:19 a.m.

So I've been making progress daily with my "one-hour a morning" routine (weekends being the exception).  I'm absolutely thrilled to be making a go of this and have been trying my best not to make daily updates about not a whole lot of progress but I think I've got enough that I can post something.  Here's how my first attempt at a "cut and patch" rust repair is going on my driver's side fender:


I used my "danger wheel" with the smallest possible remnants of my most used abrasive wheel to cut out as much as I could of the area.  You can see that the rusty part is mostly held in by its spot welds, and I can start to see the panel underneath.

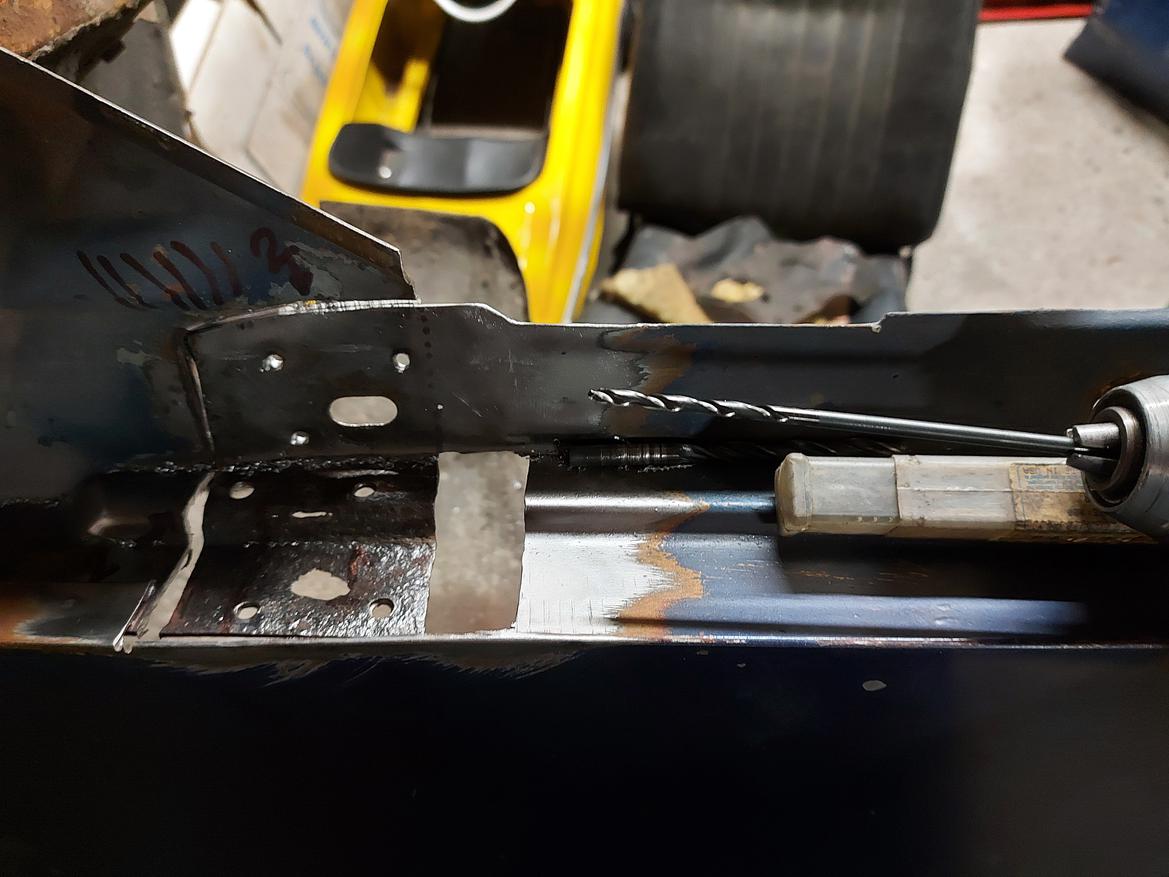
I started small with my drill sizes and worked my way up until I got to something that would do the job (I don't have a "spot weld bit" or a cutter, and with how things went so far I don't have any plans to order one unless someone suggests otherwise).


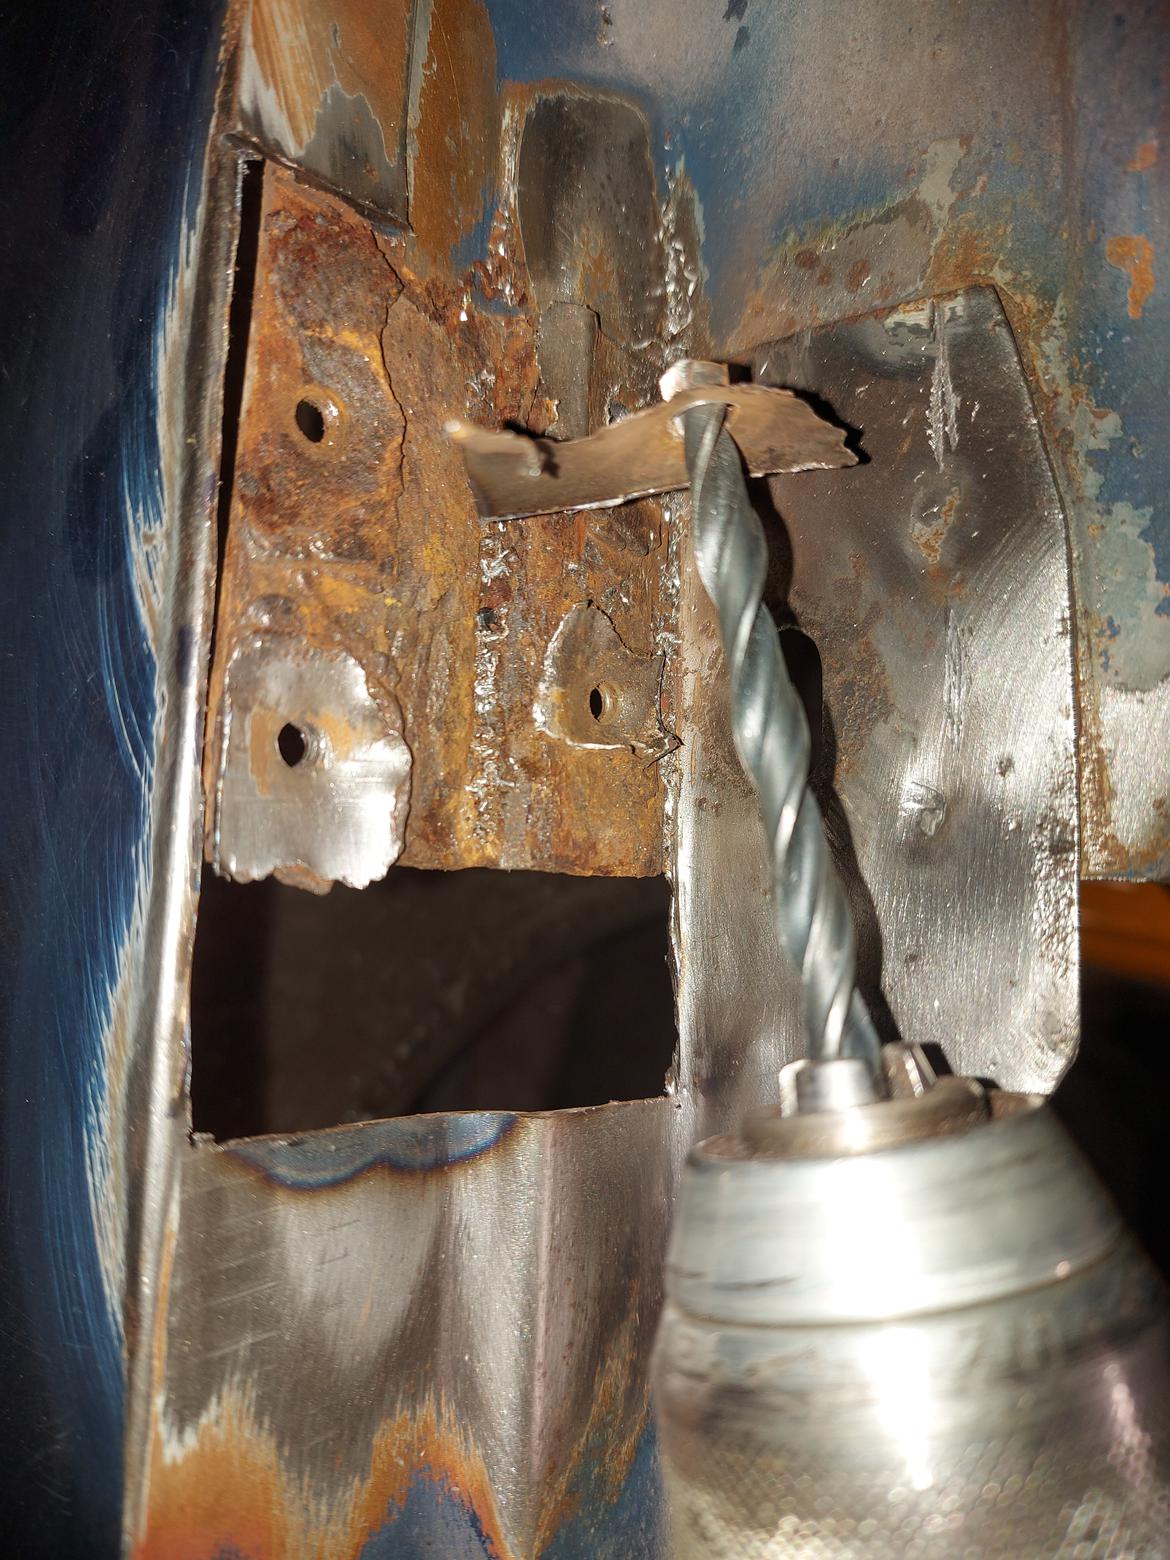
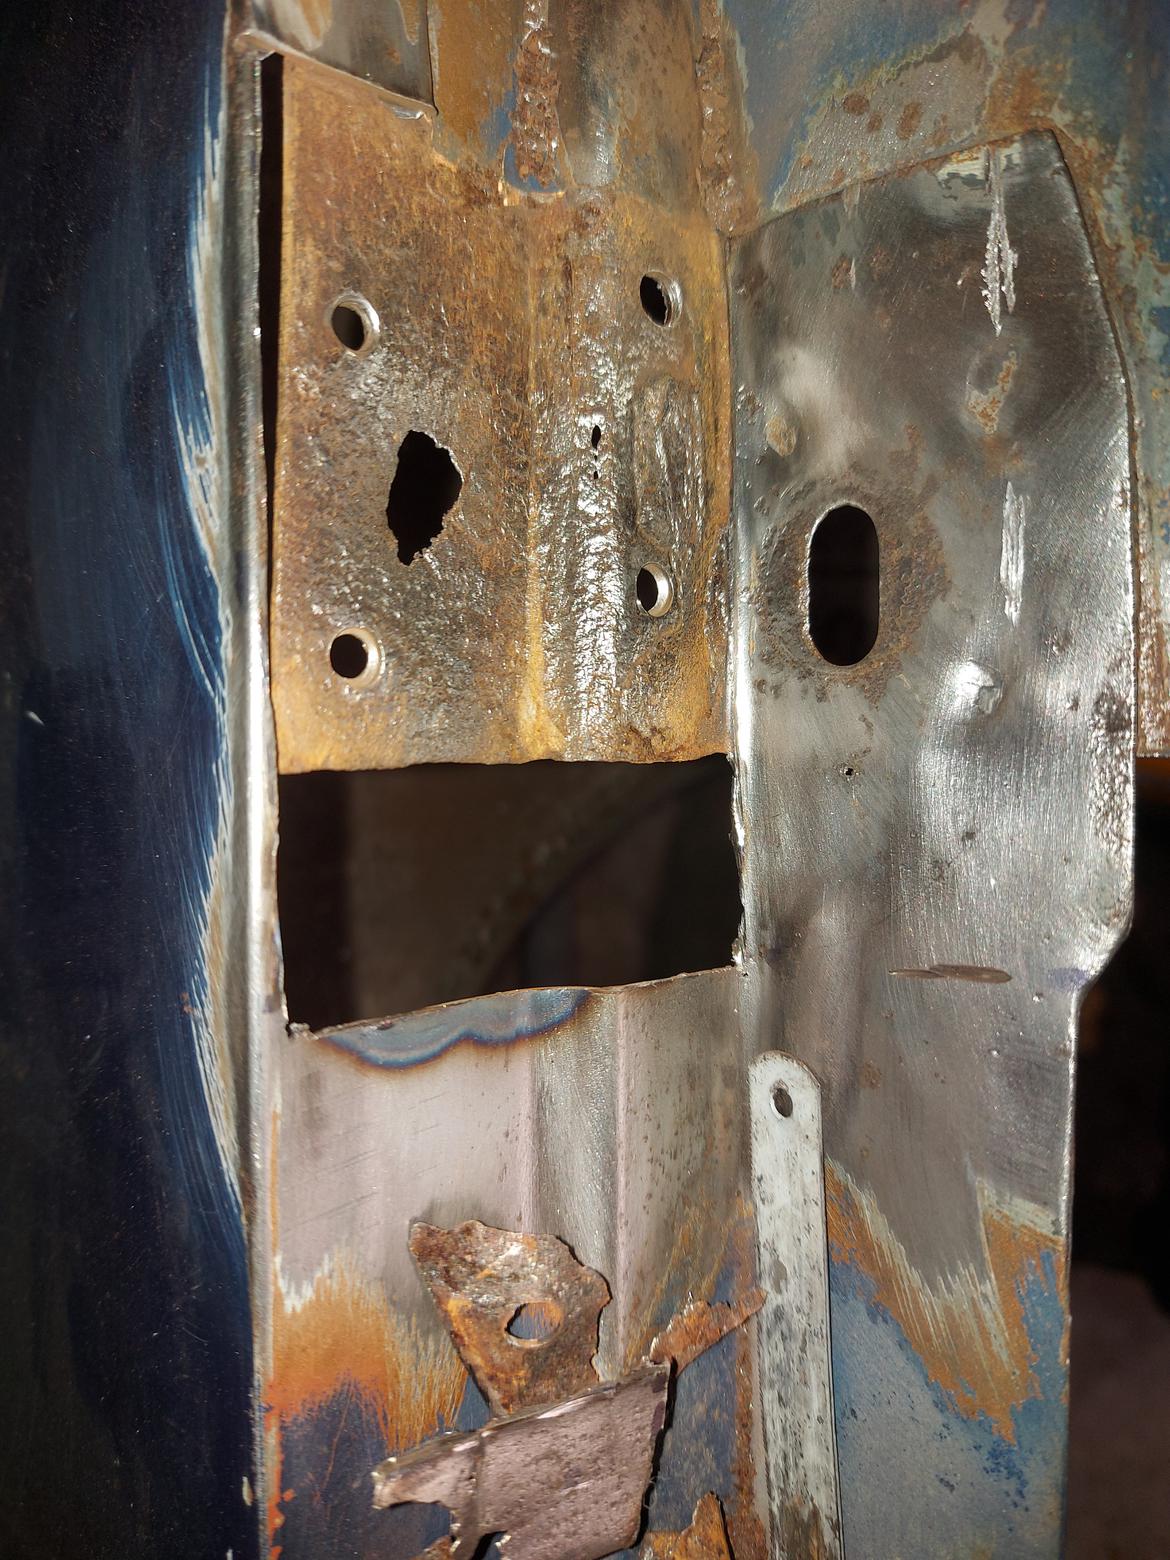
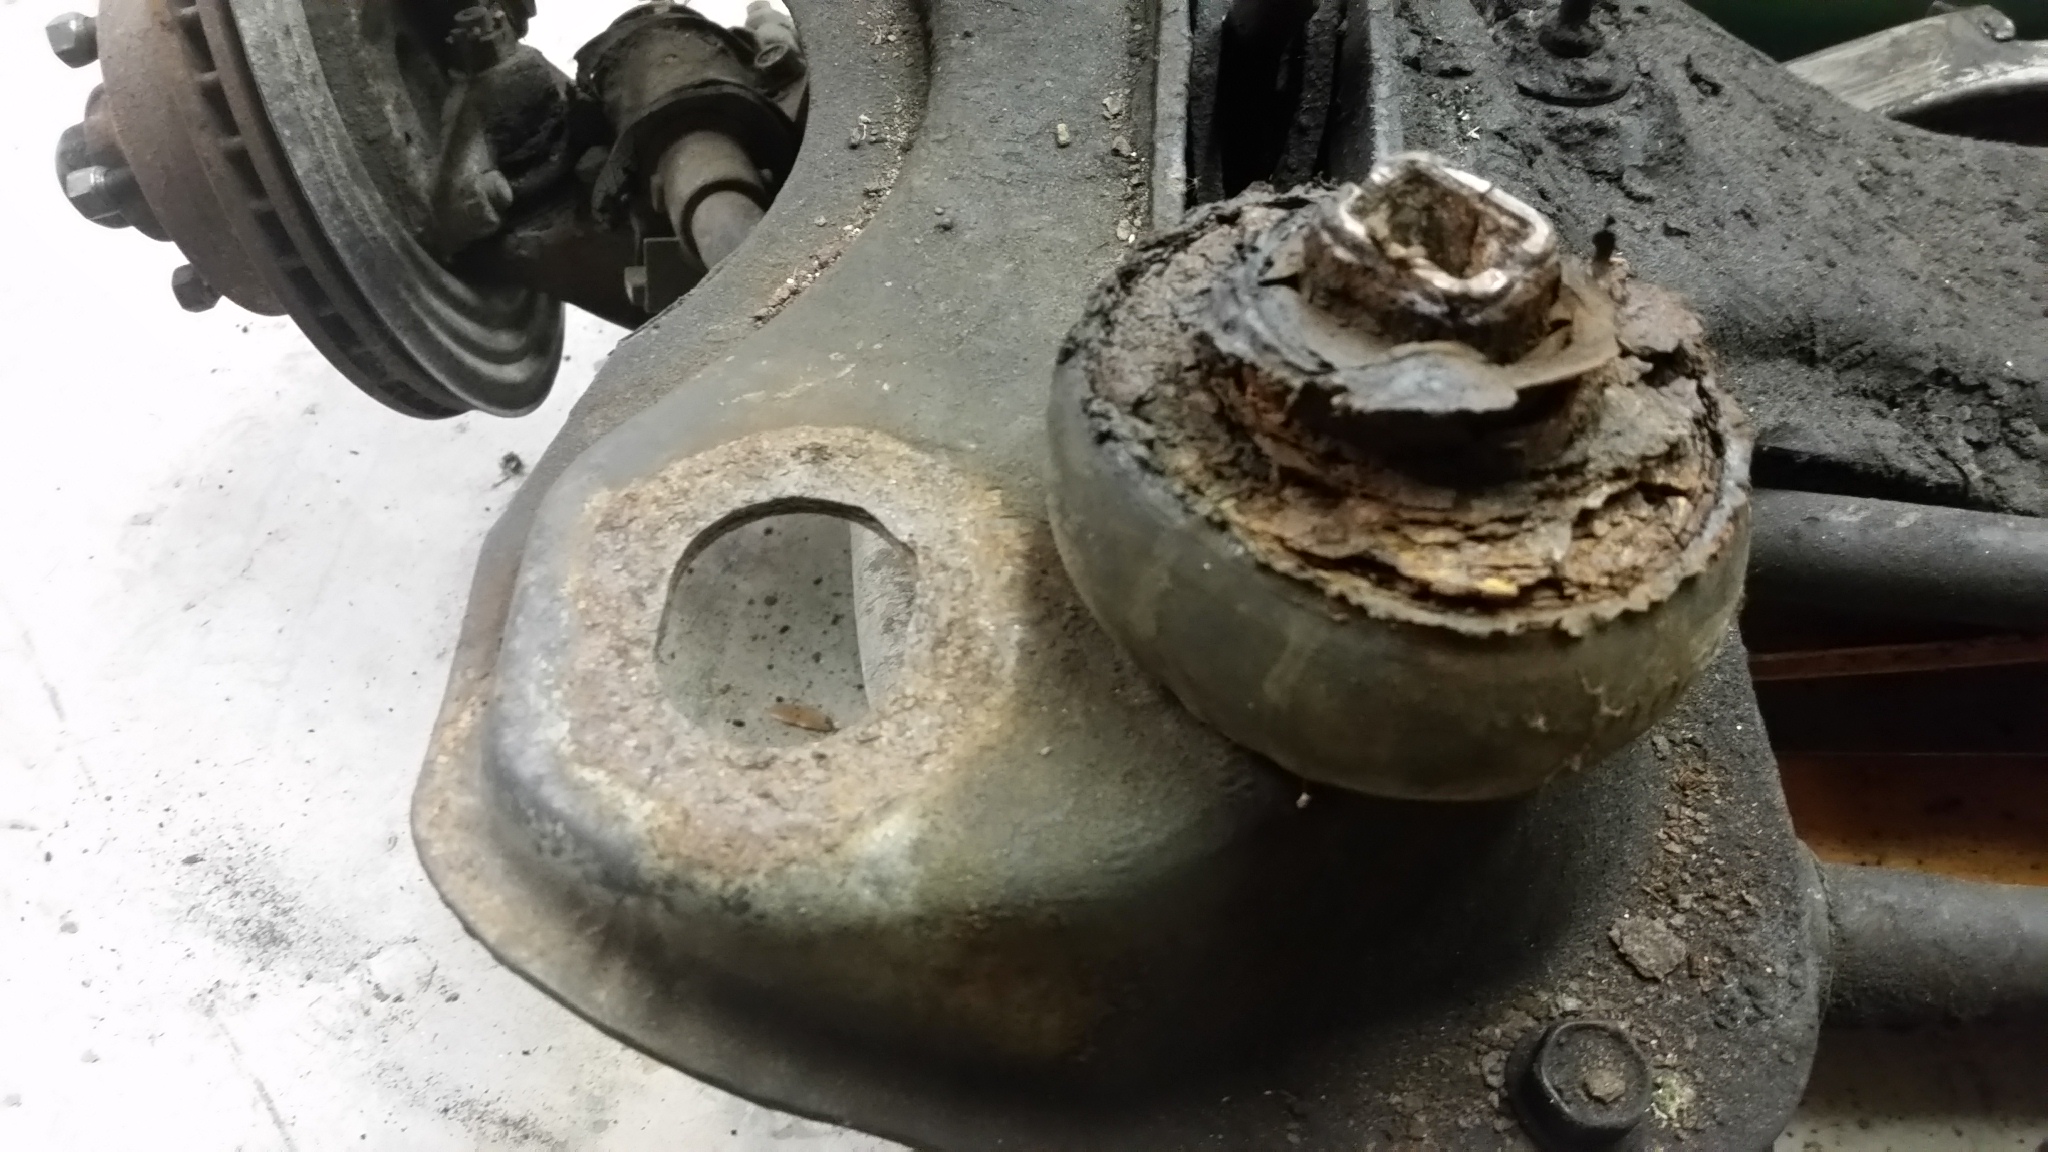
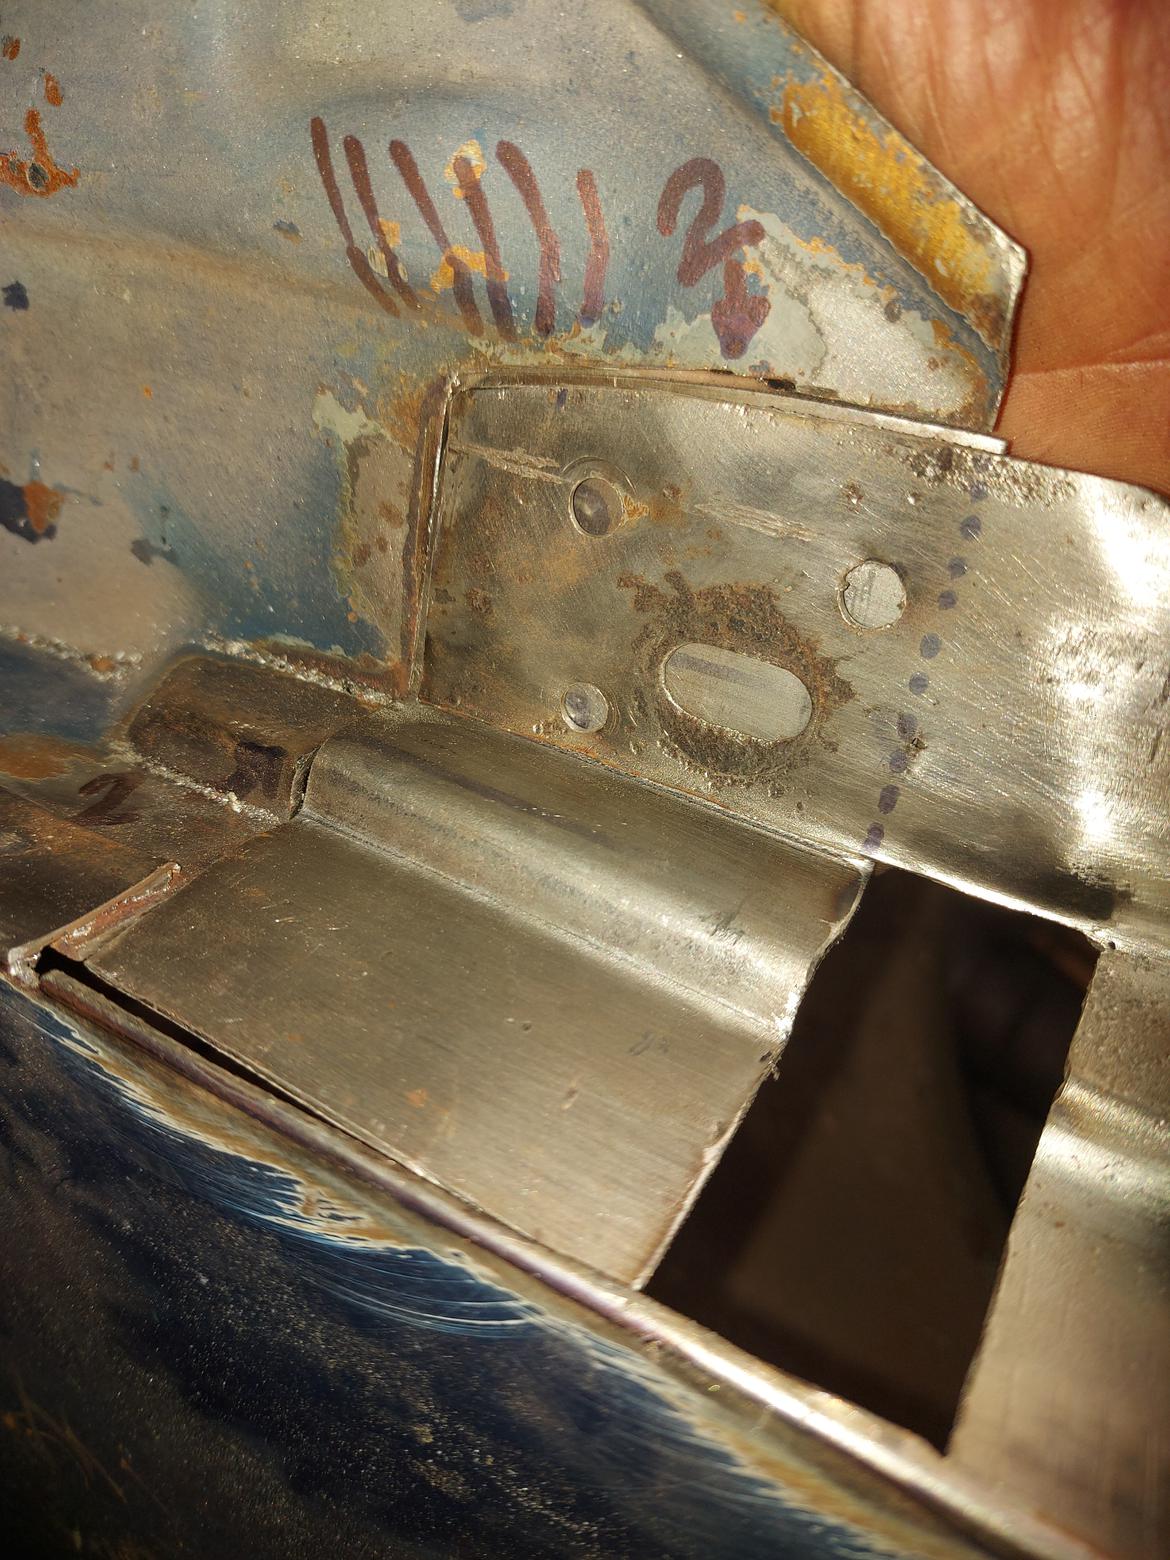
In the picture above the top layer is removed.  If the two rust holes I saw through the under layer weren't enough for me to cut out what was underneath, the rust I found under the un-cut portions was (where that bolt hole meets with the fender).  I tossed around a couple ideas to get at that bottom layer and drew out a few marker lines.


The line marked #1 was laid out and would get rid of the rust holes, but #2 also took care of the stuff underneath where the two panels met.  Ultimately I decided I that I could probably pull off a #2 (poop reference intended) and went that direction


My goal was to get rid of the rust whilst avoiding that "bump" that I lined out with marker (above).  I feel like I'm taking a leap here, and don't want to risk too much without a parachute.  That bump looks like it'd be hard to duplicate.


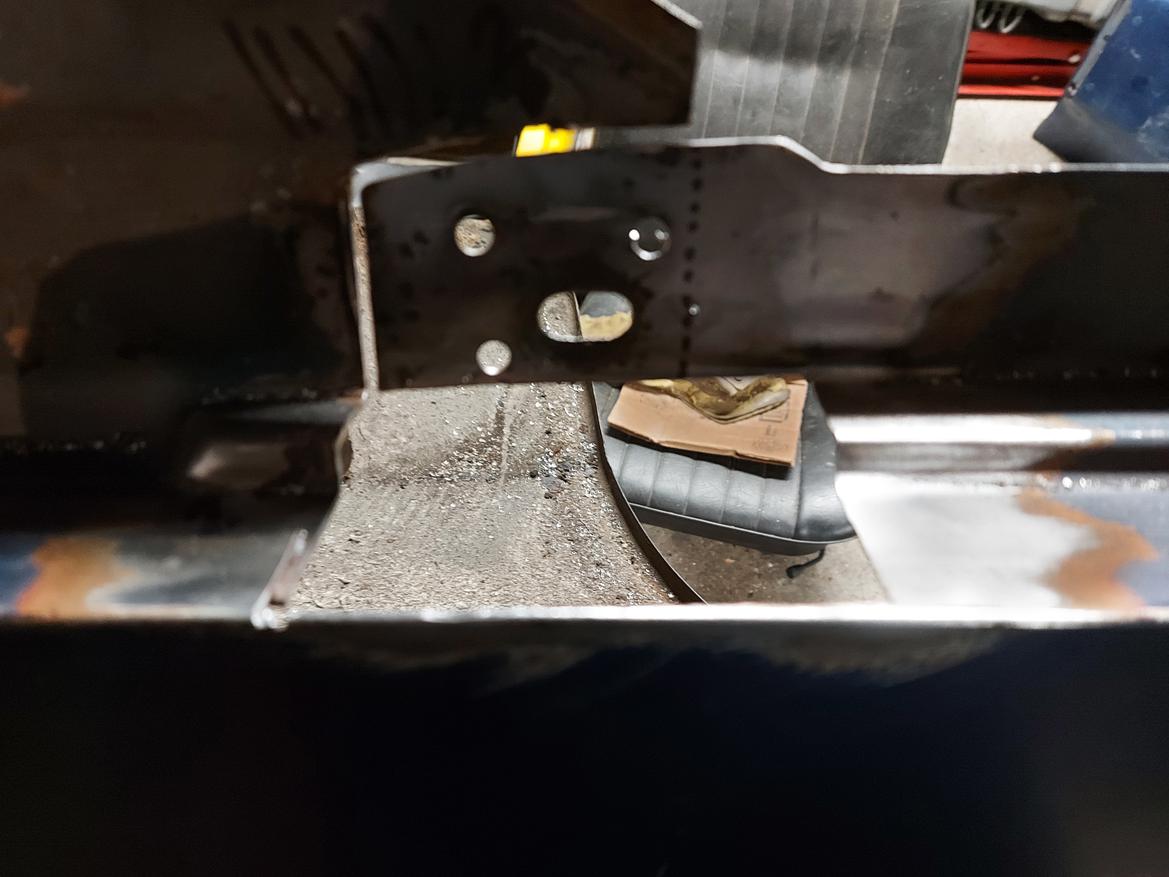
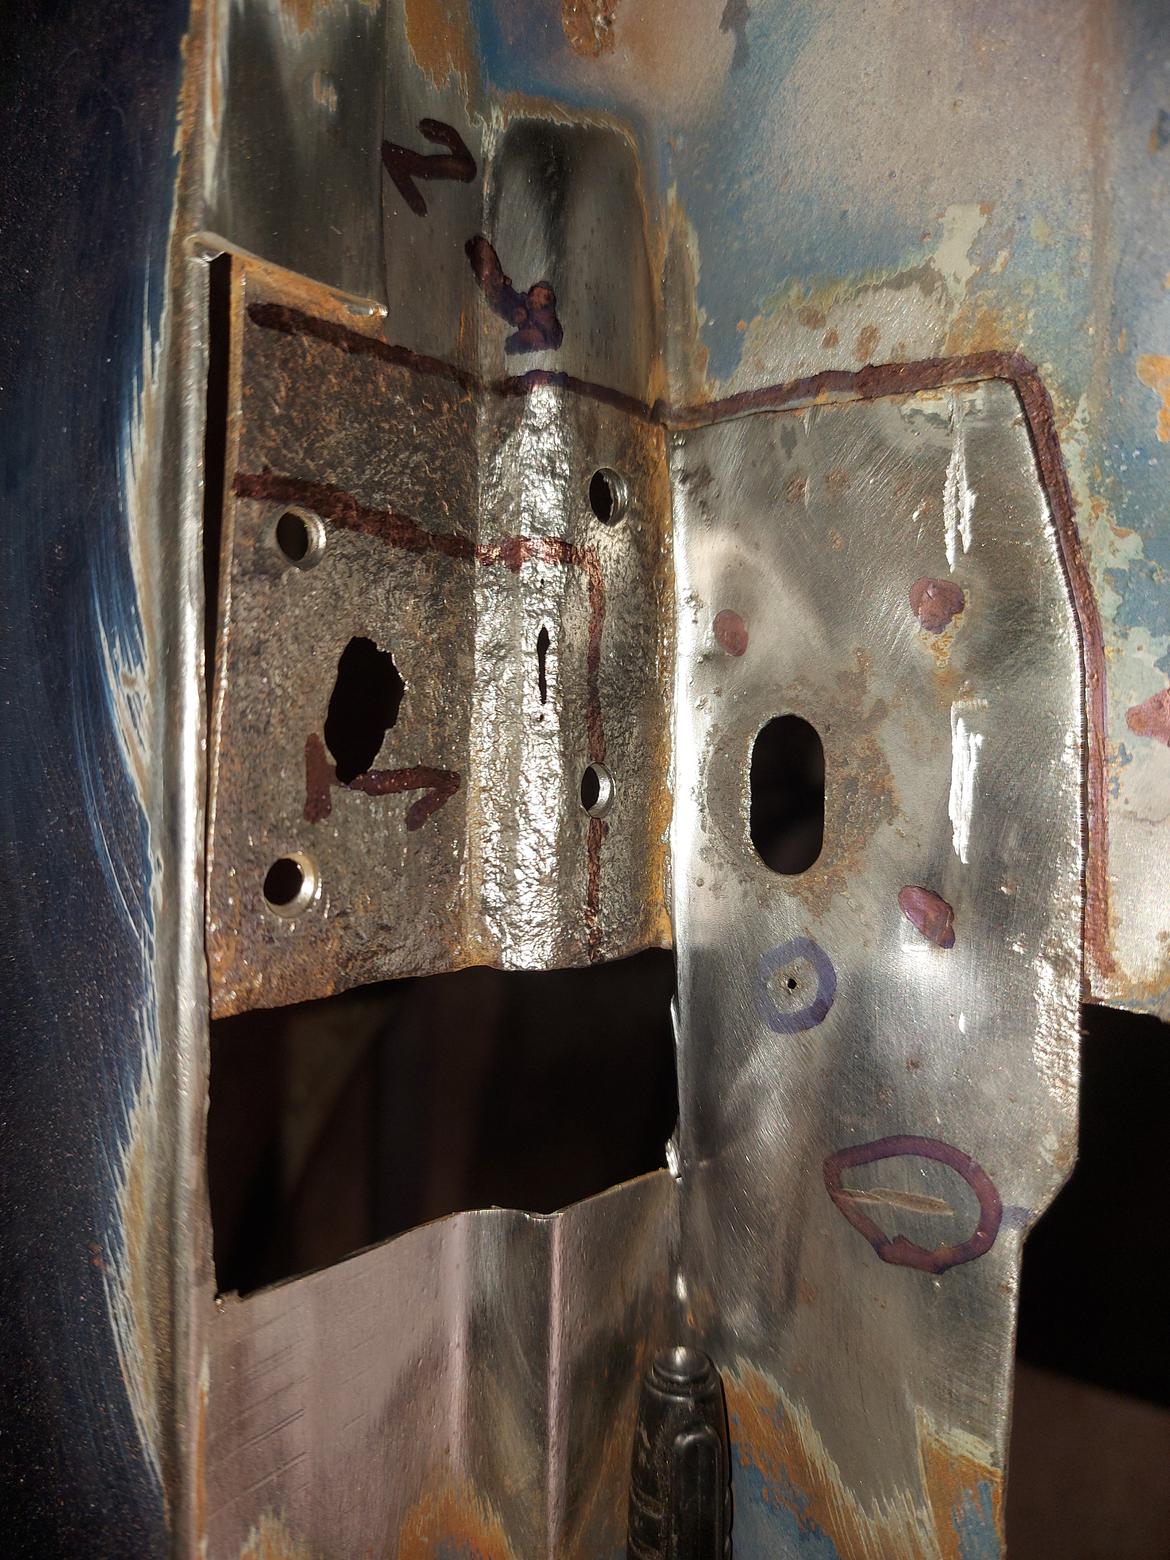
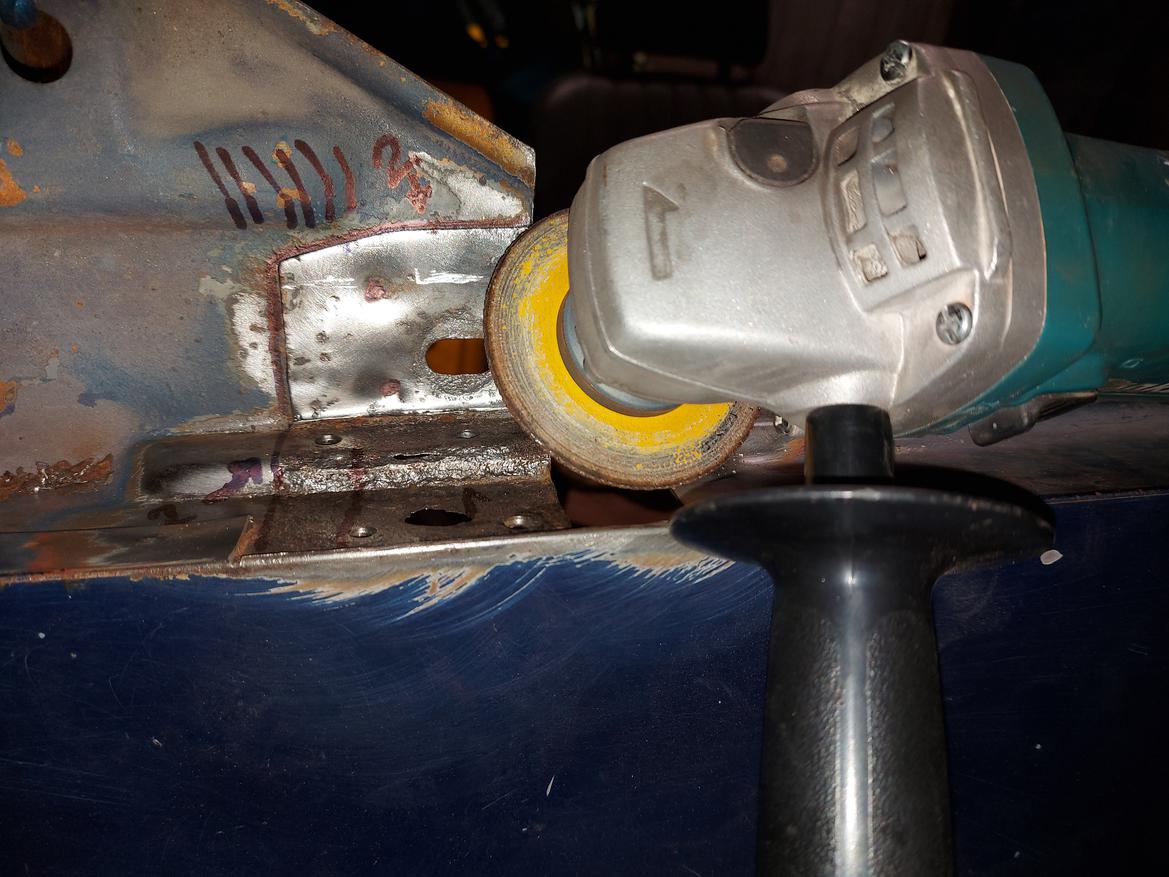
Spot welds out, and we've got the section removed! (yay).

About this time that hammer (and a few other things) I ordered back in December started to arrive.


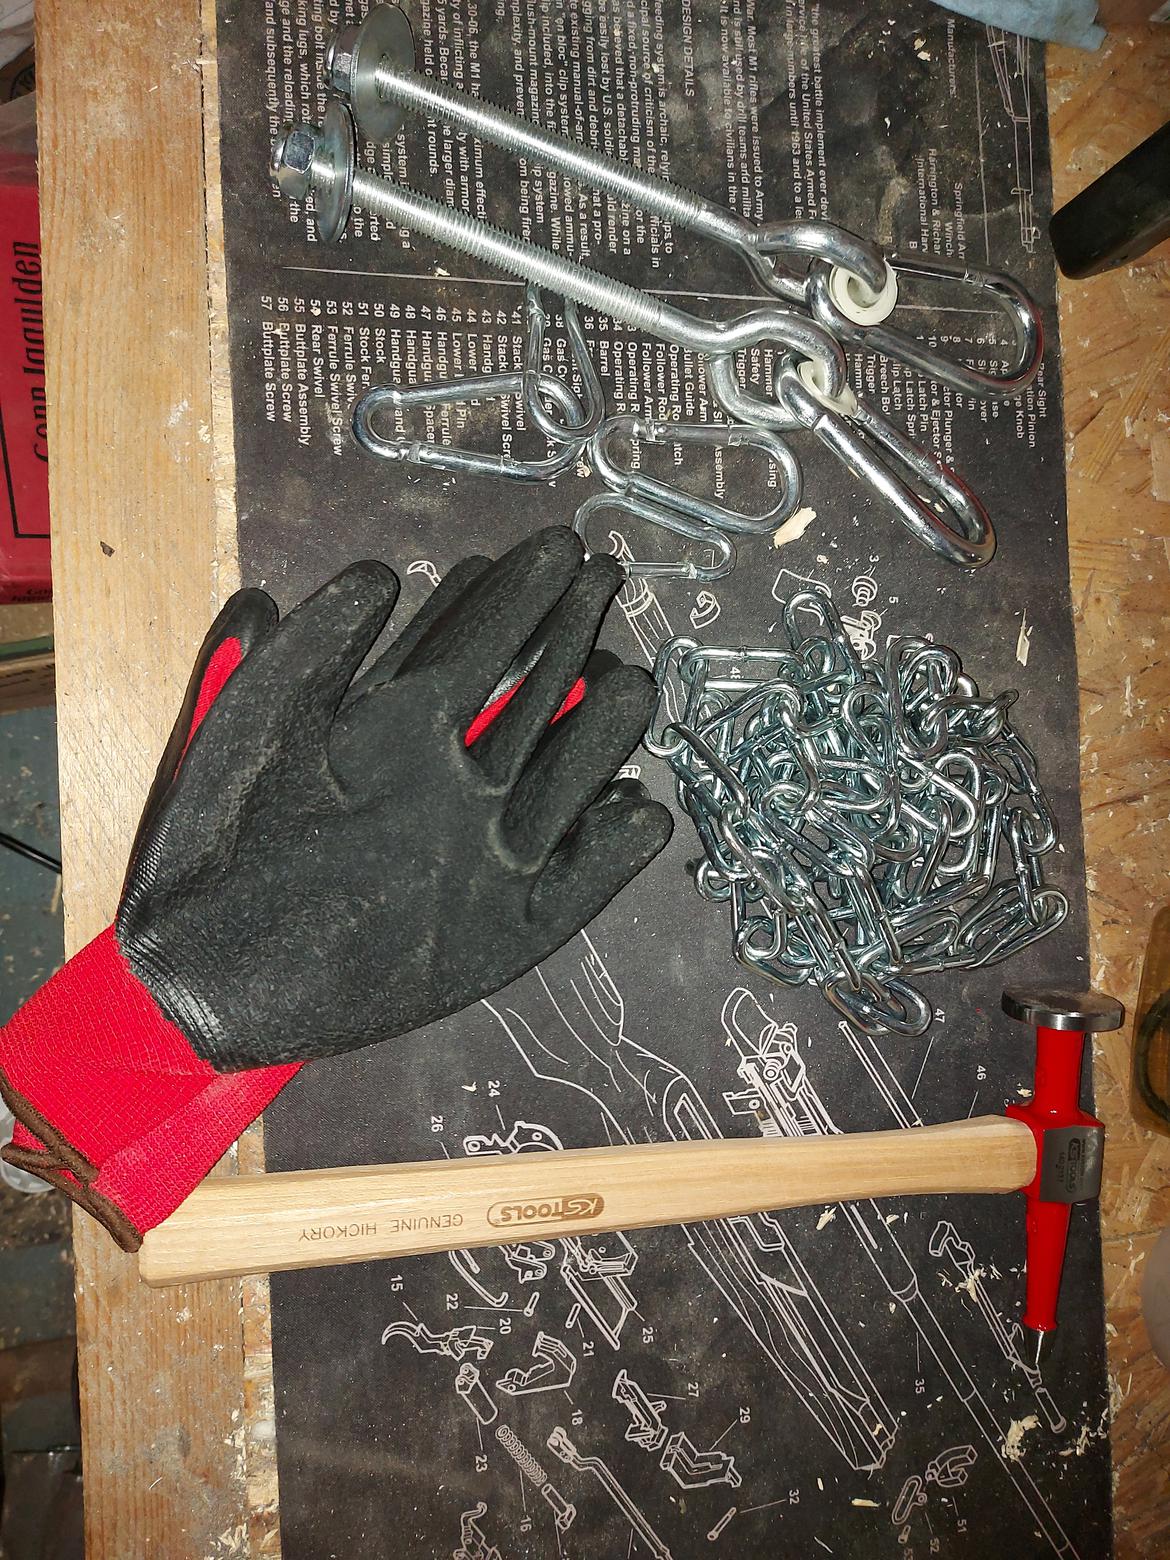
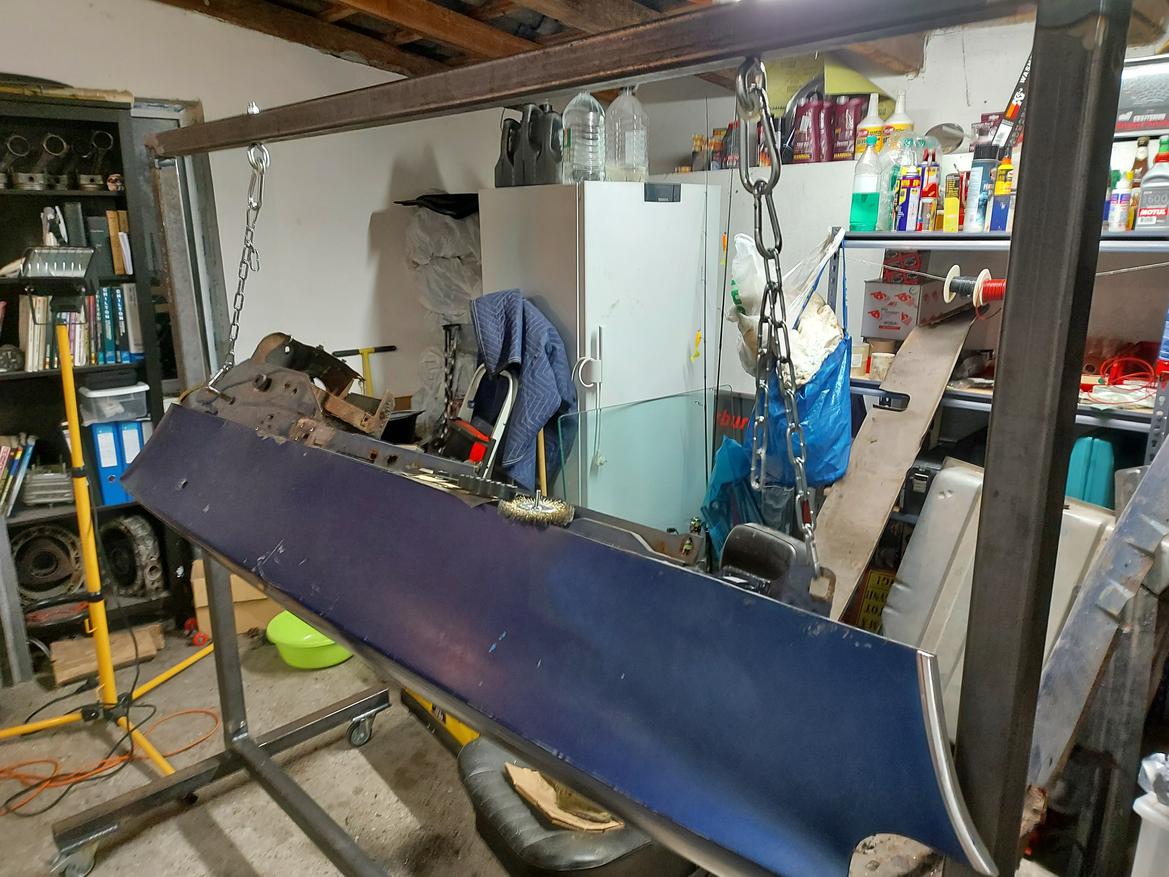
I had figured the ropes on my panel frame were going to be temporary so while I was picking up the hammer, I snagged a length of chain and some attaching hardware to upgrade things a bit.

Here's my "stage 1" upgrade to my panel frame:

(Cringe worthy "stage upgrade" reference intended)


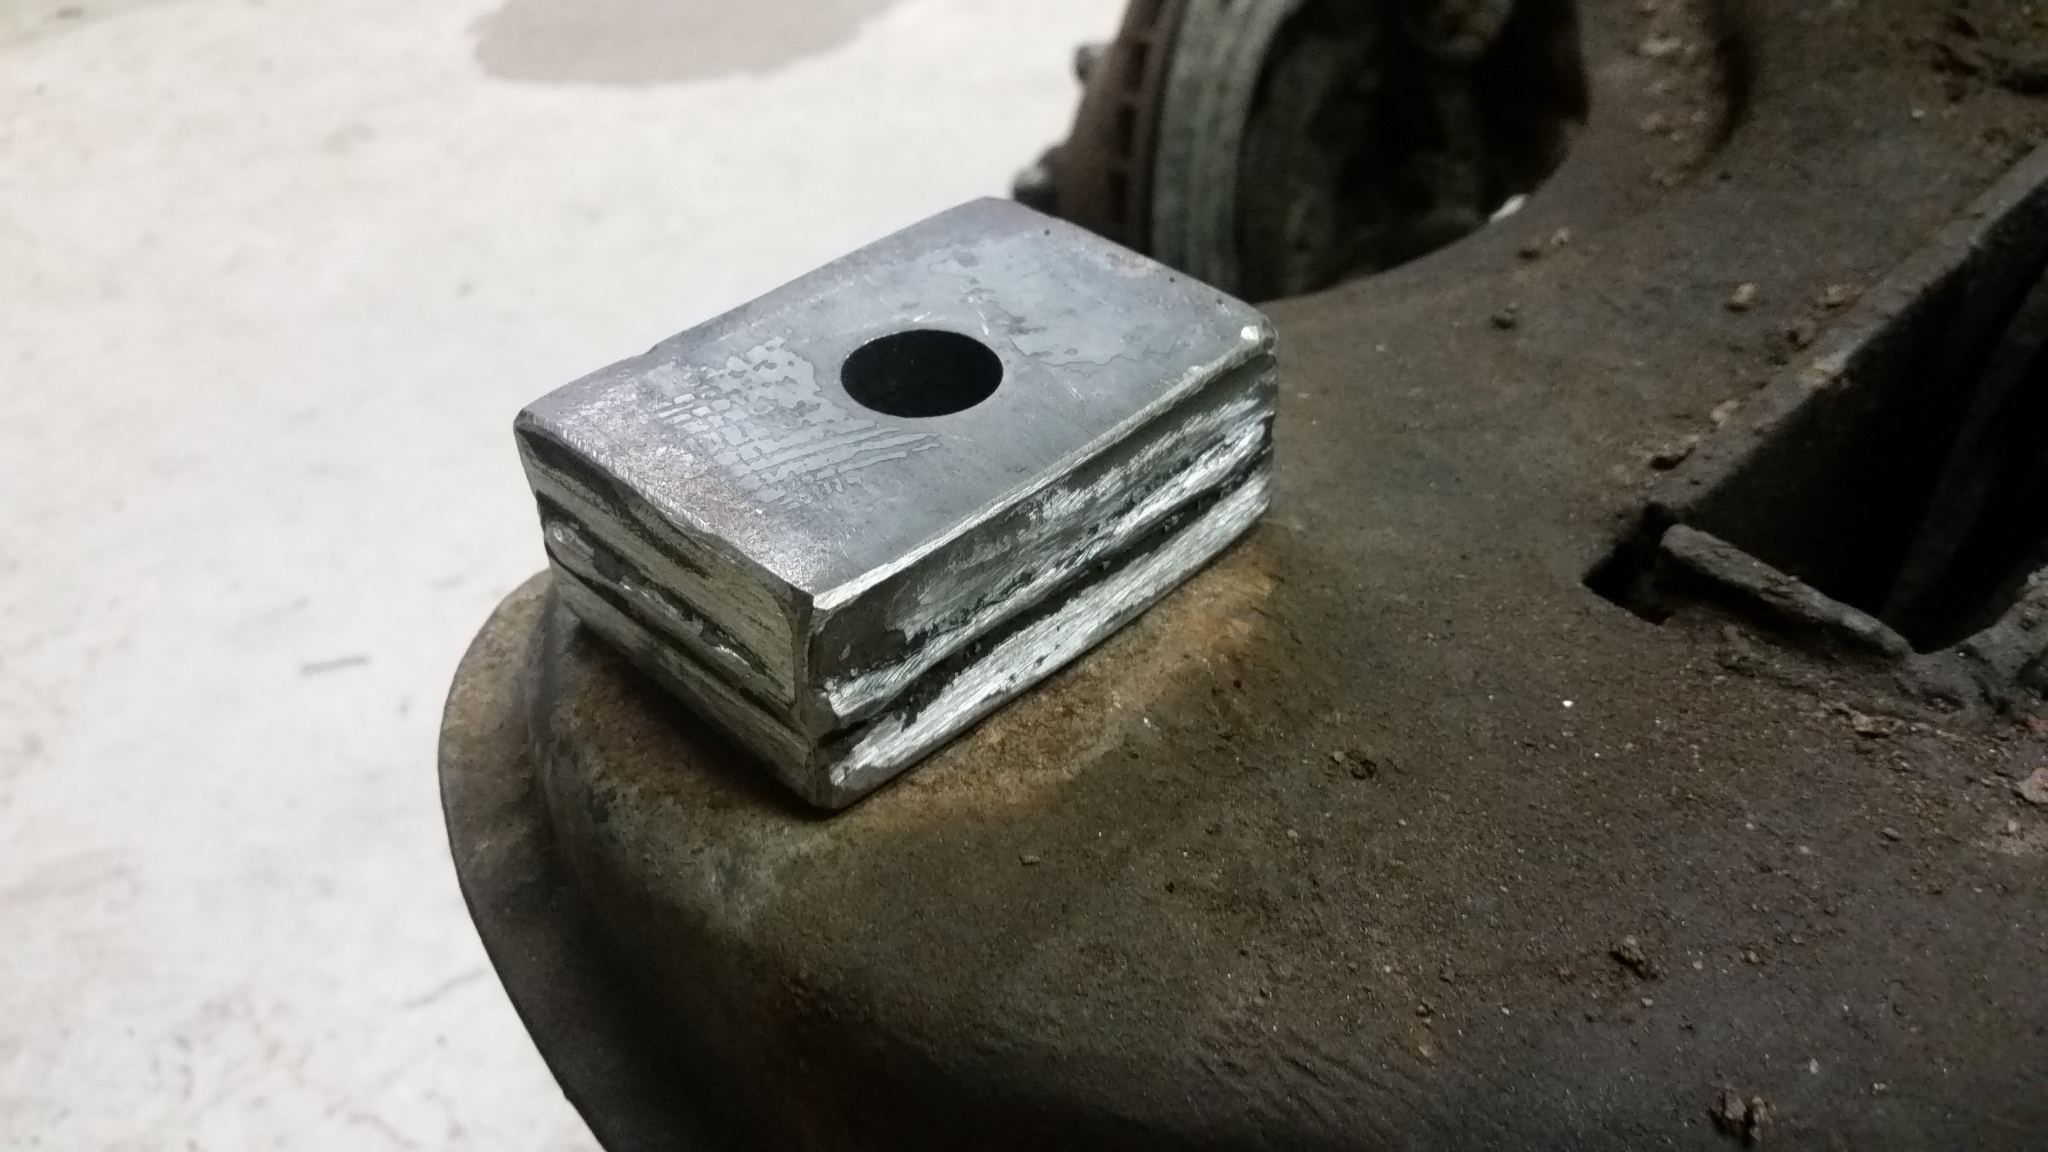
With everything cut out, I needed to find some material to make replacement bits.  Unfortunately the benefit of working day-shift may be "guilt free garage time" but it also means I'm working at the office during the hours that the metal shop (singular) is open...  Looking around inside the car and garage I found two bits of metal that could work as  filler material:


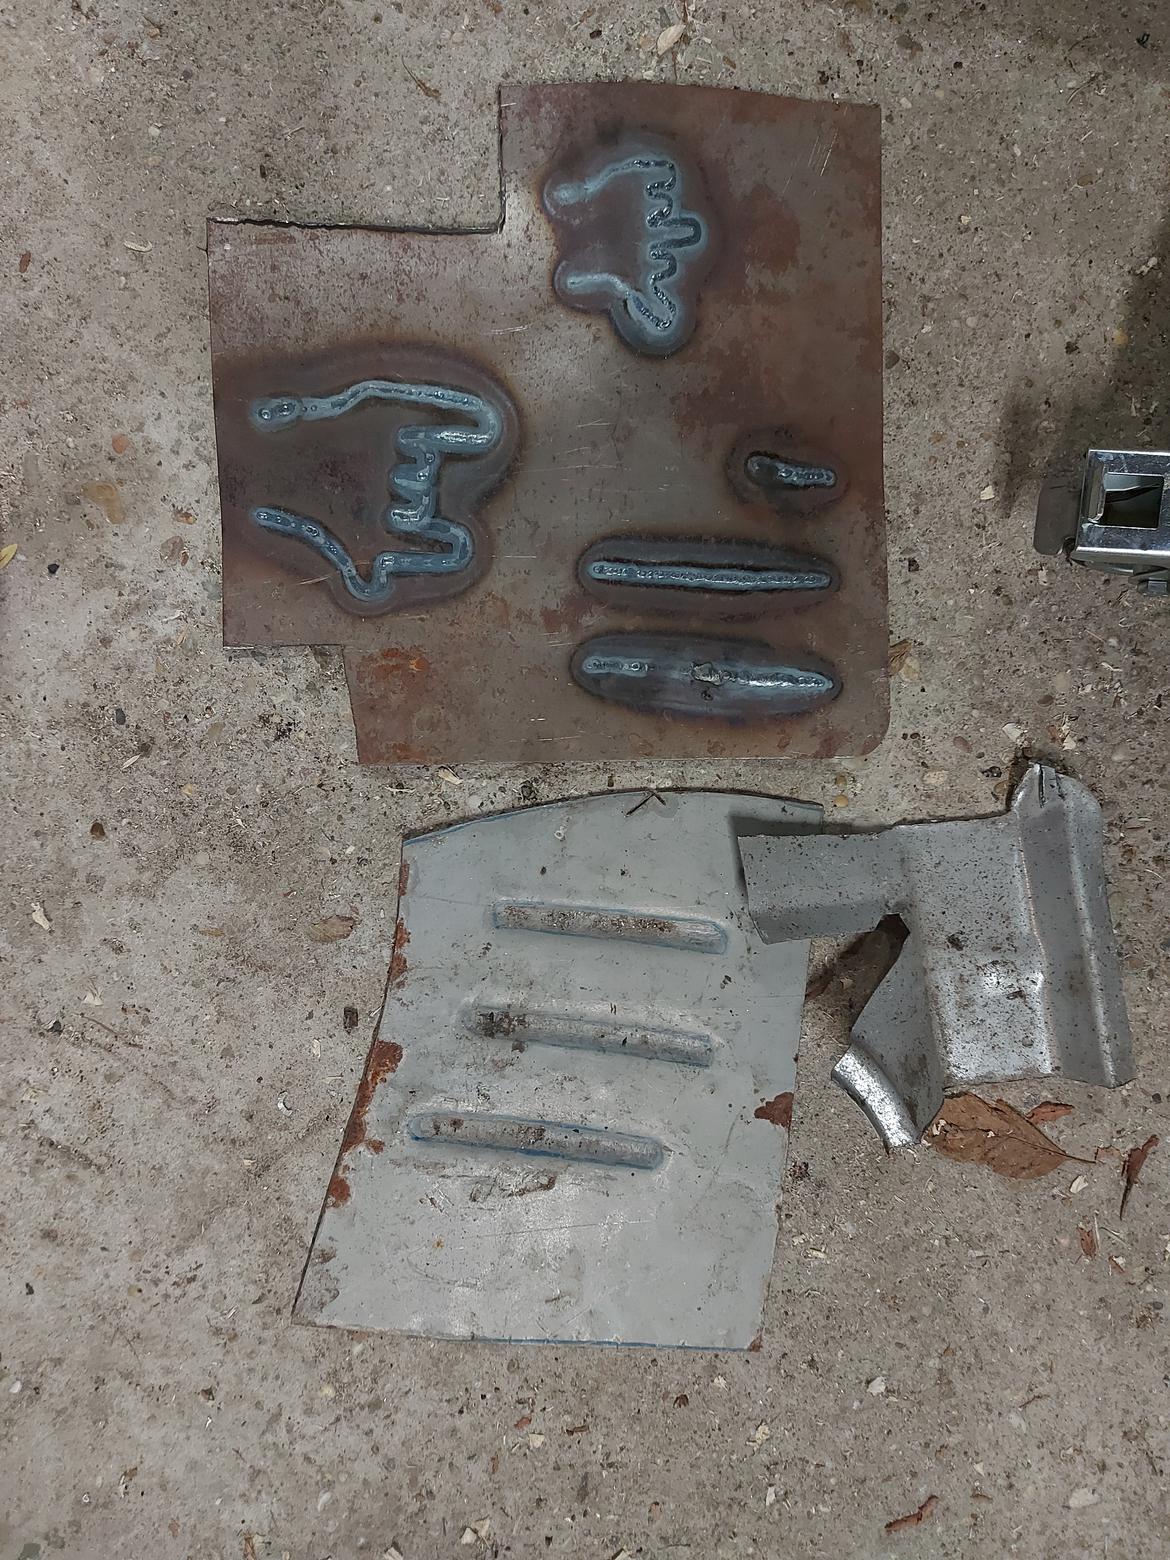
The top piece, funnily enough, was something I did very near this time of year in 2021 (so about 11 months ago?).  This is when my hungover/quarantined butt got off his lazy rear and decided that 2021 was going to be the year that I laid a weld that I wasn't completely ashamed of.  This random piece of flat stock had been in my inventory since Tacoma (circa 2016?) and I figured torch practice was something it was suited for.  I started with the straight lines and immediately dipped my tungsten into the puddle.  Things didn't get a whole lot better from there.  You can kind of tell my mood at the time by what was drawn wink

The bottom piece is something I found in the Charger.  It looks to be intended for a floor repair but the way the dimples are hammered really has me bothered.  I don't know whether I can do a better dimple job or not yet so I decide to play it safe and cut up the weld practice piece.


Also, in the spirit of "playing it safe", I gave myself plenty of material on all sides of the cut so I could mess up multiple times if needed wink


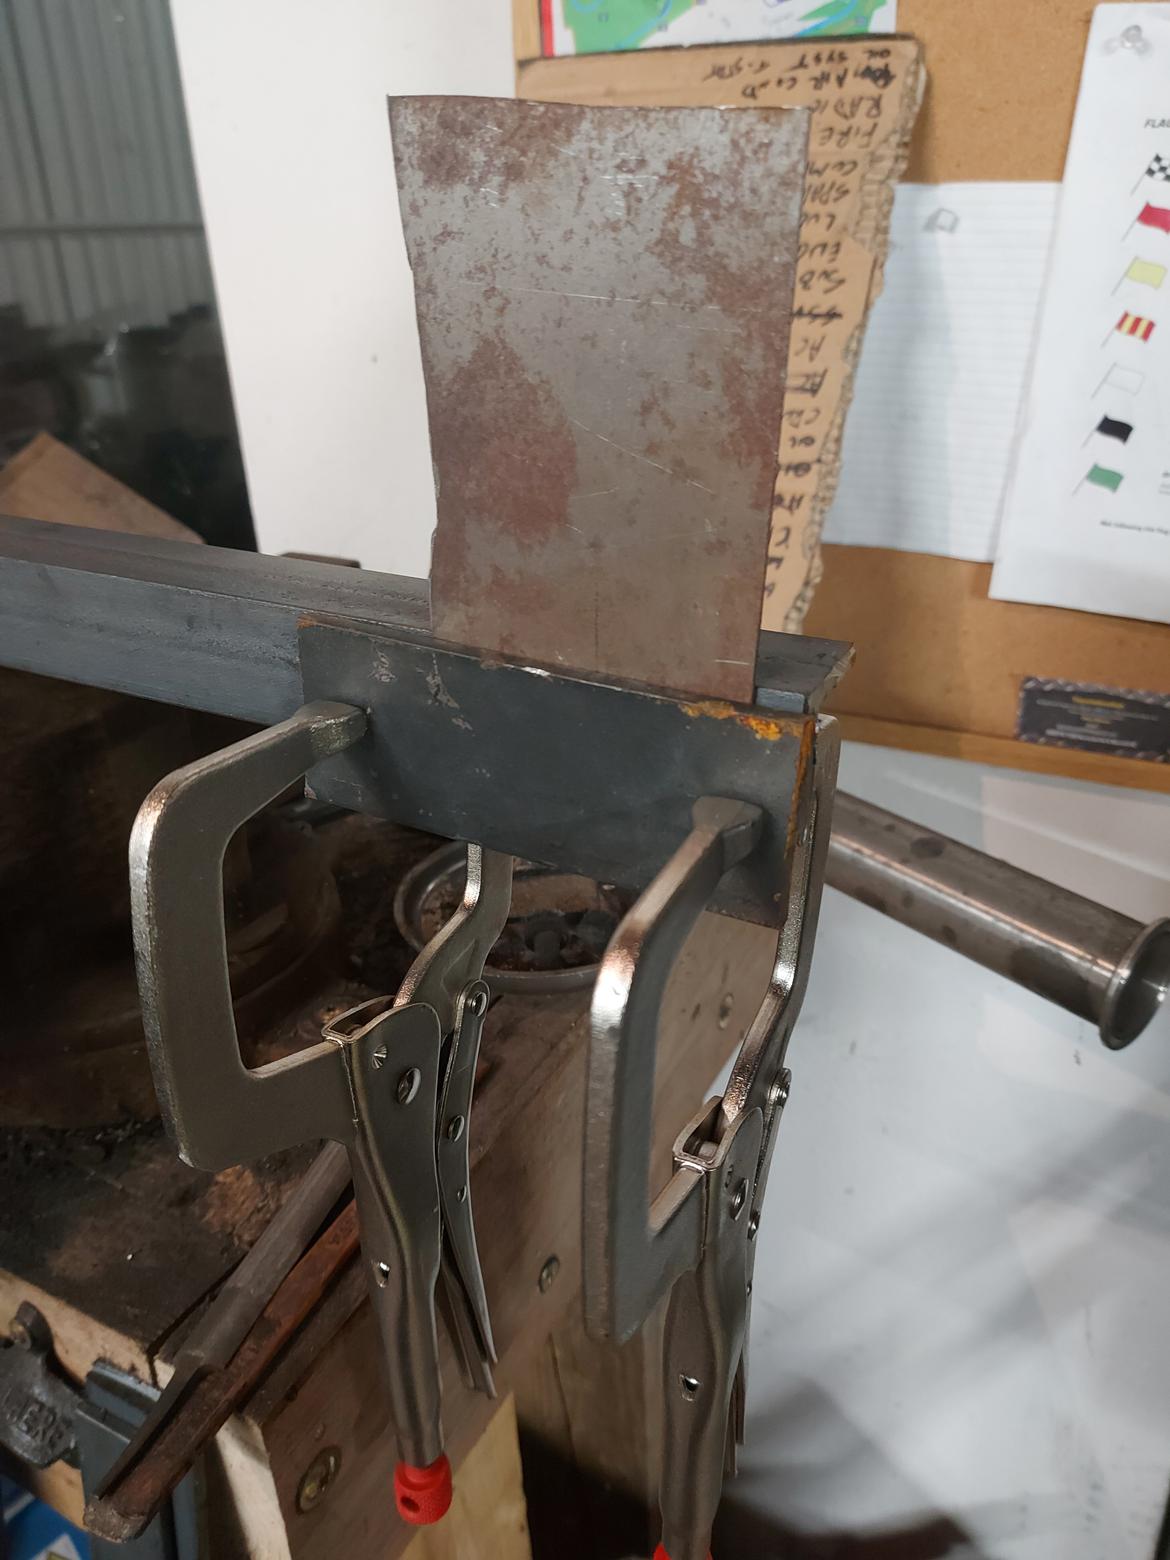
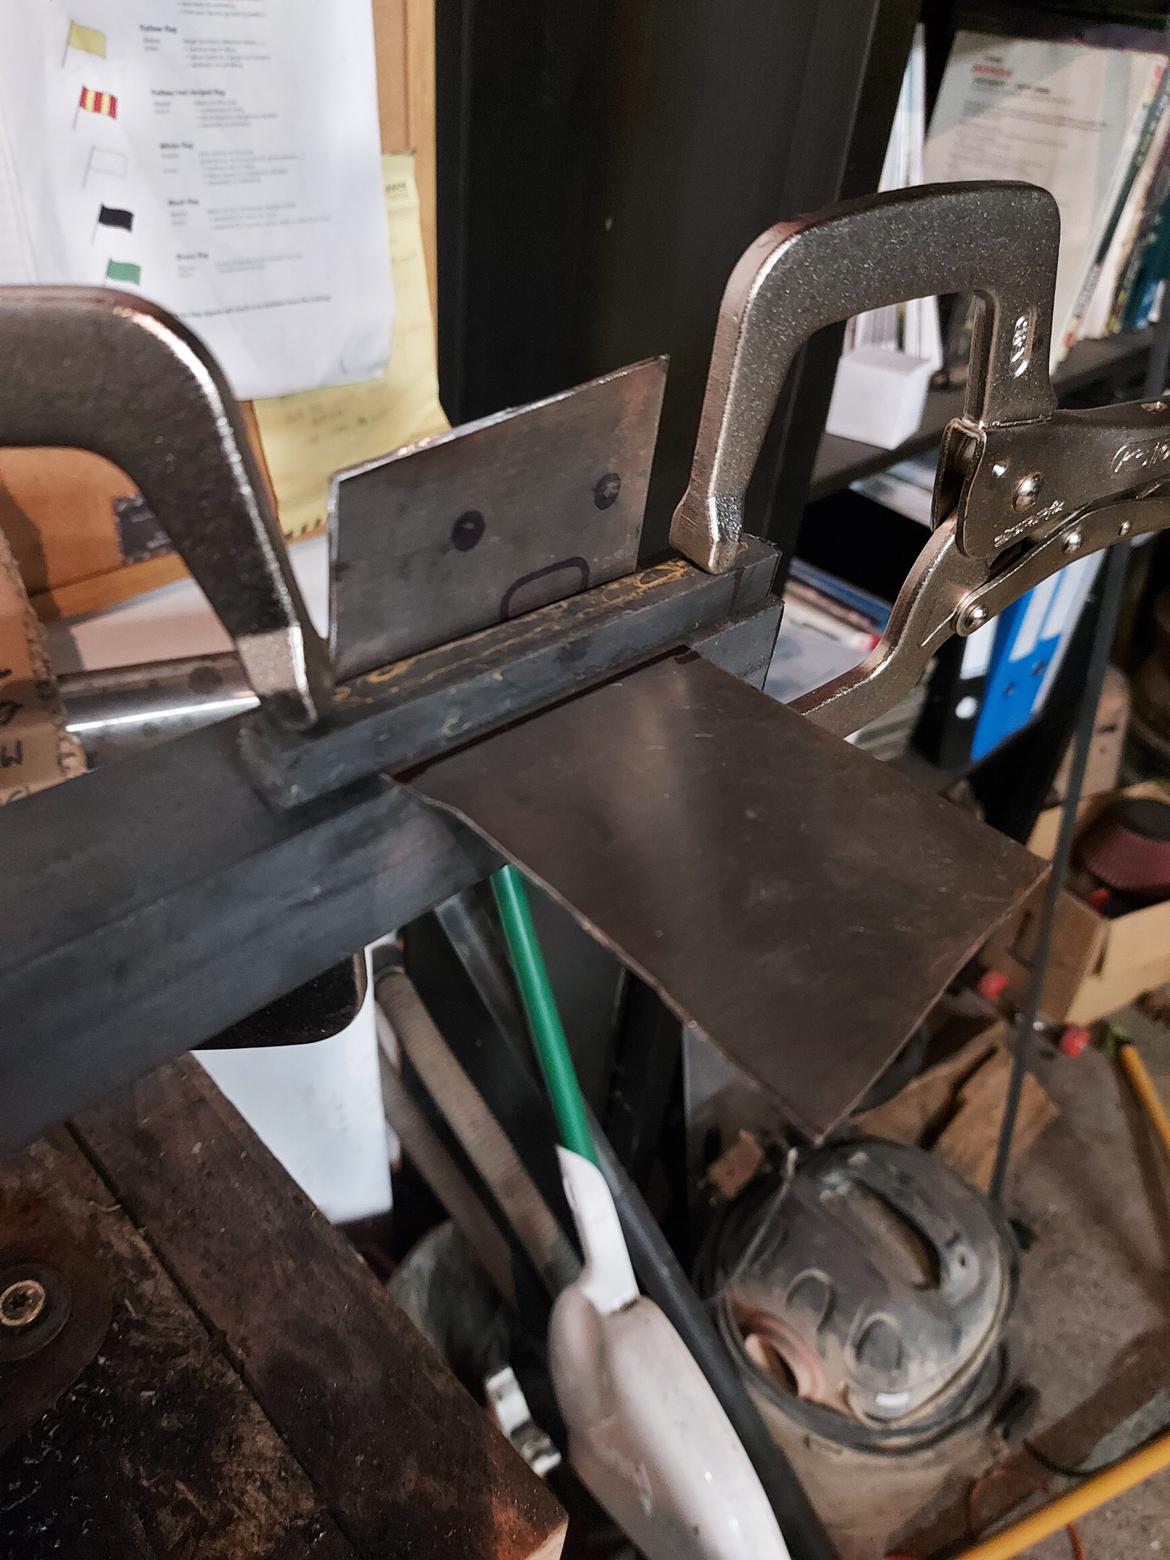
I don't own a finger brake, and bench-vice bends have never worked for me but I have an idea involving angle stock, flat bar stock, and lots of those clamps I bought back in December:

90-degree bend, here goes:
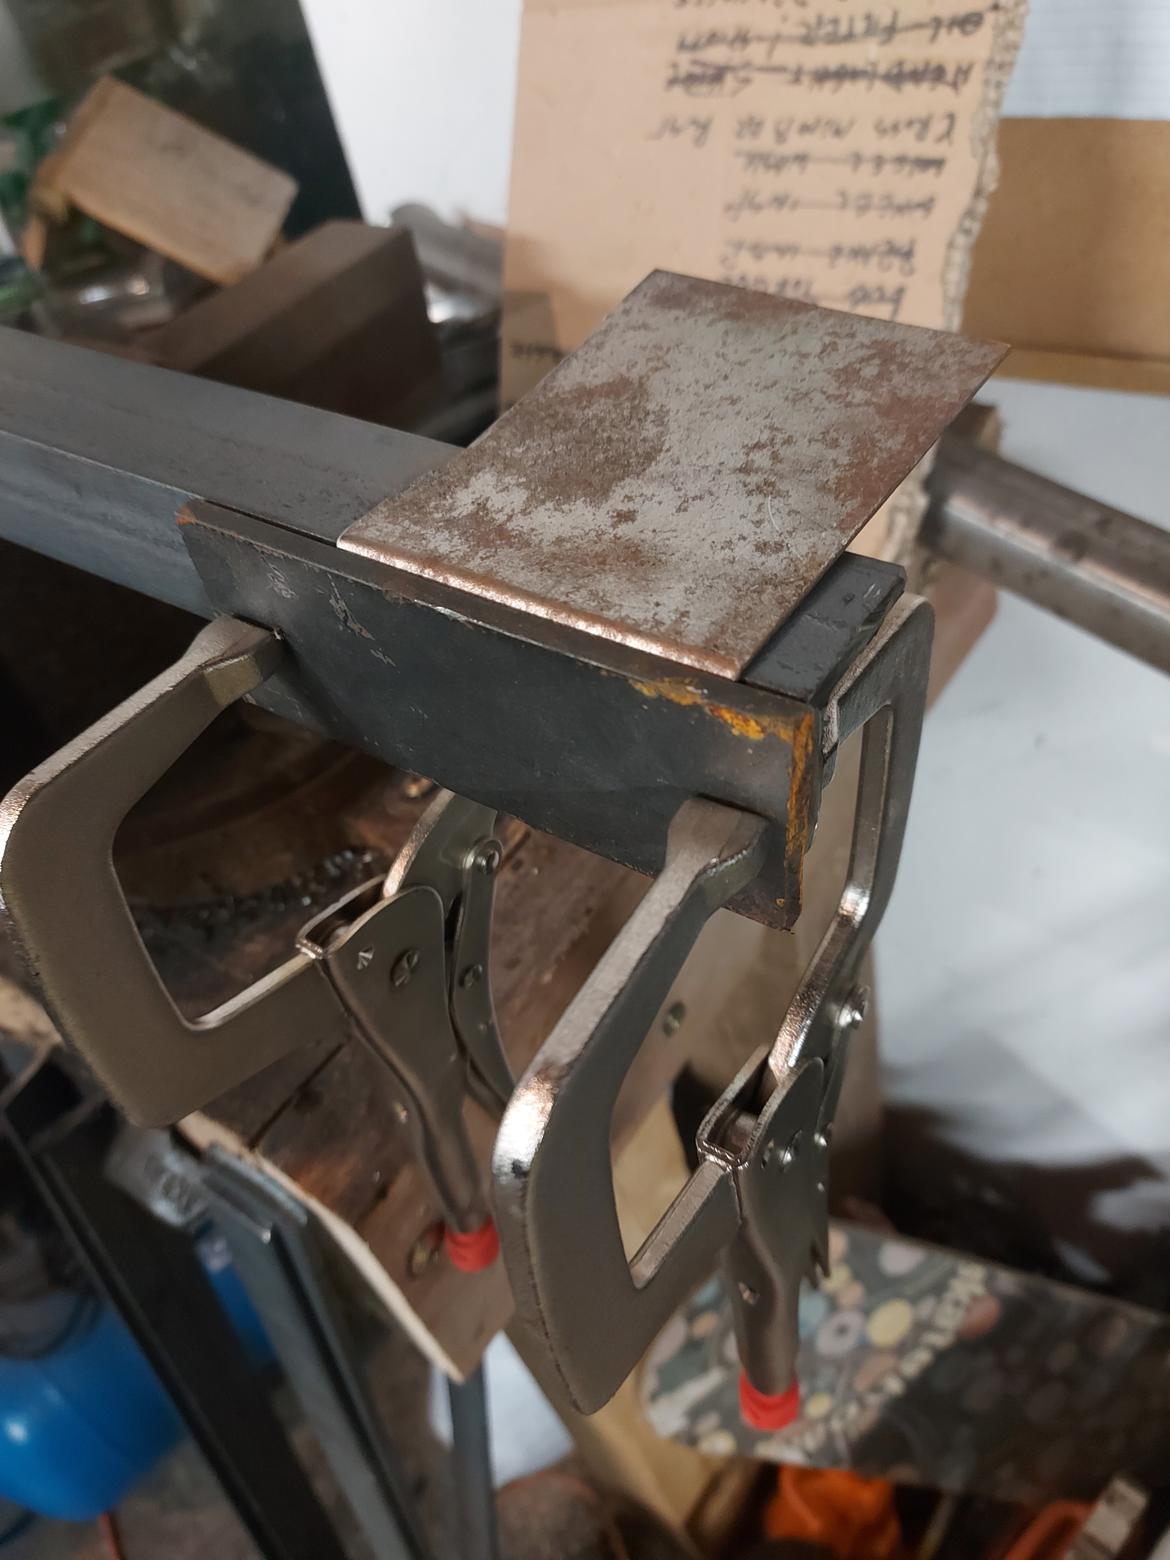
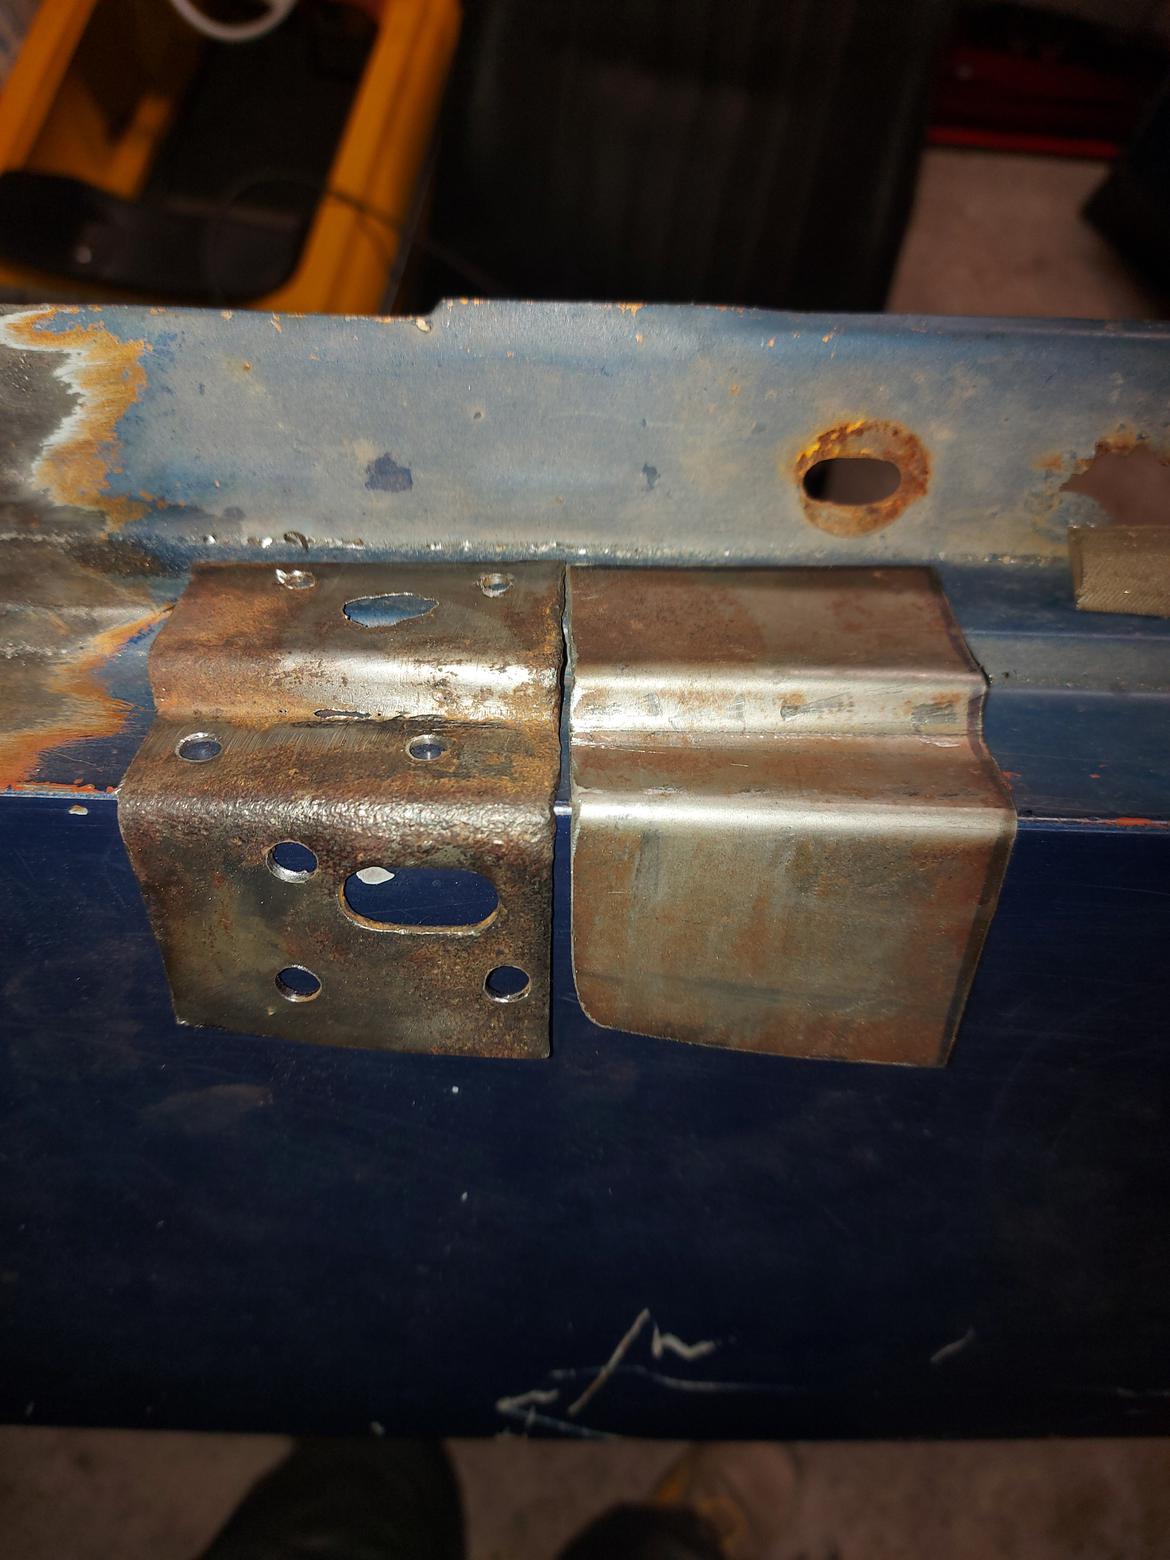


This had me unbelievably stoked laugh  What you're seeing in the above is the final results of a Monday through Friday morning effort.  The cleaning and cutting of the fender alone took me two days.  Getting the metal cut out of the donor stock, and cutting the angle and bar stock was another day.  I didn't get that bend made until mid-session Friday.

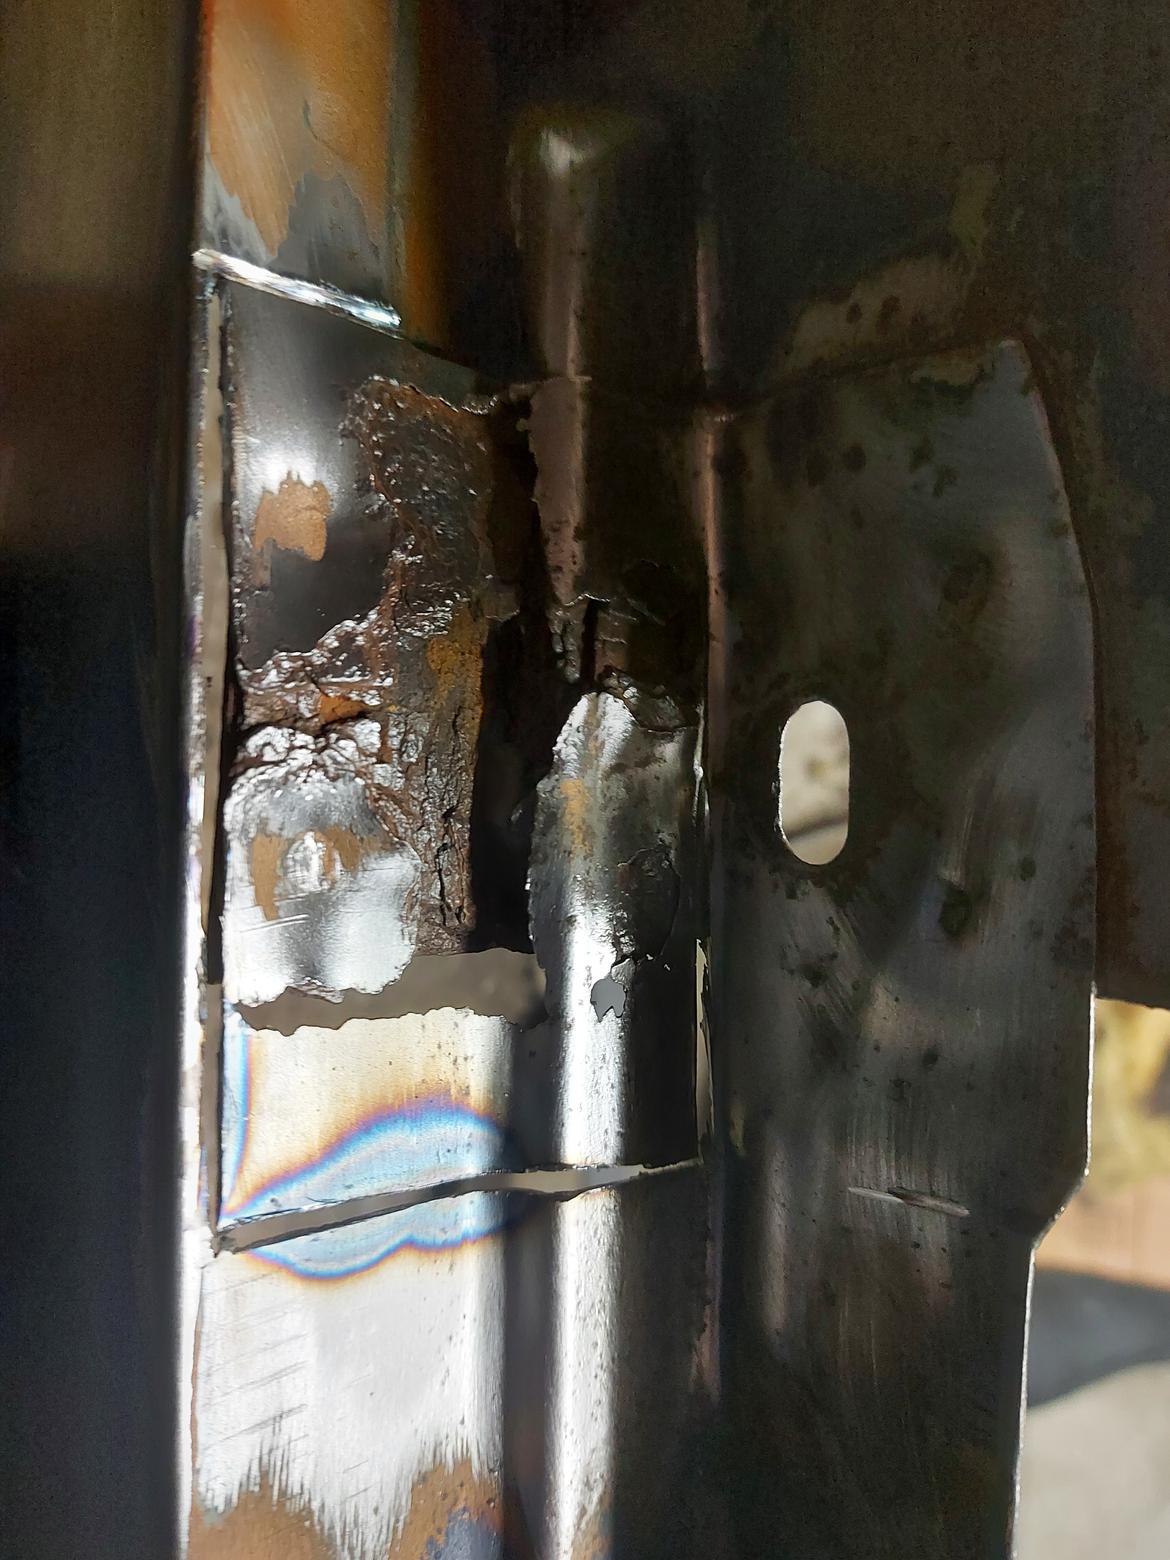
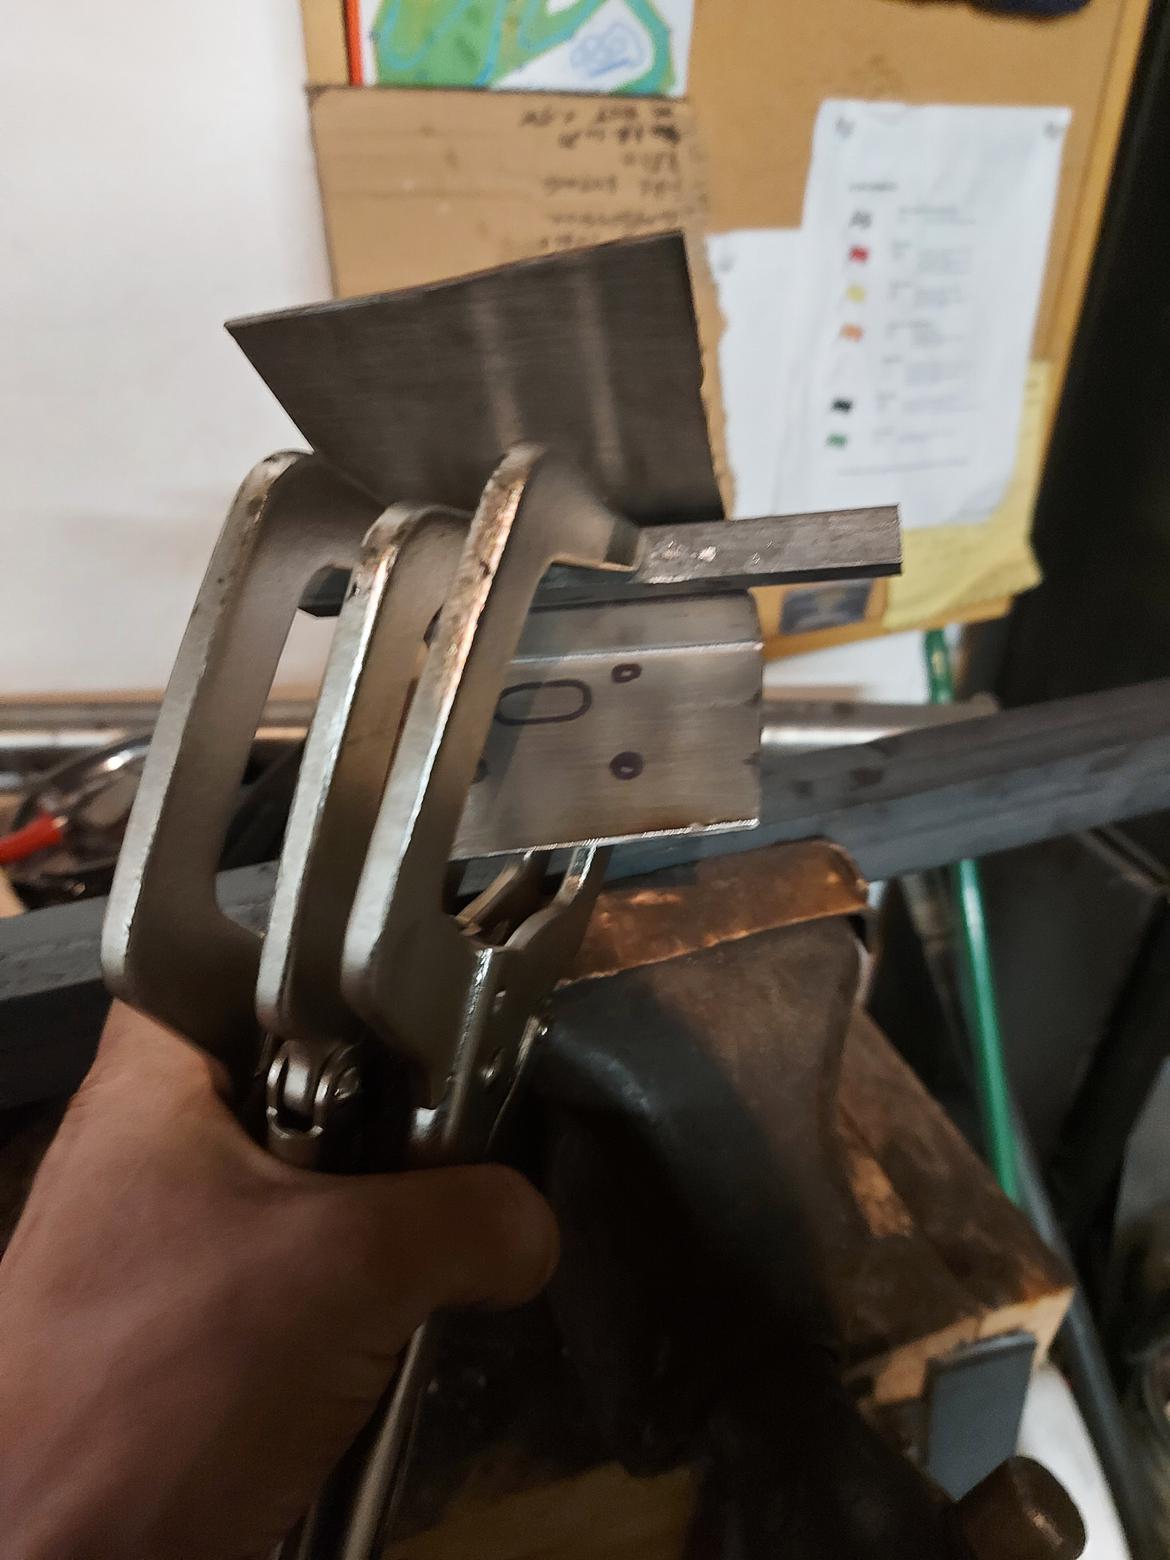
With the success of my 90-degree bend, I started some head scratching to finish the session.  This mid-section joggle of this fender is going to be a bit difficult and I'm not quite sure how I'm going to do it yet.  I toss around a few ideas but ultimately end Friday with the below being the best I could come up with:


I figure if I can mount my donor stock in that sort of contraption, maybe I can use a chisel (or similar) to get that bend punched in there...

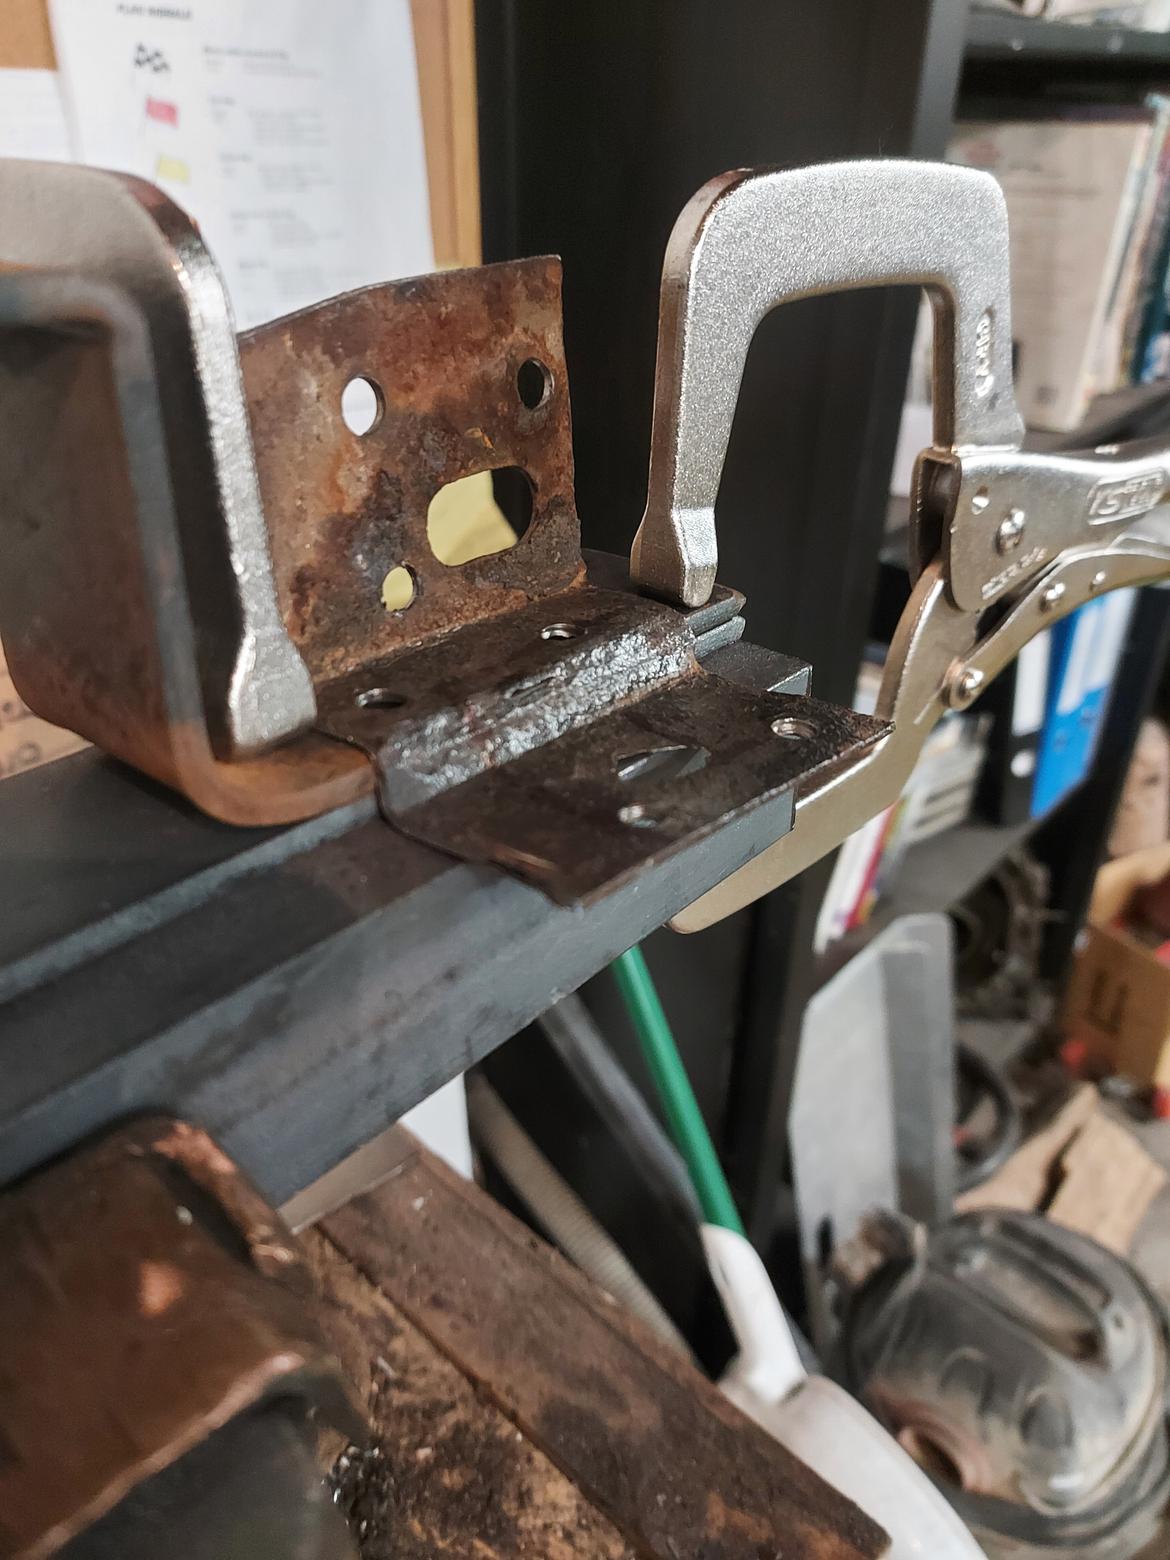
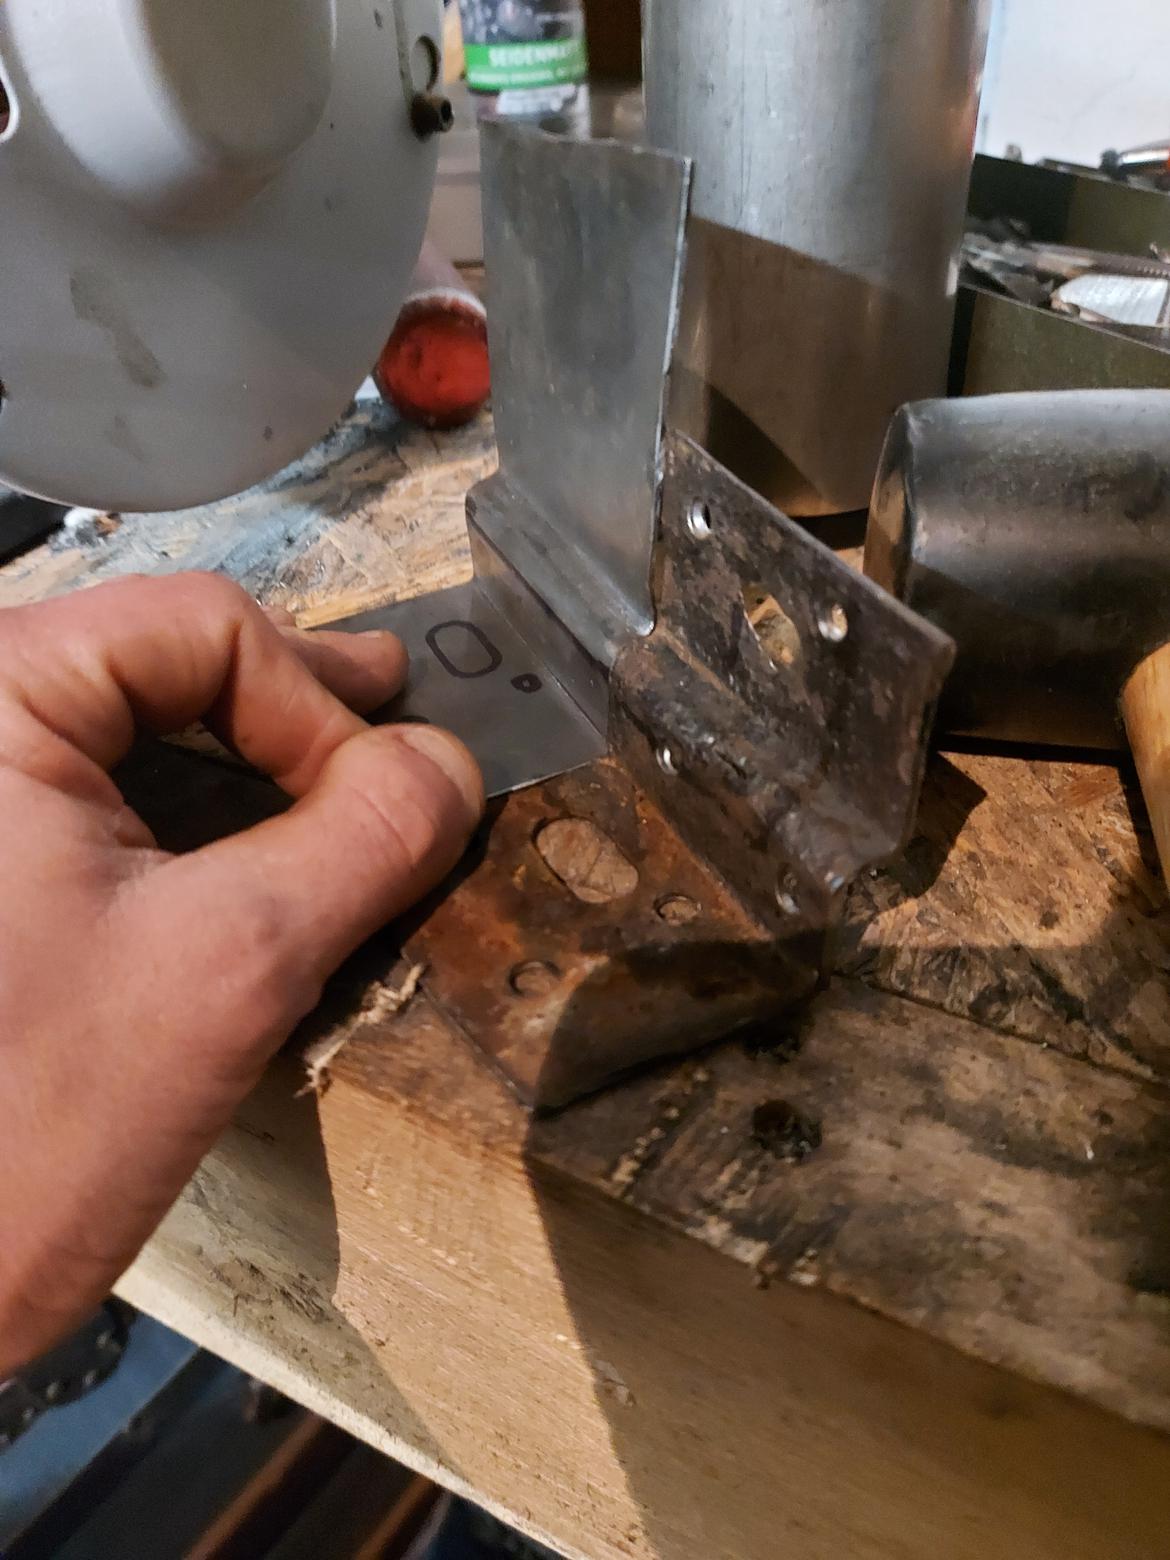
By Monday, I'm not so sure so I scrap the idea in favor of something a bit more simple.  First I use square stock to allow my clamps to bite, and hammer out a rough 90:


Then I use multiple clamps to bite half-way on to that bend, to wack out the rest of the joggle with that rubber mallet.  The bends aren't "sharp 90's" so I need a little "roundness" in them to look like the original. 


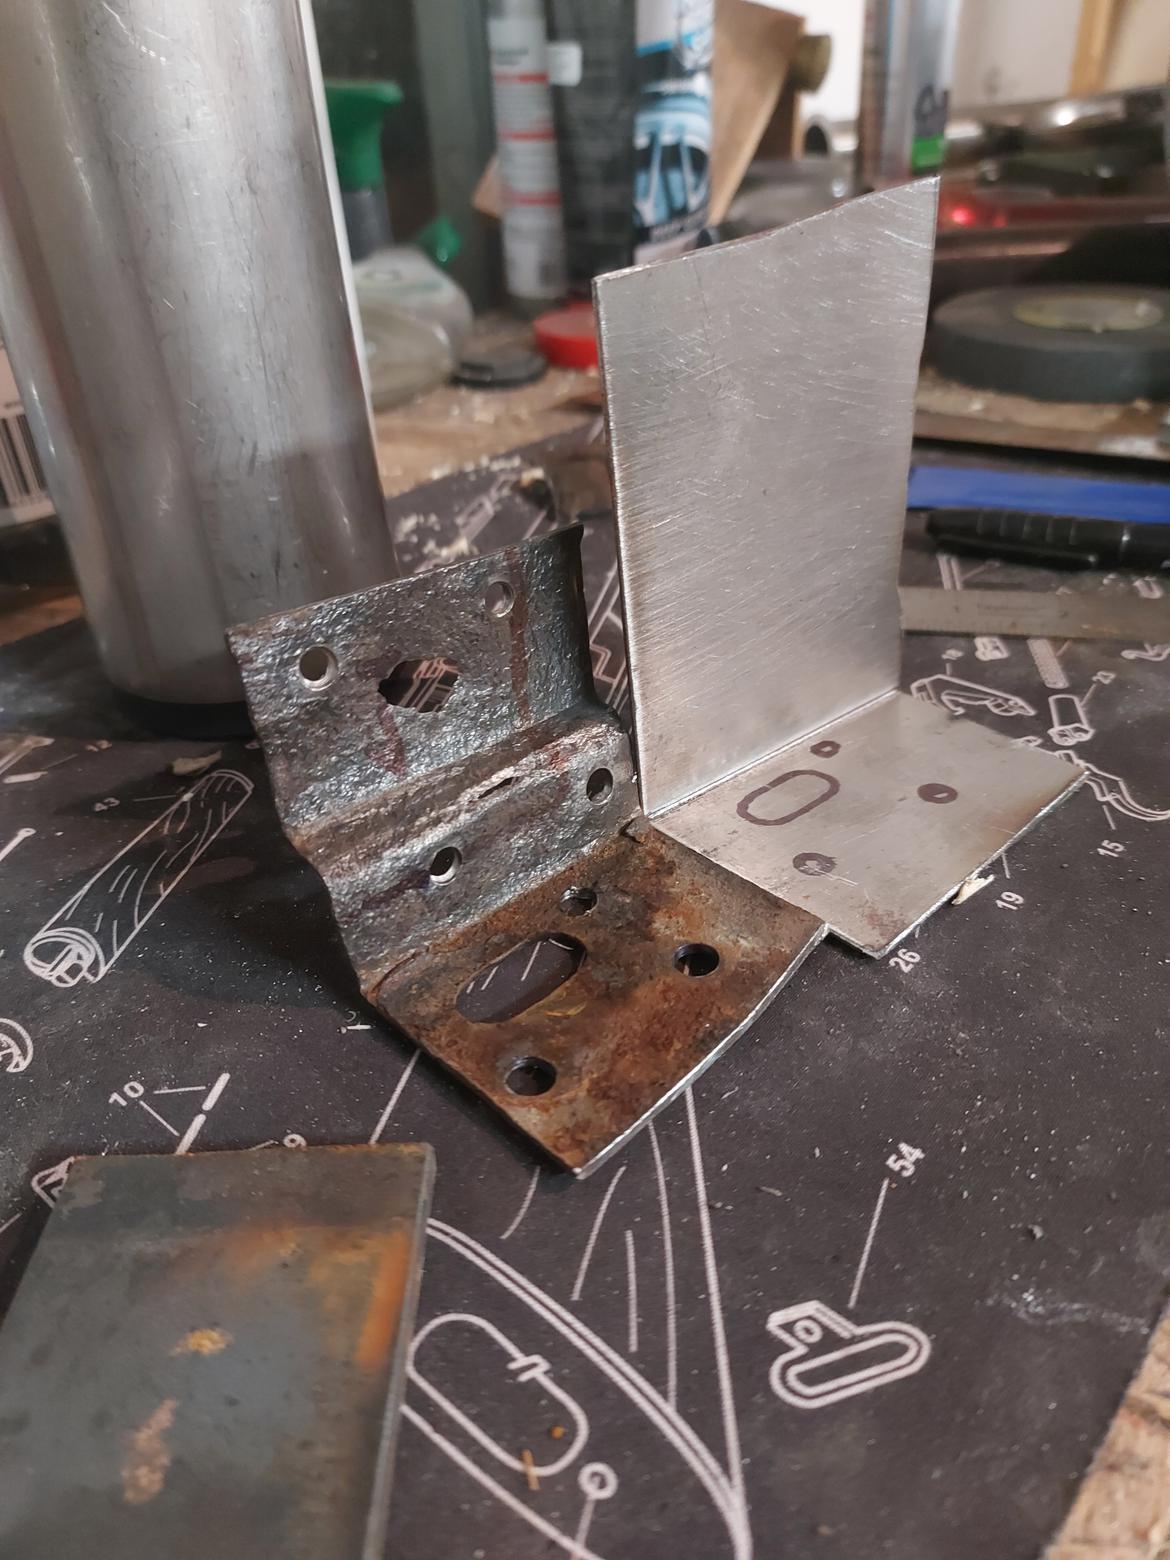
What comes out of my efforts looks like this:


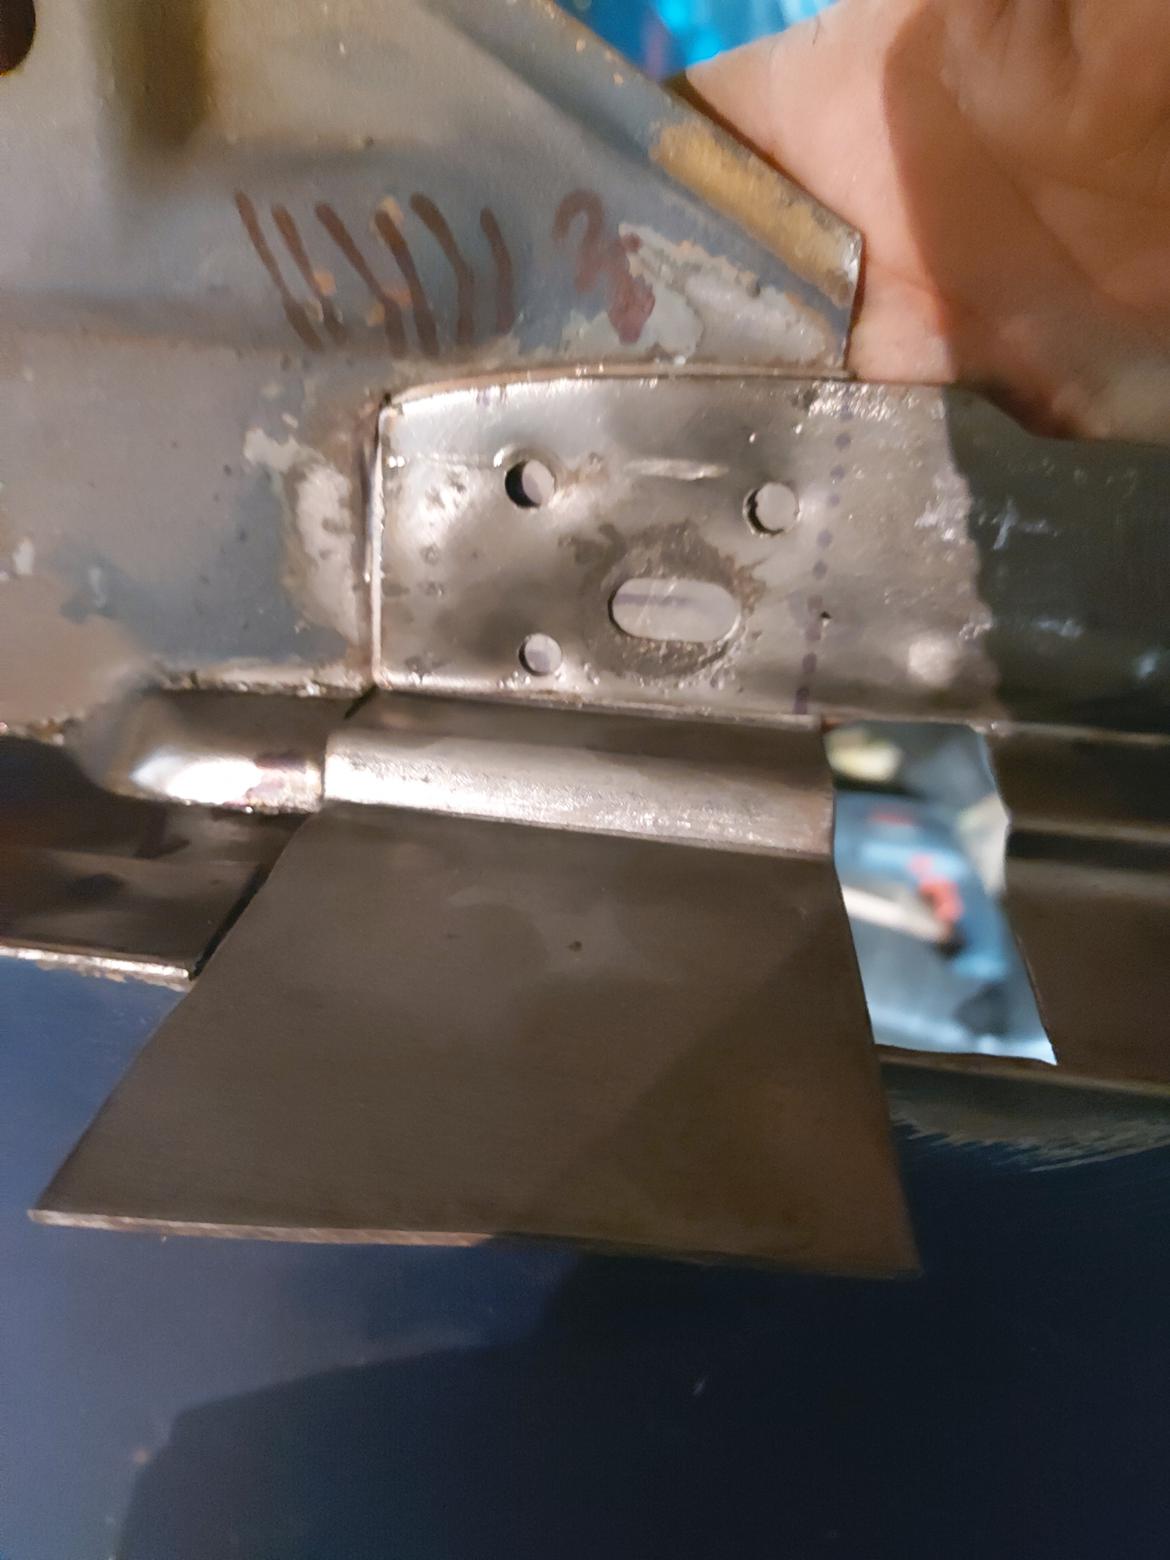
(Told you I left a lot of material on there for "goof up" room)

After that it was a lot (and I mean a LOT) of "back and forth" with the bench grinder to get things inside their footprint

Eventually we get to something that looks like this:


Old VS new there at the end.  The bends aren't perfect, but hey!  What do you expect when you're dealing with an idiot swinging a hammer? laugh

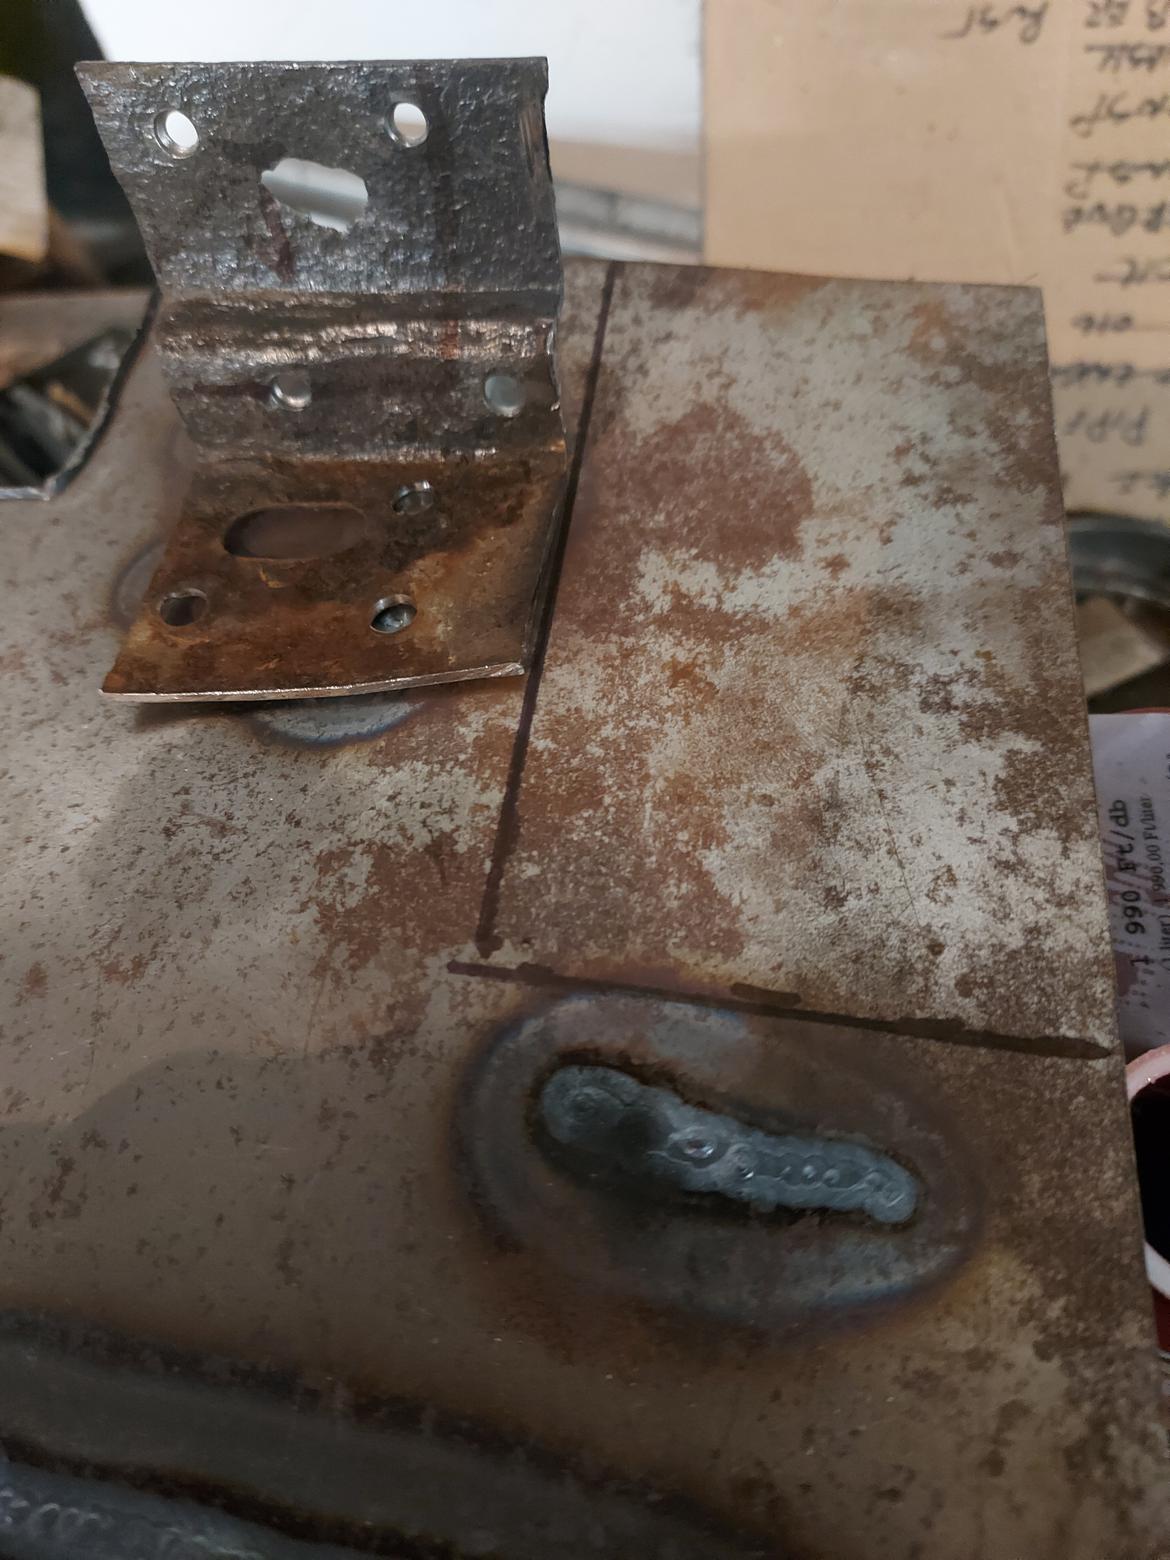
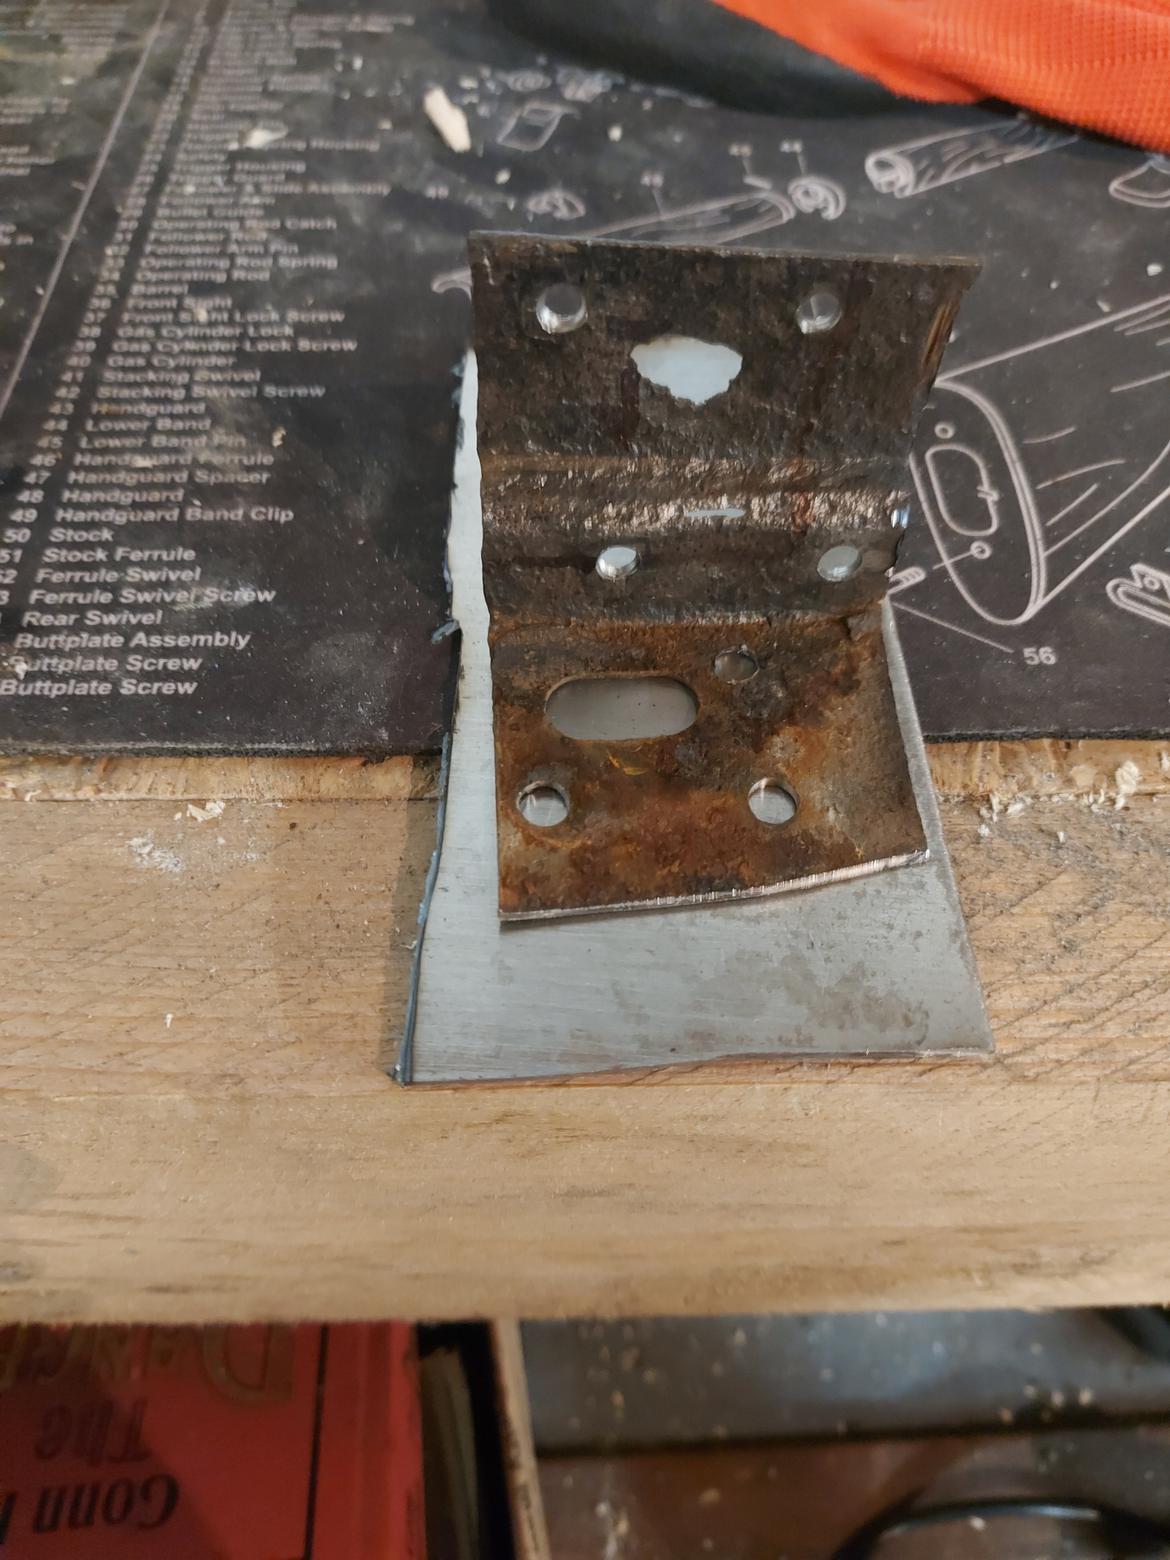
Next up is to hog out that mounting hole, and weld it into place!  After that, I'll work on the top skin, slap some primer on it, and call it macaroni.  Honestly though, this is a TON of fun, and I find myself completely consumed by it.  It turns out that this is the exact creative outlet my darn brain needs and I find myself not only looking forward to my morning sessions every day, but unable to think about anything else afterwards.  I REALLY hope the welding goes well and that this turns out as good as I hope it will.


100% good times.

Hungary Bill (Forum Supporter)
Hungary Bill (Forum Supporter) GRM+ Memberand PowerDork
1/10/22 4:35 a.m.

Meanwhile, we did get an afternoon at the new house where some important progress was made.  Our last remaining bit of furniture was removed from the place:


And while everyone on this green earth uses them regularly, it seems like no one's willing to pay for a used one of these... So in the bin it goes.


Although, I will admit to breifly considering replacing that carburetor I've been complaining about a la "Red Green" style:


Remember.  If the women don't find ya handsome, they'll sure find ya handy wink


Keep your stick on the ice.

Hungary Bill (Forum Supporter)
Hungary Bill (Forum Supporter) GRM+ Memberand PowerDork
1/10/22 5:55 a.m.
jh36 said:

In reply to Hungary Bill (Forum Supporter) :

Or even do a hybrid and keep your main frame rails and build to it with an endoskeletal tube frame? 
I have a deep aversion to rust and rot, so the thought of having a clean, strong platform excites me. I love your journey!  

I think I've made a decision on this, and I think that is exactly the direction I'm going to head in.

After searching a bit more into tube-frames to drape this body over I came to two conclusions:
1) Not much exists for post 1970's Chargers, but what does exist doesn't differ too much with regards to wheelbase compared to the 1973.  SO a "JH36 Camaro" approach would entirely be possible.
2) 100% of the tube frames I found in number 1 are made for drag racing.

Boo

But building the endo-cage brings with it some issues:  Unlike the US, I'll never get anything that doesn't look "stock" through the roadworthy inspections here ("TUV").  So if I go "straight to cage" then 100% of my testing will be done on a race track and that will require towing the car to and from as well. 

Now I'm not 100% against that if the idea becomes impossible, but I could save a TON of money (Trackday admission here is just over $400 for a full day) by shaking the car down as much as possible on the street.  And I think I can "street" this vehicle first without too much cost in doing things twice.

I figure I can keep the 318 and maybe even the automatic transmission (if they both work) for the purposes of "registration", and set about sorting the suspension, brakes, etc.  I could even get away with the manual swap and the 440 swap as they don't check the "originality" of the engine/trans combo after my initial registration.  This would let me do about 90% of tuning on the car before I turned a wheel in anger.  It would also allow me to have a title in my name should anything bad happen to the car (right now, all I have is a sellers contract and some import papers in someone else's name).

But the "piece de resistance" with all this is:  If I get the car registered then inspections are only required every two years.  That means, if I time things right I can get the car re-registered and then go "full race" with it (seats, interior, cage) and then I can...
1) save money by driving it to and from the track for the remainder of the two years.

2) Drive it to work or haul my kids to school in something that's comically not meant for the road.

and I think #2 fully embodies the spirit of the original car so that is 100% the target I'm going to aim for laughdevil

AClockworkGarage
AClockworkGarage Dork
1/11/22 11:38 p.m.
Hungary Bill (Forum Supporter) said:

[T]he PNW was a podunk place with ... a relatively new football team in Seattle that absolutely sucked. 

Nice to see some things haven't changed.

Hungary Bill (Forum Supporter)
Hungary Bill (Forum Supporter) GRM+ Memberand PowerDork
1/18/22 5:52 a.m.
AClockworkGarage said:
Hungary Bill (Forum Supporter) said:

[T]he PNW was a podunk place with ... a relatively new football team in Seattle that absolutely sucked. 

Nice to see some things haven't changed.

Yeah, I remember back in "the day" when we wanted to be sarcastic (and not ever do something) we'd say that we'd do it "when the Seahawks won the Super Bowl".  It's pretty insane to think that they've been there three times now.

Hungary Bill (Forum Supporter)
Hungary Bill (Forum Supporter) GRM+ Memberand PowerDork
1/18/22 6:23 a.m.

Ok, when we left off we had our first panel cut but if I'm honest not much has happened since then.

To prepare for my first welds, I took my danger wheel to my scrap steel and tried to melt it back together:


Where I promptly burnt a hole in things (below):


Womp womp... 


I dialed things back a bit, I think I was around 40-amps?  I'm really just going by the recommended settings for material thickness.


I didn't like this.  I thought it was too hot and my filler rod was too small (1.6mm).  Which is kind of a bummer because JUST the day before I was so CERTAIN that I would need loads of 1.6mm filler rod for this project, I went and ordered 5-kilos of the stuff.

Ah well...


When I ground things down (just to see what's the what) it kind of looked like this:


Admittedly, that's just a "quick and dirty" for practice, but I still wasn't happy with the results.  I felt the heat setting was too high, and of course I already mentioned the filler rod.  So I made another slice with the danger wheel and dialed things back a bit on the welder.  I also went up a size on the rod material (2.4mm).

The results of which looked more like this:


Let's face it.  I'm never going to win the "Golden Instagrams" with my welds, but that last one should work good enough for what I'm doing so I went after the fender (and oh boy, am I glad I started in a relatively hidden spot laugh )

I started off something like this:


But welding on the underside really bit the big one so I peeled back what was on top and went at it from that side until I made it look something like this:


Luckily a hardware store order came in that looked something like this:


So when I was done, things looked more like this:


In doing that, I decided I needed to invest in more grinders/sanders if I was going to go about things this way.  I originally gave these little guys a try for the tight spaces:


And they worked well enough, but eventually decided to order a pneumatic 90-degree grinder of the DeWalt variety from Ebay, and one of these little sanding disc guys:


(Photo shown as an example, I don't have the tools yet)

Parts are on order, but I'm told it's going to take 2-3 weeks for delivery (and if you're noticing a trend with the time it takes to get things here, it's not just you.  It's quite the local joke)


In the spirit of showing my mistakes, the top part of that weld absolutely kicked my butt.


It's hidden, so I wont care but it turns out my TIG is a "pretty pretty princess" when it comes to prep and darn if I couldn't get the tools I had in there good enough to get things where they needed to be.  Any "buzzing" in that area yielded crappy results and a shower of sparks.

Meh.  That's why we test on inconspicuous areas.  Besides, I'm still new enough to claim that I'm "still learnin'" wink

Good times.

Hungary Bill (Forum Supporter)
Hungary Bill (Forum Supporter) GRM+ Memberand PowerDork
1/18/22 6:40 a.m.

So next up was the top layer to all that.  In the spirit of full disclosure I was put on "hold" while I waited for an opportunity to get to the steel shop last Friday, but I'll hold off posting on that area until I finish with this one in an effort to keep things somewhat organized.

Basically, there wasn't enough free space left on the "middle finger" steel panel I have to make the patch I needed, so I bought a sheet that was half-meter by 1-meter (2mm thick, which I think may be a little thicker than the fender steel, if I'm honest...)


So learning from the first patch I made, I decided that "welding" on the inside radius of a bend was fine, but grinding it smooth afterward was probably a bit more of a hassle than I cared for.  With that in mind, I chopped off this last part of the top panel at the dotted line:


After that, the bending and hammering goes much like the first one:


Close enough. 

Man, that joggle really kicks my butt.  It's just impossible to get with the tools I'm using right now.  If this becomes more of a "thing" I may have to employ a different method because what I have makes a much larger "shelf" than what's on the car... 

Anyhoo, much drilling, hand filing (of that oval bit), and grinding follows:


Until we get something that resembles what we cut out!


"Brrt" goes the welder...


And all was going good until it wasn't and I found myself precariously close to burning through the material again.  I stabbed the filler rod into the puddle to save my butt, and in doing so I dipped the tip of my tungsten into the puddle.

Boo...


Normally I'm not above fudging through such things, but if I'm ever going to get better at this then I need to start having something that resembles some sort of "standards".  So off I went.  The "get ready for work" alarm was about to go off, and I wasn't in the mood to pull apart my torch to grind the tungsten again, so that's where we're leaving off today.

Somewhere about here:


Good times.

Hungary Bill (Forum Supporter)
Hungary Bill (Forum Supporter) GRM+ Memberand PowerDork
1/18/22 6:43 a.m.

A few things I think I forgot along the way:

1) I bought a spare bottle of Argon from a friend who accidentally bought it for his MIG (instead of "mixed gas").  Having the spare bottle should allow me to continue welding should I run out of gas, but not be able to get to the welding shop (like now.  This month is a complete "no go" because of working hours VS welding shop hours).

2)  I watched a "Chris Fix" video on welding floor pans and he had some panel clamps that I thought looked super cool, so I bought a set.  They look like this:


Honestly, I've only used one once so far.  The tab there in the middle is a little bit thick for my TIG, and I don't like having that much gap when I'm welding.  More to follow on those, I think.


and


3) I am getting my MONEY out of my cutting wheels, I tell you what laugh


Good times.

obsolete
obsolete GRM+ Memberand HalfDork
1/18/22 10:46 a.m.

Always enjoy these updates. Keep at it!

1 2 3 4 5 6 ... 8

You'll need to log in to post.

Our Preferred Partners
dXnEwcEKiw3f7cE3fAaxU1hlFk1uz4I4rsIOzHGCHMMN88q2qsPRkeS7wKQIziC6