


What? You can't find alcohol at your local hardware or Pharmacy? ;)
I hear ya though, there's a station just up the road from me that sells E85, but there aren't too many others around.

What? You can't find alcohol at your local hardware or Pharmacy? ;)
I hear ya though, there's a station just up the road from me that sells E85, but there aren't too many others around.

SilverFleet wrote: I wish I could just cut it out and keep the spare in the hatch when I drive it, but from what I'm told, that creates airflow issues when you are going real fast down a track or traveling at highway speeds.
I cannot imagine that this is true. Source? This could make your patching much easier.
tuna55 wrote:SilverFleet wrote: I wish I could just cut it out and keep the spare in the hatch when I drive it, but from what I'm told, that creates airflow issues when you are going real fast down a track or traveling at highway speeds.I cannot imagine that this is true. Source? This could make your patching much easier.
I can't imagine this would cause anymore issues than the rear bumper cover or the rear trailing arm.
If you're concerned, get yourself some coroplast or aluminum and build a diffuser to seal the area behind the bumper and improve the aerodynamics while you're at it.

turboswede wrote:tuna55 wrote:I can't imagine this would cause anymore issues than the rear bumper cover or the rear trailing arm. If you're concerned, get yourself some coroplast or aluminum and build a diffuser to seal the area behind the bumper and improve the aerodynamics while you're at it.SilverFleet wrote: I wish I could just cut it out and keep the spare in the hatch when I drive it, but from what I'm told, that creates airflow issues when you are going real fast down a track or traveling at highway speeds.I cannot imagine that this is true. Source? This could make your patching much easier.
I've thought about doing this and building a diffuser. I will still need to carry the spare, so maybe I can mount it under the car or something. I still cannot find a rust free car around here to cut parts from.
The main drawback to that is that I want to keep the car as stock as possible body-wise for if I sell the car down the road. That is, unless one of you nuts wants to buy it. ![]()
SilverFleet wrote:turboswede wrote:I've thought about doing this and building a diffuser. I will still need to carry the spare, so maybe I can mount it under the car or something. I still cannot find a rust free car around here to cut parts from. The main drawback to that is that I want to keep the car as stock as possible body-wise for if I sell the car down the road. That is, unless one of you nuts wants to buy it.tuna55 wrote:I can't imagine this would cause anymore issues than the rear bumper cover or the rear trailing arm. If you're concerned, get yourself some coroplast or aluminum and build a diffuser to seal the area behind the bumper and improve the aerodynamics while you're at it.SilverFleet wrote: I wish I could just cut it out and keep the spare in the hatch when I drive it, but from what I'm told, that creates airflow issues when you are going real fast down a track or traveling at highway speeds.I cannot imagine that this is true. Source? This could make your patching much easier.
If you do it right, nobody will even notice. Grab a minivan from the JY and steal the under-a-flat-floor-spare-storage-hardware stuff. It's actually pretty slick. Similarly slick is the PT Cruiser which has a hidden nut which releases a cage the spare sits in beneath a flat area. Nobody would even realize it wasn't stock, and it would be approximately 657% easier to repair for you now.
I've tried to sell mine several times and no one, but die-hard fans, wants them. Unfortunately die-hard fans are completely broke and just want it for free or nearly free.
At this point, unless it is completely pristine, don't worry about it and do what you need to do.
The last eBay auction for mine reached $917 before it ended and I refuse to deal with Craigslist. I really want this car to go away so I can move to another project. Sigh, $60 down the hole for that auction.
I wonder, would another spare tire section from another Dodge product work? They are all pretty similar from that time period from what I could remember.
tuna55 wrote:SilverFleet wrote:If you do it right, nobody will even notice. Grab a minivan from the JY and steal the under-a-flat-floor-spare-storage-hardware stuff. It's actually pretty slick. Similarly slick is the PT Cruiser which has a hidden nut which releases a cage the spare sits in beneath a flat area. Nobody would even realize it wasn't stock, and it would be approximately 657% easier to repair for you now.turboswede wrote:I've thought about doing this and building a diffuser. I will still need to carry the spare, so maybe I can mount it under the car or something. I still cannot find a rust free car around here to cut parts from. The main drawback to that is that I want to keep the car as stock as possible body-wise for if I sell the car down the road. That is, unless one of you nuts wants to buy it.tuna55 wrote:I can't imagine this would cause anymore issues than the rear bumper cover or the rear trailing arm. If you're concerned, get yourself some coroplast or aluminum and build a diffuser to seal the area behind the bumper and improve the aerodynamics while you're at it.SilverFleet wrote: I wish I could just cut it out and keep the spare in the hatch when I drive it, but from what I'm told, that creates airflow issues when you are going real fast down a track or traveling at highway speeds.I cannot imagine that this is true. Source? This could make your patching much easier.
Now that's some good advice, thanks! I may have to make a junkyard trip over the weekend to take some measurements. ![]()
SilverFleet wrote:tuna55 wrote:Now that's some good advice, thanks! I may have to make a junkyard trip over the weekend to take some measurements.SilverFleet wrote:If you do it right, nobody will even notice. Grab a minivan from the JY and steal the under-a-flat-floor-spare-storage-hardware stuff. It's actually pretty slick. Similarly slick is the PT Cruiser which has a hidden nut which releases a cage the spare sits in beneath a flat area. Nobody would even realize it wasn't stock, and it would be approximately 657% easier to repair for you now.turboswede wrote:I've thought about doing this and building a diffuser. I will still need to carry the spare, so maybe I can mount it under the car or something. I still cannot find a rust free car around here to cut parts from. The main drawback to that is that I want to keep the car as stock as possible body-wise for if I sell the car down the road. That is, unless one of you nuts wants to buy it.tuna55 wrote:I can't imagine this would cause anymore issues than the rear bumper cover or the rear trailing arm. If you're concerned, get yourself some coroplast or aluminum and build a diffuser to seal the area behind the bumper and improve the aerodynamics while you're at it.SilverFleet wrote: I wish I could just cut it out and keep the spare in the hatch when I drive it, but from what I'm told, that creates airflow issues when you are going real fast down a track or traveling at highway speeds.I cannot imagine that this is true. Source? This could make your patching much easier.
Here is a pic:
As you see, it's a very simple round tube thing with a bolt-that-has-a-T-on-one-end holding it up. Simply loosening the nut lets the cage down.
tuna55 wrote:SilverFleet wrote:Here is a pic:tuna55 wrote:Now that's some good advice, thanks! I may have to make a junkyard trip over the weekend to take some measurements.SilverFleet wrote:If you do it right, nobody will even notice. Grab a minivan from the JY and steal the under-a-flat-floor-spare-storage-hardware stuff. It's actually pretty slick. Similarly slick is the PT Cruiser which has a hidden nut which releases a cage the spare sits in beneath a flat area. Nobody would even realize it wasn't stock, and it would be approximately 657% easier to repair for you now.turboswede wrote:I've thought about doing this and building a diffuser. I will still need to carry the spare, so maybe I can mount it under the car or something. I still cannot find a rust free car around here to cut parts from. The main drawback to that is that I want to keep the car as stock as possible body-wise for if I sell the car down the road. That is, unless one of you nuts wants to buy it.tuna55 wrote:I can't imagine this would cause anymore issues than the rear bumper cover or the rear trailing arm. If you're concerned, get yourself some coroplast or aluminum and build a diffuser to seal the area behind the bumper and improve the aerodynamics while you're at it.SilverFleet wrote: I wish I could just cut it out and keep the spare in the hatch when I drive it, but from what I'm told, that creates airflow issues when you are going real fast down a track or traveling at highway speeds.I cannot imagine that this is true. Source? This could make your patching much easier.
That does look extremely simple. Wow.
I haven't updated this thread in a while. Yes, I'm still working on the car, but sadly, it won't make it to the $2013 Challenge. I ran out of time and money for this year, but I'm keeping the build on a budget for future Challenges.
Anyway, I did a few things to the car this weekend.
I started by stripping the fuel filler neck. Since it's made of unobtanium, I need to make sure it never rusts out like the rest of the car did. Luckily, it was still in good shape with a little bit of surface rust. I stripped the existing crap off with a wire wheel and shot it with some rubberized undercoating. Sorry, no pics, but it should last another 25 years or so.
Another thing I did was mock up the driver's seat. I picked up a nice pair of 2002-03 WRX seats off the NASIOC NESIC forum a while back, and much to my surprise, the existing seat sliders from the WRX nearly bolt into the CSX. I will have to do a little but of modification, but it's pretty close. I was able to even get in the car today and check out the seating position. My fat butt doesn't fit as well in WRX seats as it used to, but I'm currently doing something about that too. ![]() Otherwise, I was able to find a decent seating position, so I think these will work out nicely.
Otherwise, I was able to find a decent seating position, so I think these will work out nicely.
So... I haven't turned a wrench on this car since last summer. My POS Dodge Dakota has sucked every second of spare wrenching time up, so this has sat. Also, it has been such a brutal winter up here that I have had zero motivation to even try to work on it. But since the weather is warming up, I want to get going with the CSX. I've set a goal of getting the car running and driving by December, or it's leaving.
The first thing that I want to do is hear it run.
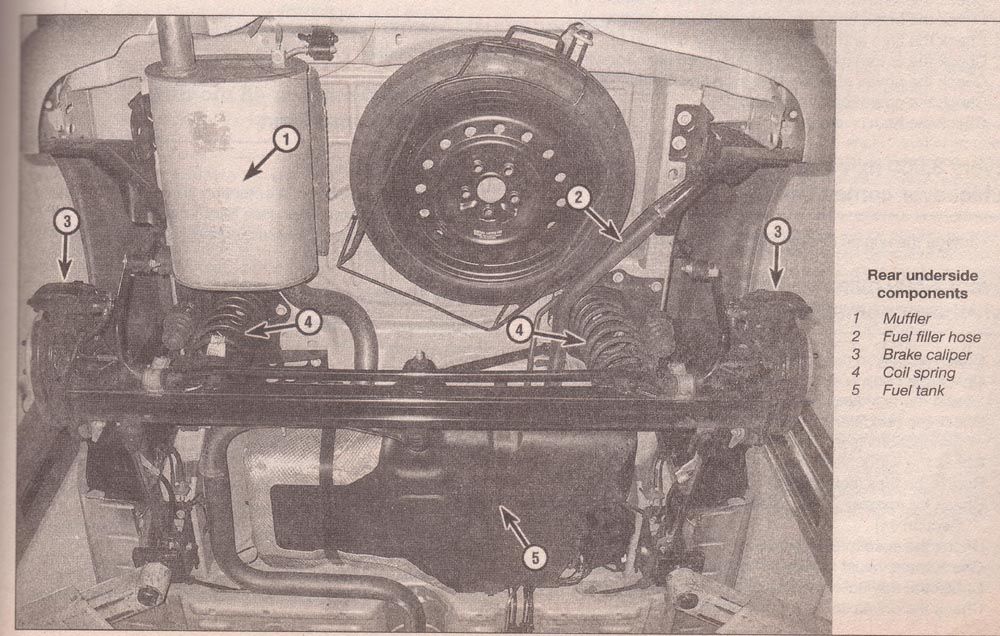
To do that, I need to install the fuel tank and patch up the fuel system. Advance Auto Parts sells the correct high pressure EFI rubber fuel line, so I need to get some of that and a few rolls of steel tube and patch up my fuel system.
Anyone know what diameter the various fuel lines are? I honestly have no clue.
Good to see the project coming along, I bought this starry eyed with ideas of resurrecting it, but after I pulled up that floor and saw the rot, it ended up just being a driveway ornament for years! (which didn't help matters much) I'll have to see if I got any performance parts still that I bought for that thing (for some reason I think I bought all the FWD performance mounts and bobble strut) . I'll check the next time I'm in town.
Now that I'm CA I'm eyeing a new project to replace my 2.5RS coupe I had to sell: a 95 Impreza base package with a JDM STI Ver2 swap and a poorly done 02 WRX Dash swap (which needs 02 impreza heater box, since the 95 impreza one only seems to work on turning the fan on and not blowing air out the vents) and no interior.....but man,compared to NE, the undercarriage is sooo clean so it should be a relative pleasure to work on.
Hey man! ![]()
I still have the car, although I haven't had the time to wrench on it lately. As I wrote a while back, my Dodge Dakota got really needy in the past year. I had to fab up new brake lines, replace the brakes all around, replace some exhaust parts, and replace all the front end bits. After that, my neighbor and I had a property dispute that made me have to get my Trans Am running again (see my other build thread).
I did go out and buy all of the tubing and rubber I need to replace my fuel system on the CSX, so when I get some free time, that's next. The new gas tank is fully assembled with an upgraded Holley fuel pump and is ready to get installed. Once I hear it run, I will keep moving with the project.
If you come across any spares for the car, let me know. ![]()
And because of this car and my Trans Am, I have decided that I am DONE with rusty cars. The 4 years I have spent battling the rust on the CSX could have been better spent making it go faster. Next car will be a fly and drive deal.
It's been over a year since I worked on the CSX. With a renewed interest in my Trans Am, and the CSX stuck in my small single bay garage, I decided that I want to get the car out of there and running so I can get the Trans Am in there before winter. Yesterday, I finally got around to turning wrenches on the car. I decided to try and install the fuel tank.
I went out and bought all the lines and high pressure rubber hose I needed to do the entire fuel system, so I started by attaching the rubber to the sender and fuel pump in the tank. I was able to salvage my tank vent, so in that went, and I was able to get a new filler neck grommet, so I installed that. I had undercoated the tank last summer, and I painted the straps with POR-15 at the time. I got the tank up in the air, and I remembered that one of my straps was iffy. It has a small tear in it. I will be ordering new ones very soon. I just wanted to get it in and get the lines set to her it run.
After realizing that the straps were different lengths, I had to drop the tank and re-install the straps. I got it back up, and remembered that I needed to install the filler neck. I had also undercoated that and I undercoated too much of it because the part that sits in the tank was covered. I tried to just jam it in there and hope for the best, but the undercoating was keeping it from sliding it into the grommet. I hit it with WD40, which apparently dissolves undercoating. I pulled it out, wiped off the undercoating, and realized after about an hour messing with it that I needed to install the filler neck from the inside of the quarter and not through the hole in the quarter. I was annoyed, and I decided to give up for the day.
In the process, I really scratched up the tank with my floor jack, so the plan now is to re-paint the tank again and order new straps and give it another shot later. but at least I am doing something with it!

Keep up the good fight.

Those sound like the kind of problems you have when you've been out of the game too long. ![]()
Do you plan to replace both fuel hard lines? Wouldnt you want to do that while the tank is out? The section between the pump and the fuel filter, at least, seems like it would be easier with the tank out.
Vigo wrote: Those sound like the kind of problems you have when you've been out of the game too long.
Here's the thing: I have no idea how they are supposed to be routed. All the lines from the fuel filter-back have disintegrated. Whatever way they were routed... I have zero clue, so I was just going to run them wherever I could. Do they go above the tank?
That leads me to my next thought: I have been thinking about replacing everything up to the engine. The lines from the engine to around the end of the front subframe rails are somehow dry and rust free, but after that, they are just gone. I was going to just splice the lines from there, but I'm thinking that I should probably just replace them all and be done with it.
Side note: If I ever buy another project car, I'm buying it from a place where rust does not happen. I HATE RUST.
Well, from what i remember, from the back of the tank they go over to the passenger side and run tucked up next to the tank until the front of the tank which is where the filter is. I wouldn't say they are pinched between the tank and body but it seems like it would be easier to make them with the tank out of the car.
I totally support this idea of never buying another seriously rusty car.
If you ever need help looking for something down here in Texas let me know, i already cruise CL as one of my main hobbies. ![]()
Back from the dead. Again.
I got home from the Challenge on Monday and I had Tuesday off, so I kept the momentum going and worked on the CSX. I primed and painted the passenger side front floor pans, and I was finally able to mount my fuel tank. I still need to connect the electrical connectors to the sender and pump. I was unable to get the rubber boots on them to flex enough to plug them in, so I'm hoping a little heat from my heat gun will make them malleable again. I also cut the existing lines back to the point where they are still good, so I don't have to run all-new lines. This will make things a lot easier.
I am shooting to have the car sputtering by the end of the weekend. ![]()

Great! Can I heckle you if there's no update by sunday?
In reply to Dusterbd13:
Of course. And of course I will have some lame excuse why it's not running. ![]()
It's Sunday night. Where's my update?

Keep going, you can do eet!
Heckle away. It's not running yet. ![]()
I had a lot less time on my hands than I thought I would this weekend due to some family issues and a surprise snow storm. I did however get the brittle harnesses plugged into their respective plugs. My heat gun made extremely short work of that. That in itself is a big win.
The next step is trying to figure out what fuel line goes to what. There is the obvious feed line, but there are also two smaller lines, which I assume are the return and the vent, but I have no clue which one is which. And do I really need to hook the vent one up to fire it up? IIRC, that goes to a charcoal canister which I believe is missing from the car anyway.
Looking at the service manual, there is also one of the sender lines that is capped. I have to do that too.
I hope to do some work to it over the week. I haven't given up. ![]()
In reply to SilverFleet:
its an update. it counts. you worked on it, so therefore no heckling from me.
but i do expect it to be running by the end of this coming weekend.![]()
You'll need to log in to post.


