1 2 3 4
TheDailyDownshift
TheDailyDownshift New Reader
12/3/21 12:10 p.m.

I forgot to put this in the last update post but this was my fix for the caliper bolt situation:


The upper bolts on the rear calipers are contained inside the caliper itself with a little press-fit cap covering it. This cap had fallen off and allowed the bolt to back out at some point. A quick junkyard trip to find a 4th gen Celica caliper cap and some JB Weld , along with some Loctite on the bolt assured that this wouldn't be happening again. This fix was applied to both sides.

obsolete
obsolete GRM+ Memberand Reader
12/3/21 12:19 p.m.

Awesome thread! I've been catching up bit by bit over the last couple days and it's been a super fun read. Looking forward to seeing where you go with the car next.

stylngle2003
stylngle2003 GRM+ Memberand Reader
12/3/21 1:16 p.m.

Halfway through the first page, I was thinking to myself "I wonder if this guy knows Brian?".  Three quarters of the way through, it's clear you're "his FX16 buddy".  Such a small world.  I caught up with him early last year at Dominion while attending a track cross.  

He (brian) started doing his 4AGE swap at my former shop years and years ago.  Great guy, super passionate and detailed.  

Awesome build, too.  Hope to see you around sometime.  My daily is an avalon on BBS RKs, but the track toy is an orange 350z with black wheels.  We're in Midlothian right near the Wegman's.

TheDailyDownshift
TheDailyDownshift New Reader
12/3/21 1:54 p.m.

In reply to stylngle2003 :

Super small world. I first met Brian when he was coming in to the Toyota dealership to buy parts when I worked there. He's a great guy and his car is insanely clean. He really saved my ass at Hyperfest too.

bgkast
bgkast GRM+ Memberand PowerDork
12/3/21 2:31 p.m.

Fun read and nice car!

GIRTHQUAKE
GIRTHQUAKE Dork
12/6/21 10:14 p.m.

Great read, took me a full day to get caught up- reminds me to get my MR2 running also...

And I feel your pain on the caliper. I still have one with the same problem sitting in a box because I refuse to scrap rare-ifying AW11 parts if they can be saved.

TheDailyDownshift
TheDailyDownshift New Reader
12/8/21 12:45 p.m.

In reply to GIRTHQUAKE :

That's how we all end up with entire sheds full of random old parts that we can't bear to toss. This is The Way.

TheDailyDownshift
TheDailyDownshift New Reader
2/10/22 12:54 p.m.


One thing that has bothered me about this car since I got it is the design of the wheel arch trim. These rubberized pieces are bolted to the arches in such a way that makes it functionally impossible to roll your fenders. The FX is massively limited on tire space, especially in the rear where even 205's are a really tight squeeze. Clearly these trim pieces had to go, but I didn't want to put on big tacky rivet-style flares (at least, not yet). Luckily these MK2 Golf trim pieces are pretty cheap and about the right size, so let's give this the old College Try. 


The factory trim is notorious for trapping water and causing rust.


This was the worst one on the car. Seriously, what a stupid design.


This was a very "by feel" approach to modifying these to fit. Lots of mocking up, trimming, and sanding. 


The overall radius is essentially perfect, and with some careful work these VW moldings can fit really well. 


I'm less thrilled with how the rear turned out. If I could do it again I'd go in a slightly different direction, but while these moldings where cheap, the shipping to get them here from the UK was not really something I want to pay again. This will have to do for now. 


To paint them I used the same color-matched spray paint I'd used in the past, but the car has faded a bit since then and it doesn't match quite as well as it once did. In the sun it looks much better, this LED lighting highlights every imperfection. These are all held on with a combination of 3M heavy-duty trim tape and zip-ties, and are in no danger of coming off without a fight. The rear fender edges were rolled aggressively, and the front fenders were actually cut back about an inch and a half to increase tire clearance and eliminate the rust. 


While the car was in the air I went ahead and replaced the rear pads which were starting to literally chunk away. The rear was still running Porterfield's HP R4S street/autocross compound, so this time I upgraded to the R4 track compound. With how little work the rear brakes do on this car, these should last quite a while. 


Another issue I've had is fuel slosh out of the filler neck. It's never been enough to worry about safety or wetting down a track, but it's enough that after a session there is some residue visible on the side of the car. To fix this I picked up a one-way check valve from Filler Neck Supply.


I had to get some hose adapters to step up to the correct size for the section of hose containing the valve, but in the end it fit in place of the factory hose pretty well. I have not tried filling up the tank to see how well it flows yet, but one obstacle at a time.


Overall I'm happy with how it turned out. I also added some tow straps (proper Sabelt parts, no ebay knockoff junk) front and rear, as well as a set of base model manual mirrors I found in a junk yard and painted to match. Other than fluid changes and an alignment, this car is ready for the 2022 season. I already have my Grid Life New Jersey ticket, but there will likely be something before that July event if my bank account allows.

TheDailyDownshift
TheDailyDownshift New Reader
4/28/22 8:13 a.m.


There is nothing quite like the excitement leading up to the first track event of a season. Last years' issues have been ironed out over the winter, the car has been freshly aligned for the first time in ages, and everything is as ready as I could hope. This would be my first time back to Summit Point since October 2020 - an event that left me less than comfortable at this track - so the opportunity for self-improvement was quite welcome.


My friend Steve brought out his awesome ND Miata to run in HPDE1 and was a great camping buddy. Track days are always better with friends.


Did I mention this was my first event in HPDE3? Passing is now allowed at any point on the track, on either side. This would come in extremely handy seeing as how almost everyone in the run group is significantly faster than me. With only 100 horsepower, I've never had aspirations of being the fastest, but the speed disparity seems to be much wider now. The first session was a bit of a shock, especially since they had Time Trials guys join us as a warm up. Over the first day I began to become more comfortable with the group and the track. That evening I got under the car to examine the still-locking rear tires, and noticed that my sway bar bushings were essentially gone.


This was all that remained. This might explain the less-than-stellar response in the tighter areas of the track.


Of course nobody carries these bushings, but after picking up some Camry bushings and a 3/4 spade bit, as well as some time with a razor blade, they could be made to fit. 


The next day the car's handling predictability was notably improved. Though I did still struggle with right rear tire lockup, even with the bias valve turned all the way down. I suspect the flat spot on the tire was contributing to this, but larger front brakes, weaker rear pads, or some weight relocation in the chassis might be in order to solve this for good. 


In all it was a great weekend and an encouraging start to the season. The fuel filler mods I did seem to have completely eliminated the issue as well which is nice. I have a fresh pair of tires to go on before July's GridLife event at NJMP, as well as some trailer mods I'd like to finish before that trip. It feels like it's going to be a good year. 

TheDailyDownshift
TheDailyDownshift New Reader
6/28/22 2:06 p.m.


This year for Hyperfest, I decided to just attend and hang out rather than drive, treating it as a mini-vacation of sorts. While the event was fairly relaxed, watching the aftermath of Collete Davis' Corvette fire in the days after really struck home the need to take fire safety more seriously. And by that I mean "literally anything more than the nothing you are currently doing".


While a car fire is certainly scary, it's also not an entirely uncommon sight at a racetrack. However the in-car video of this particular incident really struck me in a few ways. One was just how quickly things went from totally normal, to fully on fire a split second later. Another was how lucky the driver was to still have skin on her legs considering how easily those nylon leggings can melt. The third was that this happened during some fairly low-speed drift runs on the skid pad. Fire does not car what type of event you're doing.


Soon thereafter I was shopping for budget-friendly fire safety gear. Racequip sells quality safety gear for budget-friendly prices, so I picked up a suit and shoes. I also bought nomex socks and a balaclava. My gloves were already up to spec. Everything here is SFI 3.2/5 rated, meaning 10 seconds of direct exposure before 2nd degree burns.


As all projects tend to do, this pursuit of fire safety quickly snowballed. The instant I put on the suit, I knew that there was no way I could wear that at a warm-weather track day, let alone a 100+ degree summer event, without risking heat stroke. The multi-layer suit may be more effective at protecting against fire, but it also means the wearer gets very toasty. A coolshirt setup was now a necessity. Rather than spending $1,000+ on an off-the-shelf kit, I decided to piece it together myself for half the price.


Here is the full list of everything I needed for this project (less some wire and a relay from the auto parts store), and what it cost. While it's not exactly cheap, it's less than half of what a brand name kit costs, and uses mostly the same components. I'll have a diagram of exactly how it all goes together at the end of this post for those who might be interested.


The first piece of the installation puzzle was where to mount the cooler. I wanted to put it somewhere that was easy to access to add ice, easy to remove to dump it out, and easy to strap it down so it can't move. The spare tire well was a great option. I added two little angle bracket "guides" to prevent lateral movement, while a ratchet strap will do the majority of the work keeping it in place.


Now to build the cooler itself. The red base of the pump is a separate piece, which is fastened to the floor of the cooler with three short screws and a ton of JB Weld Marine epoxy. This adds strength to the join, as well as sealing where the screws go through the inner wall of the cooler floor. The bulkhead dry-break disconnect fittings are fastened to the inner wall and also slathered with epoxy for strength and waterproofing. The wiring is passed through a small hole filled with RTV Silicone.


This is the ugliest part of the whole thing. The bulkhead fittings need to have room for your finger to get in and press the release button, so extra material had to be removed for space above them. Trying to get the epoxy in on this side was also very difficult without making too much of a mess. However it's function over form for me, and this does everything it's supposed to.


On the other side, the wiring was spliced to a Deutsch connector and zip-tied in place with tiny holes drilled in the outer wall.


Here is the final install of the cooler and hoses. The guides on the floor, combined with a tightened ratchet strap hold the cooler solidly in place, and the insulation on the hoses should protect them from puncture as well as aid in keeping the water cold.


To run the pump, I needed a location for a switch that was easy to reach while strapped in. I decided to epoxy an aluminum plate to where the rear window defrost switch was, as I never really use it anyway.


A Sharpie-scrawled label will do for now until I can print out a more professional-looking label. Everything works as it should, except I did need to manually prime the lines to get water flowing, so an inline primer bulb will be added to the supply line.


I recently acquired a used aluminum seat from a co-worker that I trust more than my current very old fiberglass Momo seat, so new mounting brackets were required. Square steel tubing replaced flat bar stock for a much stronger design to bolt the seat down.


Another reason I went aluminum for the driver's seat was so I could use these seat back braces from I/O Port. I might have less of an issue with using these on a new fiberglass seat, but one this old made me nervous.


This thing is going absolutely nowhere. Once I take possession of the cover, this should be a much more secure driving position. One step closer to GridLife at NJMP!


For those that are interested, here's the final setup for the coolshirt system:

1. Coolshirt (large, left exit) 2. Primer bulb 3. Male 1/4" dry break connectors (included with shirt)

4. Female 1/4" dry break connectors (5923K43) 5. Tube insulation/cover kit

6. Male 1/4" dry break connectors (5912K85) 7. 1/4" tube (5233K57)

8. Bulkhead dry break connectors (5012K79) 9. Engel 13qt Dry Box Cooler (UC13)

10 and 11. 3/8" tube (6516T27) 12. 3/4" x 3/8" reducer (5463K648) 13. 3/4" tube (6516T33)

14. Attwood T500 Pump (4606-7) 15. Deutsch connector kit 16. Littelfuse add-a-circuit

17. 4-pin relay 18. Toggle switch (90012E)

golfduke
golfduke Dork
6/29/22 10:08 a.m.

Wow, just read through the whole thing.  I love the incremental progress youve done with this car on a True Racers budget. 


Very well done. 

trucke
trucke SuperDork
6/30/22 4:02 p.m.

Love to see this car getting the love your giving it!  Thanks for sharing.

My daughter at her second autocross.  Great car for training as it has no electronic nannies and makes wonderful sounds!  Her younger sister has already told me she wants this car.  So I guess I'm keeping it.  It's our spare!

Still going strong with 303,000 miles!  Truth be told, it has gotten many new parts!

TheDailyDownshift
TheDailyDownshift New Reader
7/27/22 10:02 p.m.


"And you may ask yourself 'Well, how did I get here?'"

-Talking Heads

Let's go back, shall we?


For the past month I've been in a scramble to get some safety projects wrapped up on the Corolla. The new-to-me driver's seat was in and finally got its cover installed. With a little addition of foam in certain places, it was as comfy as ever. 


The cooler for the CoolShirt needed some proper mounting points for the ratchet strap, so some eye bolts were welded in place. 


Speaking of the CoolShirt, I noticed when I tested it that priming the system was difficult with the dry-break fittings. The addition of an inline primer bulb solved that issue. 


The hastily-scrawled Sharpie label was replaced with an actual printed label for bonus legitimacy points.


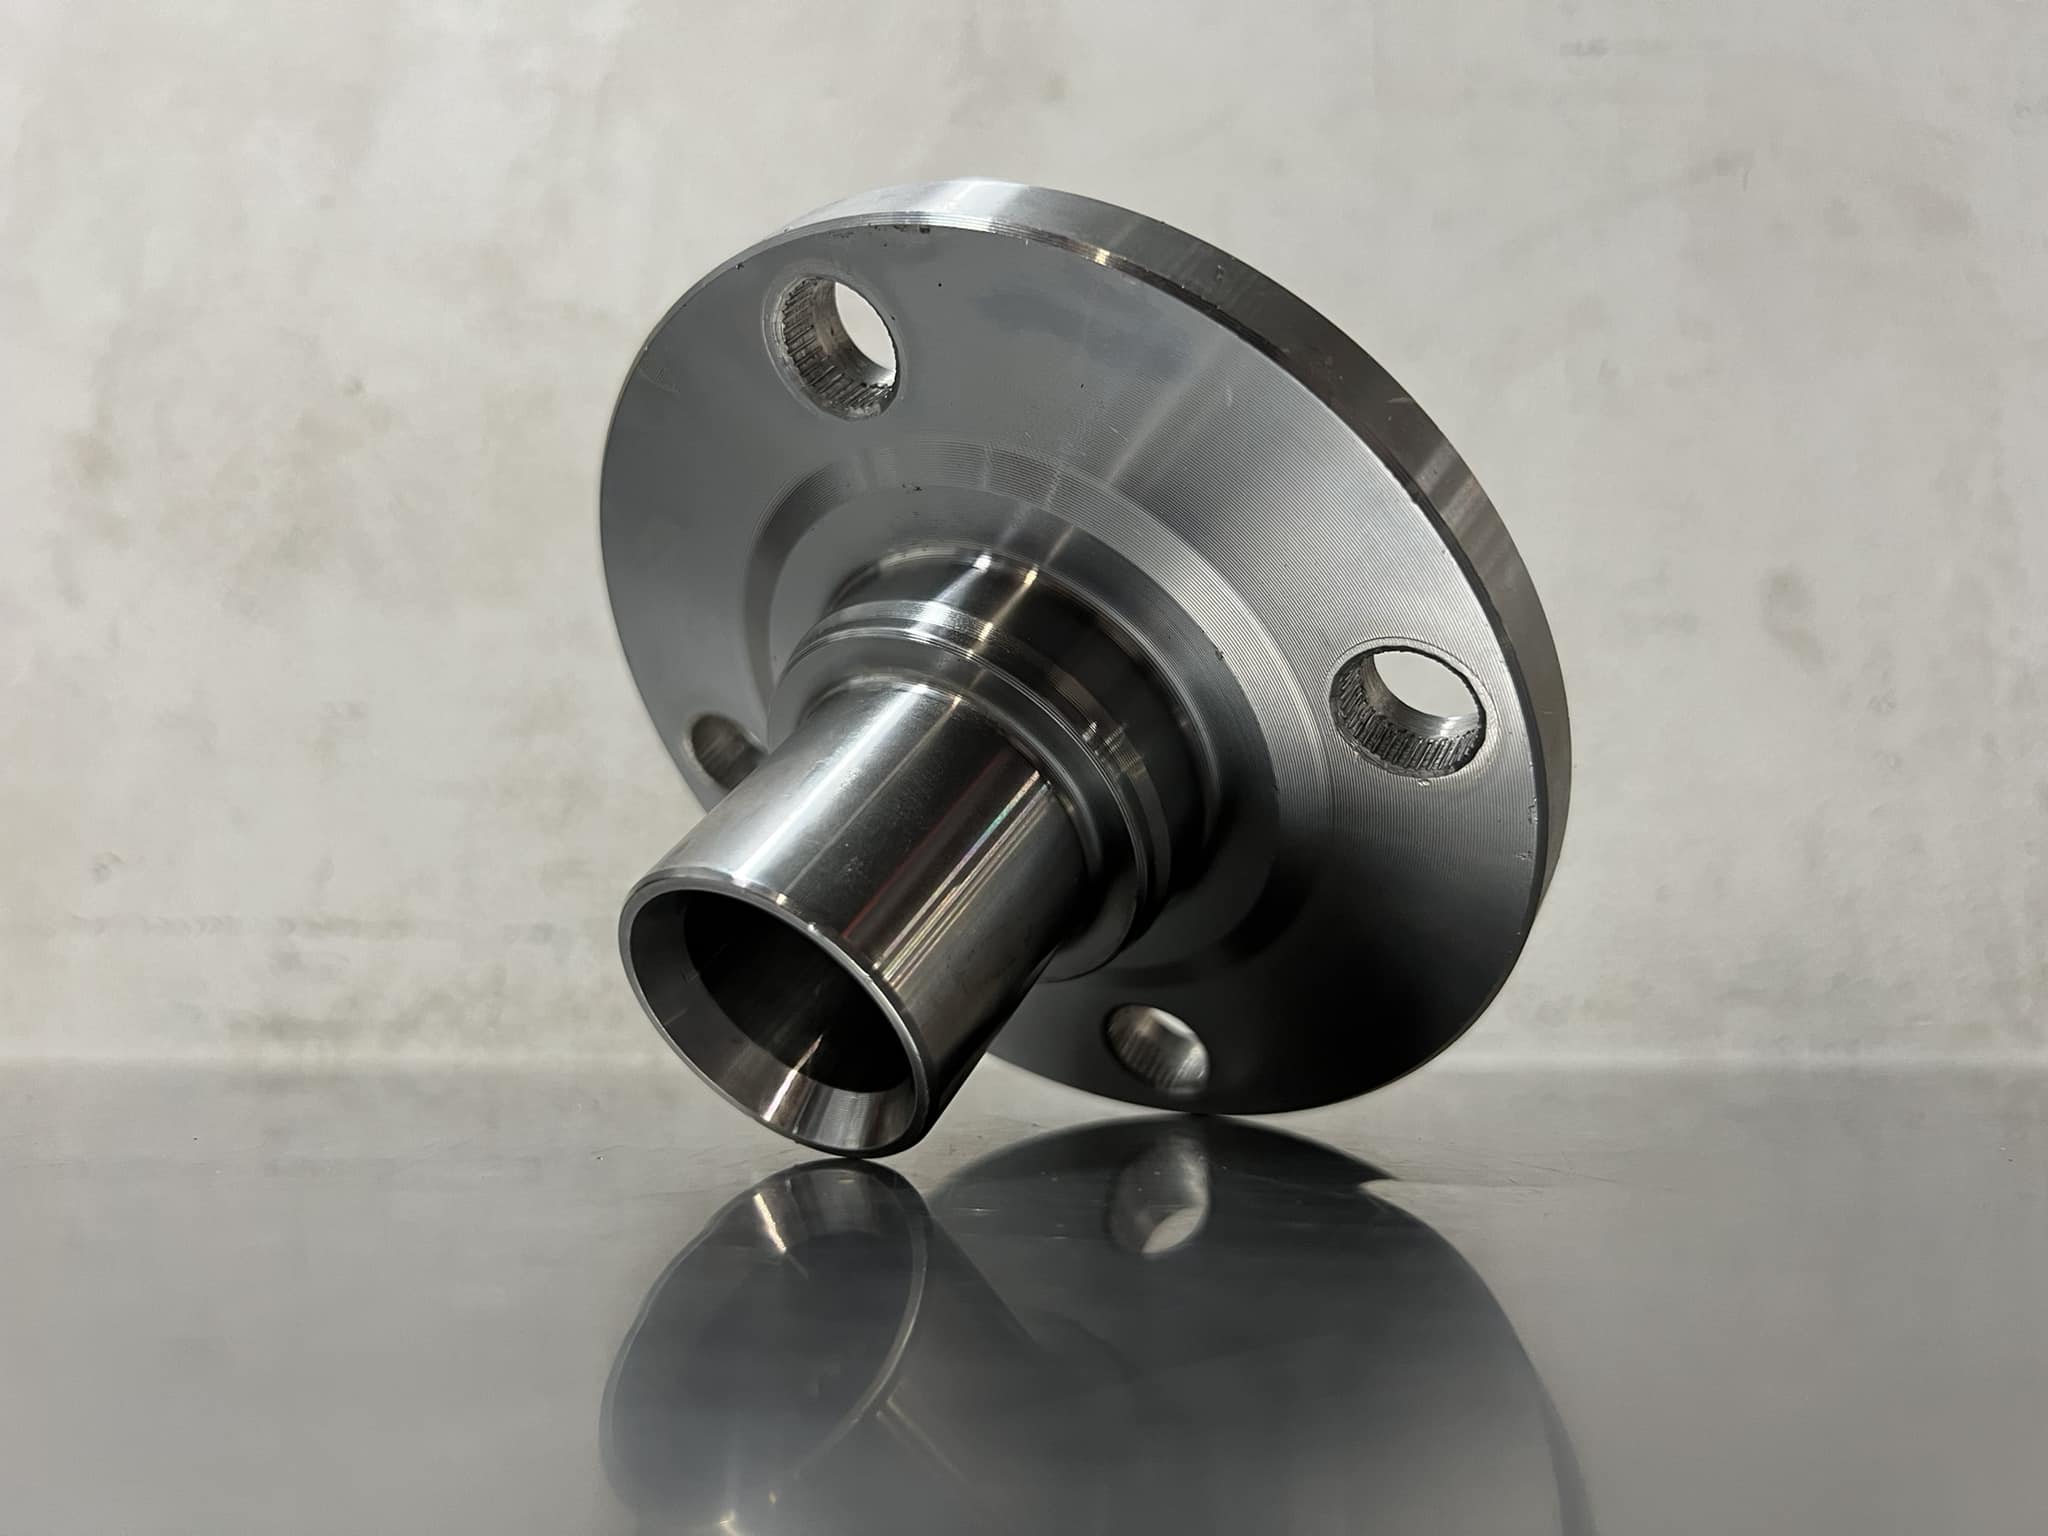
Another issue that needed sorting out was the wheel studs. As you can see, the factory studs are quite short and do not fully engage the lug nut. While they do have 7 full threads of engagement and has never given me problems, it does look a little sketchy. ARP studs went in extremely smoothly on 3/4 corners. Remember the hub and bearing I had to replace on the right front after the axle exploded at Dominion a few years back? Turns out the aftermarket hub flange is significantly thicker and it makes installing these a huge pain.


In the end they all found their home and definitely add a sense of security. I also installed wheel hub rings for the first time, as I had been just using the lug nuts and a careful installation each time to make sure everything was seated properly. However this is the correct way to do it, and the peace of mind is very nice. Little did I know that all this reinforcement to the hub area would come in extra handy very soon...


Thursday afternoon I met up with my friend Steve and we started our journey to New Jersey Motorsports Park for GridLife. We ended up hitting some pretty solid traffic and somehow got split up about 30 minutes from our destination. With the traffic delay, we were both absolutely flogging it to make it to the gates before they closed at 11pm. Steve beat me by about 5 minutes and I rolled through the gates at precisely 10:58pm - way too close for comfort. We set up camp, had a celebratory beer, and went to bed. 


When the sun came up over the paddock Friday morning we heard from the announcements that there were not many people signed up for the Intermediate or Advanced HPDE run groups so there would be a lot of track time. Steve and I were both only signed up for Saturday/Sunday but we both decided that since we were already here we may as well sign up for Friday too. When in Rome, am I right?


A few laps into the second session on Friday, I turned into turn 1, then all of the sudden the rear end of the car snapped out. I caught it but applied too much steering angle which sent me sliding off the outside of the turn through the dirt passenger-door first. The dip in the dirt caught the inside edge of the LH tires, lifting it up into the air. The outside edge of the RH tires dug into the ground and very nearly rolled the car. Thankfully it stayed shiny-side up and I sat facing the track waiting for the dust to clear so I could get my bearings. I tried to limp the car but clearly something was wrong. I barely managed to get the car through the grass up to the flag station so I was out of the way and the session could continue. Once the session ended and the tow truck came, I was able to get out and see the damage. Both RH tires were off the bead and flat. The RH side skirt was bent under the car but somehow still attached. 


After a ride back to the paddock in the tow truck, I spent the next hour or two trying to re-seat the bead and get the tires inflated. Once that was done I quickly realized that the left rear tire was rubbing on the strut. The clearance there was always very close, but now it was bent just enough to be a problem. 


I then spent the next few hours trying to cross-reference vehicles that share this knuckle and find a replacement as quickly as possible. The only place I could find was Albert's Auto Parts in Thomaston, Connecticut - roughly four hours away. The guys at Albert's were super helpful and agreed to leave the part out in a safe location so I could come pick it up after hours. 


Steve, being the amazing friend he is, offered to swap back to his street tires after his last session of the day so we could take his ND Miata which gets roughly double the fuel economy of my 4Runner. So around 4pm we left NJMP. With traffic it took us around 4.5 hours to get to the Albert's, but the knuckle was right where they said it would be. Mercifully the traffic was better on the way back so we made it in a little under 4 hours, pulling back into our camp site around 12:30AM. I then spent the next two hours swapping the knuckle out, as well as switching out the rear brake pads for some cheap Centric pads to reduce rear lockup. With everything fixed and torqued, I went to bed around 2:45am, ready to get back on track for the rest of the weekend.


The rest of the weekend went very well with no more crashing or mechanical hiccups whatsoever, at least for us. There was a big food truck gathering on the property for dinner Saturday night which was very welcome after two days of pop tarts, Cliff bars and PB&J. We even made some new friends with our paddock neighbors who were gracious hosts for Sunday breakfast. 


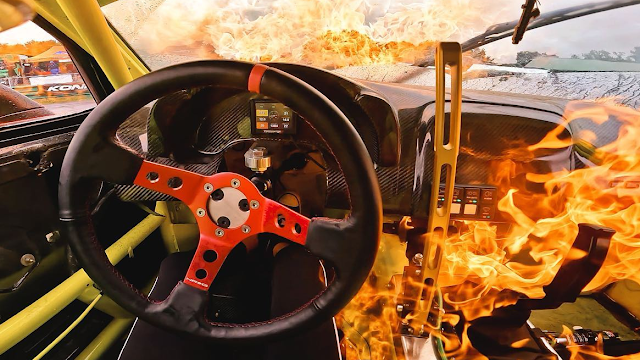
Unfortunately that luck did not hold true for everyone at the track. This weekend was the hottest on record for the last 10 years at NJMP, and the mechanical attrition rate was high. I've never seen so many sessions delayed due to oil on track. On Sunday the morning Intermediate DE session went out right after a cleanup in turn 3. Unfortunately the guy in the new-ish Corolla hatch in front of me went full send through the oil-dry and ended up flipping his car several times. Fortunately he walked away with minor bumps and bruises.


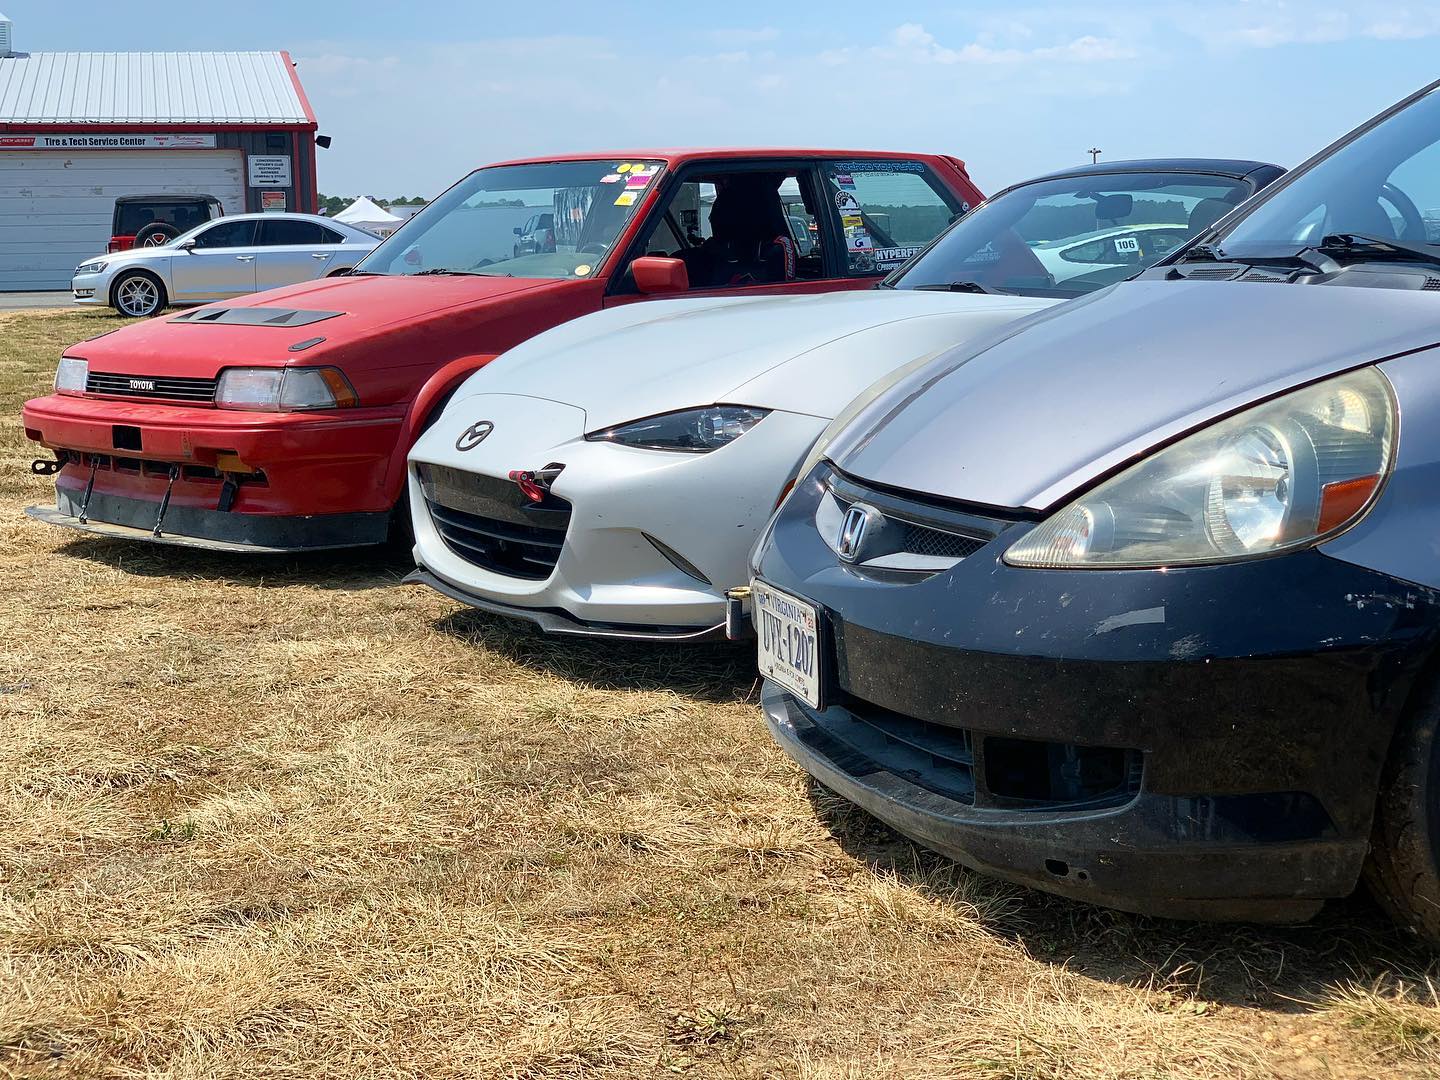
It was so nice to finally hang out again with our friend Ross who drives a Fit in Sundae Cup. It's been way too long and this weekend was a blast. You might not like it, but this is what peak performance looks like. 


The trip home was blissfully uneventful after such a hectic weekend. I absolutely loved this track and can't wait to make the trip back. I'm so glad I put the CoolShirt setup in the car, as it was absolutely necessary in this heat. We went through over 80lbs of ice over the weekend between the two coolers, the water jug, and the CoolShirt tank. Shout out to GridLife for putting on a really fun event and having such a great community. I think for me the rest of the year will just be the October NASA event at VIR, with maybe a Trackcross at Dominion with some co-workers somewhere in there as well.

Sonic
Sonic UberDork
7/27/22 10:18 p.m.

I saw you there at Gridlife but had no idea it was another GRMer.  I was in the White EG civic hatch in advanced most of the time, my wife was in the white Mazda3. 

Your car looked great out there and you were running well!

TheDailyDownshift
TheDailyDownshift New Reader
7/31/22 10:40 p.m.

https://www.youtube.com/watch?v=AwoU91vizKM


This was the best lap I managed to capture with both camera and timing up and running

TheDailyDownshift
TheDailyDownshift New Reader
8/30/22 9:36 p.m.

Nvus Images took some amazing pictures that weekend and I just had to grab a couple!


mr2s2000elise
mr2s2000elise UberDork
10/18/22 12:03 a.m.

Awesome car! I will show this to my neighbor, old filipino dood. 

He bought his 85 Corolla GTS new and his Red FX GTs new. Hes been tracking both over 20 years. Top shelf parts 

His DD is a 98 GS400 and His wife is 05 STi. 


He buys the coolest new cars and never sells. 

TheDailyDownshift
TheDailyDownshift New Reader
12/15/22 12:16 p.m.

After the exhausting weekend at NJMP I needed a bit of a breather and the car needed some work before heading back out on track again. 


First things first: the junkyard knuckle had to come back off and get cleaned up. A quick run through the sand blaster at work had the once-rusty lump of iron looking fresh, and a quick coat of paint will hopefully keep it that way. The polyurethane bushings from the old knuckle were swapped over, and back on the car it went. 


While the car was on jackstands I decided to make little block-off plates out of coro-plast to keep air from going in places it shouldn't. Not sure if it will make a difference, but it was one of those "bugging you in the back of your head" things. 


Once the car was back up and re-aligned, it was back out to an October VIR event. While VIR is usually my favorite place to be, I left that weekend feeling disappointed. With the combination of faster cars in DE3 and a big wide-open track like VIR, I don't think I received a single point-by all weekend. I also felt like I couldn't push the car as hard and I felt like I needed to, like perhaps some trust had been broken after the off at NJMP. 


I had intended for VIR to be the end of my season, but my co-workers had different plans. After getting them hooked on track driving at a Dominion trackcross, they pulled me back in for another go. I was reluctant to go back out after leaving VIR feeling bummed, but boy am I glad I did. 


At this particular event I cared so little that I didn't even bother towing the car up, I just drove it straight to the track. You would think that would mean that I'd be easy on the car but something inside me just clicked. Maybe it's what happens when you go back to your roots at your "home" track, but I drove that car harder than I think I ever have, and it was the most rewarding event of the year. I felt completely rejuvenated and passionate about driving on track again, hyped for what was to come over the winter.


Just for fun, I put the car on the dyno at work just to see where it was compared to that first dyno session back in 2019. Back then it made 105 wheel horsepower. Now, after 4 seasons of track days and at least two money shifts, on a slightly different dyno under slightly different conditions it put down a mighty 102. Not bad for a 250k+ mile all-original 4AGE. 


I also borrowed a co-workers scales and got some corner weights read. I'm not 100% sure how to interpret this data yet, but it should help with this winter's big project, which will start in detail in the next post. 


While we wait on the big Corolla project, I also did a few other things in the meantime. Firstly was re-applying FluidFilm to the frame on the 2Runner. Frame rot is the Achilles Heel for these trucks, and I intend to keep my minty fresh Texas frame as nice as can be. Pro tip: soak the cans in warm water before applying, it really helps with smoother application.


A friend of mine is looking to start tracking his FC RX7 next year and had purchased a weld-it-yourself roll bar from CageKits.org and we decided to give it a go. These kits are really cool, featuring pre-bent and pre-notched tubing with laser etching to show where things need to attach. 


There aren't really any instructions, but once you figure out the best order of operations, it really is an extremely well-designed and tight-fitting kit.


I'm extremely happy with how this turned out and couldn't recommend this kit more as long as you feel comfortable welding it up. 


Next time - the Corolla's suspension goes Super Saiyan

TheDailyDownshift
TheDailyDownshift New Reader
12/16/22 9:44 a.m.

This project has always operated on a shoestring budget, and honestly I've been massively impressed with how the home-made, thrown-together, frankenstein suspension has worked thus far. 


However the lack of travel necessitating the near-stock ride height combined with some less than ideal creaks and clunks have been an ever-present reminder of its humble roots. 


The stars aligned and I was able to score a set of AE92 Fortune Auto 500-series coilovers on Black Friday scratch-and-dent for a good deal. This is the first set of off-the-shelf coilovers I've ever bought, and true to form they are going to need some modification to fit. Warranties are for the weak.


My first concern was fitment for the rear, starting at the knuckle mounting. The bolt holes are one size too large, but Fortune includes reducer spacers to adapt down to the stock 12mm bolt sizing.


The AE82 rear knuckle bolt hole spacing (inner edge to inner edge) is a hair over 2-1/16"


The AE92 spacing (center to center) is just under 2-1/2", so the upper hole will be slotted down to fit. I may actually slot it down and "in" a little bit for a touch of camber gain because...


The Fortunes do not include camber plates for the rear. Instead they use an angled static mount. I think this will be ok, as I don't run a ton of camber in the back (usually around 2* - 2.5*).


Speaking of rear upper mounts, I think the inner two bolt holes will be fairly close and just require a little bit of slotting in the strut tower, maybe tilted a hair in to aid in camber gain. AE92 inner bolt spacing is 3-5/16" center to center. The third stud will just be a simple matter of drilling the hole. 


AE82 inner bolt spacing is 3-1/8" center to center. Not too far off. Yes the camber plates say "AW11" on them, as the AE82 Corolla and AW11 MR2 use the same part.


To make up for the lack of camber adjustment in the rear, these cam bolts will be used to fine-tune the alignment. 


The other big concern was over-all shock body length. With the Fortunes extended out a bit, they should be spot-on. Check out the improvement in travel too!


Up front, the AE82 coilover mounts up to the AE82 knuckle perfectly. However I may lock out the upper slotted bolt hole, as the factory cam bolt and camber plate allow for plenty of adjustment as-is. 


Up top we run into a little bit of an issue. The AE92 camber plates just don't have good bolt locations to accommodate the factory strut tower brace. There are ways around this, but I think I can get away with a different solution. 


The Fortune Auto camber plates are slightly wider compared to the T3's in the middle around the bearing housing, yet thinner in the adjustment bolt channels. However the adjustment channels are equally spaced. Very slight clearancing of the Fortune's upper bearing housing would allow the T3 plates to work and be a direct bolt-in solution. Though that may compromise the integrity of that bearing housing which is technically taking the weight of the car. However if I clearance the T3 plate that makes those slots awfully thin. And if I try to make the Fortune upper hats work, not much of the plate actually contacts the strut tower as the opening is fairly large. I'll have to think on this one.

Next time: we actually try and implement some of these changes and see if I can't get these things mounted up on the car - only to be taken off and sent back for upgrading to 510-series spec. Like I said, Super Saiyan mode. 

BumpHeadRacing
BumpHeadRacing GRM+ Memberand HalfDork
12/19/22 10:23 a.m.

It's always fun running across friend's build threads! I need to read back through and catch up on this

TeqDigest
TeqDigest
12/20/22 10:17 a.m.

This was very enjoyable to read! I owned a lowly 4AC powered Toyota Corolla FX back in the day with some New Zealand made branded coilovers and some other suspension goodies that made it handle pretty well for extra fun with the anemic carbed engine lol. I ended up selling it to pursue some new experiences. Still, I always missed that car so I purchased an imported Toyota Starlet GT Turbo which is like a faster, slightly newer version of that car to a certain extent...to me at least: https://www.teqdigest.com/post/the-honda-meet-track-day-ep82-toyota-starlet-does-the-firm

All of this hard work is definitely inspiring me to refresh the suspension and install an LSD as I found out a few short comings driving on the FIRM a few months back, I need to start a thread to share it with everyone on here, thanks again for documenting your build.

infernosg
infernosg Reader
1/17/23 3:11 p.m.

I didn't realize you worked at "that speed shop up in Staples Mill." Haven't been up there in a while. Looks like we missed each other last year. I only made it to VIR in March and Summit Point in November due to car issues. Hoping to hit the same this year. I'm glad you posted about your friend's experience with cagekits.org. I've been looking at them for a while. If/when I ever decide to go with a full cage I'll likely go with them.

TheDailyDownshift
TheDailyDownshift New Reader
2/2/23 11:56 a.m.

In reply to infernosg :

I'll be at Summit Shenandoah in March and VIR for Hyperfest in May. Hoping to hit NJMP with either Gridlife in July or NASA in August, then probably Summit Main in November with a smattering of Dominion events sprinkled throughout. If you're at any of those come say hi!

TheDailyDownshift
TheDailyDownshift New Reader
3/2/23 3:50 p.m.


When we last left off, I was still trying to figure out how to make the AE92 Fortune Auto 500's fit on the AE82 chassis. 


One of the biggest differences is the bolt spacing at the rear knuckle. The upper bolt on the coilovers needed to be slotted down by around 10mm. A bit of additional work was required after this picture, as this placement did not allow enough negative static camber.


Up front, appropriately sized washers were welded to hold the upper bolts in place. The Fortunes come with slotted upper holes, but on track these are known to allow for slip. After this picture was taken, the washers were welded all the way around for extra strength. A similar process was followed on the rear coilovers as well once the correct bolt position was found.


Here's the initial test fit with everything bolted up. Clearly the alignment and ride height need some adjustment, but at least we know it all fits!


As soon as fitment was confirmed, everything came right back off and we re-engaged hover mode.


The coilovers were then torn down to the bare shock bodies to be sent in for some extra special sauce.


Around 8 weeks later I got the email from Fortune that the 510's were ready for pickup. We adjusted the spring rate slightly so the car is now running 10k front and 6k rear springs. The fancy blue hardware is the only visual difference between the 500 and 510 series.


The real magic is the valving. The 510's use an upgraded valve as well as more track-oriented setup with stiffer compression than the 500 series. I'm no shock engineer, but look at the consistency between pairs, as well as the width of the rebound adjustment and lack of cross-talk between compression and rebound. Very nice. 


And here's the unholy monstrosity installed on the car! It looks so pretty!


For the front upper mounts, I did end up modifying the T3 plates to work with the Fortune shock bodies. Don't worry, those undersized washers were replaced with appropriately sized hardware after this picture was taken. The rears are a bit different, using the Fortune upper spring hat with some tapered spacers to adapt to the T3 complete camber plate assembly. 


As I was taking the wheels on and off to dial in ride height, I happened to notice two of the wheels were starting to form cracks in the "V" of the spokes near the hub. On one I counted six cracks! I purchased these third-hand and I'm pretty sure the original owner ran these on a spec Miata, so the wear and tear wasn't unexpected. Two new replacements were immediately ordered, as this is definitely not safe! At least they are pretty cheap! TR Motorsports C1 in 15x7 +25, in case anyone was wondering.


I also removed the left front knuckle to check the wheel bearing as I had been hearing a strange speed-dependent groaning sound from that corner at Dominion last year. I initially assumed it was the axle, but as soon as the knuckle was loose it was extremely obvious that the bearing was completely shot. I took the whole thing to a machine shop for them to press out as I didn't feel like doing it with a hammer again, and they informed me that the hub was also toast. Fortunately replacements are available on RockAuto, so once I got that the studs were removed and it was taken to the shop for them to install. 


That's where we leave off for now, hopefully this weekend I'll have everything back together and be 100% caught up on maintenance once an oil change and front brakes are finished. Then it's corner balance and alignment time. With only three weeks until Summit Point the clock is definitely ticking!

infernosg
infernosg Reader
3/8/23 1:33 p.m.

This was my solution to the slotted holes in the FA510 strut mounts:

A little fiddly to make but they've held the mounts in place for over a year now.

It looks like we're going to miss eachother most of the year. I'll be at VIR next weekend (3/18-19), hoping for Dominion in May, Pitt Race in July and then Summit Point in Sept, Oct and Nov.

1 2 3 4

You'll need to log in to post.

Our Preferred Partners
SjREwQ0hECw9n0amo3jOx2G21Q5oUWSe7JqAW0zkzCVwddR5WAF7XlY5ScmRqNn9