


Bruce, my car was bone stock... including the repairs a high schooler on a budget could do to the engine fire that let him afford it... I have MANY memmories in that car that include it's "personality"...

Bruce, my car was bone stock... including the repairs a high schooler on a budget could do to the engine fire that let him afford it... I have MANY memmories in that car that include it's "personality"...

Frustration of a Total NOOB:
My engine surges a bit at idle, and it hesitates on acceleration, particularly when shifting from first to second at the lower RPM's. I thought I'd be able to quickly identify the problem(s) thanks to sites like Pelican, Rennlist, and Clark's Garage.
Well, there are three suggestions for idle surge on Clark's engine troubleshooting page. And I am feeling a little tentative around the engine bay, so I'm frustrated. First, it says clamp the line from the Idle Stabilizer to the intake manifold. Well, the Idle Stabilizer, once I was able to identify it, is hiding under the manifold. How the hell am I supposed to clamp a line I can't see or reach?
Second, it says inspect all hoses connecting to the intake manifold downstream of the AFM. All said hoses are also hiding under the manifold.
Third, it says remove the throttle body. That's easier said than done, with lots of connections made with clamps I don't know how to remove. I'm frustrated because I don't want to break anything, or do anything that will cost me $$$ if I berkeley it up.
The Idle Stabilizer (I think):
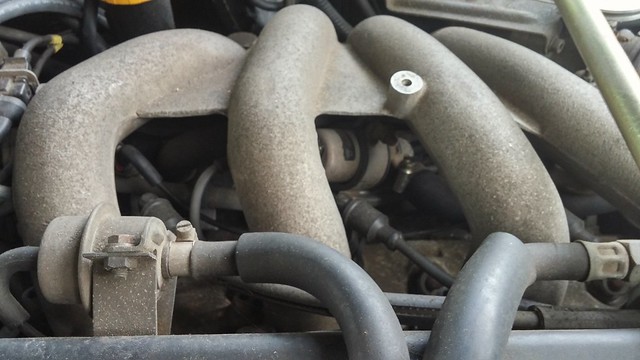
What am I supposed to clamp again?
The air intake tube going from the MAF to the Throttle Body, with half a dozen connections...
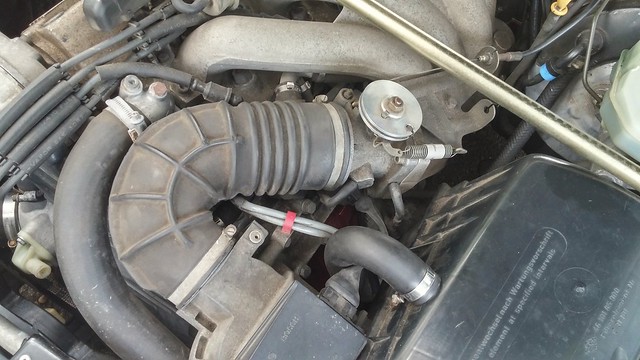
...most made with this kind of clamp:

But some, like this one right near where the air intake tube connects to the MAF, is a type of clamp I recognize. But what's the point of removing just one, when there are four others I don't know what to do with?
When I was fifteen, I pulled the engine of my '75 Triumph Spitfire using a come-a-long tied to a rafter, replaced the clutch and flywheel, and discovered the pilot bearing was missing altogether. And on this guy, I can't even get past the hose clamps?
I'm just frustrated and depressed about working on the car - I'll continue to look for youtube vids that can provide more familiarity and confidence, but it really sucks being so scared of the engine bay.
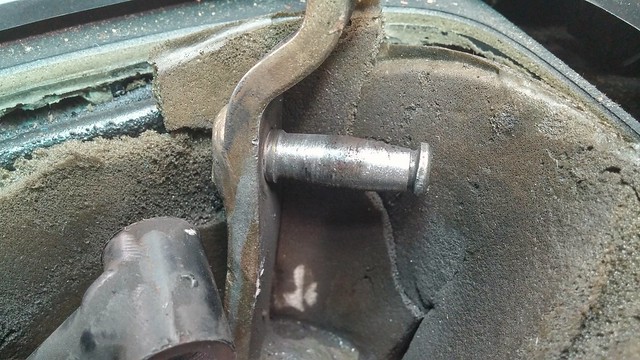
Having run into a crisis of confidence in the engine bay, I went in to work on the sloppy shifter, because it's really bad. Twice at the track, after I casually checked to make sure the car was in neutral by flopping the lever side to side, I let the clutch out and stalled the car because it fooled me. It's that sloppy.
I got the boot removed, and I managed to get the shift lever disconnected and removed entirely without dropping any little pieces into the bowels of the car. Yay!
I had been researching solutions for fixing the issue, and the one I like the most is the trick where you grind the pin's weld off, remove the pin, and replace it with a bolt, a locknut, and two thrust washers to ensure the rotation of the shift rod is immediate with any movement of the shift lever.
Here's a parts list and a good description of the job.
Here's a video showing it done. The guy in the video could have pulled that shifter right out of the car with a 13mm socket - easy peasy. Grinding it off in the car must have been a really messy way to do it.
Researching the parts, though, I'm finding that I'd need $13 of hardware from McMaster, plus $5-10 shipping, $5 of hardware from boltdepot.com or some other supplier of special bolts willing to ship less than 25 of them, plus $5-10 shipping. And those bolts would be threaded the whole way down the shank, which I didn't think was the best solution. I worry the bolt threads might be harder than the shift rod material, and would wear the shift rod worse than it already is. And in a hurry.
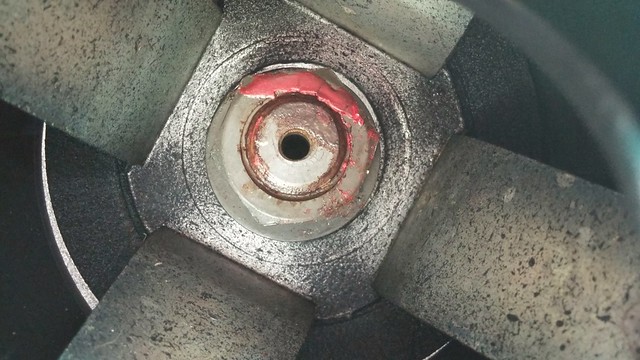
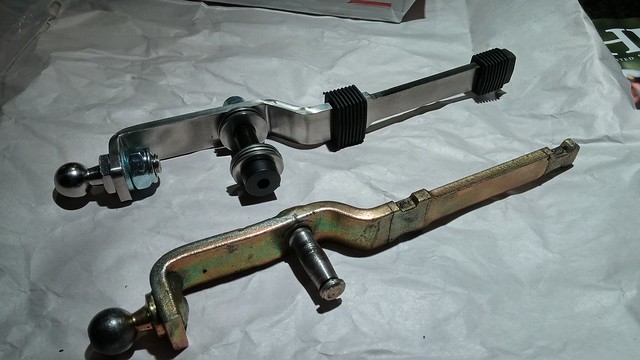
Fortunately I found the whole shebang for $60 + free shipping at Only944.com, including what the site calls a "custom made" shoulder bolt that seemed to be a better solution. In their instructions, the shifter had previously been fixed in a way I didn't even mention. Mine, however, appears to be original and worn down into the classic football shape:
The only944.com solution might cost a little more overall, but not by much. I'm hoping it will cost a lot less in terms of hassle. I'll certainly post how the part looks and performs when I receive it.

Can't help you on which hose to put a clamp on, but that one hose clamp looks like a single use crimp clamp to me. I'd cut it right down the center of the raised section and replace it with a another simplier to use hose clamp. Or... buy one of these remote use hose clamp tools and get some spring clamps. Looks way easier to use than the typical hose clamp with a screw that you need to turn. I think I'm going to buy one myself. :) long reach spring hose clamp tool
Like the 944! Can't wait to read more.
Very common on the shifter. Usual perma solution is to drill it out and replace with a bolt.

No Ace Hardware stores in your area? The bolt doesn't need to be hardened, just metric and if you use thrust bearings they'll carry the load instead of the bolt. Heck, even Home Depot carries some metric bolts in my area.
Also, Only944's shift linkage and shift stabilizer are great pieces and worth the money. Combined with a semi-solid transaxle mount and fresh fluid in the transaxle, shifting is short and crisp.
As to the air hose stuff, take the intake manifold off. It's one of the more common first steps for maintenance in that area. I'd strongly suggest buying new hoses for the stuff under the hood, a new set of intake manifold gaskets and replace it all once and for all.
The throttle body seals fails and can cause odd idle issues. Not terrible to replace, just order a throttle body o-ring while you're at it.
I could swron there was a kit that was cheap to fix it? Like one that was a whole new shifter piece but with a beefier shift arm that was replacable... ??? It's been a decade plus though.
So while I'm waiting (on argon for welding the muffler system, and on the new shift lever to complete the shifter slop fix), I naturally started another unrelated fix.
I once knew a clockmaker who said, "A 'fix' and a 'repair' are two different things. You 'fix' something temporarily. You 'repair' something forever."
I never really took that to heart, but it runs around in my head at times like this. Times when I am faced with at least a dozen tiny clock-like gears.
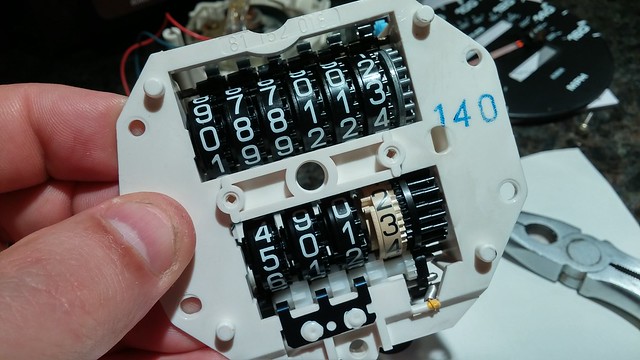
You guessed it by now, I'm fixing the odometer.
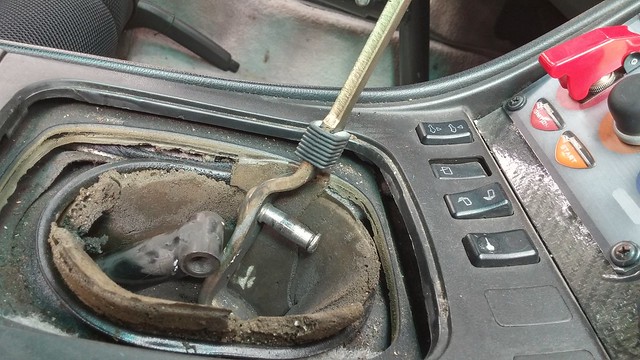
Here's the steering wheel coming off. I'm not the first to knock this 24mm bolt off the stem:
I'm not the first to get behind this instrument panel. How do I know? There's a missing screw on the lower right corner:
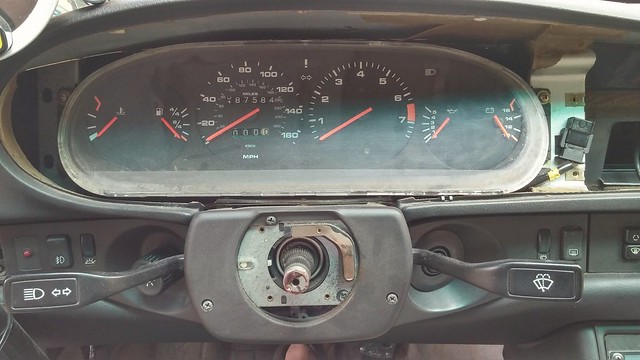
I don't even think I'm the first to get this far, because all the pieces that came off are nowhere to be found:
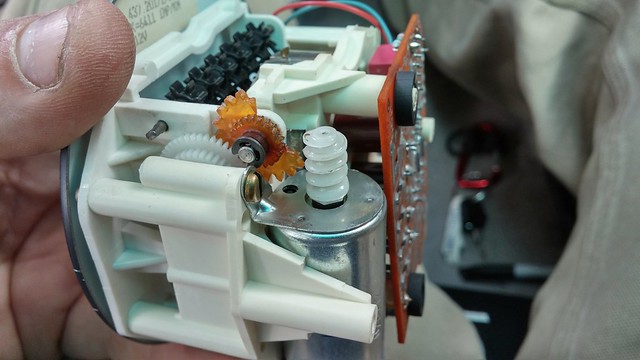
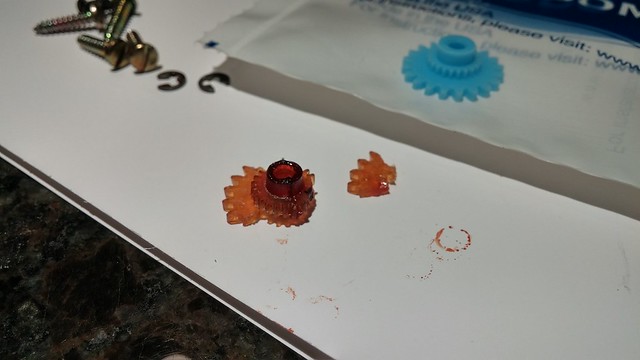
That's gotta be the original gear, and it crumbles to the touch. All that's left to do is count the inner gear teeth (including the ones that are broken off) and order a replacement.
There are many places to buy replacements. KLA Industries $29.95+$4shipping; OdometerGears $25+$5.95shipping (sold on Amazon too for more or less the same, and sold on AutohausAZ $16.61+$5.95)
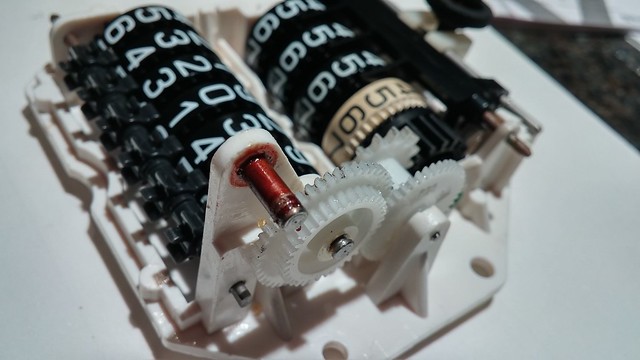
Any advice before I pull the trigger? The only thing that worries me is the 100000 numeral which is more than halfway flipped from 0 to 1. Is it binding the mechanisms? Is that normal? Can it be corrected? Should it be?
I just remember replacing it. the key to not breaking it again? do not hit the trip while moving. that breaks the odometer gear... ![]()

Great write up. Love these cars. I currently have a couple of them that are basically running parts cars. Glad to see you using the car the way it should be used
Sometimes I'll hold back on you guys just to get the helpful comments... so sue me. Or forgive me.
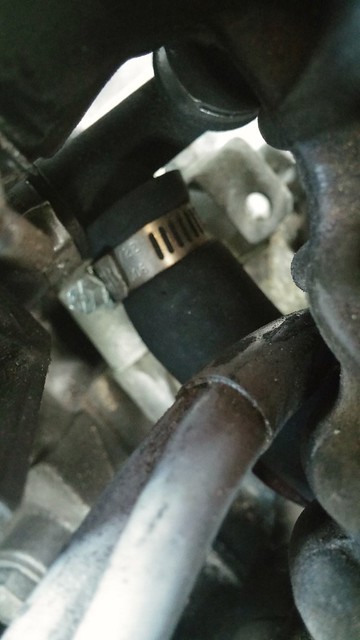
On Saturday as you might recall, I only got as far as disconnecting the air intake tube from the air flow sensor housing, before I started to cry.
But later that afternoon, after working on the shift lever, but before I took the instrument panel out, I re-connected that tube, and tightened down the clamp which actually seemed to bottom out before the tube was fully tight. I gave it an extra tightening turn to try to snug it up, and started the engine.
No more surging at idle. Are you kidding? The air leak happened to be at the only junction that was readily accessible?
Excuse me while I go buy a lottery ticket.
In reply to Mad_Ratel:
Thanks.
I ordered the OdometerGears 20x22 gear from AutohausAZ, and I'm just hoping I can put it all together and have it working. I suppose that once I have the gear installed, I can put a few miles on the car by turning the new gear, just to ensure that it won't bind up.
In reply to Billy_Bottle_Caps:
Thanks, Billy, and thanks to everyone who has chimed in. I post here because of the experience you all can share with me.
BTW, as to your brake wear issue, there are notches on the caliper pistons that are supposed to be aligned a certain way to reduce the tendency to wear unevenly and squeal.
http://www.pelicanparts.com/techarticles/101_Projects_Porsche_911/53-Caliper_Rebuild/53-Caliper_Rebuild.htm
Should apply to Brembo 4-piston calipers as well, only you have 4 smaller pistons to align. Don't even get me started on the cost to rebuild those calipers. I'm also not convinced they work all that much better than properly prepared single piston units using DOT tires in a 944 N/A. Even the 944 Spec racers use the single piston units.
Glad you found the source of the idle surge! You will want to buy some new flex lines for the fuel rail, way too many cars were lost to underhood fires from that (of course Porsche didn't make this easy of course, sigh.) So add that to your maintenance for this winter/off season.
FYI, I had my MAF come loose at the same spot... while with a girl, in the middle of NOWHERE NC. I could drive the car but not above 2k rpm, and not more than 1/4" throttle. Drove it 40 miles back on the highway at 3 am at 40 mph with a buddy following me. TO get in my dad's neighborhood my buddy had to push me with his dad's car... (thankgod for those rubber bumpers on the 944) after two days of trying to find out what was wrong with the car, dad discovered that the air boot was loose behind the maf. Causing unmetered air...
In reply to Mad_Ratel:
What I'm really hoping is that my next track day will feature MOAR POWER!
Lots of other stuff still to do, too... Things like inspecting and gapping the plugs. Changing out the fuel filter. Flushing the coolant.
You know, stuff.
First off, thanks, GRM, for making my steed the Reader's Ride of the Week!
That's fun!
Now, it's back to work. Tonight the new gear arrived. Wow, that was fast.
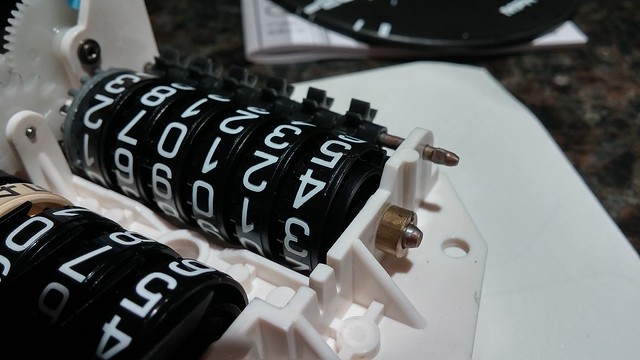
Removing the gear was pretty straightforward. I used a brush and some hand soap to clean the filth off the pin...
Here it is about halfway clean:
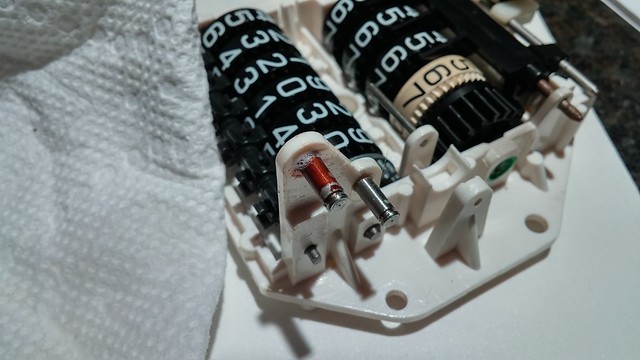
So I investigated the numeral which was stuck halfway between 0 and 1. I was worried it was going to bind up the whole works or something. Turns out there is enough slop to allow a wheel to disengage and turn, and there is a halfway detent where it landed when it reengaged. To fix it, I slid the dial over, turned it back, and let it go. To prevent it from happening again, I took a piece of credit card material and made a shim to take out the slop.

But that was a little too snug. So I used a thinner piece of plastic from some packaging:
And that worked out really well. The wheels spin freely but can't slide far enough on their axis to disengage from one another.
I added 500 miles for the approximate use I figure I've put on the car since I got it. I'm pretty sure it doesn't account for the miles the PO must have put on the car with the broken odo, but it was more to satisfy myself that the odo worked without any issues than to be truthful.
It's now all back together and waiting to be re-installed. If everything works when I get all this back in the car, I will be pretty impressed with myself. ;-)

awesome car! I like the detail you went into with the odometer. my audi has the same issue and where i'm not scared of anything in my engine bay, those small fragile plastic parts generally intimidate me into going to a junkyard rather than fixing one gear.
ive always wanted a 944 and yours looks like a very nice and fun example. cant wait to see more ![]()
2K4Kcsq wrote: awesome car! I like the detail you went into with the odometer. ... cant wait to see more
Thanks! If you like detail, we should hang out sometime. I'm all about detail. Here's more:
Today, the USPS man left this in my mailbox. So I quickly got to work on it:
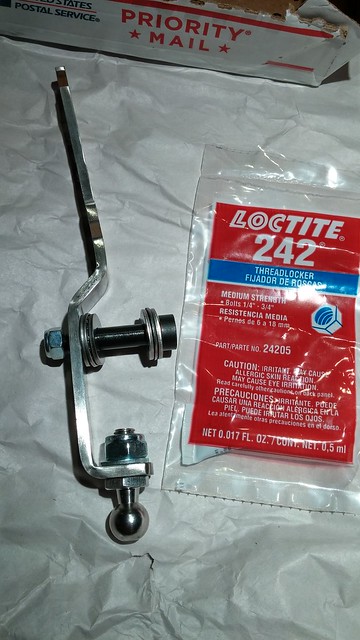
It's a nice piece of stainless, that's for sure. And the shoulder bolt is seriously a good idea. I'm glad I got this one. Get yours at www.only944.com. I am in no way affiliated with the site, but I just got fast shipping, a really nice part, good instructions online, and I'm a happy customer. Nuff said.
Here's the part with the rubber stuff transferred over to it.
And here it is pressed back into the cup. I really cleaned up the cup first, and squirted some silicone spray-lubricant into and around it. I thought about wrapping the outside of the cup with a bit of tape first, which would give it a gentle squeeze when it is inserted into the black mounting plate, but I figured it was tight enough as it is, and if it ain't broke...
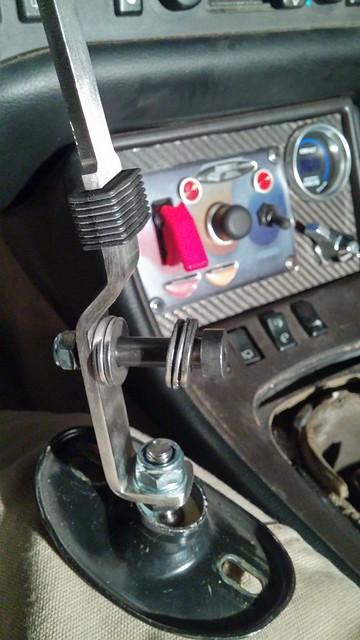
Here it is all tightened up. I didn't have a short-L allen wrench handy, but it's only supposed to be snug and I was able to do that and more by just lightly grabbing the head of the bolt with channel-locks. I also put some caliper grease in and on the bearings and bolt shaft.
I put that E36 M3 on everything.
Mostly because it's in a handy little tube that fits in my little tool box, and it's what is within reach.
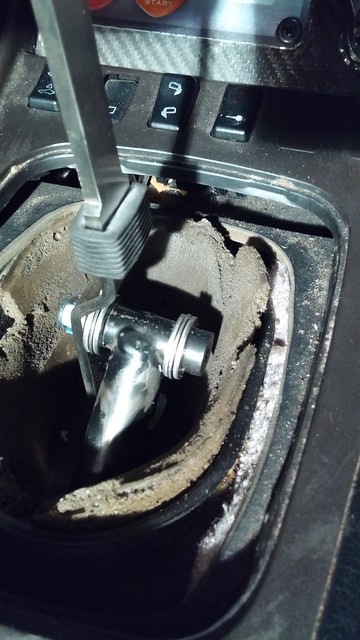
And here it is, installed, in all its glory, in neutral:
Yeah, I know, it's a picture of a stick shift. But you know what?
Look at it again. Closely. ... It's NOT BERKLEYING MOVING.
It doesn't wiggle at all. I mean, maybe an eighth of an inch side-to-side. It is so precise now. OMG, what a difference!
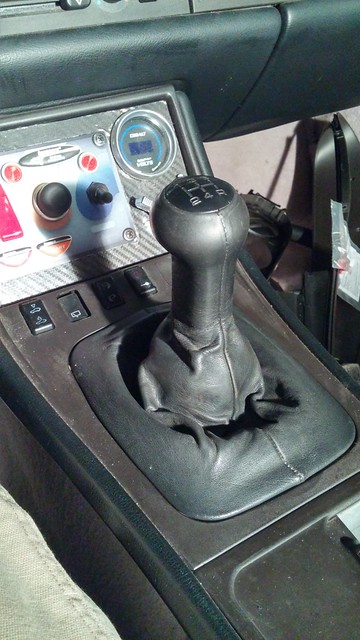
I can't wait to drive it, but that will have to wait until I re-install the instrument panel, and maybe for a major hurricane to pass through. We'll see.
I broke two of the factory shifters before I did something like your post above.
the second time I was in traffic on my way to school. My sister says all she remembers was me cursing right as the light turned green, frantically opening the elbow "cubby" pulling out a phillips screw driver and ripping the shifter out of the console. Then reaching in and shifting the transmission by hand...
It's almost time for another track day weekend! Which means the car needs to be ready. So I put it back together.
Last time, we left the instrument cluster looking something like this:
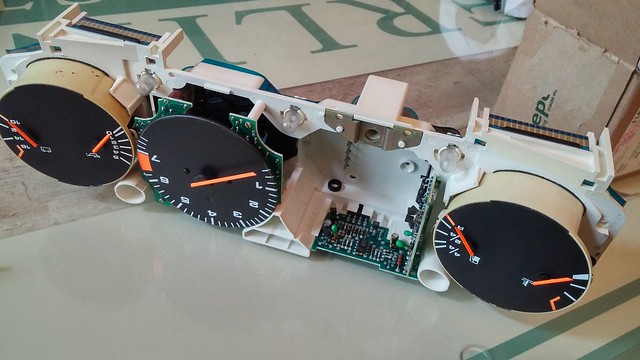
Which is to say, in a scary state. Without its speedometer, and with three dim incandescent bulbs that barely illuminate the gauges.
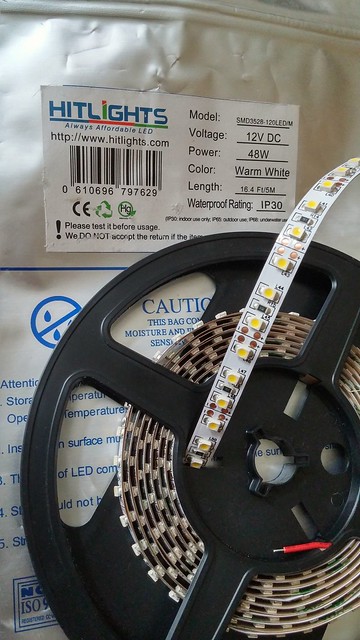
Others have hardwired LED's onto the flex circuit, some have found direct-fit LED's which are becoming much more common, and some have installed entire strips of LED's across the bottom of the panel in fancy ways.
I had some leftover 12v LED's from a kitchen under-cabinet lighting project.
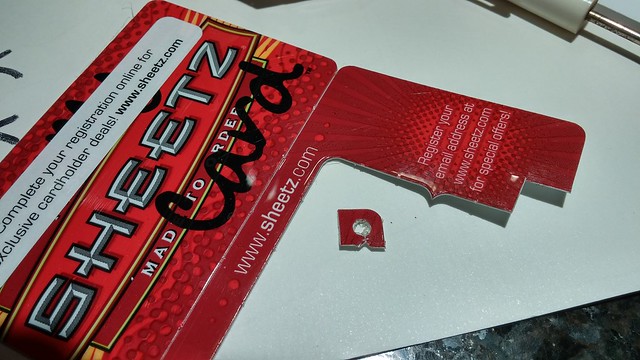
I did a hybrid installation of my own, using some more of that Sheetz customer loyalty card.
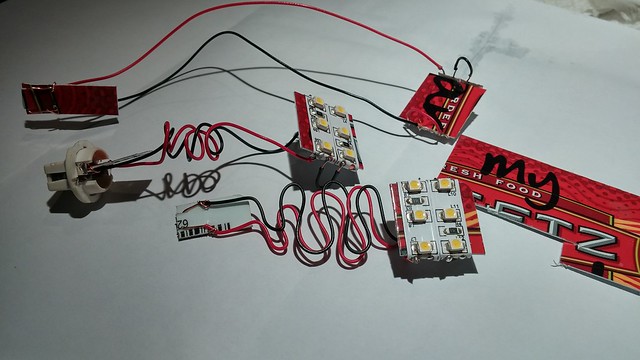
The adhesive LED's are stuck to the card, and the wires just soldered connections to them as if they were still in a short strip (all LED groups are run in parallel). The LED cards then rest right in the opening that would catch the light of the incandescents. They stay there by themselves, but I taped them down for insurance. The leads are then wrapped around another small piece of card which just presses into the stock socket.
Because they're diodes, you just have to be sure to start the socket into the hole so the 1/4 turn has the positive leads ending up on the bottom of the gauge cluster (closest to the outer edge of the flex circuit). The extra leads just get stuffed into the cavity where the incandescent would have been.
Here's my test power supply. You can feed power to the sides of any of the sockets from the back. 9V is plenty to determine you're getting them all connected.

In the background there, you can see the foil tape I used to cover the lightguides on the bottom of the cluster. Nail polish remover worked well to remove the old darkened silvering, and the new foil tape is smooth and reflective.
I also got some Meguiar's #10 plastic polish, and went at the cluster's plastic cover before re-installing it. I didn't get every scratch out, but I got it looking way better.
Before:
After:
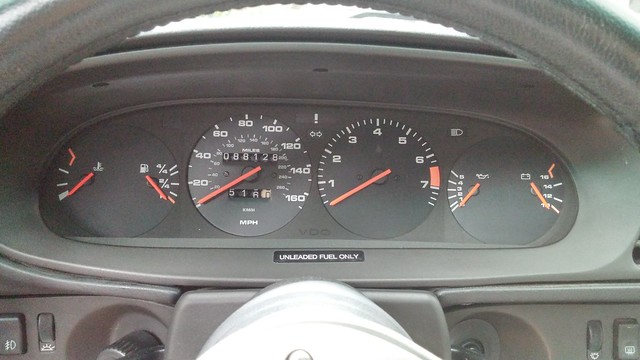
So I got it all together, and everything works! I can even see the illumination in the daylight, so I'm betting it will be plenty bright when it's dark. I took it for a drive, and the odometer turns, and I did a little calibration on the highway, just to see that the odometer miles tick off about as fast as the real ones do.
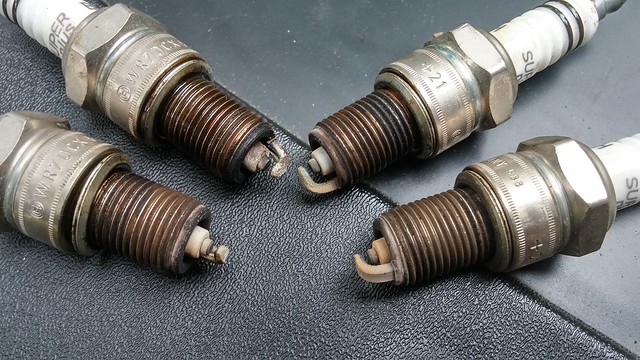
Also this happened:
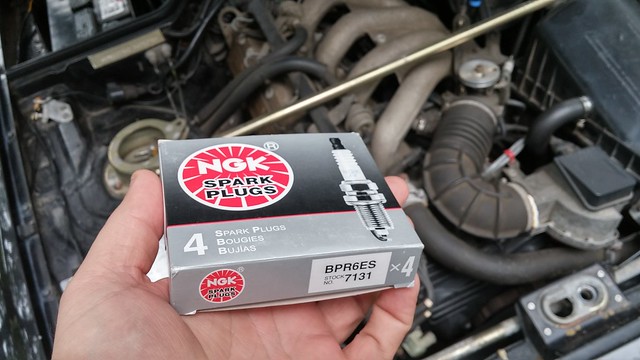
The old plugs looked ok, with decent gaps and no significant cathode or anode degradation.
The car runs fairly well, and after all the rain we've had here on the east coast, my goal is to just have a dry, running car by this weekend. I may have enough time to do the exhaust before then, but the schedule is not looking good, especially since I've never welded an exhaust before, and these things tend to take a lot longer when you have to temporarily clear a ton of crap out of the garage every time you need to get some work done.
I still have hesitation on acceleration, especially in second gear at lower rpm's. Anyone know a 944 expert in the Washington DC area willing to take a look?
I just went out to see what my dash looks like in the dark, and wow, it is pretty bright. With the dimmer all the way up, it is probably a little too bright unless you are in a well-lit city. With the dimmer all the way down, it is still probably going to be a little brighter than I would like on a dark highway.
It's not so bright that I am going to have to take action, but I just wish I could turn it down to almost zero. Before the LED conversion, I could turn it from barely visible to just visible (highly scientific description of light levels). So I suppose the adjustment range before the conversion was pretty narrow.
I guess I am simply disappointed with the attenuation range of the dimmer scroll control. I wonder if there is a handy way to make it go from 12v to 5v, rather than the 12v to 10v which it currently seems to do.
LEDs typically cut off suddenly at a certain low voltage threshold, as opposed to incandescents, which dim all the way to nothing. But I am not even getting close to that low end drop off voltage. There is room for more attenuation.
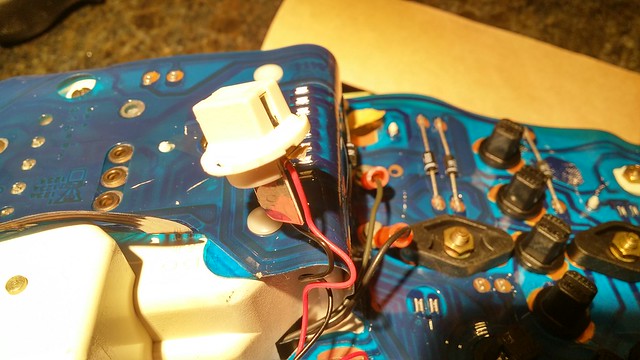
Tonight I took apart the air flow sensor because I was certain that was the reason for my hesitation on acceleration.
I followed the excellent instructions available on www.clarks-garage.com for the testing and cleaning of the sensor.
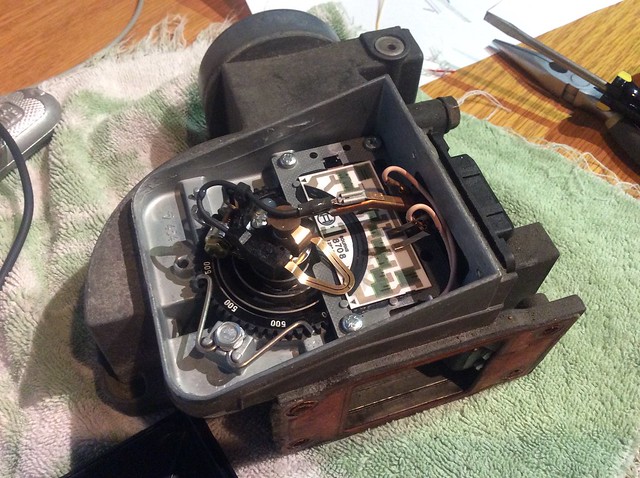
Here it is, actually, after I did my testing and minor modification to repair it.
My testing showed that the unit behaved exactly as expected, with all the correct voltages, except at the very extreme wide-open position, where it appears the contacts have rubbed all the way through the pad. You can see the white spots here:
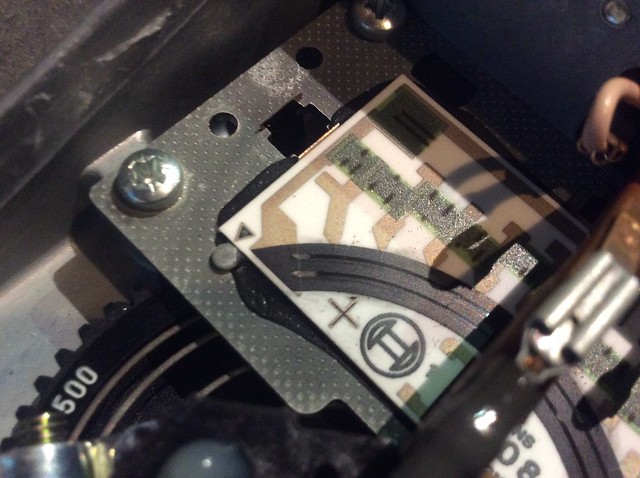
When the sensor's barn door opens that far, the voltage drops off entirely. So I'm really excited at that point, because I'm thinking, "I got this."
I bent the little copper contact arm so that it rides a little closer to the center (a shorter radius, in the clear area of the contact strip).
You can see the new path of the contacts here, I think:
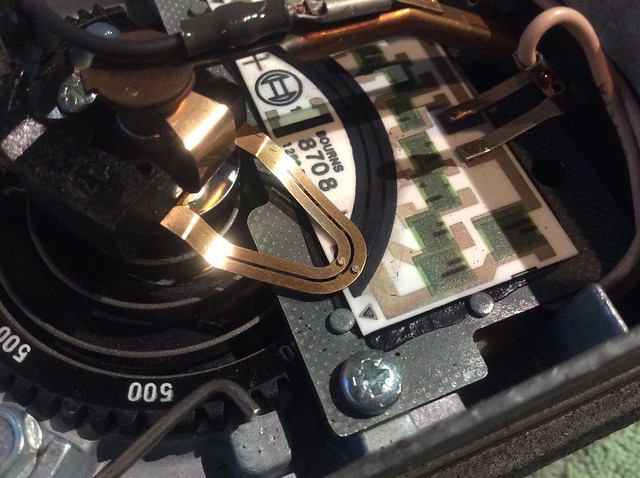
(actually, I think you can see them in the picture before it a little better. You can see the faint dark lines just inside the white dead spots)
So I tested it again, and now the voltage gain with the opening of the barn door is as smooth as can be, all the way to the extreme. I'm thinking, "I am going to be FAST now!"
I put it all back together with fresh silicone, dropped the unit back into the car, tightened everything up, started the car, and it behaves about like it did before. I don't think it improved at all. Maybe a little, but I think it's my imagination or wishful thinking or whatever.
E36 M3.
It still sounds like it's gagging when I step on it starting from idle or from a low rpm. When it's idling, the idle surge is very faint, but it's still there. It's not a perfectly constant rpm.
Another symptom is that when I gun the engine, the car takes a few seconds to return to a stable idle. When I release the accelerator, the engine goes back to a bumpy rpm that's slightly lower than idle, and seems to struggle to find idle again for maybe three to five seconds. When it finally does, it smooths out again.
I really think I need some expert ears. Anyone in the DC area willing to have a listen this week?
Check the throttle body seals, TPS, ICV and your fuel pressure regulator.
You'll need to log in to post.


