1 ... 6 7 8 9 10
fidelity101
fidelity101 UltraDork
3/3/18 3:05 p.m.

Well if it was a ringland I think I would have silver oil and I'm just overreacting.


If you want something done right you do it yourself, hence why I never take my vehicles to shops in the first place because I'm just as competent or more than their mechanic but when I pay for things done I like that they are done correctly...

so I bought a compression tester (for piston type engines)


And did my own test to verify their claim. Unplugged CKP, unplugged connector to coils, unplugged fuel injector connectors then put the the battery on the charger only after I warmed the engine up to get more accurate readings.


plugs looked fine too, maybe a touch lean but nothing scary.

Replaced the leaking trans line and now lets hope that everything is just peachy and I can go get some dyno tuning done to the engine just to be safe.

Sonic
Sonic UltraDork
3/3/18 5:36 p.m.

Hooray!

759NRNG
759NRNG SuperDork
3/3/18 8:16 p.m.

And 15w50 as crankwalk  suggested next oil change perhaps.....

fidelity101
fidelity101 UltraDork
3/16/18 9:03 a.m.

4 things left now:


1. That stupid rattle!!!!!

I didn't notice the noise until I had the exhaust "fixed" it leaks still a bit and when you strike it, it rattles. Maybe the root of the noise???

it is a bit hard to tell in the video but you can hear it more profound in person, you slam the door you can hear it a little too. (I'm kind of grasping at all straws here)


2. OIL LEAKS! drive me nuts! It seems to be coming from the rear oil pan, the filter and the CKP sensor - which leads me to think that this is crankcase pressure issue. No vacuum leak now (gave up on the catch can) which also leads me to believe that I am still blocking a part of the PCV system. I checked with some mechanics wire and a USB boroscope for your phone (which was well worth the $14) and the one in the bottom of the intake manifold is not plugged. However I am blocking the fresh air port on the intake manifold with my throttle body adapter. OBSERVE!

the adapter blocks this square off...


look at the throttle body for the 8.1 it has a port that leads directly there and is before the throttle so it sees full vacuum all the time regardless of throttle position.

So I either need to drill and tap for a 1/8" NPT fitting that gets to that port in the manifold or go through the spacer somehow. I already have a port I made on the intake tube for the fresh air so a hose will not be a big issue seeing air before the throttle plates.

3. Clutch fan bearing are bad (has some wiggle to it) and the blades are a bit bent and rusty so being that this was the only junkyard parts I used on the swap I will just replace this and move on...

4. With all of this taken care of THEN I can get a dyno tune understand the power output and give you a proper burnout video (when I find a 2nd set of wheels with bad tires on them because I want to go with a set of winter tires for this beast because BFG T/As are terrible on icy roads)


fidelity101
fidelity101 UltraDork
11/30/18 2:57 p.m.

update! 


I bought blizzak LTs and put them on some powdercoated OEM wheels, truck shows 70k miles (16k miles on the swap so far, engine is now at 100k) and only a few issues really remain:


1. The noise as mentioned before is still there, not getting worse or better so I give up

2. I keep getting 02 sensor codes for insufficient switching because it keeps sticking to the richer end of the table due to the re-cal

3. it will trigger a misfire if I keep the RPM above 3k+ in gear the higher the RPM the less time I need to keep it there to trigger the misfire. But I can row through the gears WOT no problem so its a bit bizarre. 

4. oil pan/timing cover oil leak still present - stopped caring. 

5. US general toolbox in back to aide the rally service and general useage, 2nd battery coming soon and ARB air compressor to follow with the enhanced battery setup. 


I did 1100 mile trip for the holidays and managed about 11.6mpg 

fidelity101
fidelity101 UltraDork
4/10/19 10:26 a.m.


"updates!"

  • It turns out that odd sound was just me being ~1 quart low on trans fluid, so that took care of that!
  • The flex sections in the exhaust were all leaky and failed, causing the exhaust to clunk around too -  now the truck is quiet again. 
  • because I shortened the harmonic balancer the normally exposed part of the shaft got a bit pitted and now this part is in contact with the front main seal due to the shortening so it is beating up the seal (yes I did clean up the shaft before installing the balance ) causing it to leak and it only going to get worse. So: hindsight when doing this swap - buy a new balancer ($65 aftermarket, $165 for GM part) and turn that one down to size OR if I really had the pockets I would get an 8.8L crankshaft from PSI as that has the correct CKP tone wheel for this ECU setup at the back of the engine where the existing CKP can be used but i do not want to an engine rebuild any time soon. 
  • randomly get CKP codes for voltage issues but tend to clear and go away for a few months at a time, might be related to that oil leak at the CKP because the new timing cover is garbage. Going to keep a spare CKP in the truck with me to prevent being stranded if stuff really goes bad but so far so good. 
  • about ready to pay this beast off next month (thanks tax refund!) so I can work on the mods part of this build like false floor, onboard air, dual batteries, awnings and other overlandy/service/camping support rig pieces.
  • truck now has 77k miles and has been my daily driver since fall/winter due to the rx8 engine failing (I know, shocker!)


this oil pan/front cover/front main oil leak issue is really annoying... I wish that part worked correctly as designed and produced. 

here is the winter wheel setup :)

blizzaks with 1' ground clearance and 4wd w/ locker rear is a HOOT btw

klipless
klipless Reader
4/11/19 4:01 p.m.

Glad to see that this truck is still kickin'!

fidelity101
fidelity101 UltraDork
4/12/19 9:01 a.m.

In reply to klipless :

its been my daily! work gives me a car allowance, pays for mileage, I have a 8 mile commute each way so the fuel economy is really no bother and its about ready for pothole season here in Detroit so I'll stick with the baloony tires and couch for a bit before stepping up to a more adult car again. 

klipless
klipless Reader
4/12/19 1:57 p.m.

In reply to fidelity101 :

Didn't realize you were a fellow SE Michigander. I'll have to keep my eyes peeled for this beast.

fidelity101
fidelity101 UltraDork
6/21/19 3:54 p.m.

Lien removed - time to play! 


So with a few small hardware store runs, I managed to make a false floor that was strong enough to hold the required rally totes or for sleeping on road trips...


I got tired of taking a lot of things with me but only to have to put them back in so often I made some drawers for them and used some latex paint to clean it up and toughen it up a bit, 0 smell linger so it was quite nice compared to a varnish or oil paint. 

Now instead of having a tub of stuff in the back I have them stored in these drawers nicely. I need to put a front on them for easier grabbing just haven't had the time.

The one on the right is longer so I can stash a 10x10 pop up and my folding campchairs, misc tools...


The other side  has a shorter drawer because I have cubed off some space to provide real estate for an inverter, high amperage 12v leads, air compressor.  (TBD at the moment of that right now)

So the 2nd row seats can function flawlessly with no interference, which has the added benefit of being able to reach the rear easily still.


a big air mattress fits in there in the back great too!

ontop of that with all the increased rally and a lack of desire to repair my existing open trailer, I sold that and upgraded with some additional cash to this!

gonna have a trailer project in my future soon too, mostly organization for spares, tools, tires etc. I think it needs a matching paint scheme too... right now it has a lot of mopar fadded stickers. 

fidelity101
fidelity101 UltraDork
12/5/19 1:23 p.m.

So racing has taken a priority this year and I didn't get the chance to really update this truck like I wanted but I have made some progress and have had some teething issues with the swap still...

Truck is up to 89k miles and overall holding up okay, besides the oil leak(s). I got some insight on this one of my friends is an engineer at GM specifically on their big block parts so I was able to pick his brain on the issue's that I have been having.  So for the oil leak they have had issues with the old casting mold being worn out (and certainly had witness marks of an aging tool) that was causing porosity issues, so my fruitless attempts to fix an oil leak in the timing cover was wasted because its so porous its leaking right out of the cover itself. compounded with the bad sensor design placement and oil pan, its quite greasy underneath... 

so why is this relevant? I have another problem: and its not my TMPS


The key part of this swap is getting the electronics of the truck to work with the new engine, the hardest part is cam/crank signal which is tied to the bad casted timing cover. PSI makes an 8.8L based on the 8.1 using the same ECU generation/electronics that is in my truck the only difference is that they put the 8.8 for gas generators or run them at LPG in school busses. 

Again, why is this relevant? 

Another difference between the PSI 8.8 is HOW they get their crank position, it is on the back of the block like the std 8.1L and like most chevy v8s they put the distributor there or CKP there because of crank deflection. 

This is potentially the big issue, if you hold the RPM above 3krpm for sustained duration (the higher the RPM sustained, the less time it takes to react) it will cause a misfire, the ECU is designed to always save the catalytic converters (which it has none) so it is too sensitive of a crank position and because of the sensor in the front it is more prone to crank deflection rather than the tone wheel next to the main bearing cap. So I am getting false misfires under partial load and sustained RPM which is really annoying for hills because it will chime and beep and flash a CEL and flash "service stabilitrak" because it thinks its misfiring and  trying to save the cats, cuts power and when towing 6500lbs this is really annoying when you can only use 1/4 of the torque you have on demand. These companies ditched the front CKP pickup for this reason because they needed to meet emissions requirements and if they are fighting missfires that are false this is not helping their legality to sell their product...


Solution? Potentially it is still a PCV issue (wild ass guess) because it may be falsely calculating the air and confusing the ECU? gen 3 vs gen 4 PCV systems are quite different. Otherwise I am looking into an engine rebuild with a PSI CKP and an 8.8L crank (which is a direct swap in) but this is much further down the rabbit hole than I want to go so I will first address the PCV system. 


so get a spare intake manifold from the junkyard and begin the "intake mod"


here you can see the stock PCV system for the 8.1:


all it is an open port that sucks air in from the valley, thats it. so to do any PCV system updates you need to pull the intake and plug this, but while you have the intake off, you can remove a casting wall and improve the flow. Raylar has a good animation of this:

tada!


now with the throttle body adapter blocking this throttle body port I ordered a new adapter and prepped the new manifold for swapping, basically cut the ugly bump out, do your work, weld that cap back on and on. 

added bonus is that I get to re-do the intake plumbing which frees up a battery tray mount (where the stock airbox currently occupies) essentially which allows me to mount an air compressor instead of running crazy thick leads all the way to the back. 

this is a bit of a win win and I will just run an aluminum tubing/silicone hose style intake. 

so with the intake modified and PCV re-done I will get an engine/trans re-cal and go from there...

more on that to come. 

fidelity101
fidelity101 UltraDork
12/5/19 1:32 p.m.

So the trailer started to get organized, after painting the inside white, in efforts to make service less hectic and less of a mess. 


simple, and effective its a tight squeeze but it works and the car fits with some room to spare! Still need to make an exterior tire mount as well as find a way to store the truck spare (factory attachment rusted out and failed) then eventually have the toolbox raised off the floor allowing for more storage spaces underneath for totes. 

still tempted to hang all the spares on the wall like the pro's with the mesh but that requires effort, this is jam E36 M3 in a box and stuff it under a table type of ease...

after that some lights will go up potentially as the front of the trailer has a battery box and is wired in a way that receives alternator voltage, so still working the idea of an inverter and run cheap Menards or HF lighting AC style or  do something else that operates off the existing DC voltage. 


not too shabby! 

Patrick
Patrick GRM+ Memberand MegaDork
12/5/19 1:43 p.m.

I got some folding tire racks off amazon for my trailer for under $40 each and they've held up to 2500 miles with heavy wheels on them so far.

fidelity101
fidelity101 UltraDork
12/16/19 2:31 p.m.
Patrick said:

I got some folding tire racks off amazon for my trailer for under $40 each and they've held up to 2500 miles with heavy wheels on them so far.

Hindsight I probably should have done that, the wood is a bit heavy... and I kind of botched the dimensions on accident and made it harder to assemble but managed to get it done in sturdy formation. 


meanwhile, intake progress moves onward!


and now to vent the crank case properly after re-assembling the intake manifold...


next up silicone hose intake and install the fancy new to me modified manifold. 

java230
java230 UberDork
12/17/19 10:02 a.m.

Do DC LED's for lights. Running thru an inverter is so energy inefficient. LED's are CHEAP.

fidelity101
fidelity101 UltraDork
12/19/19 10:32 a.m.
java230 said:

Do DC LED's for lights. Running thru an inverter is so energy inefficient. LED's are CHEAP.

Good to know. Also I'm not fond of adding an inverter to the trailer when the suburban has one. (not hard mounted yet but is physically in the truck)


meanwhile, intake progresses!


silicone hose intake 4" diameter


now with the crank case vented out of the oil cap, I still have my ports on the valve covers I can eventually run a catch can setup if I wanted, but for now this is good. 


I have lots of room for an air compressor now which was not feasible before due to very high current leads running the long distance to the trunk from the engine bay, 00 gauge wire did not sound fun for the ARB twin compressor.  Still need to take some exact measurements but I am open to going to the single for space/cost reasons too. 


now thats left is to do a touch up on the engine/trans calibration and see if my "misfire" issue dissapears, if it doesn't I need re-think next steps...

fidelity101
fidelity101 UltraDork
12/21/19 12:17 p.m.

Okay so lesson learned, PCV is a good thing because I needed that suction to keep my oil leak at bay, now it is the exxon valdez...

BUT with the PCV port plugged under the manifold now I can set up a proper PCV system like the original LY6 had. 

parts on order and should arrive after xmas, hopefully wrap all that up and then be ready for the rallyX tow on Jan 4th.


THEN I can do a proper recalibration. 

fidelity101
fidelity101 UltraDork
12/22/19 11:26 a.m.

Something I did a while ago that I forgot about was utilize the good battery in the dead engine rx8, so with this being a 2500 it was very easy to hook up a 2nd battery, it has a tray ready for it already. A simple battery isolator and ta'da!


it is very common to need the use of an angle grinder or dremel or some other power tool when you are in the middle of a field for rally service, not to mention with the inverter hard mounted it will be a very self sustained rig. 


I have a 12x11x6" space for an air compressor on the other side now. I plan to mount an air tank where the spare tire used to be underneath and eventually have a swing arm for the spare tire. 

fidelity101
fidelity101 UltraDork
1/1/20 2:37 p.m.

Don't need the compressor at the moment so I moved onto more urgent matters, I have hard mounted my dual battery fuse so its much safer now, the PCV plumbing is done and works - the catch can should arrive Friday and its an easy install. Got the misfire issue fixed, but the tune will have to wait as I have an exhaust leak at the manifold/head gasket... so I'll just sit on it for now until the exhaust gets worse and either fix it and call it a day or spend 1500+ and re-do the whole exhaust with some stainless long tubes. 

so aside from that I was able to finally get around to mounting this 4KW inverter. The idea will be to run posts to the front of the inverter and will tap into the 2nd battery with some long heavy gauge wiring. 

also sneak shot of the handy fire extinguisher mount setup I run on pretty much everything, its a simple pin to remove then part of the mount that attaches to the fire extinguisher slides out and you are ready to rock!


this also leaves me just enough room to find a way to fit a small toolbox which is next on the short list of vehicle prep. It turns out when you drive a project car, things tend to happen... who would have guessed?!

fidelity101
fidelity101 UltraDork
1/6/20 2:53 p.m.

I had a better idea and quicker access to the fire extinguisher by relocating it to the floor. This allowed me room for a decent sized toolbox so I could some roadside repair if need be. I also had to add a divider to keep the toolbox from hitting the inverter... but had just enough space for the cable. 

Now that the bed side is done, need to find a spot for 2 firewall bulkhead connectors and run the 12v leads from the 2nd battery to this device. 

yes... I need to vacuum...  :) 

Recon1342
Recon1342 HalfDork
1/6/20 4:37 p.m.

Looking snazzy, vacuum or not...

fidelity101
fidelity101 UltraDork
3/4/20 6:16 p.m.

Bought a new daily so this now I can spend some time doing maintenance It is time for operation NO EXXON VALDEZ!! 


the timing cover is the new design with a few tweaks and hopefully not leaking, it is made with a brand new tool not some sloppy worn out one so that will help. Die casting tools don't last long 

Also I went with a new balancer, I think I cut too much off the top last time and it is related to my belt slipping issue when i hit a puddle, this should correct that. As well as when you shorten the shaft you now have the formerly rusty area beating up the front main seal, so hopefully a fresh start will help. I'm tired of all these damn oil leaks and I have well water so I don't feel like slowly poisoning myself. 


fidelity101
fidelity101 UltraDork
4/9/20 11:28 a.m.

Okay so quick update and to elaborate on a few things. The trigger kit is more focused on hot rod swaps (454s) than big trucks that came factory with EFI (496s) so there are some issues. 


1. the new cover design to not support truck accessory drive water pump, (not sure about van/ single serp belt/big truck style, they may use the same waterpump) 


so you must grind part of the CAM sensor boss away for the top bolt location so unfortunately this is a wasted feature. 


2. Because of the new casting mold, the sensor won't leak oil past the o-ring.


3. You need a few bolts to switch to allen style because there are some recessed bosses so you for hot rod swaps you get better clearance on aftermarket harmonic balancers.

4. The lower section of the timing cover that meets the pan has a gap in it which causes the oil pan gasket to not seal properly, Larry mentions this in the 8.1 performance manual but its a bit vague:
 

"The front oil pan seal radius on the timing cover needs to be modified. The gen 5 and Gen 6 timing cover has a groove for a lip seal to mate to the oil pan - but this doesn't work with the 8.1L oil pan (gen 7)"


this small variation within big block generation's timing cover/oil pan gasket makes the front lower part of the sealing issue a challenge, in the performance manual they mention how they fixed it with some JB weld and allowing the gasket to seal properly but there is no diagram. Does anyone have a 454 cover they can send me so I can line up and make some clarity for everyone on this swap? I already shelled out the 30 bucks for this book to help out too lol.


Also,  if you wanted to use the inspection cover you need to install it when the engine is not attached to the transmission because of the bellhousing spacer, it makes this complicated in vehicle/attached. 


I'm currently working on my spare intake manifold with this free time with this quarantine time we got too, give it the same treatment

fidelity101 (Forum Supporter)
fidelity101 (Forum Supporter) UltraDork
5/20/20 1:21 p.m.

Not sure if I am taking quarantine  extremely well or completely going crazy but it is allowing me to wrap up a few small tasks and re-re-redo others. 

First things first. no more oil leaks! I am finally bone dry!  (no photo needed because its a boring photo) and I managed to install the plastic splash guard and make a few new splash guards for other areas, hopefully this also will resolve my tossing belt issue. I think when I cut off too much from the balancer it had the serpt belt angle a bit wonky so one touch of water with a tip in of the throttle and off she goes. Need to find a big puddle and test thing theory now...

in other news, I'm re-re-re-doing the PCV system AGAIN! I thought I had it correct with the 1/2" bungs welded on but it seemed to want to fill the catch can in a 200 mile tow (or less)  I think the placement of the driver side valve cover bung was too close to the rocker and was basically sucking up E36 M3 tons of oil. Part of the rear most rocker arm looked dry even...

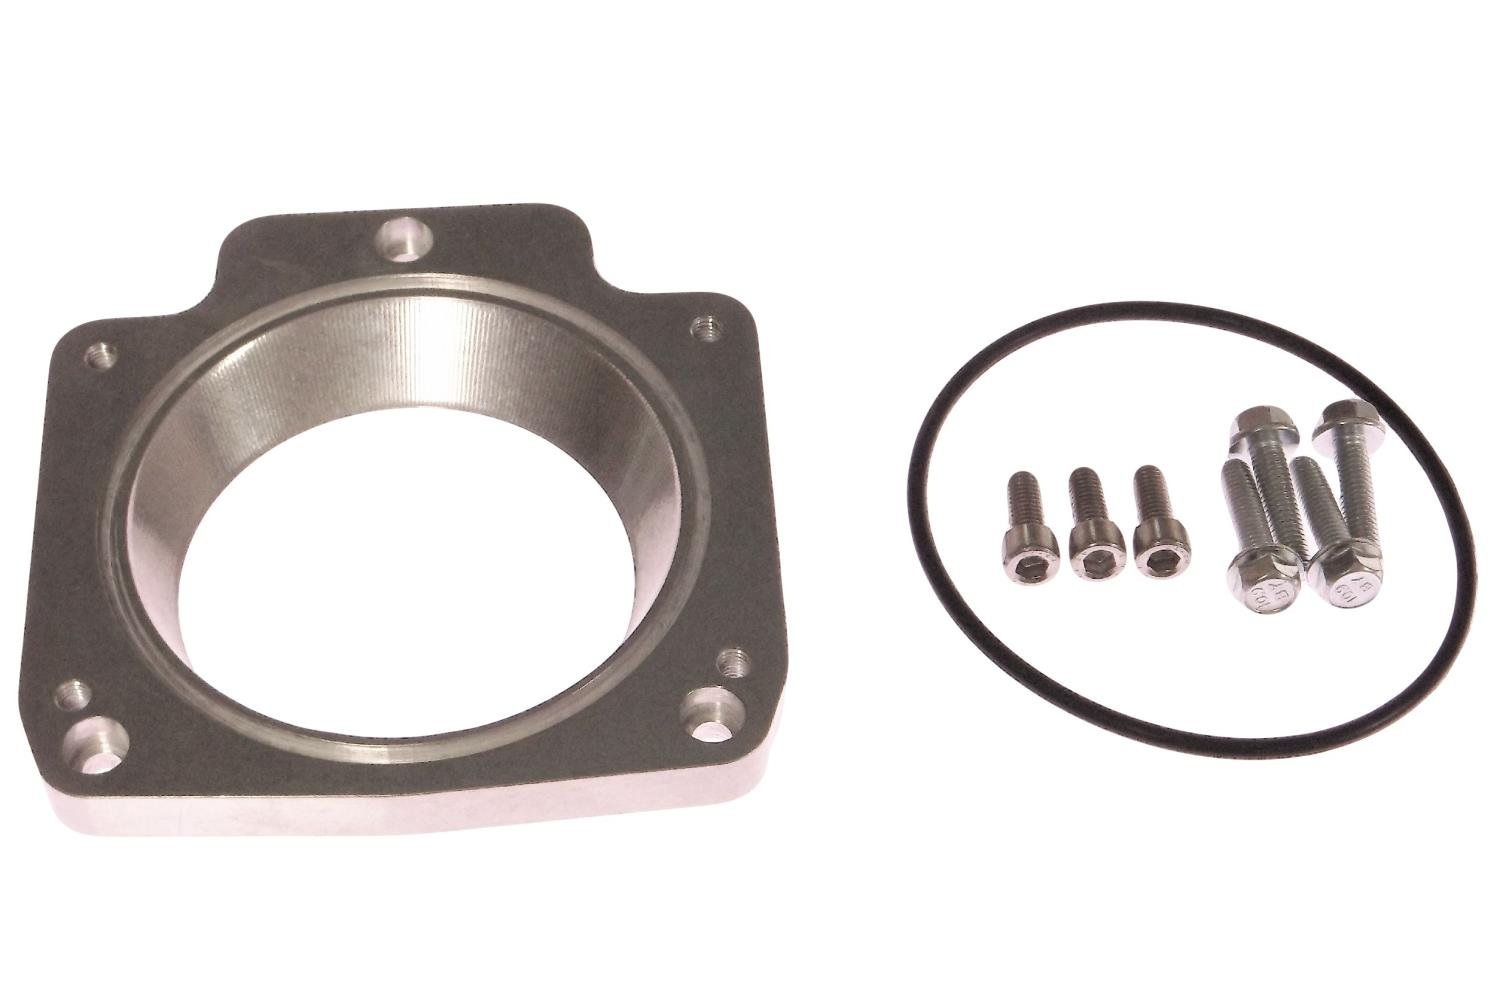
so in brings this fancy ass bling to the rescue (hopefully) as this has been an awful experience since there are so many correct ways to do a catch can setup correctly and cans with some steel wool are incredibly expensive for no reason but I digress....

these have a double baffle system but placement is trickey, they advise that you can put these in nearly any location on the valve cover (where it fits) so I was able to find a spot in-between the rocker and the valve cover mounting hole: 

so while were here it looks like im cleaning and re-painting then re-doing the valve cover gaskets again... *sigh*

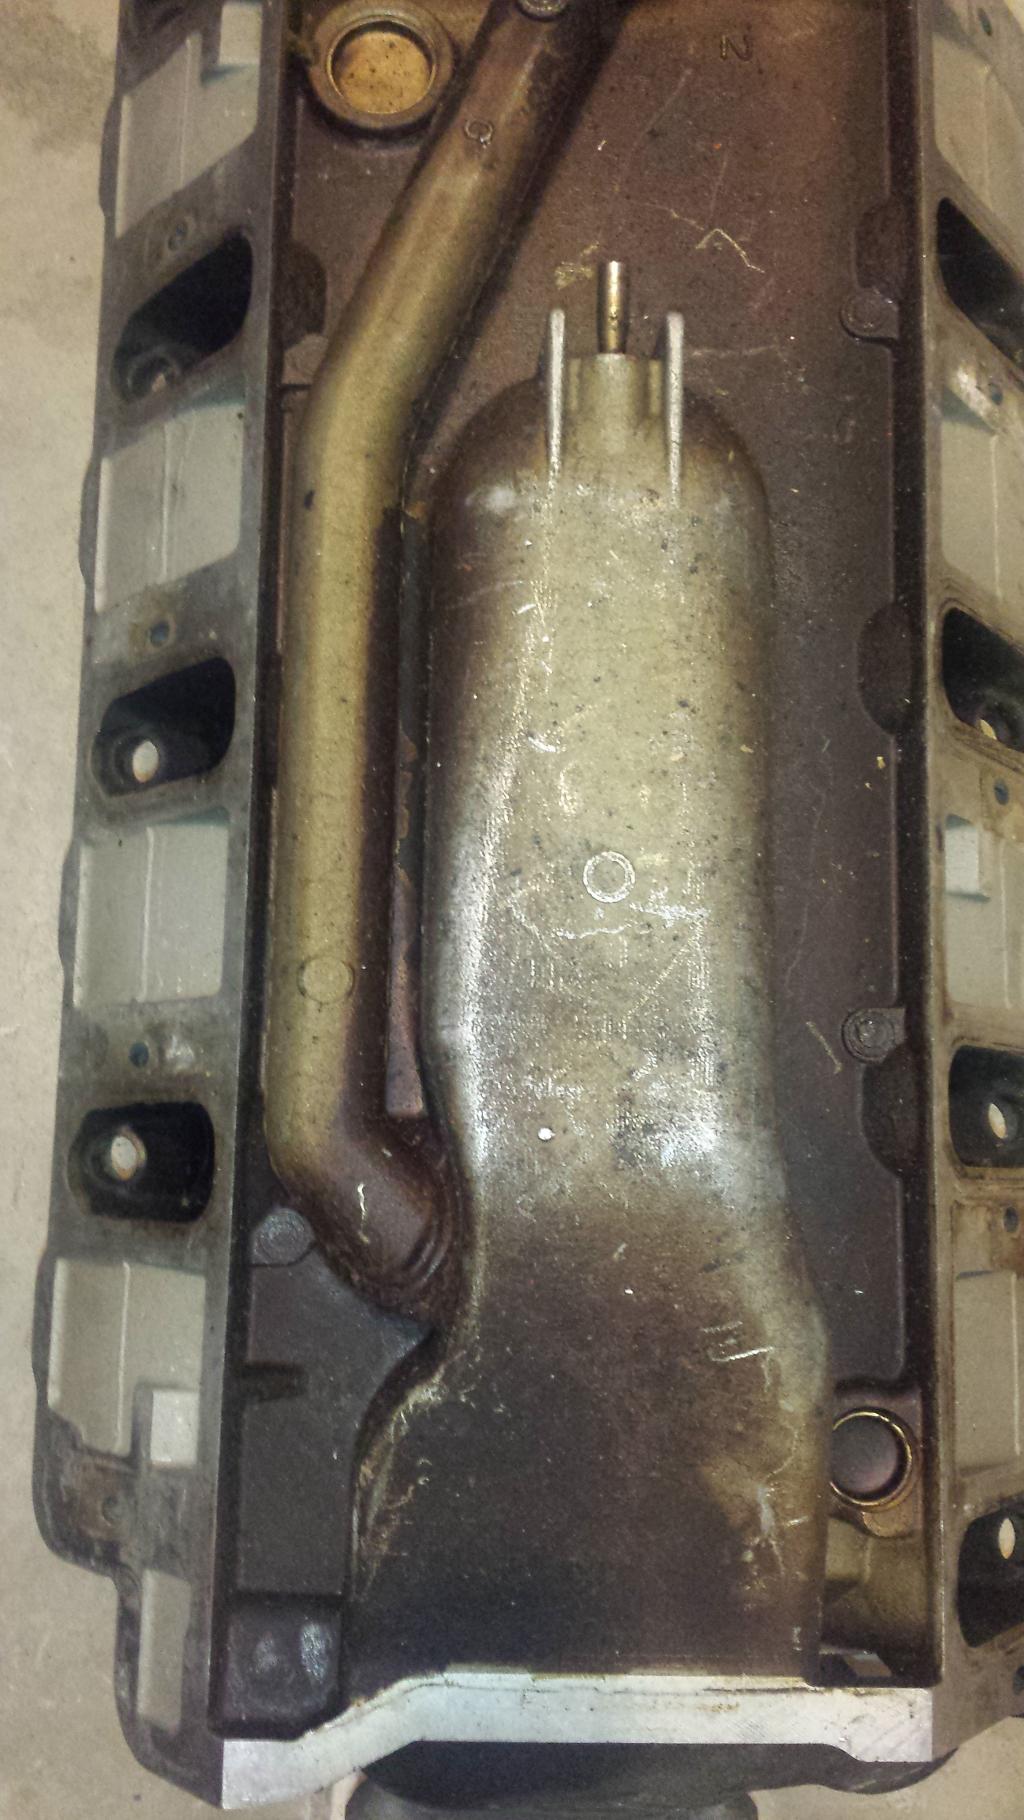
but this gives me hope as the gen six 454s have PCV ports in their valve covers in a similar location, but here is the snazy motionworks kit installed: 


however this is a -12ORB which is huge and I have to neck down 3/4" piping to 3/8s across the system so I am not an airflow expert here but maybe this is something to do with PCV system issues? 

can't quite test it yet as I keep fumbling with adapters and tubing and with COVID delays in shipping its like building cars in the 90s/00s again...  we all have grown impatient that's for sure.  maybe finally after this I can get it retuned properly and for the last time. 


so while I wait on these pieces I did some electrical updates to the truck, "needed" to replace the batteries so I went with an  AGM style (turns out I was just leaving the dome light on in the back) but they were 5+ years old and mismatched lead acid so I figured it was a good time to do that, more robustness is always good and I am moving towards self sustainable service/camping adventure vehicle. 

re mounted the battery isolator better and had to make a bracket for the large between battery fuse but the engine bay looks better, with this done I was able to wire up the inverter I installed many months ago... 

I went with 1/0 gauge wire. its 4KW unit but I don't plan on running a refrigerator for 24 hrs so this should be fine, there is no safe place to put it under the hood and with the airbox out of the way it is a perfect spot for an air compressor! however when it arrived it was missing parts so I'm going through an exchange on that currently so that will have to be installed later (soon).

I was originally going to do bulkheads but it looks like the City of Chicago (prior owners) had already pierced the main grommet so I just ran the thick cables through there and headed towards my high amperage posts... when in Rome I guess - 

I only have 1 area of visible wire and I ran it between the center console and driver seat, only a little bit of gaffer tape needed to conceal, but take a look, everywhere else is pretty easily route-able and hidden!


you can spot the black wire if you have a keen eye, but the real hero for the backseat is this weathertech floor mat, it conveniently hides the large wires and works really good as a floor mat so theres that.


then the wire runs through the rear seats and under this clever panel:


flip the back seats up and everything is well reachable, (makes for easy fire extinguisher mount too) here is what it looks like under the panel. 

and when its all buttoned up!

inverter tested and works good, now I have a high amperage lead that is connected to the secondary battery should I want to wire up anything goofy back there. 


Now to finish up the PCV system and install the air compressor when the missing parts arrive. 

fidelity101 (Forum Supporter)
fidelity101 (Forum Supporter) UltraDork
5/27/20 2:15 p.m.

well the PCV system seems to work? I'm still wondering if this is too much air flow and I need to neck it down to 3/8s instead of some mix of 3/8s, 1/2 and 3/4... 


Since no -12ORB to 3/8 barb exists, I could 3d print it but Im not so sure on the resolution on the threads, luckily the -12 ORB is so big (1.25" wrench size for the nut portion) I can drill it out and tap it for 3/8 NPT to make my own fitting. Problem is that these fittings are a bit of a bitch to get to so I had to buy a crows foot attachment guy to make it installation possible. 

Still need to get a tune done but I will tow this weekend and see how much oil gets ingested, it will be a good comparison. From there I can work towards this, potentially I just need a reducer on the inlet size? Maybe I'm drawing too much air (regardless of baffle) through the PCV system. 

So with these questions unanswered, I moved on towards the fun project and likely to be under utilized... 


BEHOLD!

I figured buy once, cry once. I also have a 5 gallon air tank on the way that I plan to install in the rear and give myself a front/rear air line outlet so you can plug in air tools or fill bike tires/dry your hands/blow air at yourself/whatever even though most my powerful tools are electric now and maybe even an electric die grinder is coming I still want this to be versatile as possible. 

the whole reason for my hot air intake was to provide some room to package this as putting inside the cabin was an idea but I fear it pulls to much amperage (58A) for the wires and this spot is just too perfect. 

plenty of room for plumbing too and the intake can be adjust slightly on its pitch, but it fits perfectly where the airbox or battery tray would be on a chevy as noted above. The beauty of this is that I'm pretty sure this same airbox/battery tray stamped piece is nearly identical on chevy trucks dating back to the late 60s lol. This would fit in the old suburban in the same spot...


you probably can squeeze it on the factory tray without any modification (aside from mounting compressor mounting holes, which BTW this was a huge help on  - https://grassrootsmotorsports.com/forum/grm/how-to-easily-and-accurately-d/145208/page1/  but the template provided works pretty good too) but I opted to weld a small piece and drill some new holes and add rivnuts so this was a bolt in serviceable piece without having to struggle too much, the air filter comes off with ease and everything is accessible. 

don't let your OCD fool you the shallow button head hardware helps with mounting, also I ran out of this hardware on this project....

I also added an extra splash shield from some leftover plastic that I use for light duty skid plates and mudflaps for the rally car. 

this catch can is stupid and it will be replaced soon but the engine bay is quite tidy, once the wiring is completed I will wrap them to match the rest of the interior. If you tighten the bracket you can't unscrew the bottom piece, and when it gets warm everything expands together and its a PITA to remove (also very hot and smooth so nothing to grip onto) so while I wait for brown santa to deliver me more goodies, I return to the mazda for more project updates... 

next up:

  • catch can/PCV system - FINISH IT ONCE AND FOR ALL!!! (as long as its right.)
  • update truck engine/trans tune
  • mount compressor switch
  • mount compressor distribution block
  • broverlanding traction pads (hide neatly behind the roof rack spoiler)
  • spare tire/bike carrier - TBD
  • 5 gallon air tank
    • mount said tank to chassis
    • plumb system
1 ... 6 7 8 9 10

You'll need to log in to post.

Our Preferred Partners
LIRQJyxzs8qf7r1JV6k1gyT27xKQpNIUGCdvJ6tP1quzburWPDkH7dkeaGlrgmrT