


Finally got the hardened washers and the special "Weber" 10mm hex nuts for the GT3 control arms yesterday. Put them on, control arms are now ready for install. Also got 4 liters of the special Porsche tranny oil that costs an arm and a leg

Finally got the hardened washers and the special "Weber" 10mm hex nuts for the GT3 control arms yesterday. Put them on, control arms are now ready for install. Also got 4 liters of the special Porsche tranny oil that costs an arm and a leg

I'm curious, what is a "Weber" nut and does it's 10mm socket get lost just as easily?
In reply to sobe_death :
Guess it's meant for a Weber carb? I wanted it because the 10mm hex makes it much easier to fit a wrench in the control arm vs a 1/2" head. That wrench barely fits in the control arm. No worries about the socket, can't use it!
OK, so up at it early this morning as I need to get these control arms done today. I need the car to be able to move around so I can put the other cars on the lift tomorrow and install snow wheels/tires.
Oddly in the videos I watched nobody mentioned that you need to remove the front belly pan as well as the rear diagonals to get access but, well, you do.
The front belly pan is a bunch of metal clips and two plastic 10mm nuts on the front, another two on the back. You'll note in the below picture that I'm missing the brake cooling duct on the right side. I literally just saw that this morning and I'm bummed! That's a GT2RS duct and they're insanely $$$. Argh! Oh well, I've got a brand new set of GT3 brake cooling ducts in my basement stash, guess I'll run them instead. They're a far more palatable $17 each.

Rear diagonals are one 16mm nut, one 15mm bolt and one 16mm bolt. They get in the way of the split arm.


Ok, just three bolts per control arm, easy right? Hahahahaha!!!! Well, getting the front arms out was fairly straight forward. Lining up the "tuning fork" arm on the Cervelli solid caster block? Not so much. That took awhile, plus I had to use a bottle jack underneath the ball joint to set the taper enough to tighten down the nut. Fun!
Then I realized that the GT3 uses different brackets to hold the litronic arm (headlight level sensor in English) and of course I don't have them. Argh!! Ok, well, the shop needs to play with shims during the alignment anyways, I'll order a set and just bring them with me.
Get the front done, first pic is old and nasty.

New to me hotness

Here you can see the marks I made on the rear eccentric bolts to make sure I got them pretty much lined up correctly.

On to the rear. These are even less fun than the fronts, which was hard to believe. First off I got the 18mm gear wrench stuck taking off the ball joint nut as loosening the nut jammed the wrench into the spindle. So I got to spend a bunch of time with an open ended wrench tightening the nut enough to free the gear wrench.
Then when I went to put the new arm back in I couldn't get the "tuning fork" on at all. That's when I discovered there's a very specific sequence of assembly. Because of course there is, since this is a German car and all. But I digress. Anyways, sorta seat the "tuning fork" first, then put the ball joint in it's home with the nut loose, now using a rubber mallet seat the other end of the arm. Line up the eccentric bolt, drive it home, use a rachet to line up your marks. Now struggle with the "tuning fork" bolt and the solid caster bushings. Eventually get it all.
Torque on all these is 59ft lbs for the ball joints, 118 ft lbs for the tuning fork and 89 ft lbs for the inner bolt. Done! Reassemble the front belly pan and rear diagonal arms. Put the tools away. I was going to pull the front axles, differential and prop shaft but I ran outta steam and time. I may do that later on this winter....

This job rated a solid 6-7 on the "suck-o-meter". I'm glad I'm done and I don't want to do it again.
EDIT: Make sure you've got the holes on the caster pucks in line with the tuning forks. So they should be on a diagonal, both pointing in towards the center line of the car, lining up with the tuning forks. Like this...
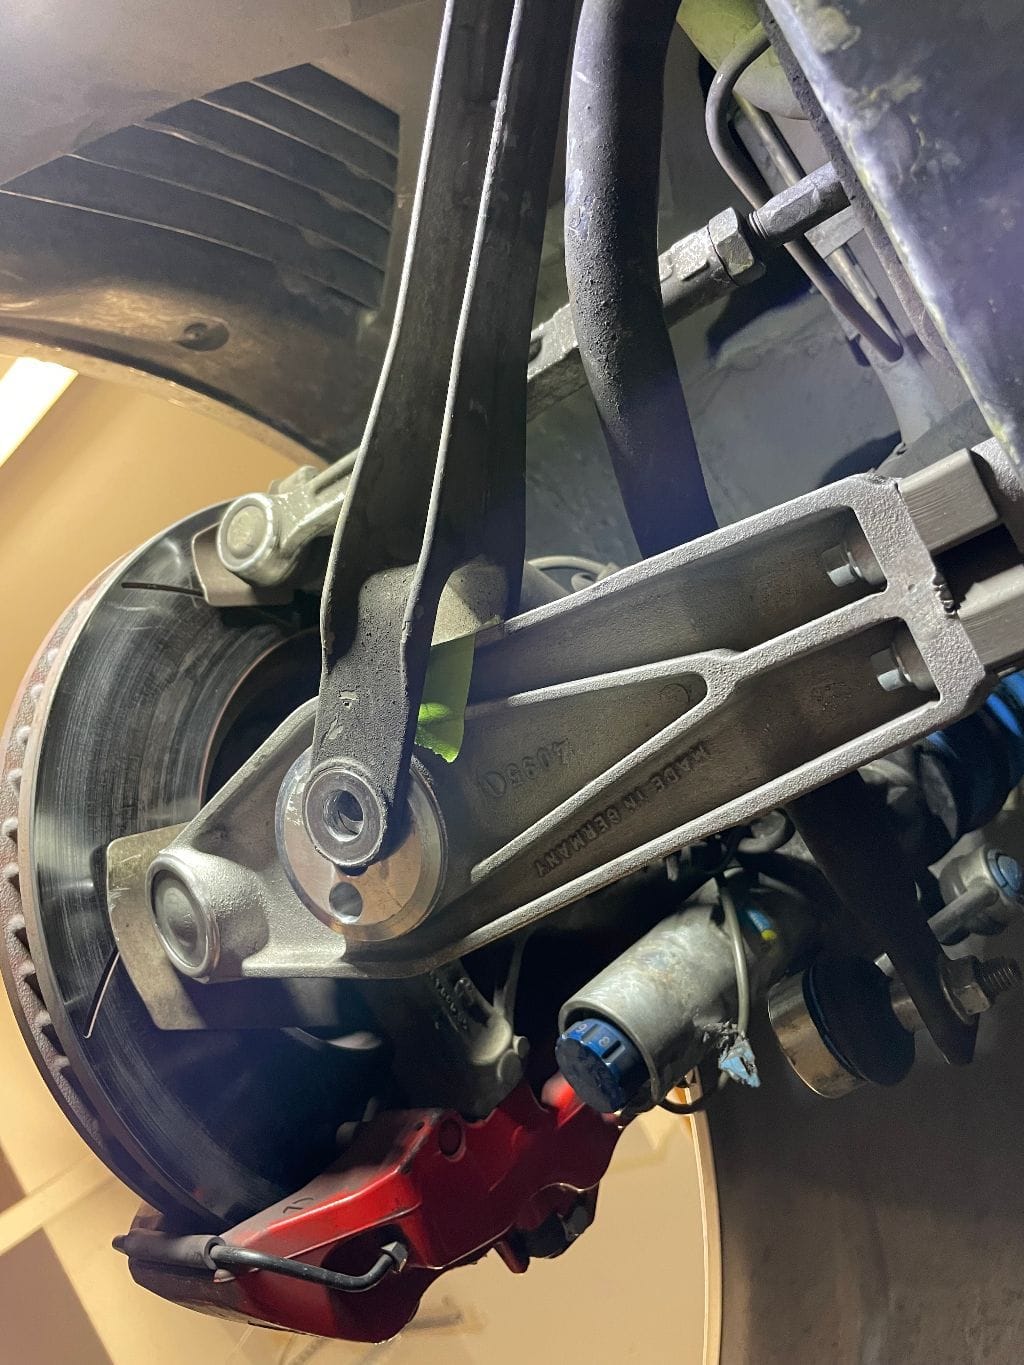
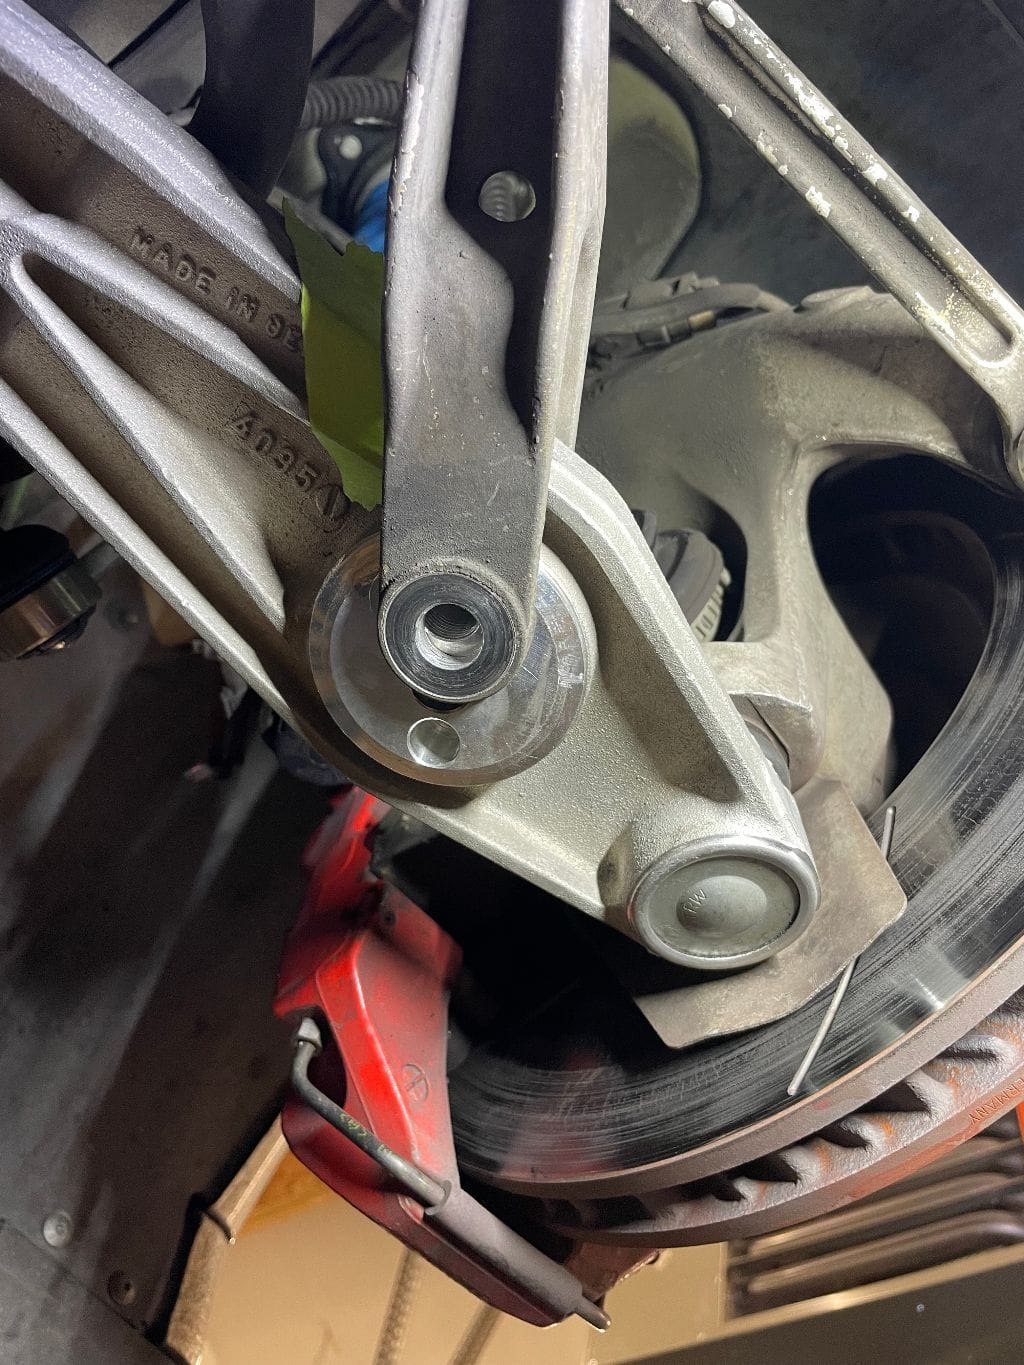
This will be a good starting point for setting caster. Also if you install the arms with a bunch of shims in them, expect to have to adjust the toe in the front, at least as much as the thickness of the shims you've added...
So tow truck was supposed to pick up the car this morning at 7:30am. I set it up yesterday afternoon. I get up around 7, look at my phone and see that they're scheduled to come at 9:30am. Ugh.
I get the car off the lift and drive it up and down the street to see how it does. It does ok and I decide to try and get it to the shop myself. I make it but it was a little sketchy. Call Hagerty, cancel the tow. Get a text from the tow company that they're going to be at my house in an hour. I tell them I canceled the tow. Then Hagerty calls me to ask why I don't need the tow.
Um, I called you and canceled it already? Why? Because they were going to be two hours late. Oh....
Hopefully get the 911 back Monday. Right now the Corrado is at the shop, the 911 is at the shop the KTM is up on the jack and my mtn bike is at the shop. LOL!
Got the 911 back yesterday afternoon. The shop did have to remove the transmission and send it to G-Box to have them install the diff. Unfortunately there appears to have been a misunderstanding, I thought if they had to do that I wouldn't get charged the labor to do that AND the labor to try and install it with the transmission in the car. Apparently they thought otherwise. I've reached out to the office manager and I'll see where that leads me.
Anyways, got the car back home yesterday. The "race" alignment is extremely noticeable on the street, the car really turns in sharply now! To be expected with running -3 camber up front. Car doesn't hunt on the road or follow the crown or anything, so that's fine.
The rear limited slip made a much larger difference in feel than I expected. It's hard to describe but the car feels tighter now and like it has much more of a rwd bias. I can feel the rear of the car pushing it forward more than before. Hard to describe. I was warned to run with the PSM (traction control in Porsche speak) off on track, which I was doing before anyways, because apparently with the diff the PSM intervenes even quicker.
I actually turned it off for half my drive home too, car seems to drive better without it? I need to get more miles on the car and see if that's actually the case or not. I also need to get the car on track with the AWD system still installed and see how it feels. With the diff it may drive better with the AWD deleted, which was kind of my plan all along.
Once a month the Porsche Club has a breakfast. Many of these I can't make because of my Air Force duty but I was able to make it last weekend. Brought the R, it was dry and cold, I suppose I could've taken the 911 off the lift and driven it, but laziness won out.
Had a great time seeing some friends and there was a guy there selling signs made out of license plates. All of $25, so I had to buy one!

Spring prep done! Did an oil change, this rolling oil tank really makes it easy and far less messy. I need to remember to throw some cardboard down on the garage floor tho

Then I flushed the brake fluid using Castrol SRF this time. People swear by this stuff, say they can run an entire season on it. Then if they have to bleed all they do is bleed the calipers. I'm curious to see how it holds up, I was overwhelming the ATE TYP200 that I had been using


I didn't realise you were building a GRM-ified GT2/GT3, looks like I should go back and have a closer look at this thread.

I've heard the same thing about the srf. At $70+ a bottle it had better last!
In reply to jfryjfry :
Very true, ATE Typ200 is $15/bottle. So technically I could just flush it out before every event. That would take a bunch of time tho, so hopefully the SRF is the shiznit everyone says it is.
In reply to BoxheadTim :
Yes, OEM+. So far I've done PSS9 suspension, GT3 front brake calipers/rotors, 350mm rear brake rotors, tune, exhaust, 964RS motor mounts, Euro GT3 seats, GT3 lower control arms, Guard rear LSD, GT2 rear wing, BBS wheels, etc, etc...
jfryjfry said:I've heard the same thing about the srf. At $70+ a bottle it had better last!
And that's not even the most expensive option. It might not look like much on paper but the extra 50-100* of boiling point on the dot5 fluids is a big deal on a serious track car. I went a different and slightly cheaper (~$55/liter) way, but if you're doing serious track things it's honestly a pretty small expense to pretty much eliminate the risk of boiling the fluid.
In reply to dps214 :
I was also considering Endless 650 but that only comes in 1/2 liter bottles. Comparing the temp ranges the SRF was rated higher.
docwyte said:In reply to BoxheadTim :
Yes, OEM+. So far I've done PSS9 suspension, GT3 front brake calipers/rotors, 350mm rear brake rotors, tune, exhaust, 964RS motor mounts, Euro GT3 seats, GT3 lower control arms, Guard rear LSD, GT2 rear wing, BBS wheels, etc, etc...
Did you disable AWD yet? I remember you were documenting the process last year. This is one of my favorite build threads BTW, I love the OEM+ route.
In reply to dj06482 (Forum Supporter) :
Not yet, another person I know locally went 6-7 seconds faster at our local track with AWD still on his car. So I'd have to say that it's not a limiting factor for me. I'm the limiting factor! He's clearly more willing to drive at 10/10ths on the track then I am, 6-7 seconds is a HUGE amount of time. I think I can knock another 3 seconds off my time and still leave plenty of cushion, which is my plan. My first track day of the season is May 1st.
Thanks for the props, I've gone way overboard on lots of my cars so I'm trying to be careful with this one. The rear LSD might have pushed this over the edge, I'll have to drive it more this season and see...
Track prep completed. I've been trying to take it easy as I still have 4 stitches in one finger of each hand. Swapping in the track brake pads this morning was probably pushing it as one incision oozed a little bit. Oops. Anyways, I moved the track tires out of basement storage and put them on the tire trailer

Then I put the 996 into "hover" mode and swapped out the brake pads over to my PFC08/11 track combo. Wheels back on and torqued, pumped the brake pedal a bunch to reseat the caliper pistons and put it back down on the lift deck.

Then I went on a hunt for the Garmin Catalyst cable that goes from the camera to the windshield unit. I knew I'd set it aside last Fall but couldn't remember where. Pulled out the tire trailer to go through the box, couldn't find it. Finally found it in my study, on the book shelf where I have the Catalyst, where I'd already looked. Oh well. Installed that cable so now I won't forget it. One less thing to do at the track, I'll maybe remove it this Fall, not sure.
I'm at the track next Sunday, curious to see how the alignment and rear LSD feel. The car turns in markedly better on the street and I shouldn't spin the inside rear tire on corner exit now with the LSD.
First track day of the season was today! Given that the wound on my right index finger keeps reopening, despite my super glueing it, I felt swapping wheels/tires was a poor choice. So just ran on the street tires, a set of Falken RT615K+'s.
It was cold and windy. I felt it was colder than the thermometer said too. So, first track day of the season, first time out on the track alignment and new rear LSD, it's cold and windy and I'm cold and not feeling it. That showed in the first handful of laps I did, where I was significantly off my usual pace. However by the end of the session I was closer to where I expected to be.
The second session out I trusted the grip a little more, even though it still felt cold and I wasn't on my game. At that point I did a 2:06, within 2 seconds of my personal best on race tires, which made me pretty happy. There was more there but I started to get caught up in traffic, so that was kinda it. Last session out after lunch it was warmer and I was feeling good about the brakes and tires, however the track had slowed down and the best I did was a 2:07. I'll post my 2:06 lap off the Garmin later.
So, takeaways from today:
The Garmin Catalyst said I had a hypothetical best lap of mid 2:04 today, which actually would beat my personal best. Wow, so on street tires (and not even the best ones) if I'd strung together a real flier lap I would've beaten my best lap on NT01's. Damn, and that was me throwing away the braking zone and turn at the end of the back straight every lap. There's probably 2 seconds a lap right there.
The rear LSD made a huge difference, I'm no longer lighting up the inside rear tire on corner exit. I need to be jumping harder on the gas earlier on corner exit now to take advantage of it. The track alignment was noticeable, the car turns nicely into the apex. I put in Castrol SRF brake fluid and the brake pedal was consistent the entire day, gave me much more confidence in the brakes.
So I really do think there's an easy 2:01 in the car, with me driving well within my abilities and leaving room for error....
Sounds like a lot of fun. Improving always feels good.

You can't discount the extra speed gold BBS wheels bring as well :)
Here's my fast lap from yesterday
And here's my "hypothetical" fastest lap, on street tires, which would beat my current real personal best on Nitto NT01 race tires. What's interesting is it's showing me picking up all the time through the corners, which means my off season changes of track alignment and rear limited slip diff have made a substantial difference in cornering speeds.
So I meant to completely unplug the PSM pump yesterday. I even removed the plastic trim piece that covers the brake master cylinder and the PSM pump at home before I left so I'd have easy access to the PSM plug. It's this one, here, under the brake master cylinder

Unplug it and PSM is totally disabled but everything else, like ABS still works. You get a warning on the dash that you can clear with the stalk. Once you plug it back in everything is happy again in warning light world.
Why do this? Well, even if you turn PSM off via the dash switch it's still ON in the back ground. I've found that it'll boost cut me on corner exit, which it did a whole bunch before I installed the limited slip diff. So I just wanted to completely turn it off.
Then it was cold and windy and I wasn't feeling super awesome on the track so I never unplugged it. I meant to try it out in the afternoon session and just forgot. Oops. Well, I'll give it a try next time I suppose...
So very recently I've been having some issues with the front splitter getting torn off the car when I back it off the lift. Don't know why, never had an issue with it before. So one of my eBay splitters got destroyed, which sorta stinks as it was brand new. So I thought about what changed and the only thing I could think of was I was parking the Land Cruiser and had put the drip trays a bit further back so I could line the LC up right, so that meant the 2nd bridge jack was further back than it used to be. So I repositioned the bridge jack all the way to the front of the lift and thought I'd taken care of it.
Well not so much! I pulled the car off the lift and not only did the splitter pop off but the tab on the bumper that holds the splitter in broke off! Doh!!! There's nothing for me to try and glue/bond/plastic weld back on. Dammit! Well, time to do what I do best, which is drill holes. Since the inner fender liner was already damaged I figured one more hole isn't going to matter.
Drilled a hole and threaded a zip tie through it and the mounting hole of the splitter. Seems secure. Yes, I should've used a black zip tie, I just don't have any right now. I will swap it out for a black one. A friend is coming over this week to watch me pull the car off the lift and see what the splitter keeps getting caught on.

Got some nice pics of the car while at High Plains Raceway.
You can see the splitter hanging down in this pic, I hadn't done my zip tie trick yet...


Looking good! Glad it was a successful outing!
You'll need to log in to post.


