1 2 3 ... 5
SilverFleet
SilverFleet UberDork
3/28/16 8:43 a.m.

Old Thread Here: https://grassrootsmotorsports.com/forum/grm/2012-mazda-3-25l-my-2-year-review/71592/page1/

Back in October 2011, I traded in my 2009 Subaru WRX for a more practical 2012 Mazda 3. I was able to get the car exactly how I wanted it: Crystal White Mica, 2.5 S Touring package, 6MT, and a 5-door hatch body style. I was waffling between the Mazda and the Honda Civic Si, but the Japanese Tsunami made them unavailable new, and the Mazda was a near match performance-wise on paper. Anyway, I tried looking on Mazda forums for the ins and outs of the car, and there was basically no good info on how to do anything except modify the Mazda emblems and paint interior trim. So, I was flying solo with the car. Luckily, it's been a great car and very easy to work on. This thread will serve as a log of all of the things I've done to it; basically, a maintenance log of sorts, but others can reference it too.

SilverFleet
SilverFleet UberDork
3/28/16 9:19 a.m.

As mentioned in the old thread, I was having some trouble with the brakes. I replaced my stock brakes with Centric rotors and Stop Tech Street Performance pads at around 65K miles, and shortly after, I developed a wheel shake and a brake pulsation. I chalked it up to bad motor mounts, unbalanced tires, and other things, but it was definitely the brakes. At about 100k, I had enough. I started looking into replacement brakes, and kept seeing those cheap slotted/drilled kits on Amazon. After doing some research, I decided to give it a shot. Ended up ordering a kit through MaxBrakes.com for $151 shipped. They came e-coated and have ceramic pads. Here's some pics:

This is one of the Centric rotors. It's kind of tough to see, but that thing is warped!

See that line on the rotor surface? It looks like pad deposits, but it's not. It's actually missing material, or a defect in the rotor. Total crap.

I wasn't expecting anything great from $151 rotors and pads, but I was pleasantly surprised when I opened the boxes up. The rotors were machined nicely, and definitely better than any cheap rotors I've bought in the past.

This is my dog Holly. She was helping me do my brakes. Holly thinks I am totally lame.

Holly would much rather derp it up in the yard than do brakes, and I don't blame her one bit.

Rotors have that e-coating on the surface, but that wears off as soon as you hit the brakes.

After having them on the car for 9K miles, I'm pretty happy with them. They stop really well, and the e-coating has held up on the hubs and the outer edges. I'd probably buy them again. No cracking on the slots or holes, either. Only gripe is that they are a little noisy when cold, but that doesn't bother me one bit. They are ceramic pads, and they barely dust at all.

SilverFleet
SilverFleet UberDork
3/28/16 9:39 a.m.

After doing the brakes, the car did drive better, but there was still a high speed wheel vibration going on. Again, I didn't know if it was the wheels or my bad motor mounts or the brakes. The new brakes got rid of the pulsation under braking, so that was out. So was it the wheels or the mounts?

It was the wheels; specifically, the tires.

This was confirmed when I swapped back on my winter wheels. The car no longer shook at speed. Plus, this is what the tires looked like:

These are Kumho Ecsta PA31 all season tires. I put them on the car at 65k, and even with rotation, the inside edges were wearing out. My last set (the stock tires) did the same thing too. Last time I brought the car in for tires, I asked to get my alignment checked. They said it was fine. They also said that this was VERY common with Mazda 3's, as they leave the factory with an aggressive camber setting, which is what makes all the automotive journalists fawn over their handling. I've heard that the only way to correct this is with camber plates, so I'm just going to live with it. The weird thing is that one of the tires has a flat spot on that inner edge (you can see it in the photo). Not sure if that was a tire defect, but the car would thump at low speeds presumably because of this.

Since I needed new tires, this time around I wanted to upgrade the width to the "+1" size of 225/45/17 (factory is 205/50/17 on a 17x7 wheel). This is still a daily driver, so I stayed with all seasons basically for the tread wear. I decided to try out Nitto Motivo tires this time around after hearing good things about them. Got them on sale, and they had a $70 rebate too.

These almost seem wider than a 225, and they are meaty!

I had them mounted on the car over the weekend, and yeah, they look and feel great. These cars should have come with 225's from the factory. Best part is the high speed vibration is gone! I'll report back when they have a few more miles on them, but I'm impressed. They really transformed the car.

SilverFleet
SilverFleet UberDork
3/28/16 10:47 a.m.

With the recent brakes and new tires, the car was a lot better to drive, but it was still clunking and squeaking like crazy up front. For a long time, I suspected the rear motor mount and the transmission mount, so I ordered them up and tossed them in over the weekend. I have not seen a write-up on how to do this to a regular 2010-13 Mazda 3, so here you go!

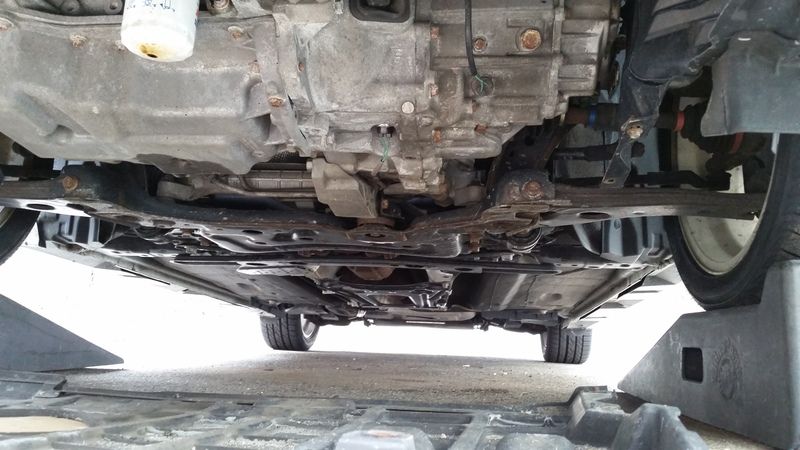
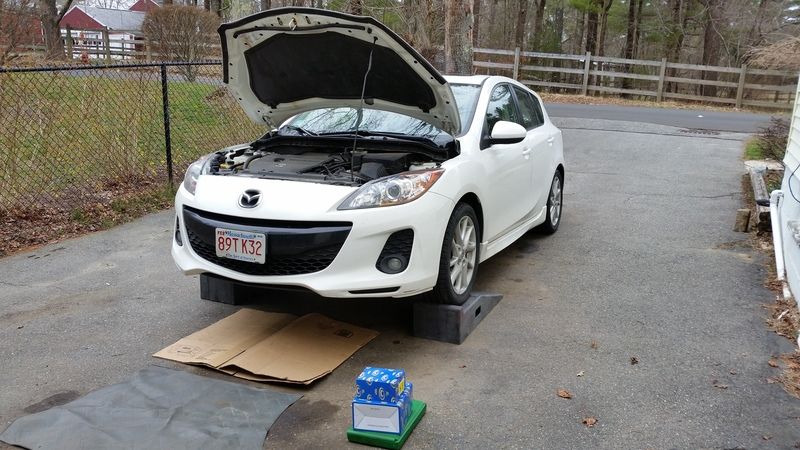
First step is to obviously get the car up in the air. You will need to remove the under tray, which requires a 10mm socket, an extension, and a panel puller tool or flathead screwdriver for two push pins that help hold the tray up.

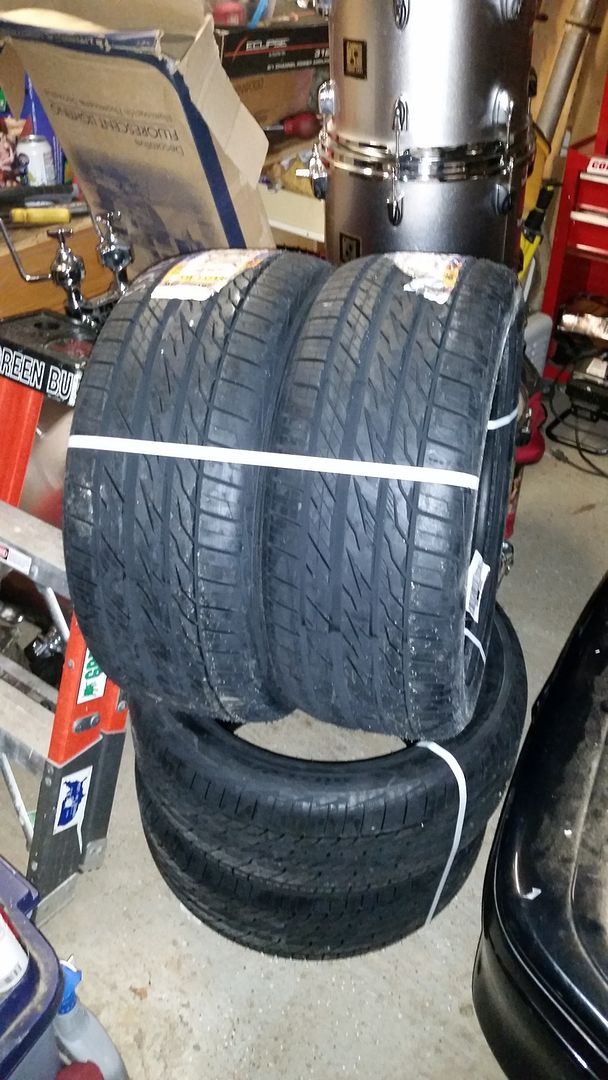
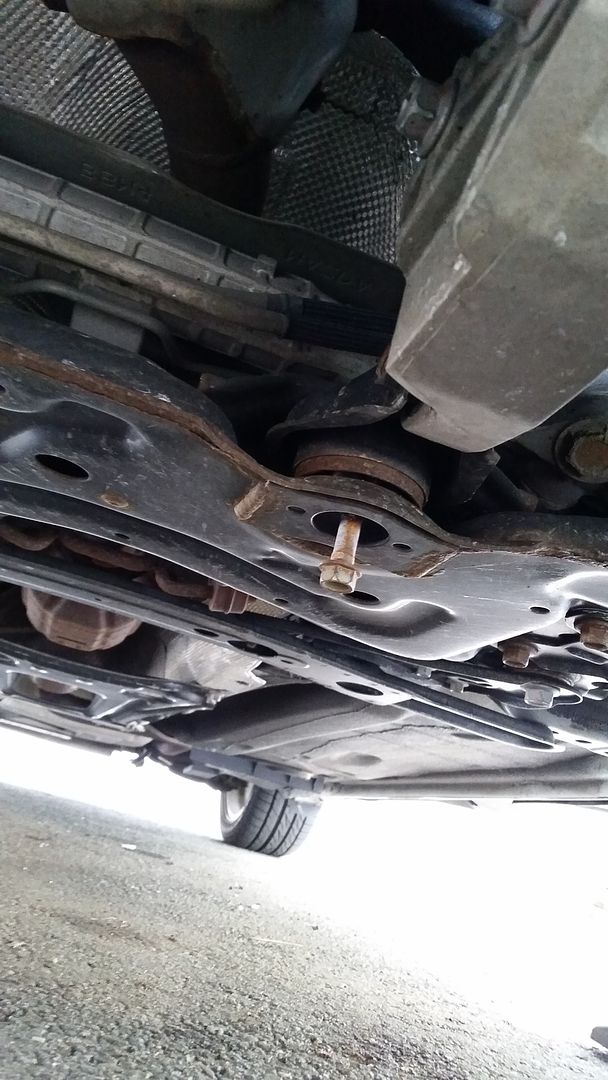
These cars have three mounts total: the driver's side has the transmission mount, the passenger side has a hydraulic motor mount, and there's a mount in the center under the car that acts as a pitch stop which attaches to the subframe. I ordered the parts from Rock Auto. Came to about $77 shipped for the transmission and rear mount. I checked the hydraulic mount for leaks, but it looked fine so I didn't bother replacing it.

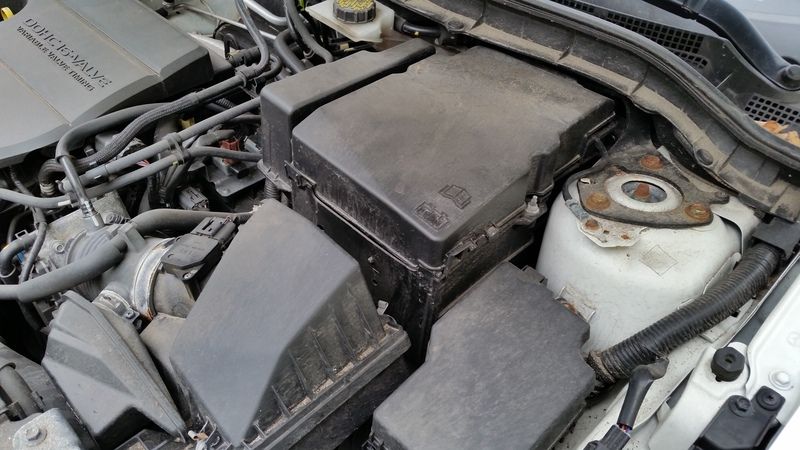
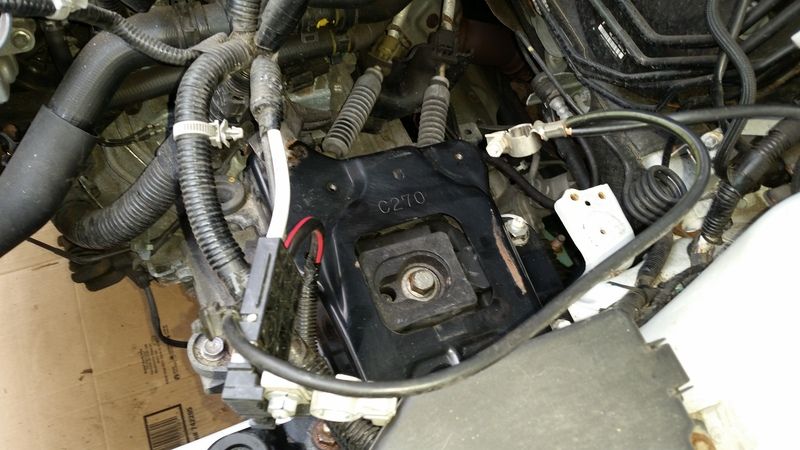
Pop the hood. See all this stuff? You have to remove a lot of it. The battery box/ECU holder, air box, and battery need to come out to access the mount. Basically, a 10mm socket removes most of that stuff.

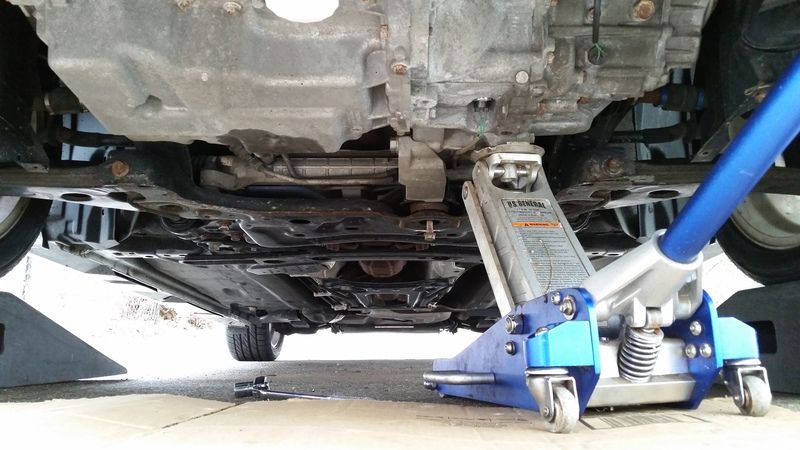
VERY IMPORTANT!!! Get a floor jack under that transmission! Find a decent place to position it and keep it there until the new mount is in. Your motor/transmission will not like you if you don't. Trust me.

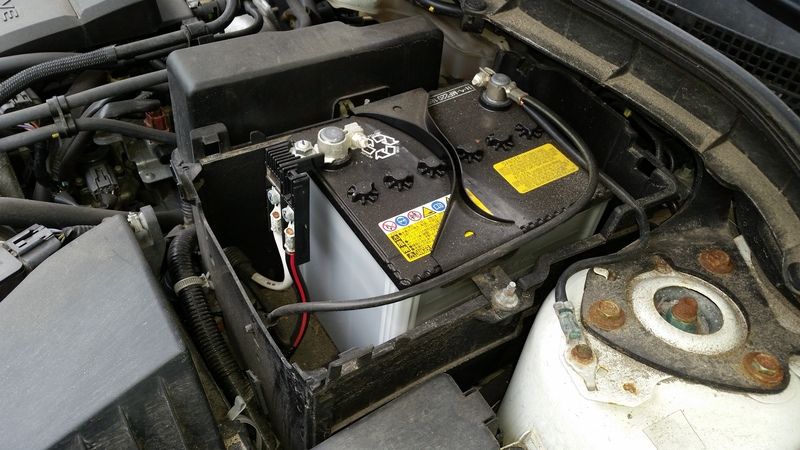
Pop the battery box cover off and remove the battery. The battery, hold down, and box itself are all 10mm bolts and nuts. Pretty simple.

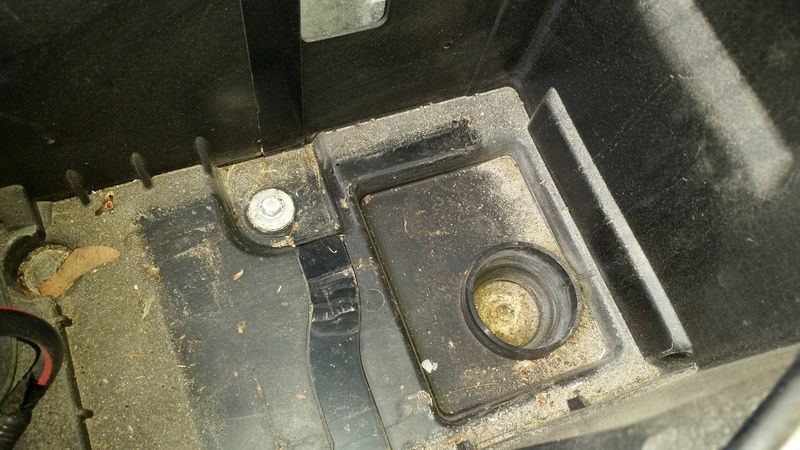
The inside of the battery box. Gross! The battery is OEM and has never been disconnected in over 108k miles! Remove the three hold down bolts.

Here's another shot of the inside of the battery box. The battery cables and the ECU wiring harnesses are attached to this panel of the box toward the front of the car. Push the pins in with a pair of needle nose pliers and remove them. Then, this front panel actually slides out. After that, you can remove the rest of the box.

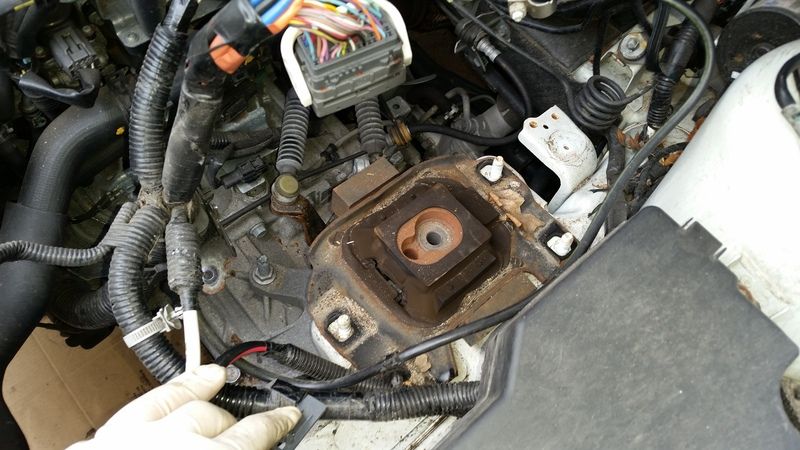
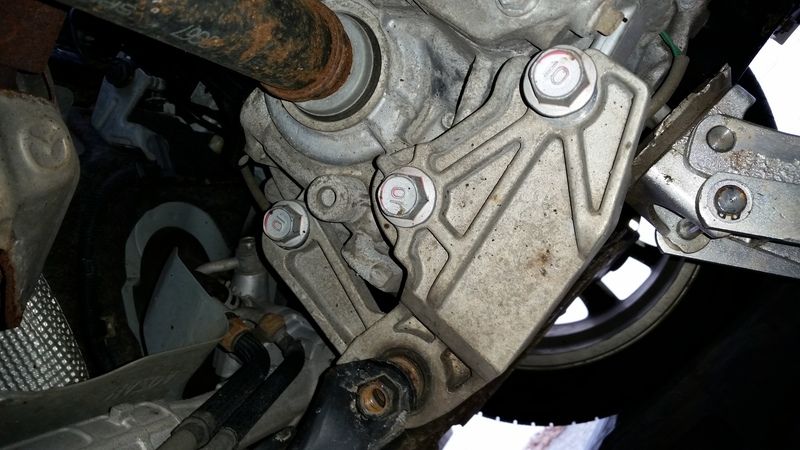
A view of the mount with everything out of the way. I forgot to take a pic of the airbox removal, but it's pretty easy. Remove the bolt to the core support, unplug the MAF plug, and loosen the clamp at the throttle body. Pop the two push pins out of the Transmission mounting bracket cage, and there you go. That big wiring harness up top is one of two that plug into the ECU. Lift the white lever up and it will plop out of the ECU. DO NOT pry it out! There's 4 nuts that hold on the mount to the unibody and one bolt that screws into the transmission itself. All of them are 17mm. The center one was really hard to remove; I had to use an impact gun to get it loose.

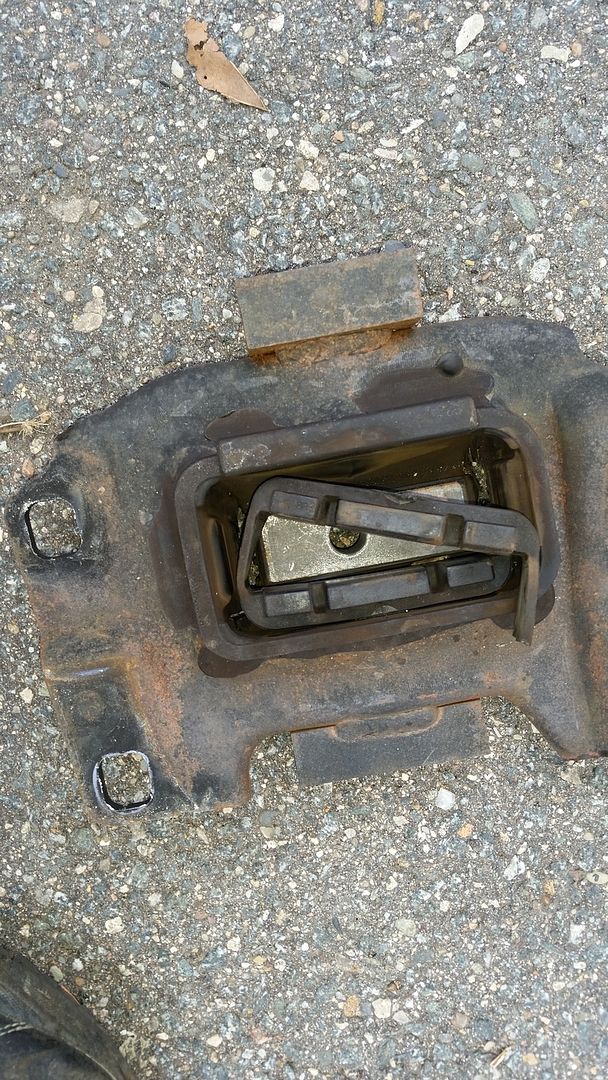
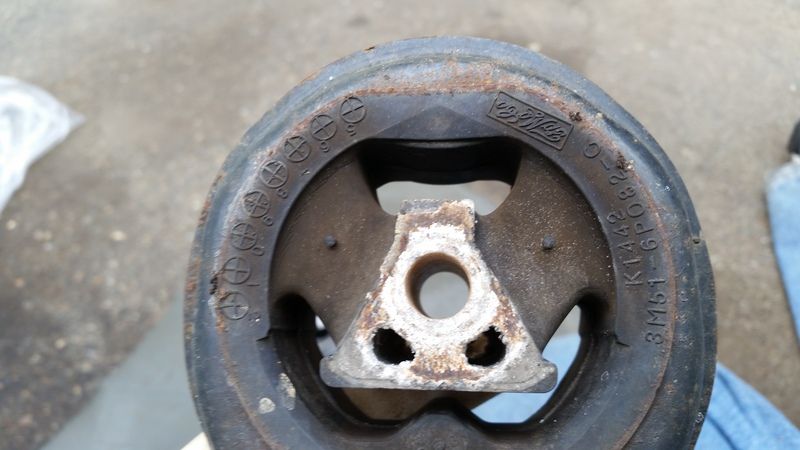
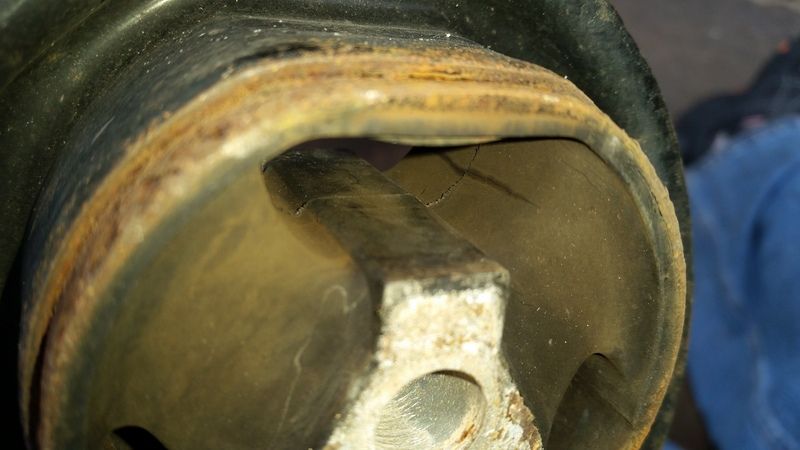
This is the old mount. It was shredded pretty bad. In addition, after removing the mount, I noticed some metal shavings under the mount. It was all kinds of messed up!

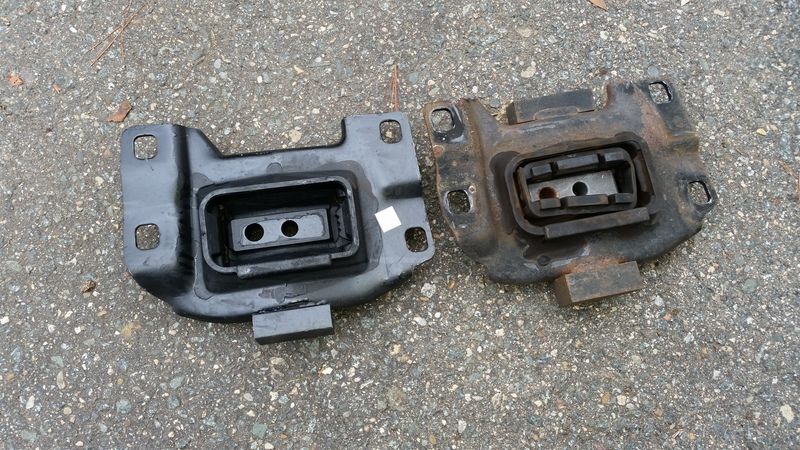
Here's the new mount next to the old one. Notice that the shredded part actually isn't part of the new mount. It has beefier rubber around the center section, though.

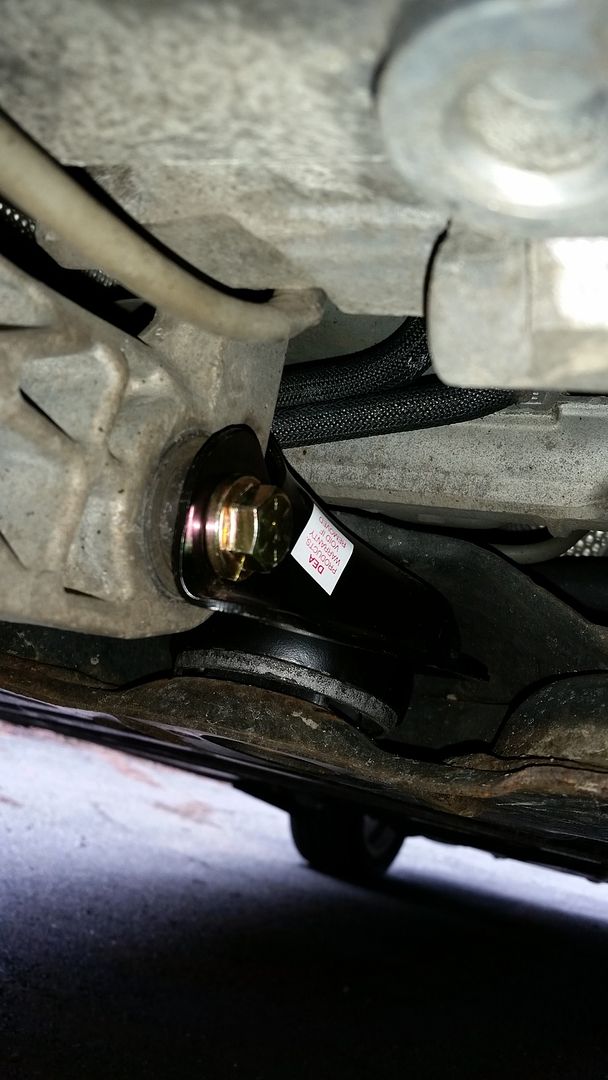
New mount installed under the "cage" that the battery box and air box attach to. The trickiest part of the whole install is lining up the mount to the transmission. There's a little dowel pin on the transmission that lines it up, and you have to get that in to line up the bolt hole. This is easier to do with a second person, but not terrible to do by yourself. Just make sure that jack is under the transmission! After that's done, just toss everything back in the way you took it out, and you are good.
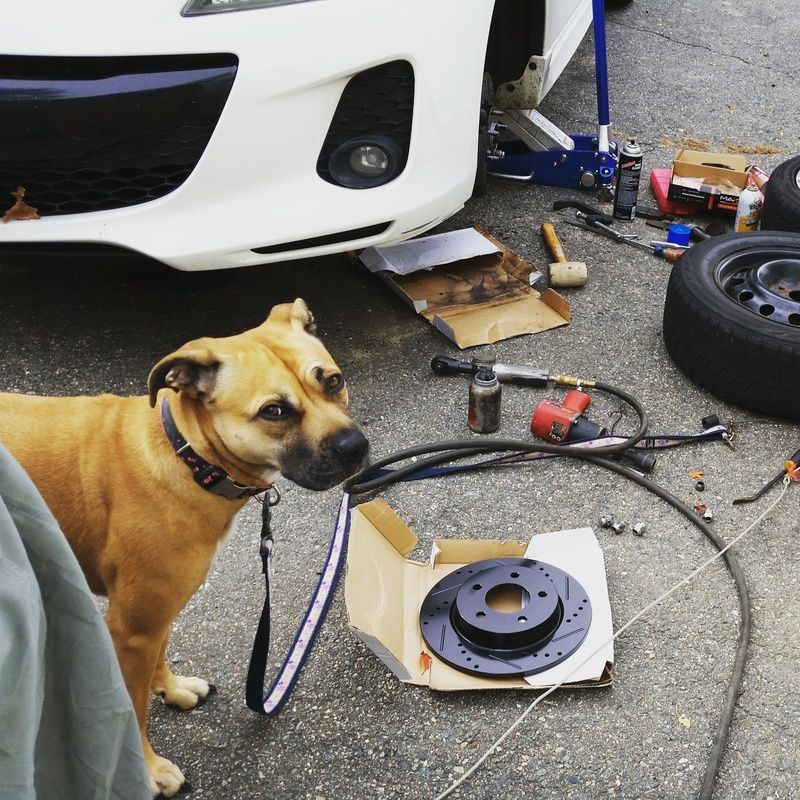
SilverFleet
SilverFleet UberDork
3/28/16 11:06 a.m.

With the transmission mount replaced, I took the car for a quick spin. Much better, but there was still some slop, so it was time to do the rear mount.

Here's the view under the car with the undertray removed. On the right is the transmission, and in the center rear is the rear mount. In the center is the rear mount.

Again, do this with the jack under the transmission. To the left of the jack pad you can see an aluminum arm extend toward the mount. This is held in by three 18mm or 19mm bolts (I forgot, sorry). The mount is held in the center by a 17mm bolt and to the aluminum arm with another 17mm thru-bolt.

Another shot of the mount. Crack the mount bolts free before removing the aluminum arm.

Here's a shot of the aluminum arm. After you remove the mount bolts, you'll need to remove this to get the mount out.

With the mount out, let's inspect it. Yep, that's a Ford part.

See that black line in the rubber? That's a good sized crack. Along the perimeter were stress cracks as well. This thing is toast.

Old and new mounts side by side. The new aftermarket one is a little beefier, just like the transmission mount.

Biggest (and only) hiccup of the swap: the aftermarket mount has a different thread pitch on the welded on nut for the thru-bolt. I grabbed a new bolt (7/16 coarse thread) for a couple bucks in Grade 8 with a lock washer at the hardware store up the street.

Once everything was up and in, I reinstalled the undertray and took it out for another drive. The mounts are tight, and there's a little bit of startup NVH going on from the mounts being new, but most importantly, NO MORE CLUNKS OR SQUEAKS!!! The car rides better and shifts better now than when it was new, aside from some trim rattles here and there. Together with my tire replacement, the car feels so much better. The steering and handling is 100% better now. Finally!

The_Jed
The_Jed PowerDork
3/28/16 11:37 a.m.

I've been shopping for a hatchback with a manual transmission for quite a while.

Thanks for posting this and your periodic review thread. The 3 is definitely on my list of wants.

Wxdude10
Wxdude10 Reader
3/28/16 9:57 p.m.

Thanks for the detailed writeup. I'll be doing this to my 6 in the near future and this is great!

chiodos
chiodos Dork
3/28/16 10:12 p.m.

Poke the hydro mount with a finger and see if it squirts at you. A visual for leaky mount didnt come up with anything but when i poked my friends hydro mount it leaked its innards on me. Question, how many miles are on yours? Its crazy to me how quickly those mounts go out of these cars. My friends is a gen1 ms3 and lasted 60k miles, he threw on a rear mount first and it lasted 1k before it went bad. Hes since replaced the hydro mount and im trying to convince him to do the trans mount cause im sure its toast too. He replaced the new rear mount with a poly one today so we will see how long it and the others last.

SilverFleet
SilverFleet UberDork
3/29/16 8:10 a.m.

In reply to chiodos:

The hydro mount is ok. I did inspect it and mess with it, and it is fine. The car just hit 109k last night.

As far as the other two mounts go, it seems to be a very common problem with all the Mazda 3's and MS3's up to 2013, the final year of the Ford/Mazda/Volvo chassis. At 50k, I did install a poly rear mount because that was supposed to be one of those "bang for your buck" mods. All I think it did was expedite the failure of the transmission mount, which was likely on it's way out anyway. Honestly, unless it's a full track car, I wouldn't bother with poly mounts on a Mazda 3. And if it IS a track car, replace ALL of the mounts with poly mounts. Doing one, like I did, will just cause the others to fail.

RedGT
RedGT Reader
3/29/16 9:11 a.m.

Well, if your mounts were that bad on a '12, I am sure my '06 with 50% more miles on it is in need as well. I am trying to stop spending money on this car and you are not helping.

SilverFleet
SilverFleet UberDork
4/1/16 9:37 a.m.

Slight update: Over the course of the week, one of the mounts started creaking. It was definitely a different noise than what was happening before, which was more of a squeak/clunk, and it only did it when inching forward from being stationary. Last night, I went under the car and grabbed the engine and rocked it back and forth, and I could hear the creaking coming from the crossmember that the mount fits into, so I removed the rear mount again and hit some stuff with white lithium grease. It's a little better now. Starting and inching along at stoplights is still a little rough, but it's WAY better than the way it was. The car still feels worlds better at speed, especially under heavy throttle and on the highway. Shift feel is vastly improved too.

I've also been thinking about doing the "washer mod", which replaces the four shifter cage bushings with washers for a better shifter feel. They make aluminum pre-cut little "pucks" to do the same thing, but at $40+. I figure I'll try the washers which should cost like $2.99. Might be a waste of time.

Another note: The combination of more rolling resistance and me resetting the ECU (from removing the battery) made my gas mileage go down a bit. Last tank was 25mpg on the nose, whereas I usually get 27mpg. I filled up today, and will be watching this in the coming weeks.

slowride
slowride HalfDork
4/1/16 10:14 a.m.

Does this happen on automatic cars also?

SilverFleet
SilverFleet UberDork
4/1/16 10:20 a.m.
slowride wrote: Does this happen on automatic cars also?

It does, but to a lesser extent. They use a completely different transmission mount, but the rear mount is the same. My wife has a 2010 3 i Touring and it has the 5-speed auto and almost 130k miles, and all of her mounts are fine. Her car has had other issues though, like all of the TPMS sensors literally crumbling apart at various times, the transmission pan rotting out, and the neutral saftey/selector switch failing.

Funny how all the parts that seem to fail on these are the ones made by Ford.

slowride
slowride HalfDork
4/1/16 11:05 a.m.

Well that doesn't sound so good. Mine is the skyactiv 6-spd auto. But then again I'll probably get rid of it at around 130k anyway. Mine has a big plastic pan to keep me from seeing the transmission pan rot...

SilverFleet
SilverFleet UberDork
4/1/16 12:27 p.m.

In reply to slowride:

Since your car is a Skyactiv car, you have the better 6-speed auto. My wife's car has the older Ford designed 5-speed which is shared with the Ford Fusion/Mazda6. Completely different animal, and I wouldn't be worried.

SilverFleet
SilverFleet UberDork
4/6/16 8:22 a.m.

URGH!

So, the creaking noise is back and worse than ever.

Now it's doing it in all gears at low RPM, and I can replicate it by releasing the clutch slowly. Sometimes there's an associated clunk as well. I'm going to have to take it all apart again over the weekend and see what is going on.

The weird part is the car still drives 100% better than it did before I did the mounts. Shift feel is still improved and it's less jarring over the bumps up front. It's definitely a different noise than I had before I did the mounts, so I think I'm still going in the right direction.

SilverFleet
SilverFleet UberDork
4/6/16 3:38 p.m.

Another annoyance the car has been giving me: the Bluetooth system. When I'm on a call, the car will randomly drop the Bluetooth signal. According to my phone, the Bluetooth is on the entire time. I've read on other cars that you have to turn off the wifi feature on the phone because it interferes with the Bluetooth pairing, but that has nothing to do with it. Manufacturer-specific forums have been pretty much useless, aside from some people replacing a Bluetooth module hoping for results. This only started about 2-3 months ago. I'm using a Galaxy S5 for a phone.

fidelity101
fidelity101 SuperDork
4/7/16 2:26 p.m.

black rotors?!

SilverFleet
SilverFleet UberDork
4/7/16 3:37 p.m.

In reply to fidelity101:

They were e-coated. Basically fancy paint. The stuff on the rotor surface came off the first drive while bedding the brakes.

SilverFleet
SilverFleet UberDork
4/9/16 4:34 p.m.

I think I finally killed the creak.

I took everything apart again today. I hit basically everything on the transmission mount with grease, torqued it to spec, and put it back together. Nope, still creaked. I then pulled the new rear mount and swapped in the old one again. I also noticed that I may have installed it upside down. BAM! No more creak! Hopefully it stays that way for another 100k miles.

SilverFleet
SilverFleet UberDork
4/26/16 4:26 p.m.

Quick update: Creak/clunk is definitely gone for good.

I'm pretty happy with the car now with the wider tires and the new transmission mount. It drives better now than it did when it has 100k LESS miles on it, and I still maintain that 225/45/17's should have come on this thing from the factory. It rides and handles sooooooo much better than ever before.

One concern I had after I put the tires on was that the gas mileage has gone down. For some reason, my second fix to the mount made that better as well. I don't know if it's because the tires were breaking in, but I went from getting an average of 25mpg back up to 27-28mpg like I used to. I consider that a win.

SilverFleet
SilverFleet UberDork
7/5/16 9:34 a.m.

Over the past few weeks, I've been hearing a rattle/clunk come out of the rear end of the car that was getting progressively worse. I started grabbing suspension bits to see if there was any play, and the sway bar was just flopping around back there because the end links were toast. I ordered up some new end links and installed them over the weekend.

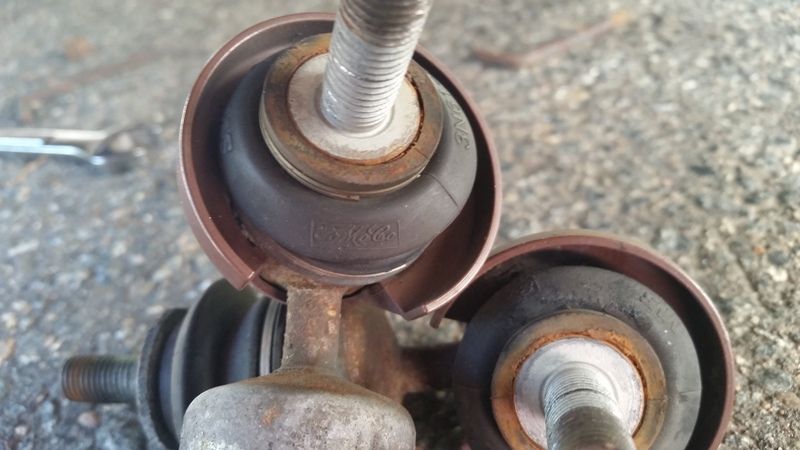
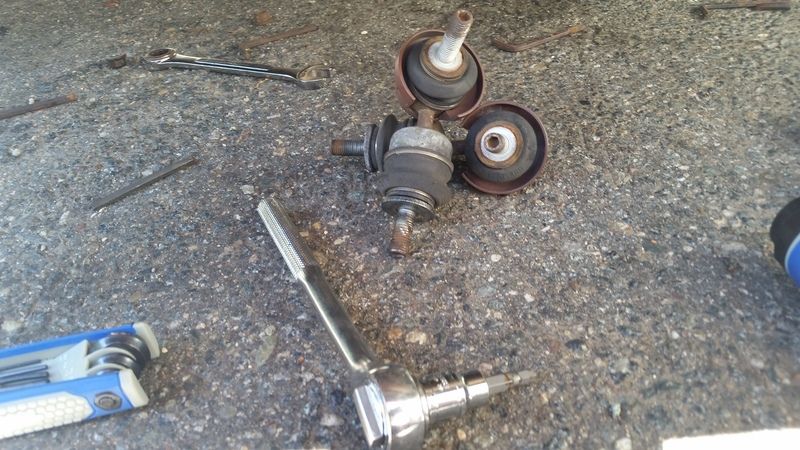
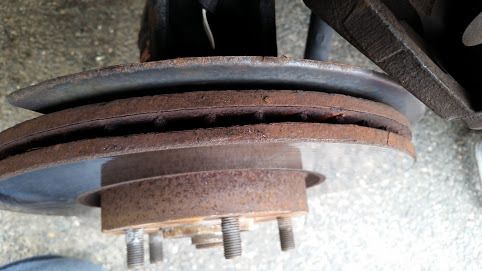
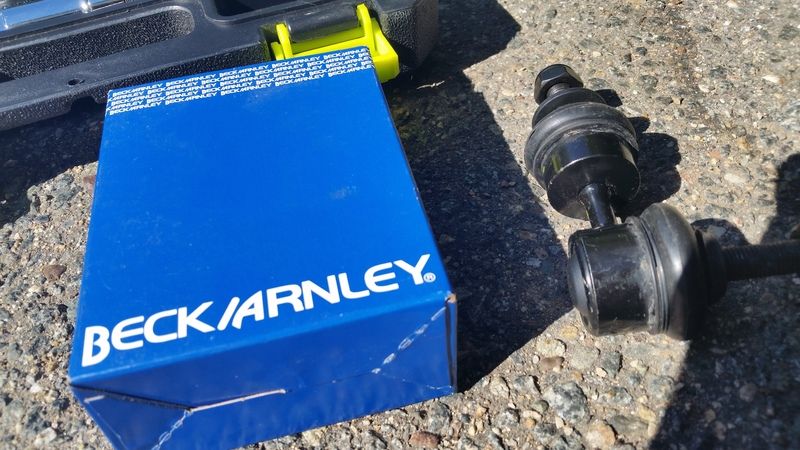
There's three types of end links: the factory style with the hex head rod/nylock nut, the Moog style that ditches the hex head rod for a two-nut approach (which you need crow's foot wrenches to install), and the adjustable performance ones that Whiteline and a couple of other companies make. The factory ones have a plastic ball, and most of the good aftermarket ones don't. I chose these Beck/Arnley ones because they were closer to the factory ones, but with metal balls on the joints.

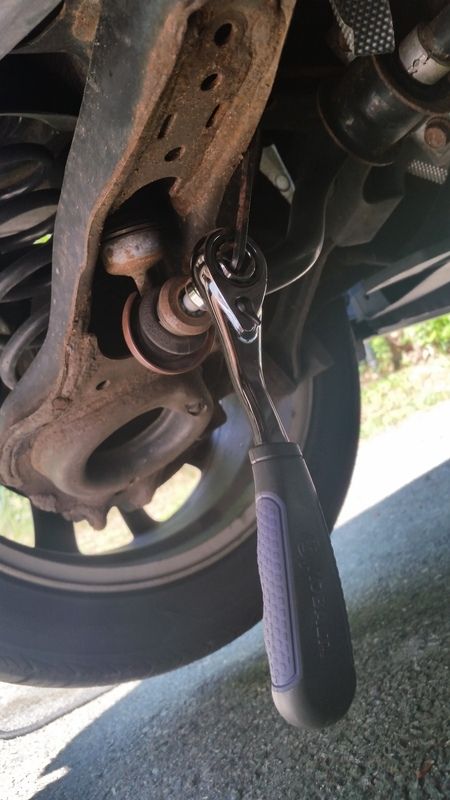
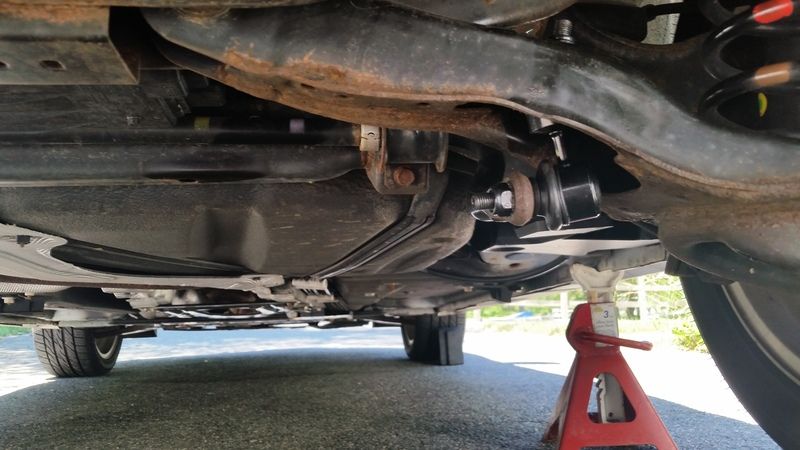
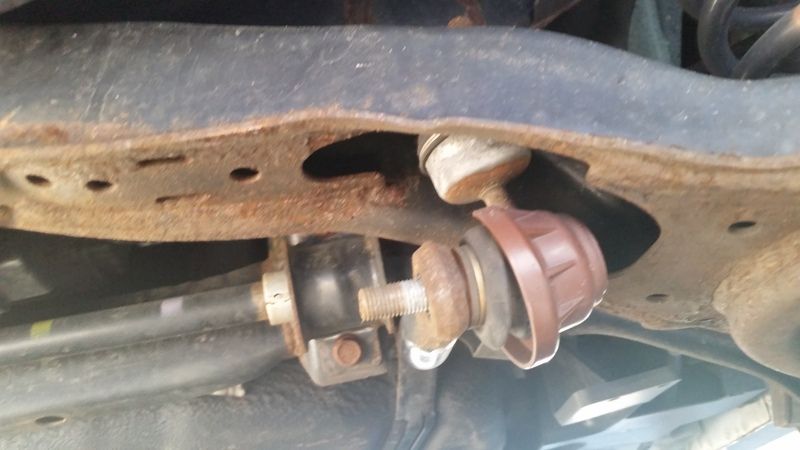
Installation is easy if you have the right tools. Jack the car up on the middle crossmember in the rear and put it on jackstands. The wheels can stay on. You'll need 14mm and 18mm gear wrenches (or a pass through socket set, more on that in a minute), your favorite penetrating oil, and a 5mm hex head, preferably a socket-style one (more on THAT in a minute as well!)

Pass through socket sets are cool. I picked up a set over the winter at Lowes (Kobalt brand) for like $25, and they have 1/4" and 3/8" handles with sockets and extensions. These are perfect for jobs like this, and are easier to use than a ratcheting wrench if you have the space. Basically, you toss that on and put the 5mm hex head in the middle and hold the center rod to loosen the nut. In theory, it should work. In practice, not so much. I snapped THREE hex head keys before smartening up and going to buy a decent 5mm hex socket. I had so much trouble with the top nuts that I had to cut one off with a cutoff wheel!

I finally got the old ones out after about 3 hours of wrenching, and most of that time was running to the parts store to get the correct hex head socket. They were trashed! Oh and look: more parts with the FoMoCo label that wore out! I can't fault these though, they put up with the Aggro-Crag roads of New England for 115,000 miles. I'd quit too!

If you look closely on the left, you can see the remnants of one of the hex keys. When that thing snapped, it went flying! USE A HEX HEAD SOCKET!

The new ones needed a little finagling of the sway bar, but they went right in and fit fine. The trick is that you have to get them both in position and get them through the upper holes at the same time, or you'll be fighting them all the way. Tighten these to 40 ft lbs and toss some blue Loctite on the threads and you'll be good to go.

The car feels a lot tighter out back now and it makes the car 100% better to drive. I love cheap fixes that make the car more enjoyable. Next on the list are plugs and gear oil at 120k. 5k to go!

SilverFleet
SilverFleet UberDork
8/8/16 10:33 a.m.

Quick update: I am now the proud owner of this 2012 Mazda 3! I paid it off recently and got the title in the mail. Party time!!! It's the first time since 2002 that I haven't had a car payment, so I'm going to enjoy it for a while.

CyberEric
CyberEric Reader
8/8/16 10:17 p.m.

Congrats on the official ownership. Great car, my dad just bought a '15, and I was impressed when I drove it. My next car will probably be one of these.

Out of curiosity, what are the alignment specs on the car?

SilverFleet
SilverFleet UberDork
8/9/16 8:38 a.m.

In reply to CyberEric:

Honestly, I have no idea what the specs are. I've been told that they are on the aggressive side for a factory built car, but I have no clue what they are.

1 2 3 ... 5

You'll need to log in to post.

Our Preferred Partners
NRe7H9YSstVf55O5aWf5OEKXMO5L8kb8yEl4WmJuouFItykgb7bhWoUuWdyIOsko