1 2 3 4
johnvitamvas
johnvitamvas New Reader
11/26/19 12:21 p.m.

I've posted this build elsewhere to mixed reactions but I thought I'd share it here too. When I first experienced the RX-8 back in 2005, my first thought was it was an amazing chassis in search of an engine. I'm a rotary guy from way back, but without a turbo they always fell a bit flat to me. This project is the product of many hours spent traveling across the country competing in SCCA autocrosses with nothing to do but think.

After competing in a DSP BMW 330Ci for almost ten years I thought it was time to move on and SCCA's Street Modified class interested me more than any other, plus it would let me finally scratch the "do something interesting with an RX-8" itch. So here we go.

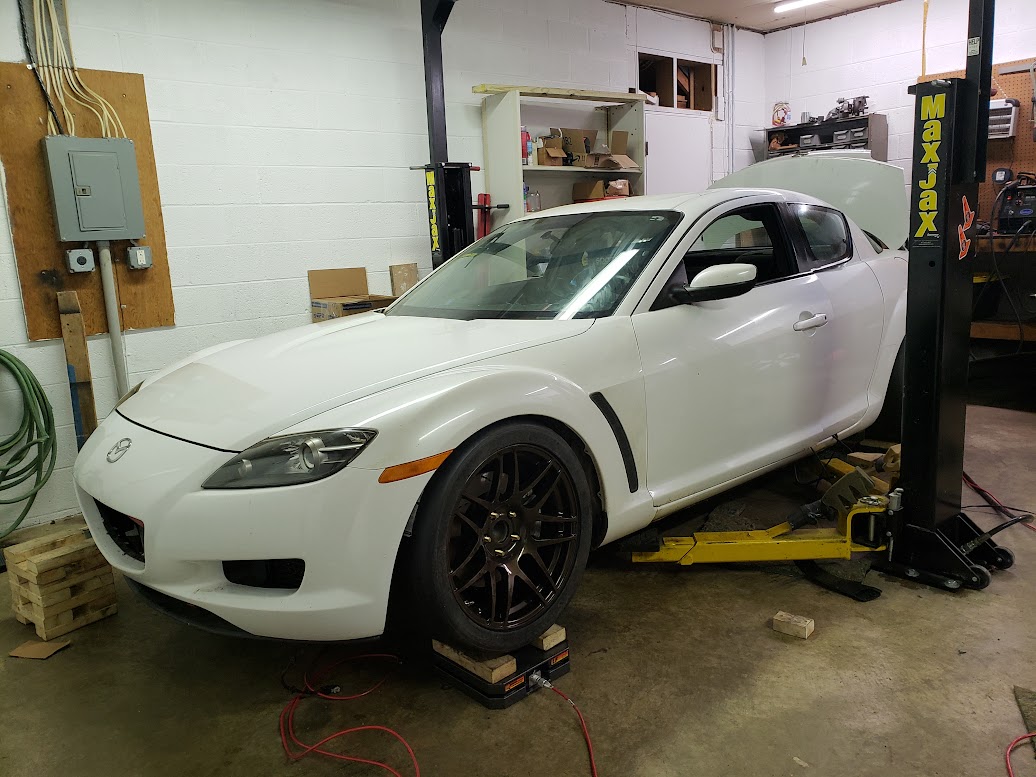
It all started with this gem, picked up in North Carolina for the princely sum of $2,000. Cars this clean don't seem to exist in Maryland. It's a relatively rare 2005 base model, meaning no sunroof and no DSC. Lacking DSC was important to me as the ABS system is a lot easier to deal with.


The best part of the car is it came with the worst part already removed. The ABS unit is on the opposite side from an MX-5 and I could see right away that it's going to interfere with the intake manifold on the four cylinder.

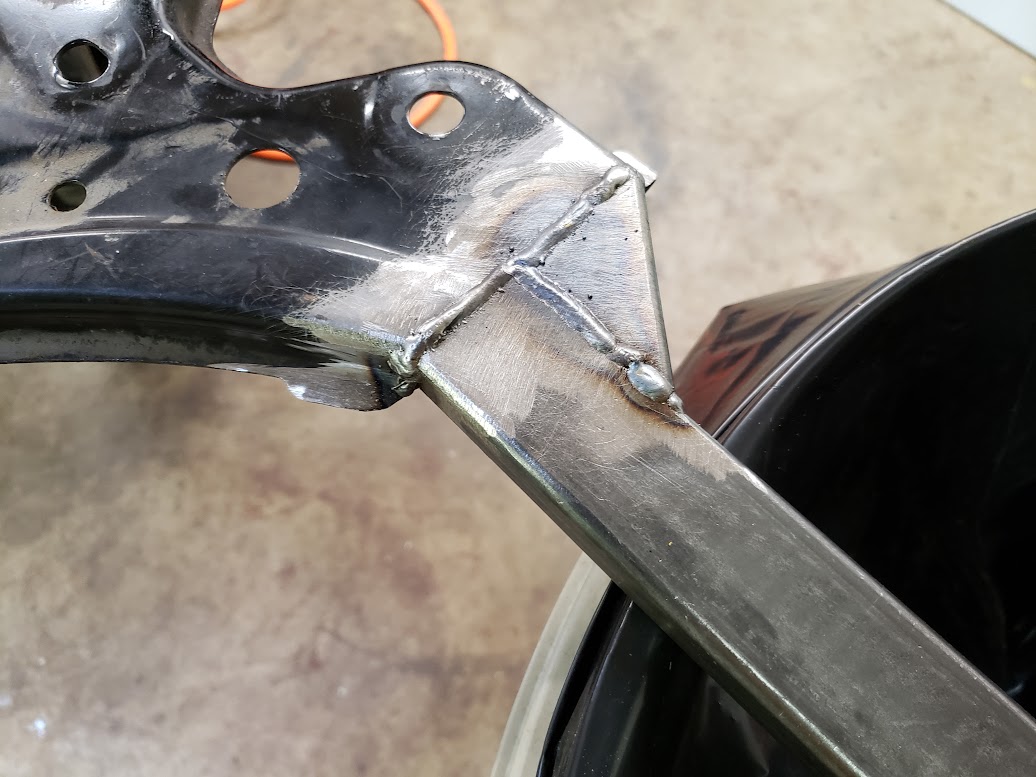
The front subframe and steering rack weren't going to be usable. The RX-8 electrically-assisted rack is enormous. The mounts are also set up for the Renesis and would take a lot of work to adapt to the engine I wanted to use so I didn't end up using it.

The rear subframe was resused, but it had to come out to get solid bushings, converted to accept a Ford Aluminum 8.8, and all the rear links converted to spherical bearings.

This is a view from the rear looking forward, just showing how clean the underside of the car is.

Bye-bye, emissions controls.

I started on the rear subframe first, starting with converting to solid aluminum rear subframe bushings

The rear subframe with all the mounting bushings installed.

When I started looking at NC's, I realized that chassis is almost identical to the RX-8 from the firewall forward and from the rear glass backwards. The NC's front and rear subrames will bolt directly into the RX-8, and vice versa. I figured I'd use this to my advantage. I thought it'd be very handy to have an NC around for parts scavenging.

So I bought one.

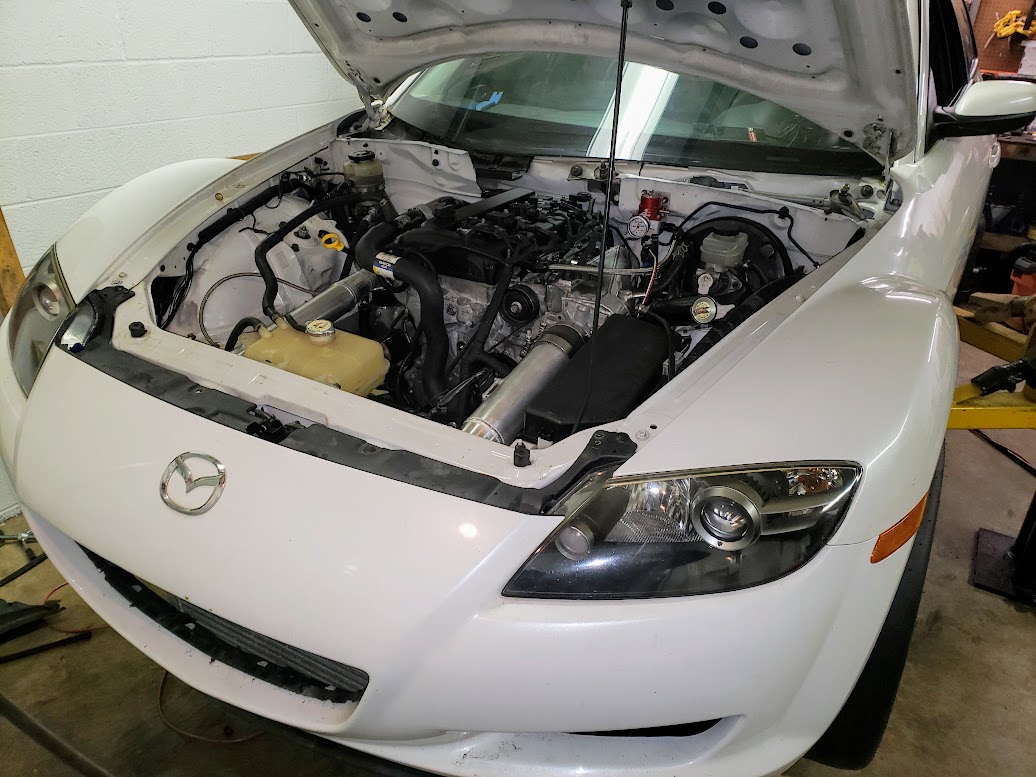
I could quickly tell that the engine wouldn't directly bolt into the RX-8 without major firewall surgery because the engine setback is so extreme on the MX-5. The top of the 2.0L will end up inside the passenger compartment. The even-taller 2.5L would be even worse.

Gradually lowering...

Lowered onto furniture dolleys

And, out! Installation is not quite the reverse of removal at this point. But now I could at least start to take measurements.

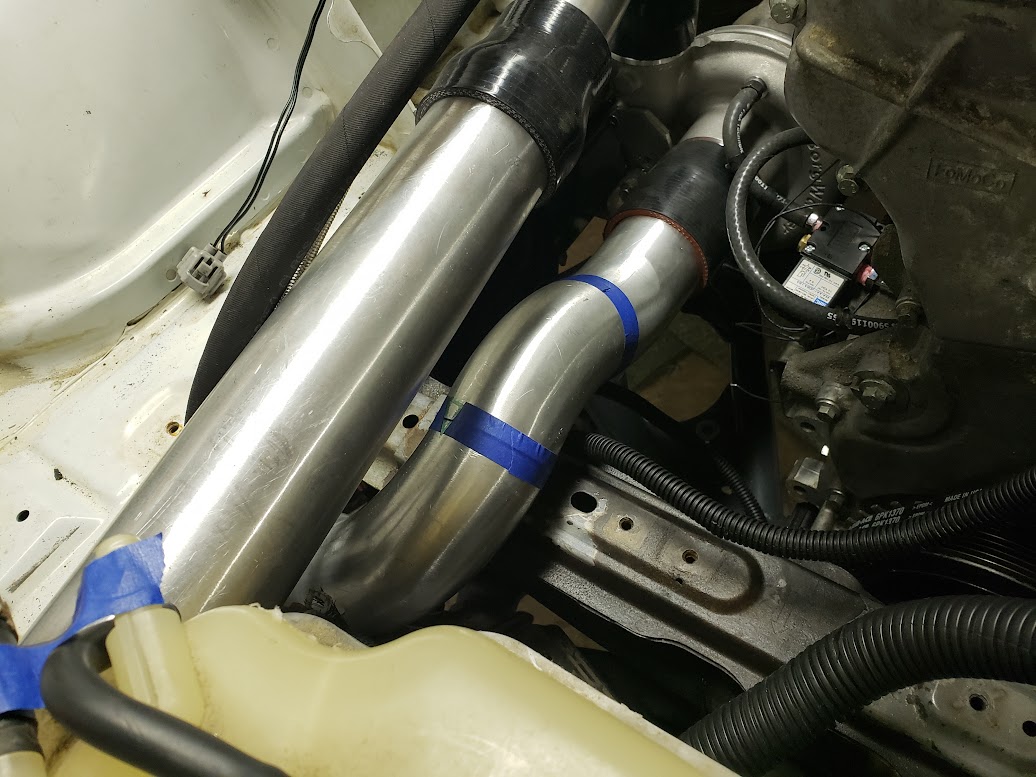
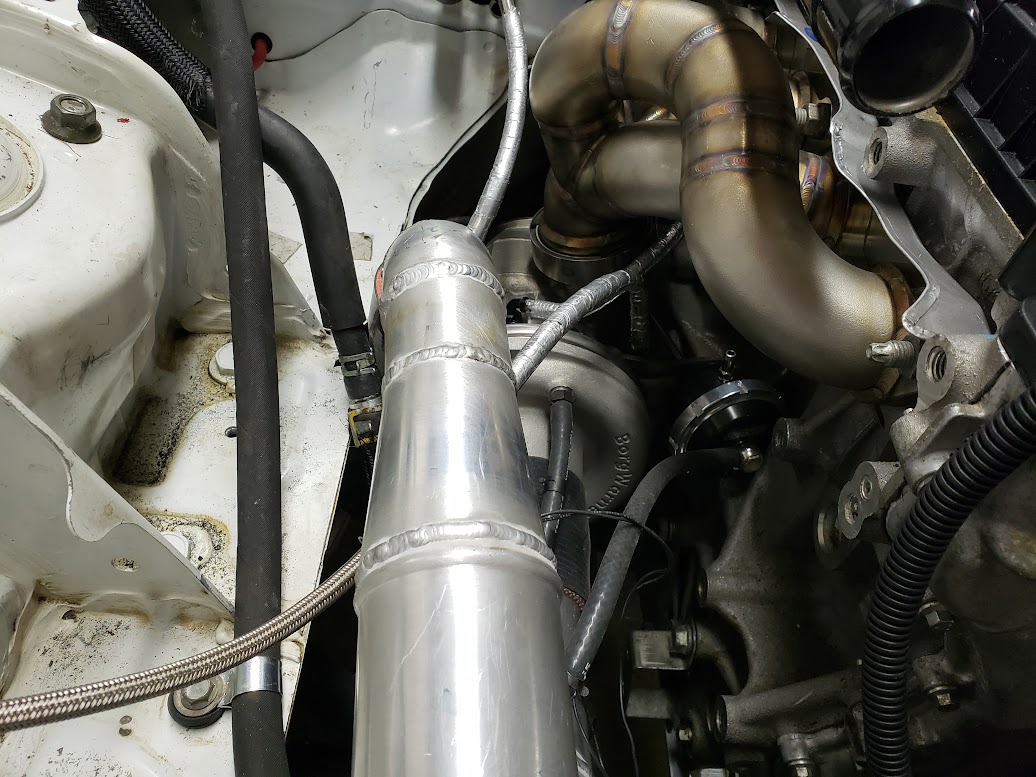
Figuring out exactly where the engine wanted to live took a lot of time, partially because my full-time job occupies a lot of time and partially because I've never tackled something like this before and have basically zero fabrication skill. So I spent a lot of time sitting in the garage sipping coffee staring at the car, making slight movements of the drivetrain, and then going inside. :)

johnvitamvas
johnvitamvas New Reader
11/26/19 12:29 p.m.

I ended up buying a kit from Ronin Engineering to convert the rear end to a Ford 8.8. It was really well made. I worried a lot about the Ford "tripod" joints but so far none of them have broken.


The first piece in the kit is this rear mount. This bolts to the rear cover of the final drive unit, and the ears accept bushings and then fit to the rear mount on the RX-8 subframe without modification.

The welds on this piece are really well done. It's made of 3/8" thick steel plate which has been laser cut and it's gorgeous.


Yes, the diff is upside down in this picture. The inside housed an open differential with 3.73 gears. I ended up putting a Tru-trac in this for 2019, and I've since converted it to a fresh set of 4.30 gears for a different gearbox.

I didn't get a great picture of the rear cover with the ears cut off, but you can kind of see it in the top of this photo. I also had to grind down the rear cover at the pry points. They were proud of the mating surface for the rear cover plate, so 1/8" needed to come off of them.

You can see how the plate fits flush against the rear diff cover with the bosses ground down a bit.


The Ronin guys expect you to use the factory Ford (rubber) front mount and a stock RX-8 rear mount, but I turned solid bushings for both on the lathe. Anyway... the next thing that needs to happen is to assemble the custom axles. Obviously an RX-8 rear half-shaft is not going to work with the Ford diff, and an Explorer axle will not work with the RX-8 rear hubs. So the Ronin guys give you new custom chrome-moly axles which are designed to mate to the Explorer CV joint on the inside and the RX-8 CV joint on the outside. Because they're constant velocity joints rather than standard U-joints, the difference in design between the two won't cause any vibrations or binding.

Here are the axle shafts they send. Beefy!

Here's an Explorer half-shaft.

I only need this end of it... the inner CV joint.

To disassemble it, the band clamps holding the boots on get opened up. The boot slides up the shaft and the inner CV cup just comes off - the only thing holding it on is the boot which seems common with American cars. Once the cup is off, the CV joint is exposed. There is a small circlip holding this on, which comes off easily with a circlip pliers.

The circlip, which gets re-used.

A three-jaw puller extracts the CV from the Explorer axle shaft.

All the bits I need from the Explorer axles. The rest hits the bin.

The boots slide onto the axle shafts, then theb CV joints install using a 32mm socket and a deadblow, followed by the circlip. I'm going to stop here on the inboard side and move to the RX-8 axles.

johnvitamvas
johnvitamvas New Reader
11/26/19 12:30 p.m.

The kit uses the outer CV joints and stubs from a 6-speed RX-8. They're very beefy and hold up to a lot of abuse. Disassembly is largely the same as the Ford axles in the beginning. Remove the boot, clean off the grease.

The difference is the RX-8 outer CV joint is held in place with a blind circlip. To get the outer CV off, you need to either pull it out or strike it off. I put the axle in my vise, put a block of wood on the CV joint and smacked it with my 10lb mini-sledge. It came off no problem.

The RX-8 CV joint looks a bit different than the Ford, and is fairly common for Japanese and European cars.

Here's that little bugger of a circlip, now installed on the new Ronin axles.

Ready to install on the new axle shafts.  It's a little fiddly to get them on, because that circlip needs to be closed up with a pliers enough to allow the CV splines to engage. Once it clears the chamfer, it slides in with a little help from a deadblow.

After greasing everything up, the new boots can slide on and the retaining rings can be clamped into place.


I made the bushings for the rear mount on the lathe. Here's the rear mount bolted to the modified rear cover of the 8.8.

Bushing without its center sleeve. The bushings are the same dimensions as the factory RX-8 bushings, roughly.


Time to make the bushings for the front of the final drive. Bit of a weird configuration, so I made the bushing as two pieces, a complex shape that presses into the front ears of the diff, and a disc to serve as the lower isolator. The Ronin guys sent me a link to a guy that makes something like this, but I thought the version I came up with was a little better designed and didn't rely solely on the press-fit to hold the diff in.

Sorry the pics are so dark.

With the front cradle mocked up. Everything fits surprisingly well. The Ronin guys did a really nice job with the front piece. I think just a little minor grinding will be necessary to tighten up the gaps for a nice weld. I have a bit more work to do before this is ready to weld but it's mostly just prep.

This is a shot of the rear bushings I made, fitted to the Ronin plate, bolted to the RX-8 subframe.

This is the front mount, with the bottom isolator bushing installed. You can see the gap from the Ronin front plate to the subframe is just a bit on the large side, probably okay for a MIG weld but a bit too large for a TIG.


Continuing work on the 8.8 swap. Final test fit before grinding everything clean and welding.

Good fitment to the front of the subframe, TIG welding this was not a problem at all.

We also put a bead on the underside, where the rear of the front plate meets the RX-8 subframe.

Cleaned, primed, and rattle-canned black.

Here's a close-up of the lower "legs" of the front plate welded to the subframe.

Another close-up of the welding on the front plate / subframe interface, as well as the front bushings, with the final drive installed. There were no fitment issues after welding.

Top down view with the final drive all bolted up. Looks like it was meant to go there! The Ronin kit is awesome...

johnvitamvas
johnvitamvas New Reader
11/26/19 12:34 p.m.

When I had the steering rack out I noticed that the two bushings on the driver's side are super soft rubber. I hate compliance in steering and suspension when it comes to autocross cars, so I made up a couple of delrin bushings and re-used the stock Miata metal inserts from the rubber bushings (with the rubber burned off :) ).

I fabbed up some engine brackets. It was a lot more difficult than I thought it would be but again I have basically no fabrication skills so I was kind of fumbling along at this point. I bought 3/16" steel which was pretty hard to work with, especially since I don't have a professional tubing notcher or a particularly powerful welder. I could have made them out of square tubing but round... well... it looks better.

Anyway, I started with a piece of 1.5" OD steel tubing and made a riser off of the engine mount on the subframe. I welded a bottom piece to it that I cut out of a flat plate of 3/16" steel. I drilled a hole in the bottom for the engine mount stud.

Then I notched another piece of tube to mate up with that vertical tube. This was tricky since the bracket on the engine is about three inches forward of the engine mount, and about an inch and a half up. I ended up having to tweak the notches I put in the tube quite a bit to get the angle right. Then I had to cut the other end of that tube so that it would line up with the engine plate. I cut an oblong hole in each plate for the tube to slide into so it could be welded from both sides.

Anyway... lots of words. Here is what I ended up with on the driver's side (passenger's side was too hard to get a picture of).

Ugly tack welds but my machine really struggles with 3/16" steel. On the other side I pre-heated the brackets with a torch which helped a lot and gave me stronger, smaller tacks.

I took the brackets to my buddy who is an excellent TIG welder and he finish welded everything. He laughed at my pathetic tack welds but he made it work.

I ended up cleaning these up and painting them so they wouldn't rust. The engine had been supported by a above-engine support bar and it was in the way of getting a lot of stuff done. Tack welding these with that bar in place was a bear. I ended up doing what I could from the bottom with the car on the lift, but access wasn't great under there either and I'm such a novice welder I'm nervous doing anything not on a bench.

Next up... transmission mounts and ... a turbo!

johnvitamvas
johnvitamvas New Reader
11/26/19 12:40 p.m.

I removed all the emissions crap from the wiring harness. I made some brackets to fit the NC radiator and fan in the RX-8. I didn't end up using the stock radiator, but it was convenient to be able to make off the shelf parts fit wherever possible. I got the input shaft of the gearbox cut down, which is required to work with my bellhousing (which is designed for an FC TII transmission with a shorter input shaft). I got the driveline angles correct by shimming the front diff mount, and I got the slip yoke and pinion flange for the 8.8, which means I can start building the driveshaft.

Wrestling with the intake manifold took some time. It wanted to share space with the ABS pump and the belt tensioner that replaces the belt-driven steering pump that I'm not using. The tensioner that came with my 2.5 actually worked once I milled off about 30mm of material from the mounting bosses to move it closer to the engine. The stock NC intake manifold is pretty restrictive and also doesn't fit with the engine straight up in an RX-8, so I got an old used Moto-East intake and cut down the runners to move it closer to the head so it would clear the ABS and the fuse box. I relocated the ABS pump to under the master cylinder and re-routed all of the lines. I modified the Mazda 3 alternator, which sits low on the driver's side to make room for the turbo and exhaust plumbing, so it would clear the steering coupler. I spliced in the wiring for the alternator, and finished the battery routing. My hands were filthy all day so I didn't take any pictures of that stuff, but I did take a picture of the "finished" product.

I really wanted to get this thing fired before thanksgiving '08 to stay on schedule but I needed to pick a clutch and flywheel first and well, that milestone came and went.

I love pick and pull salvage yards. I initially went there because my car was missing the front crash beam. The local yard had an '08 RX-8 and it didn't look from the pictures like it had been in a front end wreck. Turns out the car was pretty nice, and the bumper was already gone. So I nabbed the crash beam (four bolts per side, literally took a minute to get it on the cart). While I was there I saw that someone had removed the front wiring harness but left the bottom part of the fuse box. The one in my car had two broken tabs that I had planned to repair, but when I saw this fuse box I just grabbed it. Score.

While I was there I noticed that there were a bunch of Mazda 3's around. I remembered that the belt tensioner that came on my 2.5L engine was for a Ford, which uses  a different belt (different number of ribs, different offset) than the Mazda engines. I deleted the power steering pump from my car and am putting a tensioner where the pump used to be, up between the intake manifold and the cylinder head. On a Miata with the power steering pump deleted, this would just bolt on.

Unfortunately, because of some packaging weirdness with the RX-8 and this engine, the intake manifold and the fuse box want to occupy the same space in the engine bay. Moving the intake manifold closer to the engine by shortening the runners solves that problem, but then the manifold hits the tensioner. The solution was to take the tensioner down to the milling machine and remove a bunch of material from the mounting legs, re-drill the outer part of the mounting bosses to recess the mounting bolts, then re-drill the inner part of the bosses for the centering dowels, and reinstall everything. The result is just about perfect... but was a ton of fiddly work.

Throttle body has clearance to the fuse box now. The DBW throttle is not exactly small.

It also bothered me that the aftermarket subframe didn't have provisions for securing the factory brake line clamps nor the ABS sensor wires. So I went out to the boneyard and cut those tabs off of the factory subframe and hammered them flat so they could mount up just like stock. Eventually I'll just tack weld these onto the subframe, but since I also cut the factory control arm mounting ears with the ABS and brake line tabs, they're secured and in the stock location.

I also finished up a bunch more with the wiring. I ran the hot lead from the battery (re-located to behind the driver where the rear seat used to be), deleted all unnecessary wires from the engine-side harness, ran new wires to the alternator, re-pinned the factory harness for the Mazda3 alternator (moved from the passenger's side of the engine to the driver's side to make room for turbo plumbing on the exhaust side of the engine), and ran the wiring to avoid possible contact with any moving parts.

I got the stock MX-5 radiator installed with some custom brackets I made... I ended up buying a nice big radiator from Strano, but I started with the stock one for fitment. I started measuring for coolant hoses. It's starting to come together.


johnvitamvas
johnvitamvas New Reader
11/26/19 12:42 p.m.

Starting to work on a trans crossmember, while also teaching myself to weld. What could possibly go wrong? I ended up doing a lot of practice welds that I then cut up to verify penetration, before making this stuff. It lasted the whole season without cracking, so... win?

Kinda sad that I ended up throwing a lot of that away when I changed gearboxes. But oh well.


Turbo setup came in as well. I had some nervousness about it not fitting, but everything cleared. Bonus.

Eaton Tru-trac with the original Explorer gears.

OjaiM5
OjaiM5 Reader
11/26/19 12:43 p.m.

Amazing Fab work and Welding!

Mndsm
Mndsm MegaDork
11/26/19 12:44 p.m.

Following with interest. I'm still convinced I should put a DISI in one, some day. 

johnvitamvas
johnvitamvas New Reader
11/26/19 12:47 p.m.

Modified coolant crossover pipe. I later painted this to make it look a bit nicer.

Diff and driveshaft  done (thanks Sam Strano for hand delivering the driveshaft!), and rear end was sort of buttoned up at this point. The rear wheel / tire (315/30 A7 on an 18x11 Forgestar) clears the inner shock tower by maybe 5mm but sticks out past the outer fender by about 15mm, so an aggressive fender roll / pull ended up being necessary.


I built the oil system out of -10 AN braided line. I used a remote oil filter mount because the stock mount for the Duratec/MZR is in the way of pretty much everything when you put the motor in an RX-8. I ran lines from the filter to a stock RX-8 driver's side oil cooler, then back to the engine. I planned to eventually add an Accusump, but that hasn't happened as I write this in November of 2019. I added ports for oil pressure and temp sending units to go to the engine management for alerts / engine protection. I started building the fuel system out of -6AN teflon / braided hose. Pain in the ass, that stuff is. I added a 10 micron inline filter tucked up in the trans tunnel and converted the fuel system to a return-style rail with an external Aeromotive rising-rate FPR and a GM flex sensor in the return line to feed to the engine management. I've since gone back to a dead-head system at the rail with a surge tank in the trunk due to pervasive fueling issues throughout 2019.

I upgraded the cams to a set of Dynotronics turbo (FI "1.5") cams, which should wake the engine up above 5,000 RPM. The stock cams are pretty pathetic and the 2.5 falls on its face at high RPM. I had to swap the front pulley as well since the engine came with the wrong one. Timing these engines is a bit of a weird process, I guess I never realized they didn't have woodruff keys on the crank or cams. So, learning experience. I also picked up a custom baffled oil pan with a windage tray built in and kick outs for more oil capacity. Nicer than the Ranger pan I had been planning to run...


johnvitamvas
johnvitamvas New Reader
11/26/19 12:51 p.m.

At this point the engine was in for the tenth or so time, and I was hoping it would be the last (spoiler alert: It was not the last time). I made a battery mount, finished all the battery wiring, and powered up the car. Everything worked, the fuel pump primed and built pressure, no leaks. I finished up the oil plumbing. Sensors in place for fuel pressure, oil pressure and oil temp to connect to the aftermarket EFI. The DBW throttle even works without the engine running.

Mostly I spent a bunch of time cutting and fitting intercooler pipes until I was happy. I wanted to minimize the number of silicone couplers in the intake tract so I had a buddy TIG weld it all together for me. I really need to buy a TIG welder. And learn to TIG.

The piping is a lot easier to manage without all the couplers everywhere.

I got the clutch fitted, reinstalled the transmission and finally got to install the driveshaft that arrived months ago. Everything fit together as expected. I bled the clutch and tested its travel... it seems to fully release but it's definitely close to the floor. I may need to modify the factory clutch pedal, or at least just adjust the plunger to get a little more release, but I won't know until I can start it and test the driveline with the engine running. It's already been reinforced as I guess it's pretty common for them to break.

I didn't like the way the Fab9 kit had the oil drain at the block set up. They call for you to drill and tap the block in an area between two internal strengthening ribs. The problem with this is the block casting is angled there, so it's very hard to thread in the (3/8 NPT) fitting they want you to use. And the hose to the turbo is so short it's a pain to install. And everyone seems to have issues with it leaking. I saw this stripping out pretty quickly, so I turned an AN fitting to TIG weld into the block, now installing and removing the turbo oil drain is easy. Since then I went to an even better oil drain setup, will have to find pictures of that.


johnvitamvas
johnvitamvas New Reader
11/26/19 12:54 p.m.

Getting there at this point... I had finished up a bunch of annoying small things. Found a coolant hose that worked to connect the hot side to the radiator (thank you Advance Auto for letting me stand in the back and sort through coolant hoses for an hour), fabbed up some coolant hard lines and made brackets for them. Made a bracket for the dipstick. At this point it was a bunch of small things to button up and a few big things - engine management, tuning and aero. But it was complete enough that I put it on the scales to see where things stand.

2526lbs is not bad, but there's a lot of weight to go back on at this point. Probably 150lbs worth.


Sorry, car still not running. Should have replacement ECU from Joe early next week. It's en route from Texas.

Still lots to get done anyway. I got started on making the rear upper shock mounts. I got this idea from Tamra and Drew, and used the same spherical bearings they did, but probably due to some differences in our shocks (or desires for bump / droop) I had to change up Drew's design a bit. Regardless, this eliminates the factory rubber donut mounts for the rear shock shafts. I shortened the housings by a couple inches as well to get the desired bump / droop numbers relative to static ride height.

Factory rear shock hat:

Top cut off:

New top plate mocked up, with the hole for the bearing cup cut out:

Not my prettiest welding, but whatever.

I turned some simple pieces to adapt the 0.550" Penske shafts to the spherical bearing. I know people say the Grizzly mini-lathes are useless but if I can whip stuff like this up in an hour, it's totally worth having.

Next job I've been putting off is re-making the lower front crossmember. This piece braces the back of the subframe to the unibody and spans the width of the unibody rails. The stock one ran into the 2.5L engine's oil pan. I cut the center out of it and replaced it with a section of 3/4" x 1.5" x 0.063" rectangular steel tubing, then braced it with another couple of pieces of tubing. It's way stiffer than the stock piece and only weighs a half a pound more.

Needs a prime and a coat of paint and it'll be good to go back on the car.

johnvitamvas
johnvitamvas New Reader
11/26/19 12:56 p.m.

And in January of 2019, it lived again for the first time with its new heart. About a year and  three months since the shell of an RX-8 landed in my shop.

https://www.youtube.com/watch?v=PNg43DdwjYA


johnvitamvas
johnvitamvas New Reader
11/26/19 1:01 p.m.

At this point I knew the wiring was good, so I started re-wiring everything for the Haltech. I probably added a lot of work in hindsight, but I was taking a "baby steps" approach to all of this. Wiring doesn't scare me, but it can be a pain to troubleshoot.

Haltech does a good job labeling wires, but it's not as cool as the printed labels down the length of each wire that the BMW had in its Megasquirt harness.

Peter Florance turned me on to these non-insulated crimp terminals, I love them. Super easy to work with.

Most of the engine-side stuff done, with temporary harness tape "tacks" to hold stuff together.

Ohmed out and portions wrapped, but with some left to go. Coils and injectors are unplugged in preparation for ECU configuration and loading of the tune. I also swapped to the ID1050X injectors while I was in there. The group of wires in the front left are all spare unused I/O that I'm not sure what to do with, I just coiled up and and tucked them away  in case I add features later on which require their use.

Lots of factory wiring and scraps of leftover Haltech wiring left over to save for future needs.

I didn't have time to configure the ECU tonight, will get that sorted out this week, get the intake manifold back on and start the calibration process.

Time for a diversion called "fun with electricity" for a moment if I may.

There are a lot of similarities between the RX-8 and the MX-5 and this includes the way the cars are wired but if you look closely there are some differences that can trip you up. Example: the thermostatically controlled fans.  Here are two wiring diagrams, first from the MX-5 and second from the RX-8.

Background: I installed the radiator from the MX-5 as well as the fan from the MX-5 into my RX-8. The fuse / relay box is from the RX-8. At first glance, everything looks okay. Both cars have three fan relays and both cars have four total connections to the fans (i.e. there are two motors, each with a power and a ground). But upon closer inspection they work slightly differently.

It took me a while to understand what was going on here but here goes. The MX-5 first. There are three fan speeds. Low has half of the windings powered with +12V switched through Relay 1 and the fixed ground wire. Medium is the same, +12V switched through relay 1, but relay 3 is also energized, shorting the second set of windings (presumably higher current) to ground. High energizes all three relays, so Relays 1 and 2 energize the high-side windings and relay 3 grounds the low side winding. Blue is "low", green is "medium" and red is "high"

Looking at the RX-8 diagram, it's a bit different. Relay 3 is actually a SPDT relay. Just wiring in the MX-5 fans with this configuration won't work, because if you look closely, just energizing relay 1 won't give motor 1 a path to ground. Well there is one, but it's in series with motor 2. Follow the green wire from the low side of motor 1 and it goes to the high side of relays 2 and 3. Relay 3's low side connects to the second cooling fan motor. You'll also notice that the RX-8 only has two control wires going to the relays, whereas the MX-5 has three. I really didn't want to add a control wire, and I didn't need to.

What I did was actually very simple. I cut the green wire where it exited the fan motor and connected it to ground. This means when relay 1 is energized, it will drive the first set of windings and run the motor on low speed. Then when Relay 3 is energized, the second set of windings will be powered and the motor will run on high. I've lost the medium speed setting, but I don't see this being a problem.


And just like that, the car runs on a Haltech.


https://www.youtube.com/watch?v=ImvwC-jr7Jc&feature=youtu.be


johnvitamvas
johnvitamvas New Reader
11/26/19 1:08 p.m.

I put a proper fuel pump in it today. And mounted the wing.

A Deatschwerks 9-307-1009 DW300 fuel pump fits perfectly in the stock RX-8 Series 2 fuel pump housing. And flows enough fuel to feed the car with E85 for more than the power I expect to make, even if I run silly boost levels. Stranoparts to the rescue when I totally forgot I hadn't ordered a pump.

Took a few hours to measure up the trunk lid to mount the wing uprights and drill it. It still needed to be set up, and I hadn't attached the upper element supports at this point, but I did all the major work mounting it up. Thanks to Rick at Ciro racing for a great deal on the wing.


johnvitamvas
johnvitamvas New Reader
11/26/19 1:15 p.m.

I ended up having some cooling problems early on. Bottom line, don't block airflow to the radiator! Haha.

Here is how the stock ducting looks. This is all using factory parts modified to fit. The openings on either side of the intercooler go directly into the radiator. There is no escape path other than through the radiator because I foamed off the sides of the radiator where it meets the vertical elements of the undertray as well as the top of the radiator where it meets the top of the core support. The bottom of the radiator is foam-sealed to the plastic undertray, which is fastened to the subframe at the rear.

Here is a view inside one of the ducts.

At this point, I had done one local event where the car basically overheated every run, plus a dyno session where the car put 400hp to the wheels. And, that's about it. So, why not tow it to spring nationals?!


It didn't go well, I got my butt kicked and the car didn't run well the whole time. It ended up being a bad crank position sensor (counterfeit Chinesium part) that took a long time to diagnose. After getting back, I did a local event and the car ran pretty well, but not great.


wheelsmithy
wheelsmithy GRM+ Memberand SuperDork
11/26/19 1:23 p.m.

Dang!

johnvitamvas
johnvitamvas New Reader
11/26/19 1:25 p.m.

We also saw spark breakup on the dyno during the first session, so I mounted up a set of Nissan R35 coils on custom brackets.

Right before Nationals I converted the fuel rail to a dead-head setup.

Installed and plumbed and wired the surge tank

Made a quick and dirty heat shield for the turbo and manifold. The ECU temperature had been getting pretty hot so the goal here is just to reflect the heat back and away from the front of the engine bay.


It died a valiant death.

And Nationals didn't go well. I did okay at the Pro Finale, aside from fragging the gearbox during practice starts, and swapping in a replacement, finishing a few minutes before my group got called to run Saturday morning. But the car was increasingly running really poorly, burning oil and really slow turbo spool. Early on in testing the car had overboosted quite a bit (like, 30+psi) and I was pretty sure it cracked some ring lands. Long story short, the car didn't survive Nationals. When I got home I started the tear-down immediately.

Not a single compression ring survived. All were broken. Two pistons had broken ring lands. With all the overboost events, overheating and fuel starvation I can't say I'm surprised.

So that leaves us where we are today. I bought a fresh junkyard 2.5, tore it down and started a better, faster, stronger setup. Custom 10:1 forged pistons, forged H-beam rods, new bearings. 

Cylinder head back on, with ARP bolts. This is the head off of the salvage yard engine, but with the upgraded valve springs and retainers.


I also picked up a G-force GSR four-speed and had an adapter plate made. So no more risk of explodey transmissions.


Progress marches on... can't wait to see what 2020 brings.


barefootskater
barefootskater SuperDork
11/26/19 1:46 p.m.

Hell of a way to introduce yourself. Well done. 

AWSX1686
AWSX1686 GRM+ Memberand UltraDork
11/26/19 2:39 p.m.

That thing is awesome! Well done indeed. 

BirgerBuilder
BirgerBuilder Reader
11/26/19 2:47 p.m.

Nice Build! I just said to myself, "400hp from the 2.5?!?!" followed up by broken pistons.

Ah, best of luck on round 2!

johnvitamvas
johnvitamvas New Reader
11/26/19 3:57 p.m.

It wouldn't have been a problem if it hadn't been overheated, overboosted, and then run really lean. frown

karplus2
karplus2 GRM+ Memberand New Reader
11/26/19 4:01 p.m.

Awesome work! I love RX-8s and have owned the same 2005 base model twice now. I have been contemplating what to do when the renesis that is in it finally dies. A turbo 2.5 swap was high on my list (largely because, not LS swap). Keep up the great work. Look forward to seeing updates!

shagles
shagles Reader
11/26/19 4:31 p.m.

I saw the 315's on the rear, how big did you squeeze on the front? Are you the same John Vitamvas that used to make offset camber arm bushings for BMW's?

johnvitamvas
johnvitamvas New Reader
11/26/19 5:06 p.m.

In reply to shagles :

Yes, I think there is only one of me smiley

I used to autocross a DSP E46 330Ci


Sorry, 315s all around

SVreX
SVreX MegaDork
11/26/19 5:56 p.m.

For a guy with no fab skills,you sure have pretty berkeleying good fab skills!

1 2 3 4

You'll need to log in to post.

Our Preferred Partners
oF28OEN2jDBnqGQIL2xIHX9jp4nw7WsWEbsaIylMcAVBVidqLaMkKVWzmMCAREyv