Trying something new here for those of us stuck indoors for the winter (or who just like playing with little cars, too), a model car build thread! I will be updating this as real-time as possible throughout the build. I'll be posting major steps in the process and giving out pointers. Feel free to use it as a guide to try your first (or 100th) model!
The subject of the first build thread is a Monogram 1/24th scale Scarab Mk IV rear-engine sports racer. I chose for the first one for a few reasons. Most importantly, it's a 1965 molding from essentially a slot car body. This means the kit has a small number of parts, no engine, a very basic interior, and no suspension. This will make for a fast and fun build where we can concentrate on the paint and assembly process. Now, I should point out that the kit I am using is a 1997 reissue, though I have built plenty of actual vintage kits. Models are meant to be built, not collected!
So, starting on...

Step 1:

First things first, always open your kit and check the contents for missing or broken pieces. Don't forget to actually look at each item, I have had many a kit ship with a tree from a different car. Here we have a bag with the parts, a chrome tree, a clear tree, and the rubber tree plus the instructions and decals.
Step 2:

I then like to take stock of what parts are going to be spray painted. Here we can see that this particular model offers the option of an open interior or a "driver" (leftover from when it was a slot car body mold). All of the parts are here, so let's get working!
Step 3:

Use side-cutting pliers (available at most hobby stores) and sharp x-acto blades to separate the parts from the sprues and then clean off major flashing and casting nubs.
Step 4:

Next we'll start preparing the body for paint. Get some 400 grit dry sand paper and sand the nubs down where the sprue was attached.
Step 5:

Now we move on to sanding the mold release lines. These are usually along cut lines, such as the wheelwells, but will need to move over smooth surfaces, such as this fender. You'll want to sand all of these down or they will show through the paint.
My 9 year old daughter and I are building a mini cooper. She is really enjoying her first build. Pics later.
Step 6:

Next we want to lightly sand the entire body so the paint has "teeth" to adhere to. Again, we are using 400 grit dry paper. Try and sand in the same direction on major body panels. Make sure to scuff everywhere you can, but be careful around trim, emblems, and the like.
pete240z wrote:
My 9 year old daughter and I are building a mini cooper. She is really enjoying her first build. Pics later.
Awesome! I got into model building because my Dad built them with me when I was a kid. I will be doing the same with my daughter when she gets older. It's great parent/child bonding!
Step 7:

Most bodies allow a few parts to be glued on before painting, and ideally you'll want to do as much of that as possible to ensure correct panel fitment and the smoothest paint job. For the Scarab, we are able to glue on both the front and rear bumpers, making a complete body. Use plastic cement sparingly.
Step 8:

Once the glue dries, sand the join lines. Optionally here we could fill in the gap and make the nose look "one-piece", but the real car was modified for every race and this body isn't accurate to any of them, so we are essentially building a "what if". I prefer this style most of the time, as it gives me freedom to build whatever I want.
Step 9:

Now our body, chassis, and wheel hubs are ready for paint. I like to spray as much as possible on models as it makes for a nicer finish. Always spray outside, or at least in an open garage. I made my paint box by cutting two sides off of a large box and reinforcing it. I've been painting models in this thing for 10 years! Notice I have already picked out my paint colors. I prefer large automotive sprays as they are easy to find, affordable to purchase, and have a large selection. The hobbyist model paints tend to be expensive, finicky to use, and really don't give you any better of a finish.
Best build thread ever. Looking forward to more. I think I need to get started on the replica 75 Corvette of my 1:1car. Have most of the parts already (about 5 different kits). 1/24th scale.
Step 10:

Top tip! Use masking tape double-stuck to the paint booth to keep small parts from flying away.
Step 11:

When you paint, use light coats. It's much easier to build up the paint then sand it all off and start over because you laid it on too thick and it ran. More advice: start and end your spray off of the parts. If you start or stop while still pointing at your part you will have massive splatter in your paint.
Step 12:

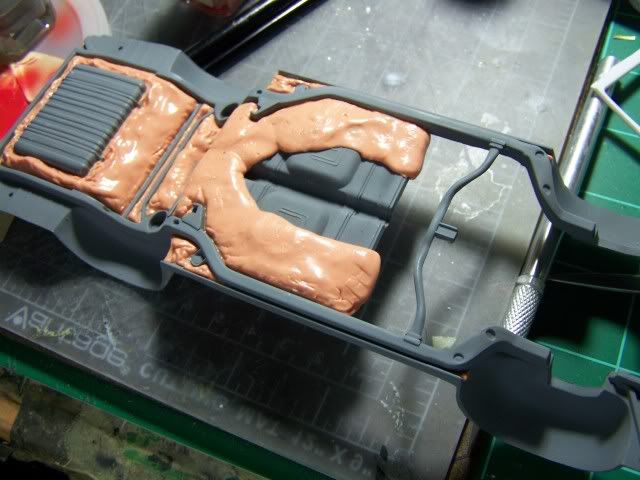
For the interior, I only sprayed what was going to be bare metal. By avoiding painting the seats, which will be a different color, I can keep paint build-up to a minimum and preserve the detailing molded in as much as possible.
Step 13:

First coat on the chassis. Again, you want smooth, even, light coats and make sure to "complete the pass". Don't start or stop over your part. Notice the colored plastic bleeding through. That's okay, we have more coats to go.
Will be watching this. I love building models even though I haven't built one in years.
Step 14:

Thus starts the most difficult part of any build, the actual paint job on the main body. This is what everybody sees first on a model and will make or break it. I like to start with the undersides to make sure I have nice coatings on the lower surfaces. If you do those last you can get overspray onto the upper surface, which could ruin the smoothness of the paint job in the most visible areas.
Step 15:

While the paint dries, we'll start working on the other parts of the model. Clip the tires from the sprue and trim off excess casting flash with your knife. Be careful no to "flat spot" the tire! If you want the tires to retain a new-ish look, sand the treads with a 220 dry (like in this picture on the left). For a "competition" or well used look, go all the way down to a 150. This part takes some time!
You, sir..have inspired me to look at my "shelf of doom". Perhaps when we're done unpacking and my man-cave is ready, I'll start building. I've got some Tamiya 1/12th F1 cars in there..
Oh, and sanding tires? Find a dowel or piece of rod/stiff wire that fits the hole in the wheel (do it before you paint, just in case) & mount the tire (I use white glue for all this, so that I can dismantle it easily afterwards). Place the "axle" in a high speed drill..put the drill in a vice & fire her up! Now you can work on the tire like it's on a lathe.
In reply to friedgreencorrado:
The dowel trick is indeed a useful one. Most modelers do that with a dremel as the motor, so they can vary the speed way down low.
Step 16:


Laid paint on the actual body! This is the first coat, and we'll see how it goes before determining the final tally. Another hint is to warm up your paint under warm tap water, it gets the paint molecules more excited so they lay down flat instead of clumping.
Step 17:

A second coat was needed on our chassis pan and interior.
You can cover the exposed seats and other areas you want to keep from getting color on them by pressing silly putty over those areas. Comes right up when done.