1 2 3 4 5
Keith Tanner
Keith Tanner GRM+ Memberand MegaDork
4/30/21 7:07 p.m.

I got it in the car yesterday! Yay!

And then, while trying to troubleshoot the CAN connection, accidentally let the smoke out when the CAN ground wire found a hot terminal. Poop.

The good news is that the parts are cheap and Mouser has them in stock. So I'll swap them out on Tuesday and I think I've found the missing code that was keeping the CAN from working. The Feather CAN transciever uses a different software library than the Pi one did, so I just have to get the incantation right to summon the network pixies.

The best news is that Hackaday did a little baby feature on my project. Which has me pretty proud.

https://hackaday.com/2021/04/29/rgb-led-rings-teach-old-dash-new-tricks/

Keith Tanner
Keith Tanner GRM+ Memberand MegaDork
5/3/21 9:57 p.m.

Feather arrived, I loaded in the software and repackaged everything. Then jumped into the car and...


Woooooo! A test drive followed which told me many things. Speedo works. Tach works. I should raise the steering column :) I have a weird light leak. Backlighting looks awful. But it works!

I turned the minimum threshold off in the g meter, and you can see the car rock when I blip the throttle. That fills me with a childlike glee. 

Woooooo!

APEowner
APEowner GRM+ Memberand Dork
5/4/21 1:57 a.m.

That's awesome.  Also, the v8 rumble combined with the Miata instrument cluster messes with my head.

Keith Tanner
Keith Tanner GRM+ Memberand MegaDork
5/4/21 8:49 a.m.

Takes a couple of years to get used to it, but you never grow tired of it.

So, a little more info since I'm now a little more coherent.

I just realized the glow on the back of the speedo is from a status LED on the motor controller. I'll have to see if I can turn that off in code, otherwise I will turn it off with electrical tape.

The cool LED I put under the dash to light up the footwell and tunnel makes for a very bright interior at night and also glows through the unused windshield defroster vents. I think the car is also running some random old sealed beams, it may not even have H4 bulbs. This means the car is really quite hostile to night vision overall. I shall add a relay to shut off the interior lighting when the lights are on, and I'll also use that to dim the dash at the same time.

Backlighting the gauges is ugly. This picture does not fully capture the sickly nature of the light. I will have to come up with a good lighting scheme since I may end up driving this car at night again in the future. That's never been a priority for it.

I'm going to play with some different behaviors for the LEDs just to see how they work.

Keith Tanner
Keith Tanner GRM+ Memberand MegaDork
5/4/21 10:38 p.m.

Different lighting behavior!

First, a TPS indication on the speedo. Just because. The camera doesn't pick this up, but it increases in intensity with throttle. Necessary? Maybe not. I was just thinking of what I could do with the data being fed to the dash via CAN. Right now, you can switch between TPS and friction circle with a button. Or you will when I install the button.

Car is not running in this video because there's no way I could show 100% throttle when free revving!


Also, a new tach behaviour - I call this a "trail". It still runs through the color gamut used for the full range indication (yellow at 4000, red at 5600). Might be a little less obnoxious day to day than the full range.


I have also added a flashing shift indicator on the tach. It's currently set to 250 rpm below redline (just because I had to set it to something), but it could be programmed to trigger at a different RPM for each gear so you get the perfect shift every time. No video because I haven't bothered to test it yet.

Keith Tanner
Keith Tanner GRM+ Memberand MegaDork
5/8/21 10:05 p.m.

Me again! Still playing with ideas. I have decided I'm going to install a light sensor in the car and simply scale the LED brightness up and down based on that. It'll add a whole $4.50 to my investment but it'll let me sidestep a bunch of other things I was going to do while improving function at the same time.

In test drives, the speedo is not updating quickly. It should be every 100 ms, but it's stuttering. It must be something in the programming because everything else is butter smooth, so I'll play with that. Right now, it's acting a bit like a chronometric speedometer which is entertaining in its own way.

Meanwhile, here are some videos of my current light setups. I have become very enamored with my tach "trail" concept. In this video, it's set to delay over 500 ms and I've set the color changes to 2000 and 3000 rpm just to make it easier to trigger. The cool thing about this is that when you're cruising down the road the trail disappears and the length of the trail really shows the rate of change of engine speed. I like it a lot.

Note that the camera on my phone really over-emphasises the brightness of the LEDs, they're not blinding in real life :) Also, I have the friction circle indicator set to full sensitivity so it's jittering around, in normal use I have it set so there's a threshold before it lights up. Not much of one, but enough to keep that jitter under control.


Lots of requests for a shift light function. Here it is set at 2000 rpm. You could program this to be gear-sensitive which would make for some useful information when combined with the torque curve and gearing. It would be pretty easy to make it increase in intensity or change color as you go past the shift point.


CharleyK
CharleyK New Reader
5/9/21 4:38 p.m.

I have been meaning to ask if you could easily add a data logger function to this project.  

Keith Tanner
Keith Tanner GRM+ Memberand MegaDork
5/9/21 6:18 p.m.

The Pi version could easily have data logged. Heck, it would have been pretty easy to have it automatically upload the logs to a server when I parked in the garage. It could have also had an integrated dash cam and then the sky's the limit on how fancy you want to get. 

There is a data logging hat available for the feather as well for a whole $9. That one would require plugging in or removing the cars, the latter is awkward if it's built into the cluster.  It's not something I was planning to implement so I haven't looked into it too closely.

I have added a fade option to my warning lights. This lets me show a red warning while still distinguishing between say, blue for coolant, orange for oil pressure and green for...I don't know. I'm just playing. But I do like the combo of red and another color for a bit more info.

Keith Tanner
Keith Tanner GRM+ Memberand MegaDork
5/13/21 9:35 a.m.

My light sensor showed up yesterday, so now I have auto-dimming LEDs. Haven't tried night driving yet but some time in a dark shop and a flashlight has confirmed function. I still need to come up with a solution for lighting the two big gauges just because it's bothering me :) I might see if I can mask off part of the back of the gauge face. Removing the green filters on the bulbs that light the cluster has helped somewhat. The sensor is just stuck on top of the dash right now, I'll find a way to stash it somewhere more subtle where it can still see the outside light level.

Spent a bit more time troubleshooting. Found a bug that would crash the cluster at 5200 rpm, fixed it. Found another that would crash it at high rates of change, fixed it. The speedometer needle was moving jerkily, so I tweaked that and it's better but still seems a little stuttery. That may be because it's moving over such a small range, and I'm wondering if the needle is binding. I'll check next time I have it out.

The funniest problem was that all of the secondary gauges (fuel, oil pressure, coolant) are off. Oil pressure reads a bit high, coolant temp reads low. I confirmed the latter via CAN. But they're consistently wrong. I thought maybe I was bleeding some voltage back into the cluster and messing up some grounds - and then I realized I had built this cluster out of random gauges out of my Big Box Of Random Gauges and the needles had been on and off multiple times. I suspect they're simply miscalibrated and badly. I'll have to pull things apart and reset the needles. 

I'm signed up for a track day this weekend so I'll see how it works at speed. I'll try to get some video!

clutchsmoke
clutchsmoke UltraDork
5/14/21 9:19 a.m.

Hopefully the track day torture test goes well!

Keith Tanner
Keith Tanner GRM+ Memberand MegaDork
5/14/21 4:04 p.m.

Road test! I took the car out to the office, a one hour round trip. Discovered that the tach "trails" work pretty darn well, settling down at a cruise but quite dynamic when you're romping on it. It does have a small bug where it will skip a light when there's a rapid rate of change, but that's acceptable as mostly I want it to be visible in peripheral vision. Tweaked the zero point of the lights on the tach after spending some time staring at them. The autoscaling of the LEDs must be working because I didn't notice them being bright or dim at any point.

The friction circle doodad is REALLY FUN. Braking, rolling into a corner and accelerating out shows a nice smooth roll around the edge. I can see this being useful. It also works as an inclinometer which is surprisingly entertaining as you're noodling along a road that could be described as flat but is clearly not!

I also spent a bunch of time dreaming up alternatives. We'll see if any get implemented. I think this might be a mature thing by this point.

Now I just have to figure out how to capture this on video at the track :)

Keith Tanner
Keith Tanner GRM+ Memberand MegaDork
5/14/21 4:10 p.m.

Also, before anyone else sends me this, here's what a different interpretation of "Miata dashboard driven by a microcontroller" looks like. There are some real interface coding chops on display here. I have a tendency to distill information down to a minimalist amount (see the Targa Miata rebuild thread for some real evidence of that!), this is more of a tech demo of what can be done.


Keith Tanner
Keith Tanner GRM+ Memberand MegaDork
5/14/21 8:09 p.m.

Went to get my old GoPro Hero 3 out of storage to shoot this. Man, I'd forgotten just how utterly infuriating they are to use. We may not get video :)

Keith Tanner
Keith Tanner GRM+ Memberand MegaDork
5/15/21 5:58 p.m.

Test day! Short version, this thing works better than I expected.

It all started off as a bit of a lark, but this has actual utility on track. Most notably, the shift light (the whole tach ring lights up yellow) is a very good indicator of engine speed. I have dismissed these in the past but it actually turned out to be useful so I shall change my tune. I also managed to trip the coolant over-temp indication a couple of times (it's a tough track for cooling) and it was immediately visible and easy to distinguish between temp and oil pressure. There was one session where the temperature gauge climbed quite high without triggering the overtemp warning, but given how quickly it happened I suspect I was just close instead of over. I may do an alternate display that shows current water temp on the speedo face along with one or two other items.

I think for track work I either want the tach LEDs to build on each other (my original design) and possibly to have them switch color in different rev ranges. The trail is great for the street but it might be too subtle for the track. Of course, I was on a track I've been driving for over 15 years in a car I've been driving in this form for over 10 years, so I don't spend a lot of time looking at the tach. Still, a way to change modes might be useful (spoiler alert).

The friction circle is a great party trick but you really don't look at it. I caught sight of it a couple of times but generally speaking you're just not looking at the gauges when you're exploring the limits of traction.

So:

Friction circle: fun but mostly a party trick
Tach trails: great for street use
Tach solid sequential LEDs: better for track use
Shift light: very good
Overtemp warning: very good

...and, of course, I retain my normal gauge function in all of this so it's all bonus information. That's the key here, the fact that the tach and speedo still work properly. I haven't replaced them, I've augmented them.

Overall I'm very happy. I'm thinking I'd like a "track mode" and "street mode" display.

The video failed to capture anything useful. I got a warmup lap and the first time I got on the gas the camera fell off. I had enough of GoPros by that point so you'll just have to imagine. Pity.

About that spoiler alert  - I think I've come up with a way to flip through multiple modes without requiring a screen or a complex interface. As long as it's easier to use than an old GoPro I'll be happy. The parts arrived today, I'll explore my new options shortly.

Honsch
Honsch Reader
5/15/21 6:08 p.m.

The traction circle thing will be great if it's picked up by in-car video.

Keith Tanner
Keith Tanner GRM+ Memberand MegaDork
5/17/21 10:15 a.m.

This was not a very successful video - but it does show the friction circle at work. This is a warm-up lap but you can definitely see what's going on with the acceleration. Leave the pits, do a pair of linked right turns, a hard left, a looooong right sweeper with the ability to accelerate through much of it, brake and turn right (35s), then a chicane (about 45s).


Keith Tanner
Keith Tanner GRM+ Memberand MegaDork
7/4/21 9:52 p.m.

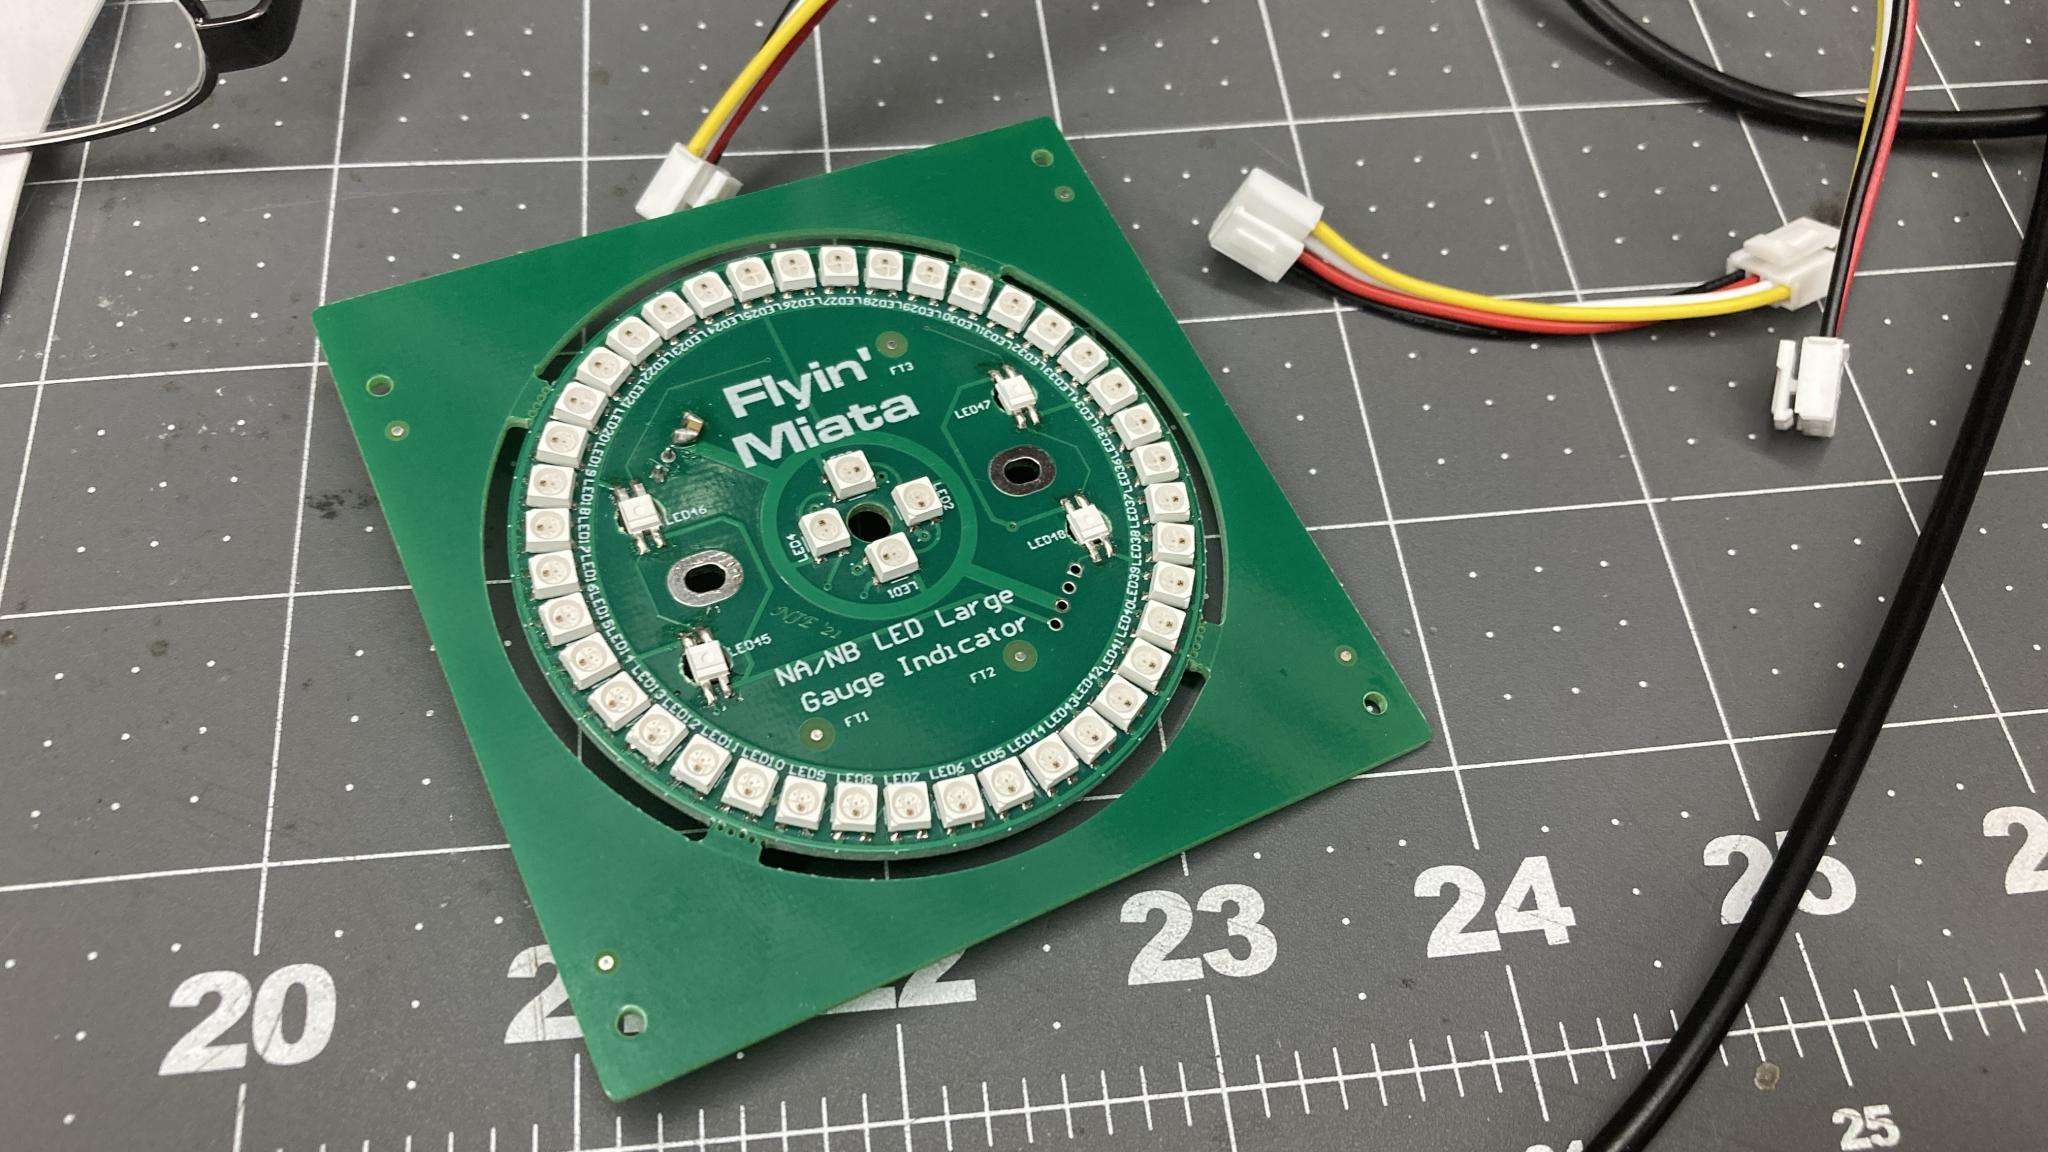
Remember this? There has been thinking, planning and implementing under way! We now have two modes.

Stradale (street in Italian to celebrate the fact that the only Italian part of this car is the livery)
- tach shows "trails"
- speedo shows friction circle indicator

Corsa (race!)
- tach is solid sequential LEDs
- speedo is split into four quadrants. Coolant temp on left, lateral G on top, longitudinal G on right. Bottom is currently unused. I wanted to be able to monitor coolant temp behavior so I can be aware of how much maximum attack I have available to me. I have considered adding fuel flow indication to the display just because I can :) Probably more useful than the g meter, honestly.

In both modes, there is now a "warm redline" that starts adding orange segments as the car gets over a certain temp, to encourage the driver to shift a little sooner. There is still the freakout mode when the coolant temp gets too high and a flash of the tach at the shift point. So we have a cold redline that shows blue LEDs below a certain temp, a happy zone where there are no special redline indications, and a warm redline that shows orange up to freakout. I like it, that's useful. 

To change modes, I wanted it to be automagic. I was going to use a subtle switch on the column but didn't manage to come up with anything I liked. So I decided to make it wheel-aware. I have two steering wheels for the car, one for street use and one for race use. The dash changes mode depending on which wheel is installed. For example, here it is booting up in the default Stradale mode (blue flash) and I attach the quick release for the race wheel (red flash indicates race mode). I'm still waiting for my second quick release to arrive so I can't show the actual wheel swap yet.


I also decided that it would be fun to add a switch to one of the wheels so I can switch modes...just because I can. Here's the bracket I drew up. S for Stradale, C for Corse. Or Sport and Competition if you want, I won't judge.

Mounted. I'm pretty happy with that. I may change the switch style, I have a few other options on the way.

And here it is in operation. In race mode, the two white dots at 12 and 3 o'clock indicate 0 for the g meters. The white dot at 9 o'clock is the warning threshold for coolant temp - above that, it starts to add the warm redline to indicate that we're higher than desired. The coolant LEDs go from blue to red as temps rise. The car is almost at normal operating temp here. You can see the flashes as it changes modes as well as the tach change.

And yes, you can see g meter showing the car rock on its springs when I blip the throttle :)

Not big changes, but now if I come up with more ideas I can have more distinct behavior between the two modes.


Keith Tanner
Keith Tanner GRM+ Memberand MegaDork
9/28/21 1:29 p.m.

We started talking about Pi-driven dashboards in another thread, so I figured I'd do an update. Not a lot of work on this version of late but I did do another track day. I'm thinking I have some voltage leaking into my grounds for the secondary gauges as the coolant gauge is offset low and the oil pressure gauge is offset high. They both seem to be functioning normally, but I have the power ground for my electronics attached to the back of the cluster and I may have to move it.

On track, I found my track version quite helpful. As mentioned, I added a little coolant temp bar graph and the warm redline. Here they are in action. The other two lights on the speedo were supposed to be lateral and longitudinal indicators but they don't work right because that's hard to test on the bench. I did find my accelerometer-equipped Hot Wheels Miata that I use for testing stashed away with all of the other toy cars, so now I can play with it. The programming, not just the car.

First pic, the car is starting to show the warm redline as a suggestion to back off a little. It's early. The speedo shows the temp scale, it goes from blue to red.

Lots of warm redline in this pic. The stock gauge is just starting to move, so obviously I need to change my trigger points for the various LED warnings. The dash is very conservative right now but it's feeding me good information in a way that's easy to process on track.

Keith Tanner
Keith Tanner GRM+ Memberand MegaDork
9/28/21 1:39 p.m.

In other news, the production version is getting closer. It's up and running and I should have a prototype to play with soon. We're also starting to look at the gauge face designs, which made me list out all the very fun things we can do. Scaling of data, pshaw. That's trivial.

For example, we can do more than one rotation of the needles. Or we can go reverse rotation. And we have all those LEDs.

Which led to all sorts of terrible interface suggestions that I'm going to have to implement just because. Like using the needles to point at things that seem important, or having scrolling morse code in the LEDs to spell out text messages, or have the tach needle rotate at a fraction of engine speed.

slantsix
slantsix Reader
9/28/21 3:04 p.m.

Awesome Stuff.


When I have the proper downtime I really need to go back to page 1 and thoroughly read this post!


Thanks for sharing!


Greg

Keith Tanner
Keith Tanner GRM+ Memberand MegaDork
4/18/22 6:54 p.m.

Good news, bad news.

Bad news first. The production version is stalled. The chip shortage was a problem - but a bigger problem was the availability of the EE that was working on this. His time evaporated along with all the chips. He's still kinda sorta working on it when he gets a chance but it's not going to be here anytime soon.

So that made me take a second look at what we're actually looking to accomplish here. It started off as the ability to control the needles, but it's the LEDs that really added functionality. So I started to think more along the lines of how to add that as a minimum specification. Our EE had been talking about pulling the information from the cluster (as no NA or NB Miatas have CAN from the factory), so I took that as an added requirement.

I also wanted it to be easy to program and to be fairly processor agnostic. The ability to expand and add extra capabilities is also important. I've been working with the "Feather" line from Adafruit, which has the advantage of being very modular and extremely well documented. If I don't need CAN, the base of the whole thing can be a $12 RP2040 unit. If I want CAN, well, I just plug in the M4 CAN Feather instead. The basic code doesn't change other than the new stuff for reading CAN. If I want to control the gauges, I can use a motor control board - which is exactly what I did before. So basically, this whole thing becomes an I/O board and display for a Feather. That's a lot easier to engineer and it takes advantage of some of the work already done by the EE.

I took that and started doodling inputs and outputs. The interesting part of this will be interpreting inputs that are in an analog form instead of nicely packaged on the CAN messages.

So here we go. Let's see if I can build a prototype of my new and improved design so it can be produced. This might take a little while, but it's more fun than sitting on the couch watching reruns. I picked up a few extra bits because who doesn't love toys and also so I can explore some options and also because I need to replenish some stocks.

Turbo_Rev
Turbo_Rev New Reader
4/18/22 11:18 p.m.

I always thought it would be cool to bring those audible style warnings from aircraft into a race car.

"WARNING OIL PRESSURE BEEEEEEEEEEEEEEEEEEEEEEEEEEEEEEEEEEEEEP WARNING OIL PRESSURE..."

"Caution Coolant Temp....Caution Coolant Temp" 

etc., etc.

Could have a lot of fun picking someone to do the voice recordings (are you married? ;) )

Side question: I'm an Ocean Engineering student (offshoot of Civil, mostly) who's trying to learn robotics. I have a heavy mechanical background but virtually no practical microcontroller/embedded systems experience. I'm taking a class or two to remedy that but would you make a recommendation to start learning this kind of thing? Book, project, etc.? 


Keith Tanner
Keith Tanner GRM+ Memberand MegaDork
4/19/22 12:37 a.m.

A great way to learn something is to have a project or a goal, then learn what you need to know to get to that goal. 30 years ago it was called Outcome Based Education, now it's probably called something else - but every 30 years the concept rolls around again. But for adult hobby education, it works really well. Heck, this whole project has been like that for me. It started off with "how do I control the needles in a dashboard?" and I had to keep learning new things to do the things I wanted to do. Adafruit is really supportive of this with lots of clear tutorials, but digging around the open source community in general is quite useful. I first got introduced to the Raspberry Pi because I wanted to do something with an old tube radio. I learned properly about PIDs because I wanted to do a drive-by-wire throttle. I know I'm going to have to learn/develop some new skills in order to make this new version work properly.

Speaking of which, most of my time right now is spent making notes on what the various IOs are and deciding what pins I want to use on the Feather. The first challenge is how to deal with the secondary gauges - oil pressure, engine coolant temp (ECT) and fuel level. I've come up with two ways to make these work depending on if I want/need to hijack them. I'll do the easy version first.

So, lots of non-sexy notes and wiring diagrams and sitting and thinking. I've started breadboarding the circuits, though - with what I've got already, I have a tach input, a speed input and the LED outputs. 

One really nice thing that Mazda did for me was print actual labels on the traces on the circuit board and make all of the important connections screw terminals. Tapping into them is ridiculously simple, which is important for something that will be installed by someone who isn't me.

This is the back of the oil pressure gauge. The three screws are ground, switched power and the oil pressure sensor. Thanks, Mazda! In an attempt to make me look foolish, they did actually print all the labels upside down.


Keith Tanner
Keith Tanner GRM+ Memberand MegaDork
6/24/22 1:13 p.m.

This got set aside, but is back on the bench. Again, the goal is to turn the LEDs into a peripheral for an Adafruit Feather microprocessor, because that unlocks a bunch of possible other peripherals and lets Adafruit take care of writing tutorials.

I've confirmed that I can read engine speed via the ignition signal, so yay. Trying to read two different frequencies (VSS and tach) with a fast refresh and a microcontroller that doesn't multithread is an interesting challenge, this will give me a chance to push my abilities a little further. If cars just weren't so SLOW, it would be a lot easier :) The RPM signal on the GM CAN bus updates every 125 ms so that's my goal. 

Current status:

I also have one of the LED circuit boards created by our friendly EE on the way so I can make this look more like the final product. I just have to build the interface board, which is currently all breadboardy.

Anyhow, I was scheduled to do a Facebook Live for FM and we'd had people asking for updates, so I did one. I plugged in an LED ring and told it to just do a goofy light show, then decided to add a screen to show I could control it too. The fact that the latter was ridiculously easy justifies my architecture.

Enjoy the demo, including a gratuitous amount of revving as I show off the blinkenlights.


Keith Tanner
Keith Tanner GRM+ Memberand MegaDork
7/2/22 1:18 a.m.

I've been beavering away at this, which is appropriate given that it's July 1st.

First, I decided it would be a lot more convenient if I could emulate the car on the bench. So I picked up a signal generator.

Which was a transparent excuse to do cool sci-fi things with the oscilloscope.

But really, I needed it to do this.

Which is a VSS signal for an NA Miata going about 13 mph. I spent some time trying to extract good data from these signals and made...some progress. It's been a challenge to get a consistent frequency reading quickly enough, especially in the 4000-7000 rpm range. I'm trying to match the GM CAN standard of an RPM signal every 125 ms. If this was being driven by an aftermarket ECU, it would be simple. But I'm starting with the worst case of a pre-OBD-II stock Miata instead.

Then this showed up in the mail, so I decided to check it out.

Since it uses a standard addressable LED, it was just a matter of telling my system what standard it was, bolting it up and running a little demo. The gauge face is just a junky home-made style with no masking on the back that's only half installed, so we can certainly clean that up somewhat. But that looks promising. Full RGB control of 44 "ring" LEDs, backlighting and needle lighting.

I also discovered that if you set the four needle lights to different colors, you can get some really trippy behavior.


Concept proven. The next step is to get some real gauge faces made, I think.

1 2 3 4 5

You'll need to log in to post.

Our Preferred Partners
XHuIkExNRRqK5dbEAso8qmzBpeawMMtid0G6rIaFfGAVUvEshdyK0eRG7AqsJhZH