


If it is anything like my '07 Cayman the launch on the drag strip is going to be full of wheel hop. Once it settles it will be fine but you will likely need to peddle it a bit at launch.

If it is anything like my '07 Cayman the launch on the drag strip is going to be full of wheel hop. Once it settles it will be fine but you will likely need to peddle it a bit at launch.

preach said:If it is anything like my '07 Cayman the launch on the drag strip is going to be full of wheel hop. Once it settles it will be fine but you will likely need to peddle it a bit at launch.
AAZCD *Glances over at Patrick's build, smiles and buys Drag Slicks and more nitrous...*

Idea for after the Challenge![]()


AnthonyGS said:I’m looking forward to this challenge entry a lot. I’d love to try my own Boxster challenge car if I can find one priced right.
![]() +1
+1
The single radiator in the center is installed and initially tested for good flow and circulation.
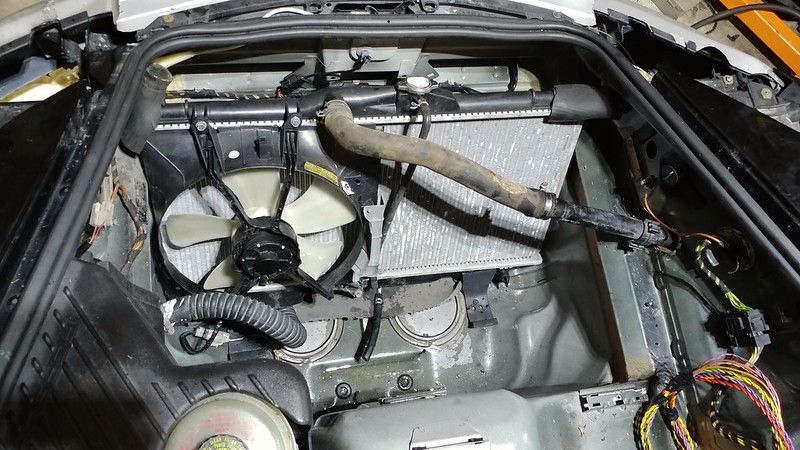
I have not wired the fan in yet or installed the hood, but it ran well at idle and low speed. The temp stabilized at a normal, steady 180 degrees without the fan. The simplest way to wire it would be to put one of the original fans on it and just shift the harness into the frunk. I think that instead, I'm going to run it directly from the battery bus with 30A fuse and dashboard switch. Simple reliable manual control. I can always make it automatic and more complicated after the Challenge.
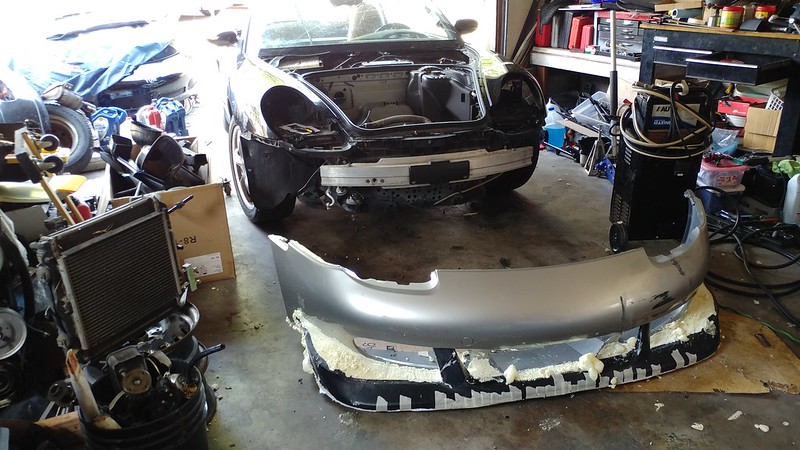
The half dashboard and steering column are back together with most of the orphan wiring bundled and tucked. I have also been messing around with the front bumper cover. It needed a big hole in the middle for airflow. The big hole was easy, but the rest of the redesign is a little awkward right now. It involves some found/stolen? sign board, part of a Jetta bumper, and some expanding foam. At the moment it's a 50/50 chance that I'll cut it all back off and work with just the Boxster bumper. Here's a pic of the early development:

Tomorrow is going to be grandkids at the state fair, so probably not much work on the car. Sunday, I'll tighten up a few things and take it out for a drive and some good pics of the progress.
Oh, Yeah! Love it.
I haven't been feeling well today, low fever and a headache, so I opted out of going to the fair. Instead I've been doing some slow, light work on the hood and front bumper. I'm starting to like the bumper. If I was to do it again, I'd open it up more in the middle and drop it lower. -Maybe just lower the whole car, but that's not happening for the Challenge.
The hood is originally from my 2000 S. It had obviously had some windshield contact in the past and I replaced it (and the windshield) shortly after buying the car. I almost hauled it off for scrap a few times. Glad I held onto it. I don't know that I would have cut into a perfectly good hood and I'm liking how this one is coming out. Gonna need paint now because of bare metal where I cut it. Probably a few short welds where I oopsed the frame a little with my cuts. That and I should probably get rid of the latch and pin it down.
Today Pics:


Nap time...

In reply to AAZCD :
I like that front bumper a lot. I’m getting a Stealth/3000GT vibe from it, but it works very well on the Boxster.
In reply to Pete Gossett :
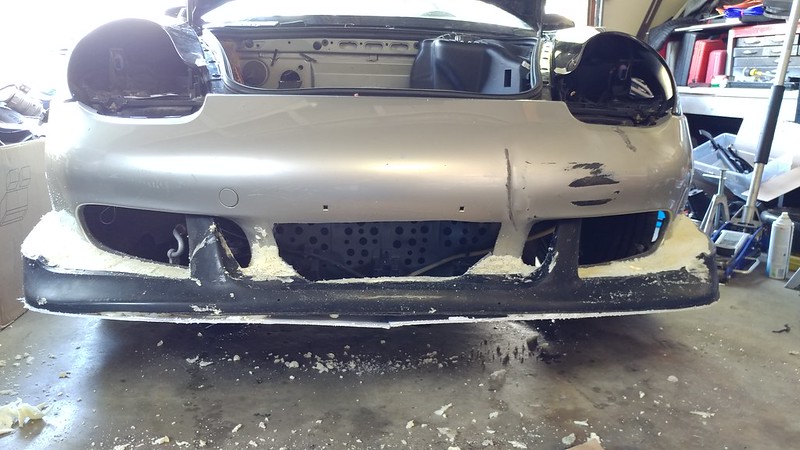
I was inspired by the Porsche 997 GT3 bumpers. I figured that skilled engineers designed them for maximum aerodynamic benefit and designers had made them sexy. Not that I particularly liked the look, but it must be good if they did it. The problem was that I was trying to build it with trash, construction foam, and some duct tape. "Finished appearance" wasn't going to happen unless I spent time, money, and added weight.
Here's where the front bumper ended - not that it was near finished, but that's when I realized that I didn't want to keep going in that direction.

GT3 Bumpers: 
Now I have cut a big hole in the original front bumper and riveted on aluminum mesh that came from a damaged fiberglass Honda Del Sol bumper that someone gave me ten years ago. Maybe ugly, maybe not, but 4 pounds lighter and flows to the radiator just as well.

In reply to AAZCD :
That also looks really good & honestly more purposeful than the other one.
The center radiator set-up is working great. I ended up using the original left side wiring and running a manual switch off of one of the fan relays. A couple issues still need to be sorted out. Yesterday after I went for a drive, I noticed that the brake reservoir was getting hot. It is in direct line of the airflow off the radiator fan and the plastic around it doesn't block much heat. For the duration of runs at the Challenge, it won't be an issue, but it's just not a good design. I'll probably use some scrap aluminum heat shield to direct the air more to the other side and up. In the future (V8 swap) move the fan to the center or all the way right.

The other issue appeared this morning. After the car sat overnight, there was some coolant in the tub under the radiator. It wasn't there after my drive and I'm not sure where it came from, hose, clamp, or radiator. Some time in the next few days, I'll put pressure in the system and see if I can find it.
I may get less than 12 points for Concours, but as my first time at the Challenge I want to do it all. I have taken a pretty good looking Boxster and ripped it apart, taken the good parts off, and put on broken & scrap parts from my stash that were not worth selling. Now I'm trying to put a shine on the turd I've made. The hood that's on the car now is ugly. Creases, dents, chipped paint, and now it has big louvers that I cut into it for the radiator airflow. Today I rushed to get it painted before I start a week of 7 am to 7 pm shifts. When I rush to do paint and body work, things don't turn out quite right. Now I'm hoping that the post-painting wet sand and polish will cover up the mess. Its probably going to need a respray though if I get time and a free afternoon before the Challenge.
Glossy black paint really shows all the flaws. After I sprayed the first coat, my lack of prep really showed. Someone gave me some sparkly powder to put in paint a long time ago and I never used it. I figured it was worth a try and dumped a little in the cup with the next coat. Not quite what I was hoping for. It turned the color from black to blue, but it does distract from the dips and bad texture a bit.

Can you end up with a negative score in Concours? Maybe I can cover it all with Miller Welder and CRC stickers.

In reply to AAZCD :
Don’t stress over the paint, “racecar-quality” is perfectly acceptable for the Challenge. Honestly, that’s one thing that really struck me at my first event - the cars you see on the cover GRM, while still awesome, hide the realities of the constraints of the Challenge much better in photos than real life.

Always lean on the following phrase
"It photographs well"
I like the sparkles

I still don't get moving away from the factory radiator setup. Just seems like doing a bunch of work to end up with something that doesn't work as well.
docwyte said:I still don't get moving away from the factory radiator setup. Just seems like doing a bunch of work to end up with something that doesn't work as well.
The main reason was weight, the secondary reasons were budget and curiosity. The factory radiator set-up with brackets, fan and condenser weighs about 18 lbs per side. The Toyota radiator with fan weighs about 12 lbs. 36 = 3 x 12. Budget: Stock radiator units FMV $150 ea. Junkyard radiator $40 with hoses and fan. Curiosity: There are two Rallycross builds that I have been following and both of them used the inboard radiator: Woody, Angry Spider. Woody has had trouble with heat, but only used a single Boxster radiator and minimal venting in the frunk. He has just added an electric pump. I had the radiator already from another project and wanted to see how it would work.
My wife and I have started calling this car the "eXboX" - Experimental Boxster. It is being built for the Challenge, but it's also an outlet for creativity and curiosity. When I wonder, "Will this work?" I can grab a wrench and some duct tape and give it a try on this car. What harm can it do to experiment with some unproven concepts? It was already dead when I bought it.

Love the new front grille!
Watching the center radiator with interest. I'm going to do something similar to the frunk and trunk for aero. There seems to be boxster projects that are more interesting on here than 986.com!

eXboX, I like it!

I love this build and it's had my wife and I watching and dreaming over all the cheap boxsters we see popping up on FB marketplace. She's agreed to me getting an old Mustang for a challenge/race car after we move, and to help me build it and I've convinced her that she needs her own race car as well, and she's agreed to a Boxster. The Porsche fanboy in me is very happy for our future. Threads like this make me hopeful that I can get one for super cheap, fix a few things, and then enjoy driving it hard.
Hasbro said:Watching the center radiator with interest. I'm going to do something similar to the frunk and trunk for aero. There seems to be boxster projects that are more interesting on here than 986.com!
The 986Forum.com has busy weeks and slow weeks. Regardless of the current posts, it is a wealth of information on these cars dating back to when 986s were still new. If you learn how to search it, there are details there for almost anything you would want to repair or modify.
I haven't discussed the back end of my car much yet. I removed the rear bumper and bolted on some stubs cut from a damaged aluminum Audi bumper. The center of the rear bumper cover is cut out around where the bumperettes were. I still left a section in the center where the license plate mounts. The stock 986 muffler is huge and heavy. I'm going to remove it. My current plan is to clamp some 90 degree elbows (scrap pipe from an Audi or Honda) onto the 'C' pipes and have it as open pipes after the cats. That should drop an easy 30 lbs off the back end. The spoiler mechanism is removed and I have a curved piece of plastic (cut from a trashed VW Jetta bumper) topped off with the original spoiler cap.


Man this build is so cool. It makes me want to do something outrageous with the 986 I just bought.
Any idea on how loud the straight pipes make these cars?
enginenerd said:Man this build is so cool. It makes me want to do something outrageous with the 986 I just bought.
Any idea on how loud the straight pipes make these cars?
I'm pretty sure it will sound like this:
..and I plan to wear earplugs when I drive for any length of time to keep what hearing I have left.

Well, that should take the "best sounding 6cyl at Challenge" award pretty handily ![]()
I brought it to work today so I could do some of the lighter work. I cut out a lot of my original mess of zip ties and re-did them cleaner with all black. I did some wet sanding on the hood and plan to hit it with some more paint later this week with the temperature in the 70s.

I also used a little finish buffer to clean the yellow off the headlights and make some of the paint scratches a little less scratchy.

Here's a view of how the top is now, also wet-sanded for some more paint.

I'm pretty sure I found where the coolant was leaking up front. The hose clamp on the bottom of the radiator was not as tight as it should have been. Seems good now and I'll check it on my next few drives.
You'll need to log in to post.


