1 2 3 4 ... 17
SkinnyG
SkinnyG SuperDork
3/2/14 10:20 a.m.

Then I started taking on the bodywork more seriously.

I hate bodywork.

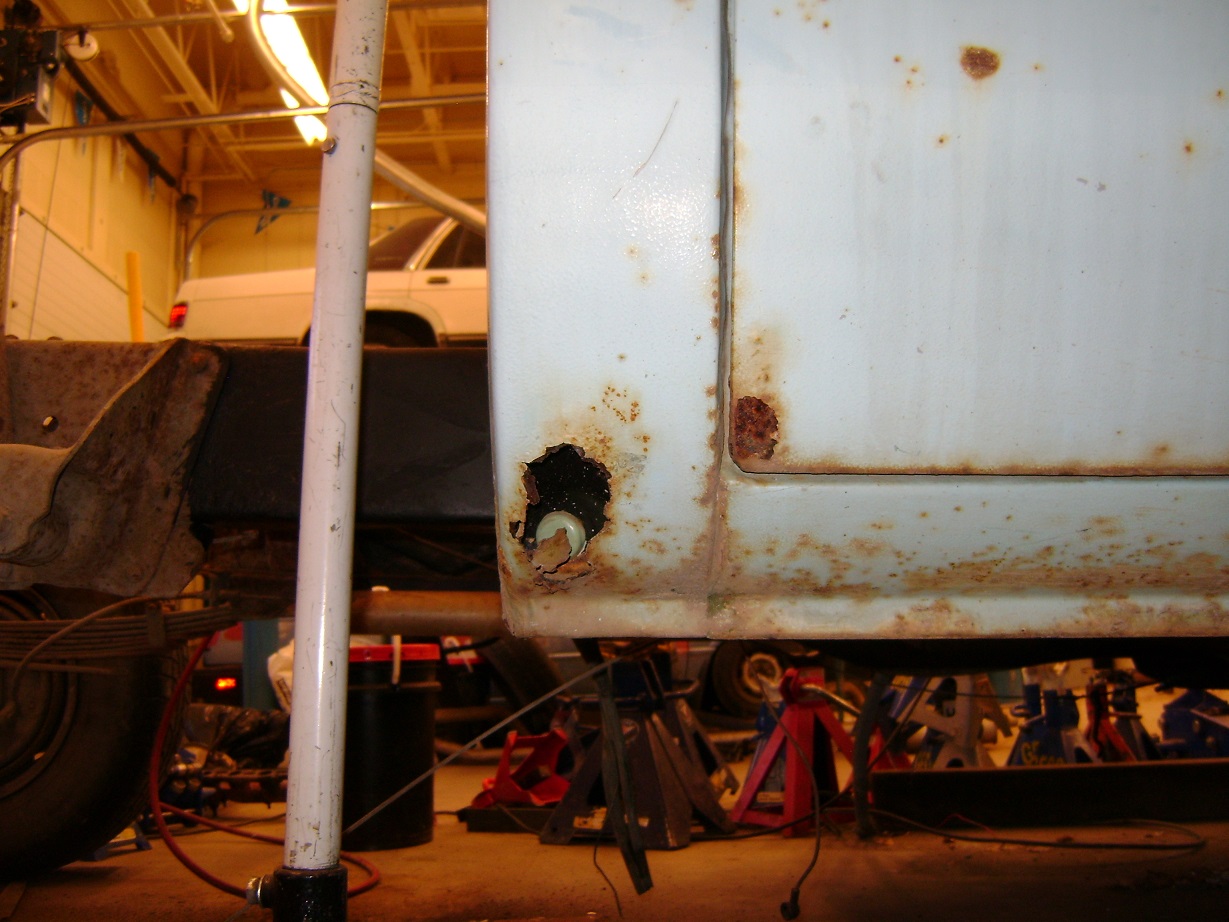
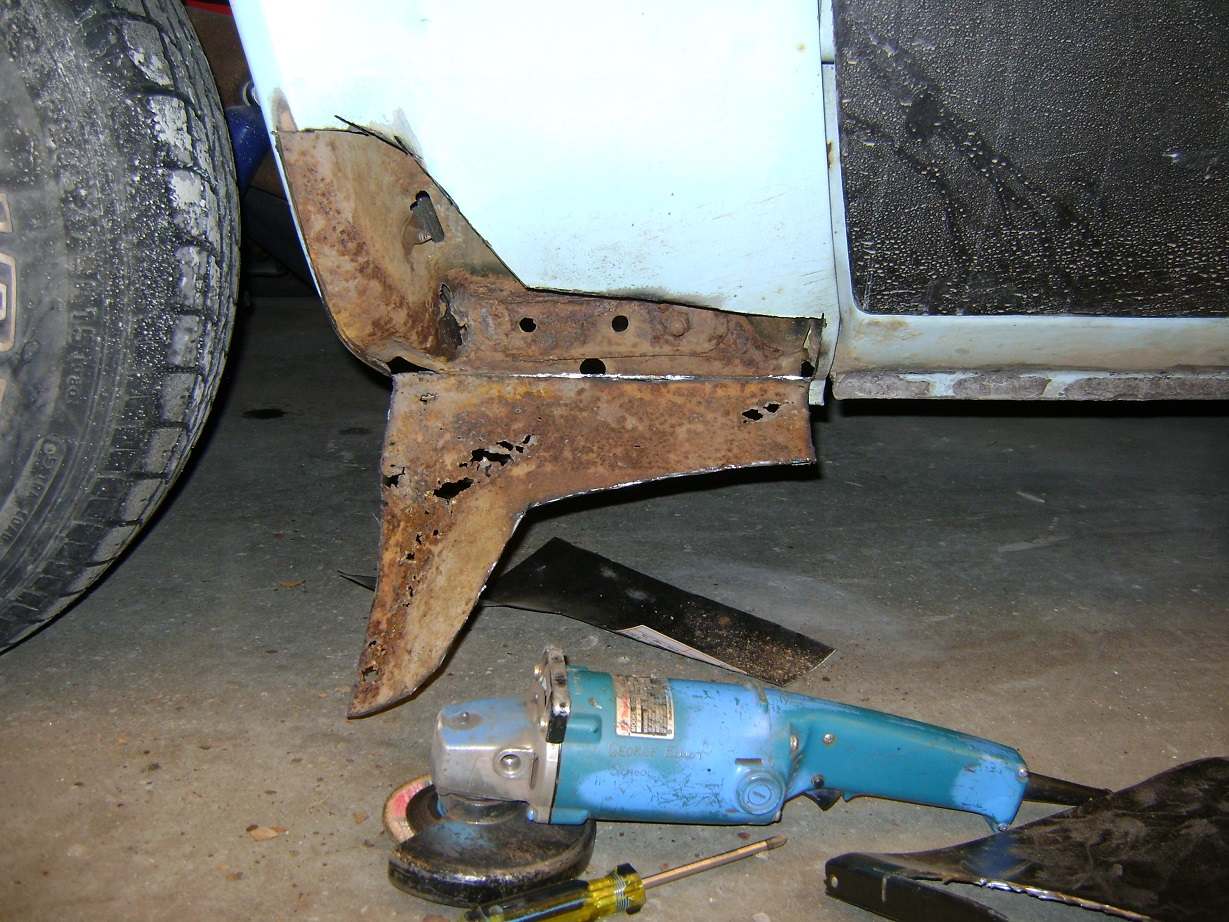
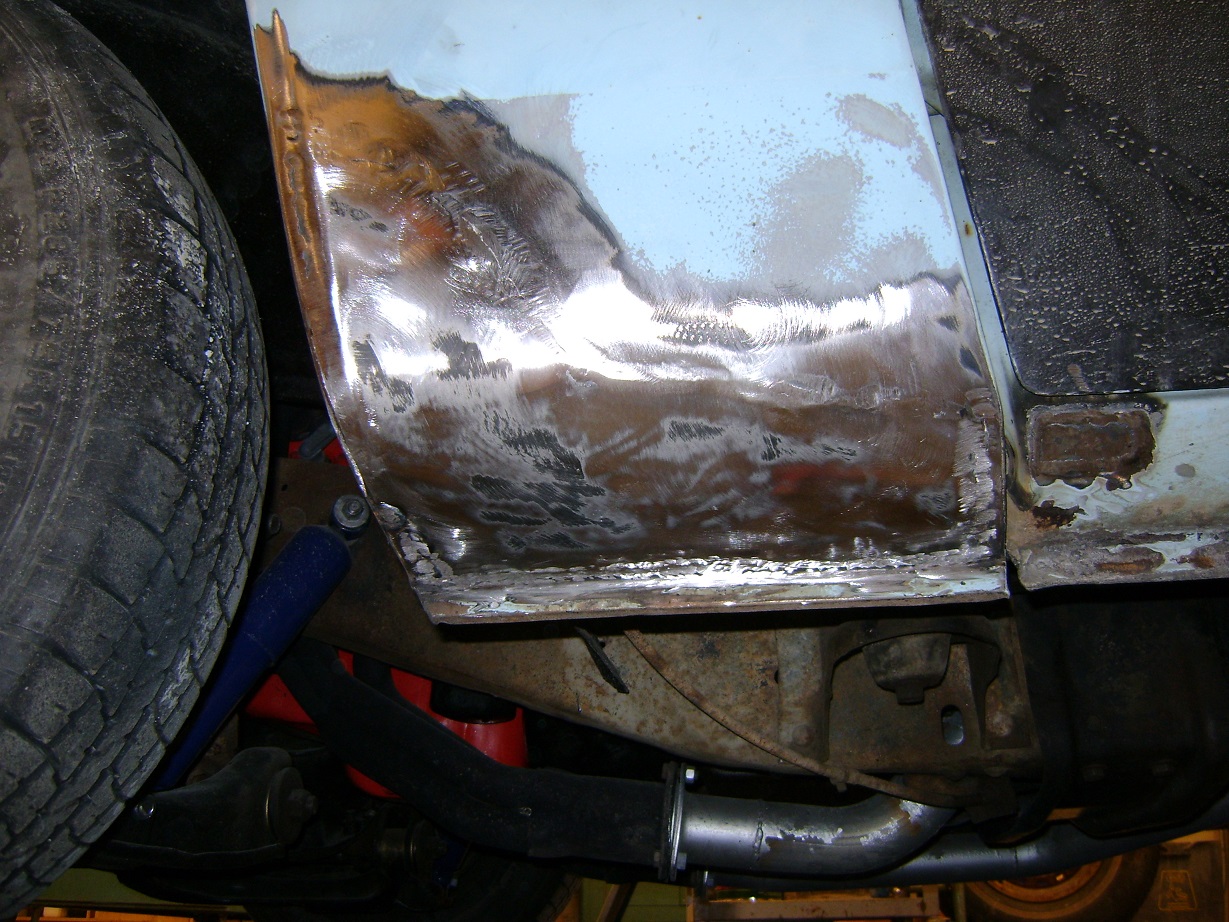
I repaired the inner wheel arches where they mount against the cab. I didn't replace the triangular brace, because I think it's ~why~ they rust there. I'll find out later why it was there in the first place.... I had patched the cab corners with leftover metal from the old box, used copious amounts of Rust-Mort and Zero-Rust paint. I neglected to take pictures of this ordeal. Lots of factory metal to weld to.

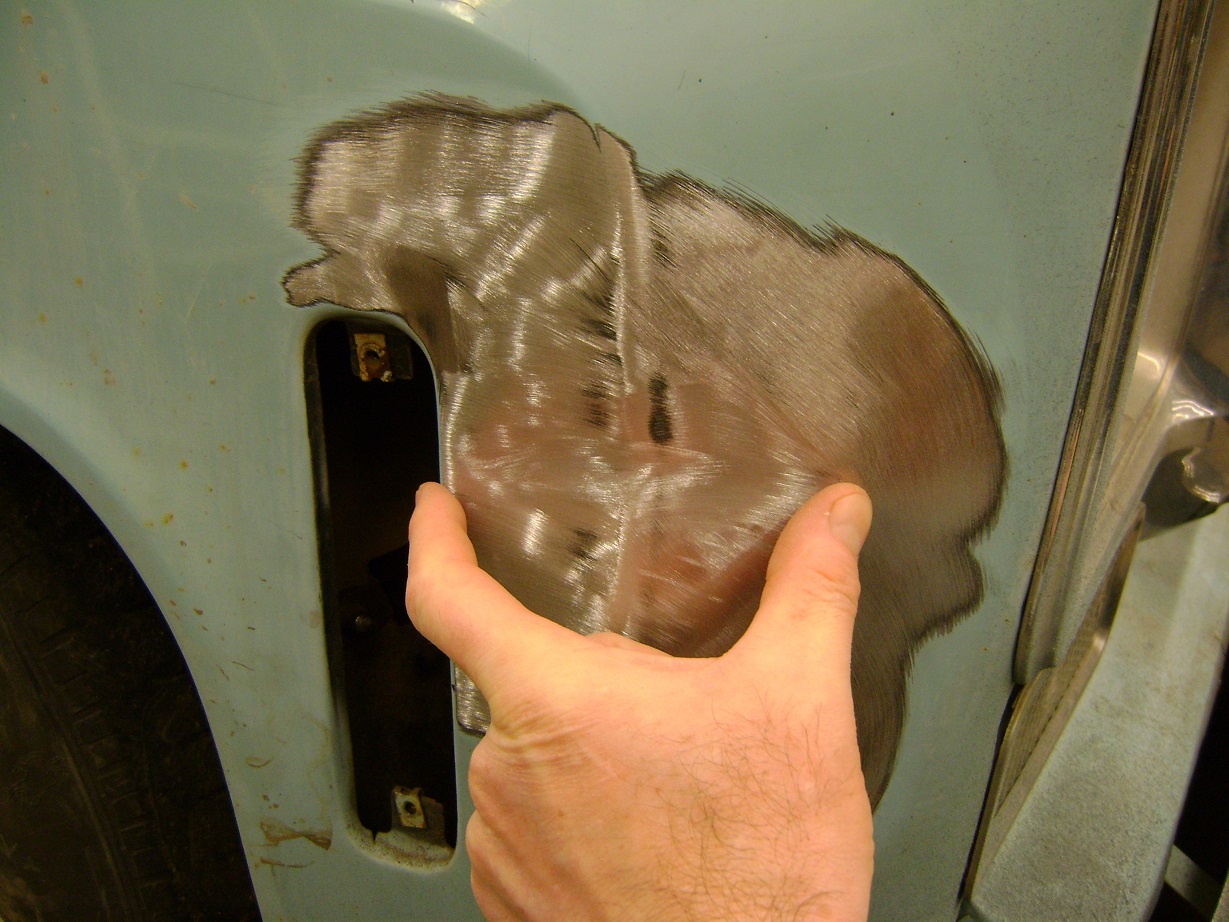
The passenger door bottom was missing, so I fabricated a new panel complete with drain holes, as well as the inside corners of the door bottom.

While I know all these rust panels are available in the aftermarket, fabricating them myself builds skill (I hate bodywork), and shows the kiddies what kinds of things are possible. Again, forgot to take pictures.

I did demonstrate how to pattern, cut, shape, and fit a patch panel to the metalwork classes. I had students help replace the door pins since they were pooched. One group ruined one of the new door pin bushes, the other group destroyed the window crank.

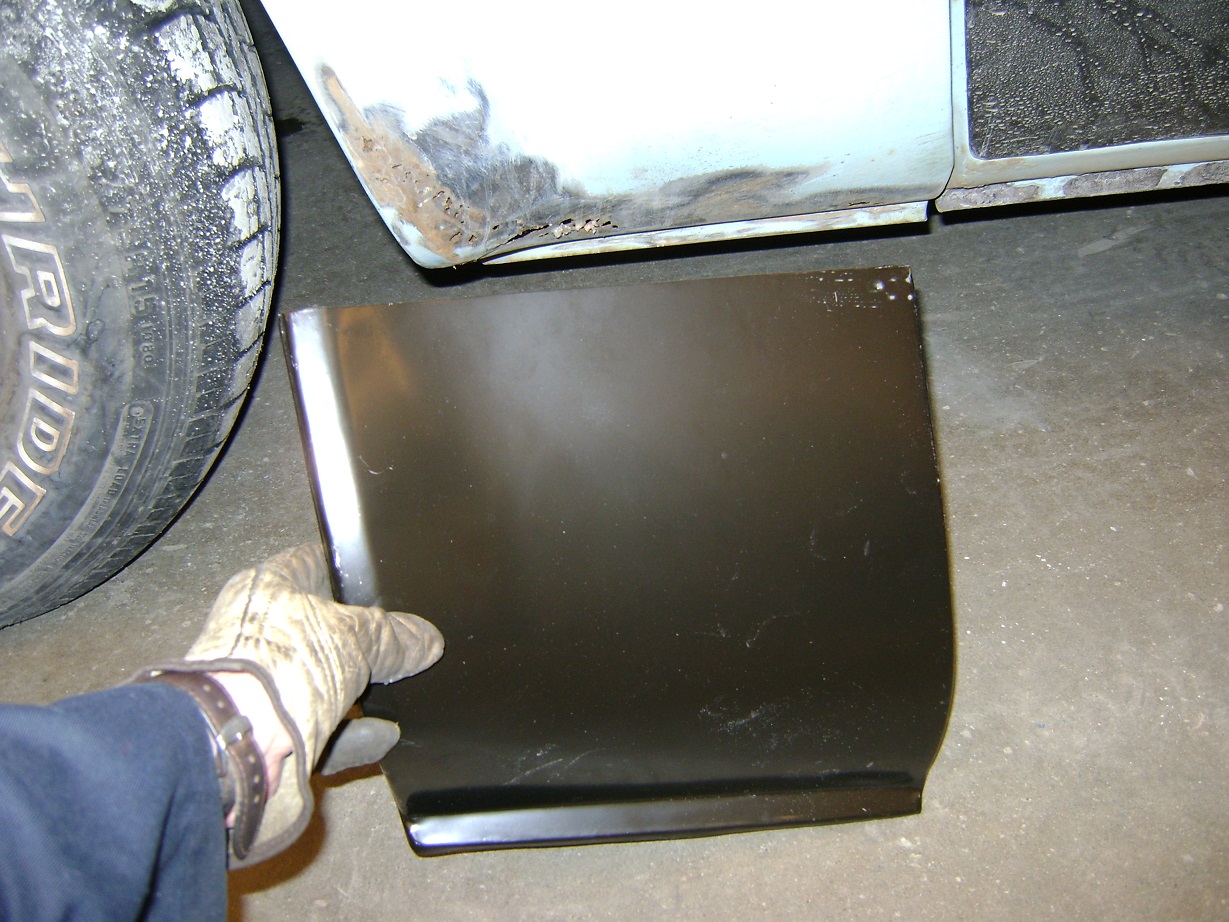
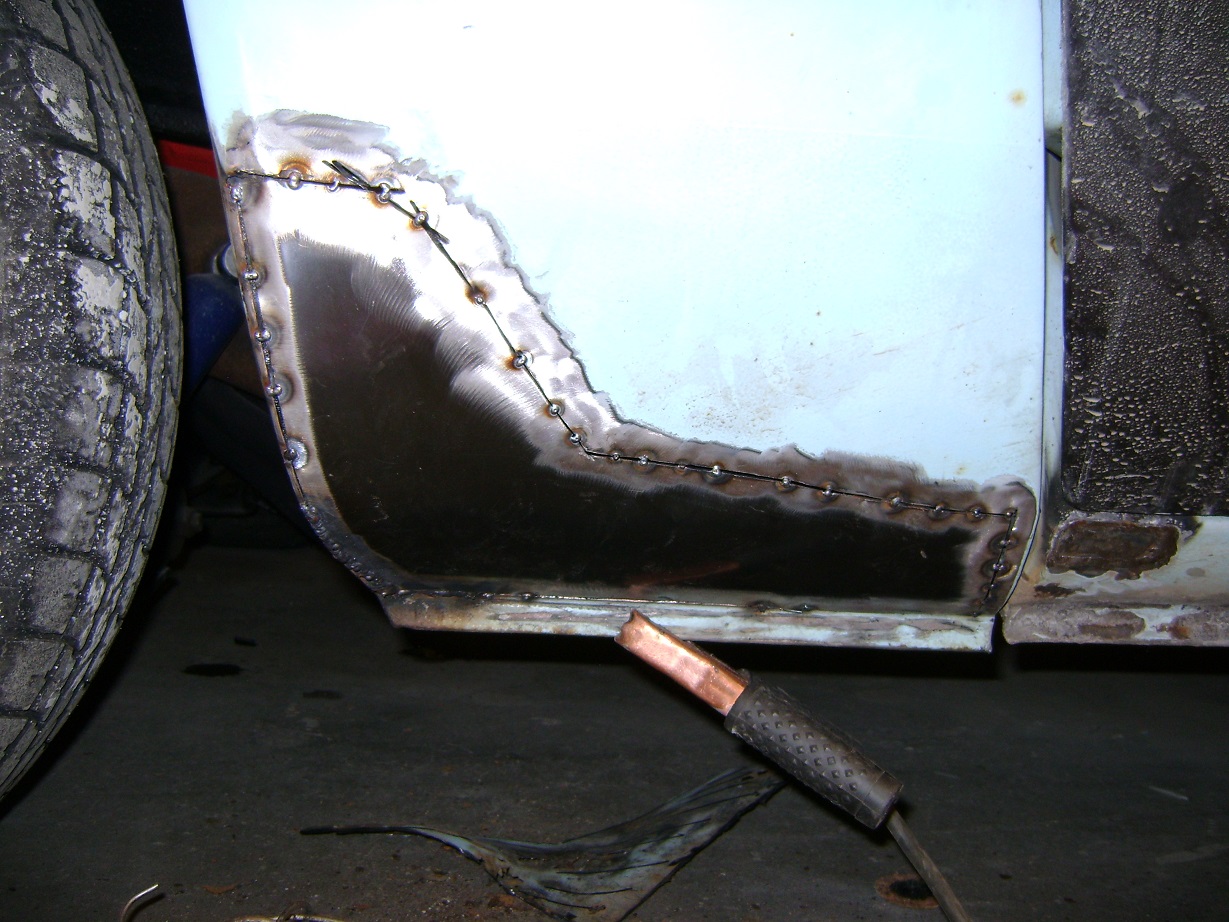
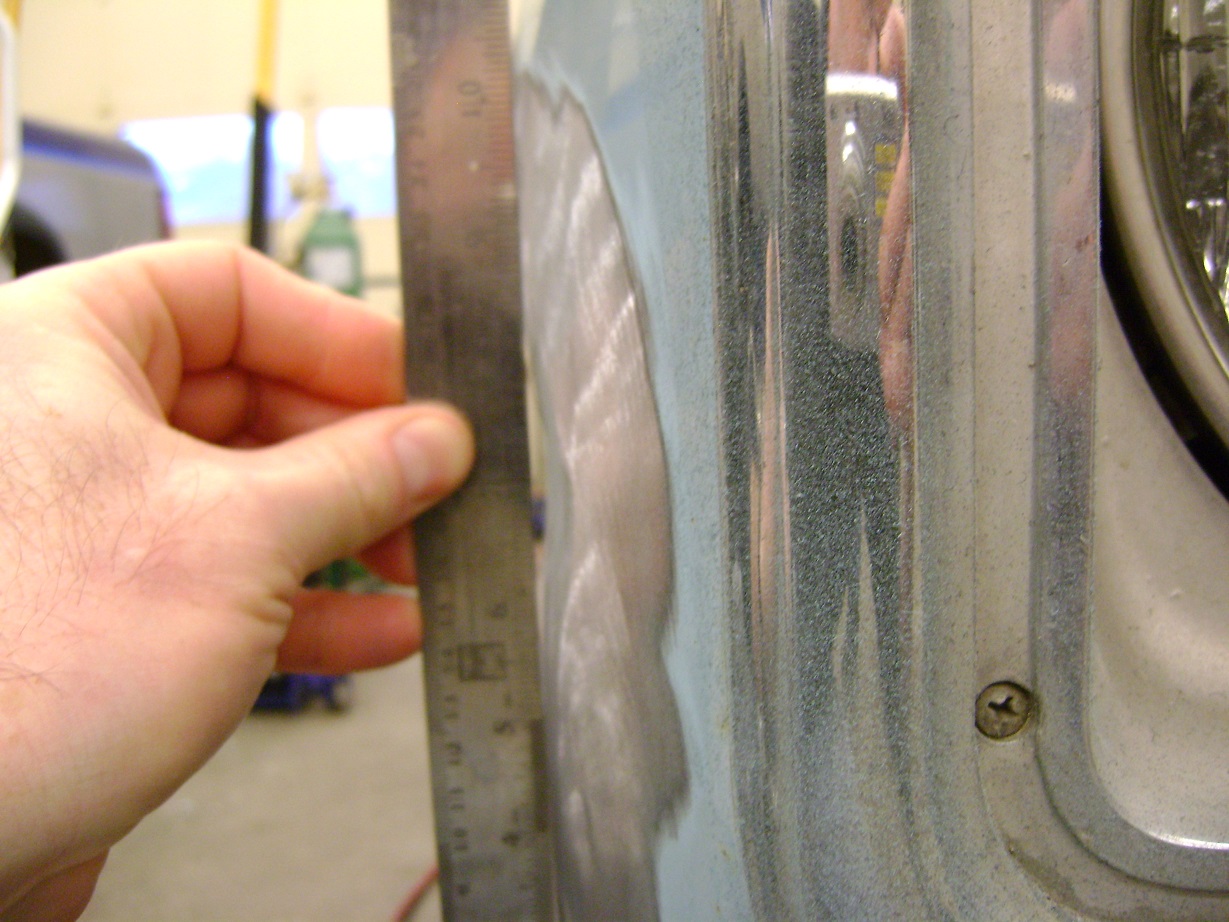
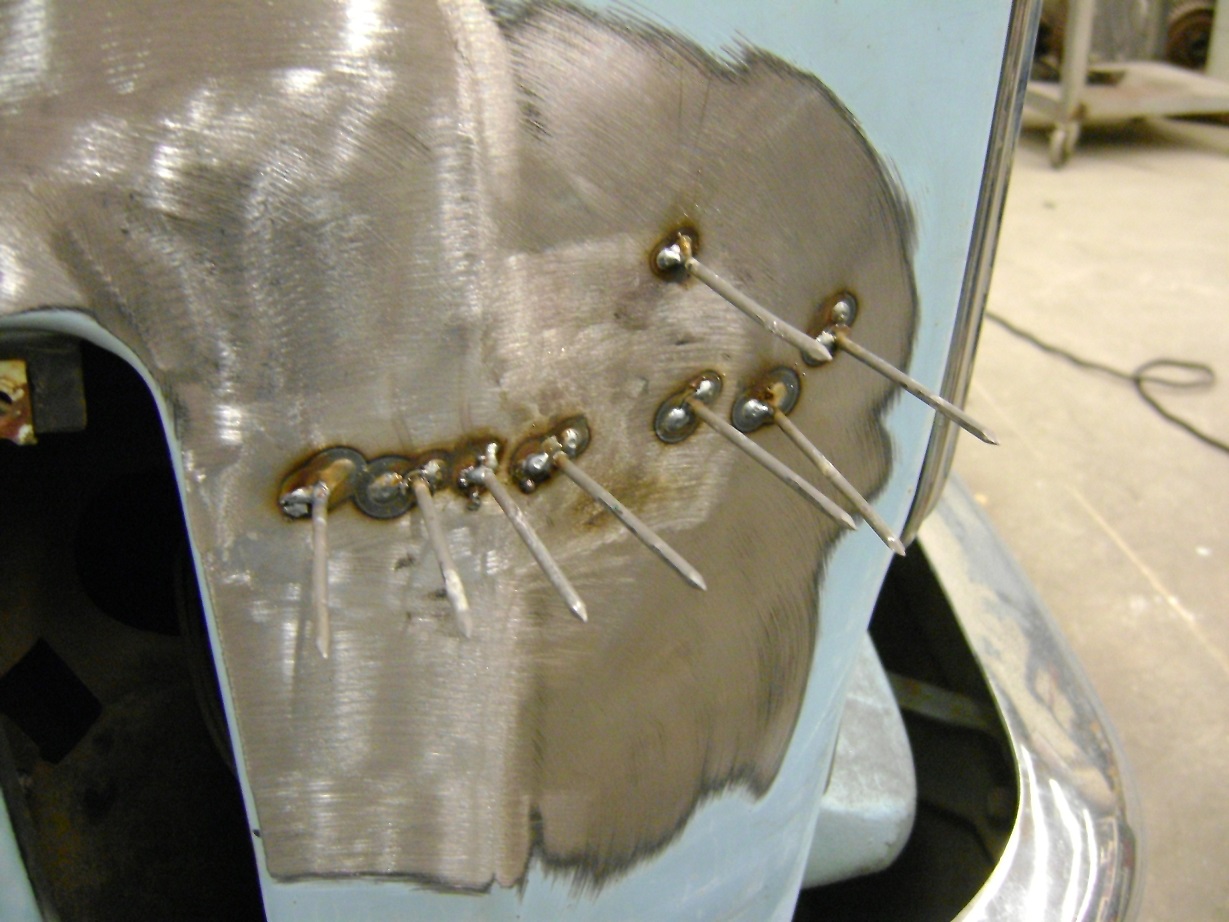
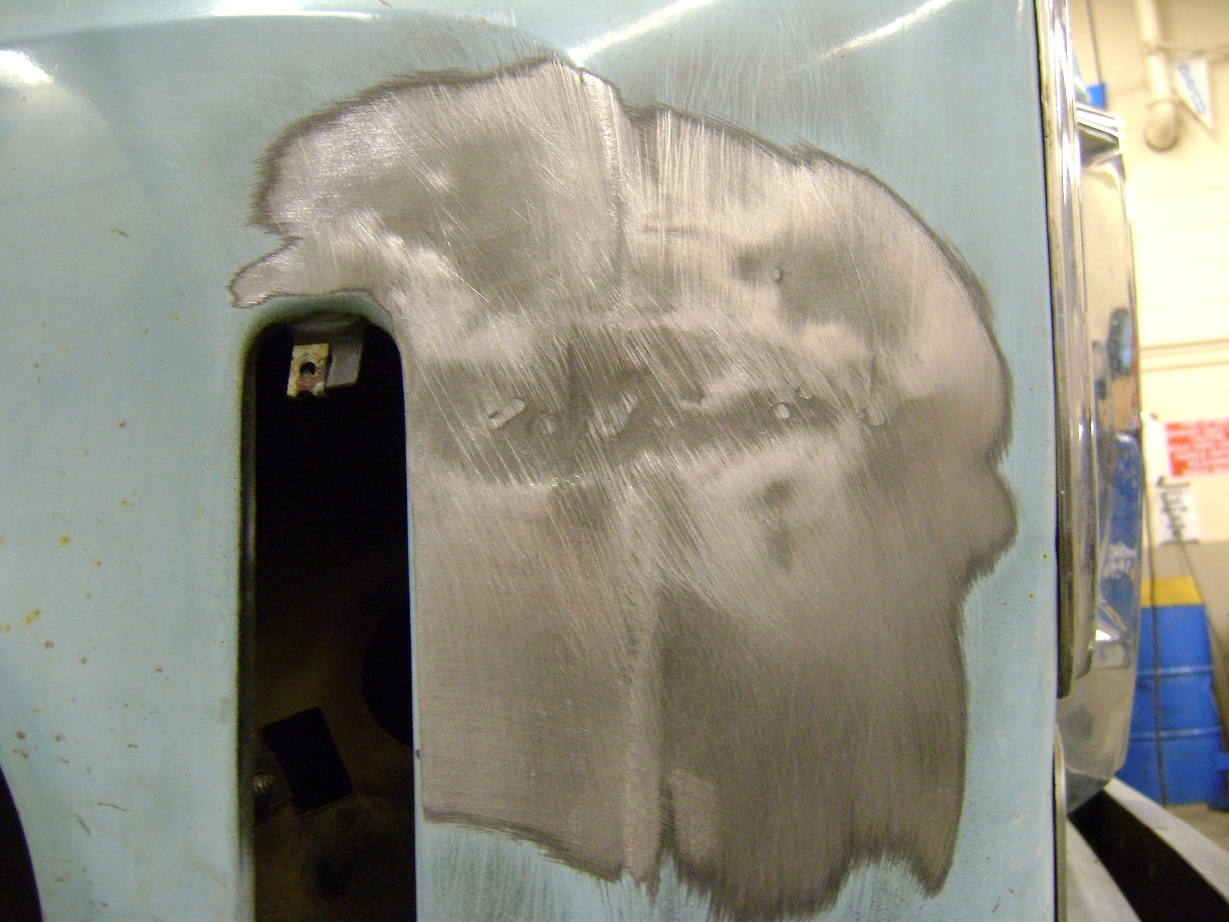
I chickened out and bought patch panels for the fender bottoms. Probably saved me HOURS of fabrication, especially since I hate body work.

solfly
solfly HalfDork
3/2/14 7:21 p.m.

SkinnyG
SkinnyG SuperDork
3/3/14 9:54 a.m.

We have a custodian on staff who used to be a bodyman. When I start ranting about how difficult it is to get anything to line up, he reminds me that these weren't all that great from the factory. I have to find a way to let go of the four decimal places of precision that I want, and try to think like a poo farmer from the 70's. Not that there's anything wrong with farming poo.

There was a hefty crease in the right front fender. I figured I could pull this out.

I MIG welded a wack of nails around the crease.

And used one of these that I made:

Grind off the nails.

Add more nails on the low spots you missed.

Light "guide coat" of black paint to show up more low spots, and repeat until you need to hatchet murder something.

Thick coat of Zero-Rust over the repair:

Ranger50
Ranger50 PowerDork
3/3/14 11:21 a.m.
SkinnyG wrote: I have to find a way to let go of the four decimal places of precision that I want,

That is still possible, but you are going to embrace and love bodywork. Which is going to involve many hours of panel fitting, grinding and rewelding body seams, followed by weeks of laying down perfect filler to just sand it all away.....

Project looks good.

SkinnyG
SkinnyG SuperDork
3/7/14 7:45 p.m.

Ok, so I've been getting into the body work. Not as picture-heavy this update.

The problem with doing some bodywork is finding more and more defects that you could actually deal with. It almost never ends, especially if you are prone to chase perfection. Eventually you just have to say screw it. And by "screw it," I mean "let's paint this with a roller."

Except I'm not going to do the "$50 paint job" with hours of thinning and sanding. Pfffft. I'm just going to throw a roller on it. Orange Peel be damned, or at least, invited.

  1. It’s a truck
  2. I am not skilled enough to do perfect bodywork in order to have perfect paint
  3. I do not have a spray booth at the school - and spraying an iso-cyanite at a public school in a residential area without a spray booth is not wise.
  4. Paying someone to paint it for me makes no sense - $5000 paintjob on a $1000 truck?
  5. I do not want to stress over the inevitable rock chips, door dings, dents, and the continual fight against rust. I am not in love with this truck that much. Maybe by rollering I'm staving off the inevitable for "the next guy."
  6. Tremclad is easy to touch up, and matching cans can be purchased at ANY hardware store in ANY town in ANY province of Canada at ANY time
  7. While it’s argued that you cannot paint over Tremclad, the existing farmer-sprayed blue paint wipes off with lacquer thinner as it is.
  8. It’s a truck

Kids at the end of last semester painted this with a roller:

And from a distance, and especially unwashed, it looks fine. Enough. For even a truck. Since I only wash my Nissan Hardbody once a year, getting that "perfect gloss" really doesn't matter to me.

TIGMOTORSPORTS
TIGMOTORSPORTS Reader
3/7/14 9:17 p.m.

There is always spray cans. I painted my truck for $50 from Lowe's on the Satin Black Valspar.

Also-Tractor Enamel paint is fabulous

SkinnyG
SkinnyG Dork
3/7/14 10:12 p.m.

The rolling is fun. Minimal masking. I can do a panel at a time as I can fit it in. Have to finish sanding the box down, and trying to fit the original '77 wide tailgate band onto the 81+ tailgate.

kevlarcorolla
kevlarcorolla HalfDork
3/8/14 8:30 a.m.

Bodywork does suck,no idea why anyone would want to do it everyday.

I've been painting/repainting the various ice racers on the cheap for about 15 yrs,never had much success with foam rollers as the paint seems to come out very flat.I have better results with a brush,takes a while longer and yes you can see the strokes so it has its obvious limitations.The large flat'ish panels of your truck are probably better served with a roller though.Carefull with the tremclad,make sure its dry for days or it blister as it offgases thru the fresh coat. These are with a brush. [URL=http://s117.photobucket.com/user/kevlarcorolla/media/geoandstudded13inchrc01002.jpg.html][/URL] [URL=http://s117.photobucket.com/user/kevlarcorolla/media/100_0143.jpg.html][/URL]

SkinnyG
SkinnyG SuperDork
3/12/14 8:57 p.m.

Originally I intended to do a Fauxtina paint job, brushing flat black, then rolling red oxide primer, then spraying body colour, then sanding down through the layers.

I was pretty stoked with this idea, but most "square" body styles done this way just look like a beater. I didn't want "beater," I wanted patina. Patina on a not round vehicle screams beater. So.... Two-tone it.

The truck was originally two-tone. I wanted to go back to that. I wanted to paint it Tremclad Gray with white inside stripe, because buying touch up paint would be SO easy (off-the-shelf Gray, not a custom colour). But I knew that seeing the original blue on the firewall and inside the cab would drive me nuts.

While I wanted the more "aggressive" look that the gray would give (Tremclad gray is pretty dark), going back to Easter Bunny Blue would be easier on my OCD without having to strip the interior to roll everything. To make this work, I sweet-talked Home Depot into experimenting to see how close they could match the original paint using Tremclad as the base.

This took some persuading as they could not tell their computer they were using Tremclad, and weren't quite willing to try "let's tell the machine it's something else and just see what happens." In the end, they experimented and got pretty dang close.

I painted the cab roof and sides white (turns out the original paint was white sides only, blue cab roof), un-thinned, three coats. No sanding in between. Because I don’t care enough to do that.

Tremclad? This feels just so wrong….

Three coats of white on the front fenders and the doors.

Two coats on the box at this point.

First coat of the blue on the front fenders – I like this colour much more!

tuna55
tuna55 MegaDork
3/13/14 9:41 a.m.

It's your truck, but I am super thankful that Fauxtina didn't work out.

Nitroracer
Nitroracer SuperDork
3/13/14 7:07 p.m.

That blue is a convincing match. The finished product should be pretty nice.

I found some random XO Rust brand spray paint that is a near perfect match for my old gold Ford. Need to find some more to do some body colored wheels.

SkinnyG
SkinnyG SuperDork
3/18/14 2:34 p.m.

So I'm curious how long this Tremclad will last.

It's pretty darn cheap, and with a roller it's pretty easy maintenance, even if it means some father-and-son time every 3 to 5 years. Still feels wrong.

Quart and a half of Blue. Quart and a half of White. Don't kid yourself - LOTS of orange peel because I'm not sanding between coats. Or thinning it.

Not really worried much about it, either. It's a truck.

ssswitch
ssswitch New Reader
3/18/14 2:48 p.m.

That looks really good. That's the kind of paint job I'd want for a truck, though I'd be tempted to use industrial paint or something just to see how much better it would resist salt and weather.

Is the Zero-Rust stuff similar to POR15, or is it something different?

Did you polish the Tremclad at all?

SkinnyG
SkinnyG Dork
3/18/14 3:15 p.m.

Zero-Rust is more like Rust-Bullet than POR15. It's stanky, sticky, and basically a paint. It is not as hard as POR is. I have read a lot of positive about it on the 'net, and figured I'de give it a shot. If this truck has survived 35 years of Canadian winters, with some modern coatings it will last at least a couple more.

No polish on the Tremclad. I may, but likely I will not.

kevlarcorolla
kevlarcorolla HalfDork
3/18/14 4:34 p.m.

Looks decent for about $50 in paint

I once reduced and sprayed navy blue tremclad on a buddies cheap ass ice racer,it came out wicked flat,shiny and full of awesome.It then lasted less than 3 months before it turned to white chalk,that sucked....did look great while it lasted though.

SkinnyG
SkinnyG SuperDork
3/31/14 7:49 p.m.

Over spring break I finished up three coats of blue, three coats of white, and three coats of orange for the pinstripe. I wasn't after the "Gulf" theme, but it seems to work well to my eyes. Also put the big boots on it today:

A local fellow had a set of old-school "muscle" size BFG's for sale for a reasonable price. They had been mounted and parked but never driven (still had the nipples on them), so I bought them for half retail.

To complete the "period" look, I ordered a pair of Wheel Vintiques 15x10 truck rally's from Summit.

MONTHS of waiting, and they finally arrived - the wrong bolt pattern - so they were shipped back. MONTHS more of waiting.... To find out what the hold-up was, I contacted Summit, who said they are waiting on WV. I contacted WV who said they make their truck rally's out of GM centers, which are getting harder and harder to find.

I figured while I am waiting for the potential "never" to arrive, I bought a pair of rims from the local wreckers, and intended to slice them so I could widen my own. On a recent "Order Status" check, I discovered the 15x10 Truck Rally's are now No Longer Available. I debated about widening my own wheels, but decided it would be (theoretically) safer if I just had regular wheels.

For a few dollars more to my useless order, I ordered up a different set of Rallys. I'll reuse the beauty rings, and I have a set of four Derby caps off eBay coming shortly.

Dusterbd13
Dusterbd13 Dork
4/1/14 2:17 p.m.

Its almost low enough.

Granted I don't know what roads look like around you.

Also, im working on a mint 81 longbed for a customer. Forgot how much room there is to work.

Yours is looking great!

TIGMOTORSPORTS
TIGMOTORSPORTS Reader
4/2/14 7:06 p.m.

What size tire did you put on the 15x10's?

SkinnyG
SkinnyG Dork
4/2/14 10:29 p.m.

275/60R15's on the rear 15x10's - same height as factory. 235/70R15's on the front.

295/50's would be (obviously) wider, but shorter too.

SkinnyG
SkinnyG SuperDork
4/10/14 9:39 p.m.

Torque Converter.

The engine, as I built it, idles nice in neutral at 850rpm (12-13inHg), and will lope pretty sweetly at 550rpm in Drive (8inHg). Driving it is kind of a two-foot affair (I actually learned left-foot braking with a cobbled-together V8 Pinto Wagon running a Crower 280 cam and a truck-case/car-tail C4), one foot on the brake to keep it stopped, the other on the gas to keep it running.

I contacted a number of torque converter suppliers, and was most impressed with the reviews and customer service of Hughes. For an off-the-shelf and inexpensive converter, I hope I win with this one. I ordered a Hughes 2500 stall.

Dropped the transmission Wednesday, replaced the front seal, got the TC installed, and put it back in in about 2 hours. Also dropped the trans pan, and installed most of a B&M shift improver kit. I used the kit's separator plate since it blocks off the 2-3 accumulator, I drilled the 2nd and 3rd holes 0.125" only, kept all the check balls, and kept the 1-2 accumulator operational. I installed the dual-feed plate as well. Theoretically these mods will give a nice firm shift, but not break things.

I also put in a drain plug, as this was really messy. Also replaced the speedometer seal, dipstick seal, tailshaft extension seal, output shaft seal, and driveshaft yolk o-ring inside the extension housing. Driveshaft will go back in tomorrow, and I'll fill it up with fluid and see if I got all the leaks. And if it works.

SkinnyG
SkinnyG SuperDork
4/11/14 8:47 p.m.

Transmission seems to work fine, shifts ok. Idles much better in gear. No leaks. Haven't taken it out on the street yet. Derby caps arrived for the wheels. Gotta beauty up the beauty rings and try them out.

TIGMOTORSPORTS
TIGMOTORSPORTS Reader
4/12/14 7:57 a.m.

Let me know how you like the new stall convertor

Also, smoky burnout picture is a must

pres589
pres589 UltraDork
4/12/14 8:51 a.m.

I really like how the paint and colors came together. Truck looks pretty good from this distance.

Datsun310Guy
Datsun310Guy PowerDork
4/13/14 7:57 a.m.

I took Metals I,II,III,IV back in the late 1970's in high school and my shop teacher treated all the shop guys like adults with a lot of respect and care (Mr. Heinrich - DGS). I think you have chosen a worthy career with a lot of influence on the youth.

SkinnyG
SkinnyG SuperDork
4/25/14 7:52 p.m.

Fabricated a hidden-hitch/bumper-mount for the truck. Not sure what the specs are on hitches, but this is all 1/4" plate and 2x2x0.250" with a purchased receiver, attached with 5/8" bolts. All I usually pull is a 1500lb trailer to the dump every so often.

Just need a license plate flipper-upper.

1 2 3 4 ... 17

You'll need to log in to post.

Our Preferred Partners
gZiZQ0wjrvwmWtWd3xcn7MVKbIUDuDoPgnk95bdBqNOVvqEKZJgbHWn8stSvKOEk