Thanks Duster, I am pretty excited about them.
Finally, we have fuel and brake lines. Its not very exciting but I'll show the routing for those interested. Starting at the cell:

Through the rear wheel well:

Up along the rocker then along the frame rail:

Then through the front wheel well and through the fender well:

I will probably make a shield for the lines in each wheel well however the fuel line is steel and is quite strong. Once I have a few more clamps I can weld in the last couple of studs, tighten the compression unions and the brake and fuel lines will be finished.
And now we have an exhaust:
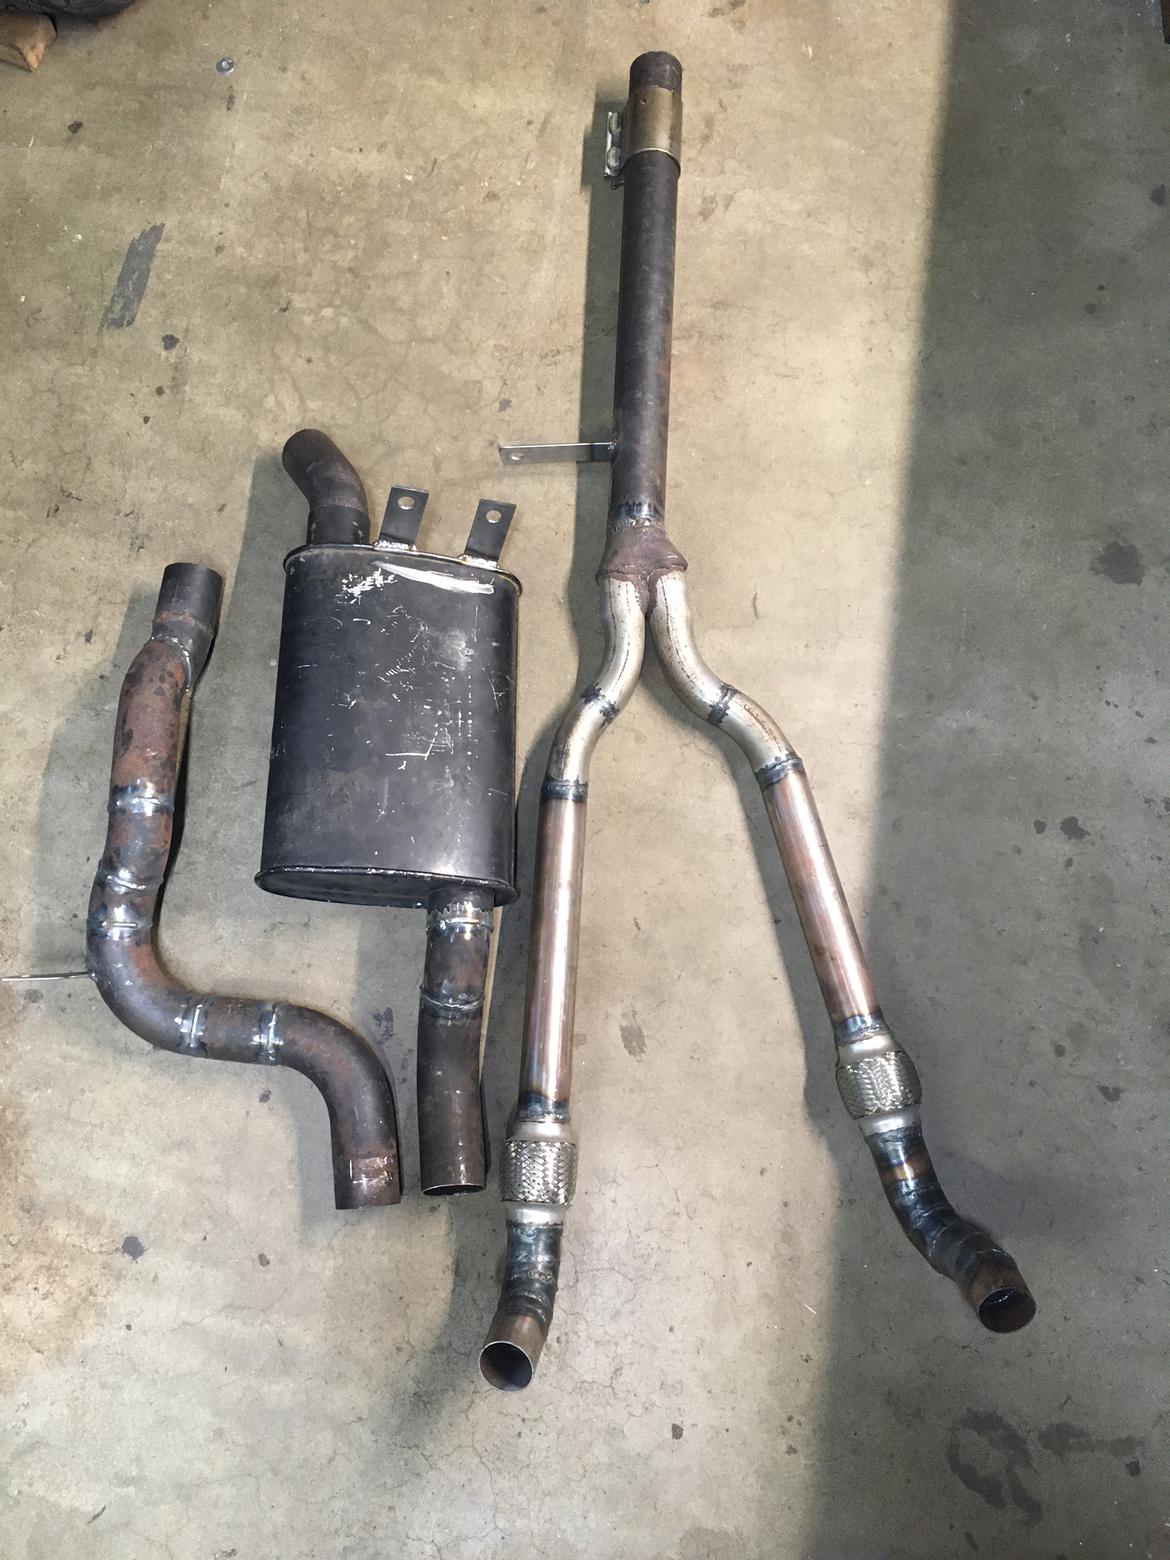
Time for some paint
Next up, a bit of progress on the trunk floor:


We have tiny battery cables now...


I also had time to cut and reweld the filler neck to properly line up. The fuel cell setup is getting close!

Next up, continuing to close in the trunk. First, some shots from enclosing the filler neck area:


And a view from below:

After that it was time to work on the passenger side of the trunk. Although I can't fit a stow away spare (I'll just have to strap it in the trunk somewhere) I can fit a small area to stow the scissor jack from the miata and an emergency tool kit. After some measuring it looked like the remnant from the first attempt at the trunk floor could be repurposed for the job.

After a bit of trimming and bending:


More trimming, fitting, and some grinding got us here:


Finally, the area over the differential needed to be filled in. First a tape mock up:

Then substitute with square stock:

Skin it with some sheet metal:

And then... satisfaction. Most major panels are now fitted. Once I get my gas bottle refilled the trunk can be welded out.

After plenty of welding, grinding, and prepping, the underside was painted.

Then I remachined the driveshaft spacer: properly sized pilots, and shorter to not interfere with the longer dust boot on the new transmission seal.

Next up the differential got cleaned out and new axle seals installed. I was careful to keep the brake cleaner away from the clutches and seals. I did most of the cleaning with light oil to flush out the grinding dust that entered while fabricating the frame/floors.

After installing the differential, ebrake cables, driveshaft, fuel line, and brake lines it was time to start assembly of the fuel cell. First, the stainless hardware was installed in the aluminum stud rings with a bit of red loctite.

After a 24hr cure they went into the cell along with the safety foam (3 blocks).

After tightening the bulkhead fittings and test fitting the pickup placement the filler plate went on.

Then the sender and filler plate were attached with hand cut viton gaskets. The teflon washers on the filler plate may have been a poor choice because they cannot stand up to much compression without breaking. In the future I will use something harder if I have trouble with sealing.

I've been following but haven't commented yet - you're doing some neat work here. Keep it up!
Your fuel cell work has inspired me.
Thank you.

Thanks for the comments Scott and Duster! I'm enjoying keeping up with both of your projects.
After finish welding and painting the fuel cell cage, the cell was fully assembled.

To test for leaks I decided to clamp a schrader valve in the vent line and look for leaks with soapy water a 5 psi... This was the result

While I was focused on achieving 5 psi and wondering why I couldn't get past 3 psi, the plastic bladder had expanded like a balloon. You can see how far the lid has raised in the picture above. To remedy this I deflated the cell and bolted the lid down. Trial 2:

As you can see the top of the tank still started to bulge at 3 psi. After revaluating and discussing with a friend we decided 3psi should be a fine test pressure. No major bubbles and it held pressure for over 5 minutes. I consider this a pass for a tank that should only ever experience atmospheric pressure.
Cleaned up and ready for install:

The fuel cell is now installed in the car will all lines hooked up. Getting closer!
Yeah, be careful there. 3 psi in a flat-sided vessel that big ends up being a crap-ton of force. No shrapnel, please!
Great progress! Can't wait to see this thing in action.
Can you do a summary/broad overview of the cell cage/can/mount method? Im drawing mine up for the new race car, and it will have to be installed from the bottom of the car with a bolt in cage due to the rear cage segments being in the way above it. Unless i only want a 5 gallon cell....
But yours is looking like a work of art.
Thanks Turbine!
Duster, I'll give you the overview of mine however I have to note that the various racing organizations have rules about ratings/bladder type/tube size/tube placement/mounting hardware etc. Mine may not conform to many of those rules and is complicated by the custom filler.
The inner plastic tank is attached to the metal can lid by the ring of 1/4-20 studs (these would normally hold the fill cap on as well). The metal can lid is held to the rest of the can and the cage by the 1/4-20 bolts around the perimeter. The cage has 4 stubs that mate up with double shear tabs on the chassis attached with 3/8 bolts. Does that clarify it?
In reply to Shavarsh :
Yep!
Any concerns about the 1/4-20 mounts in shear? Id ASSUME not since its painted, but figured id ask. Youve essentially done what was in my brain, only i was thinking 6-8 mounts with 3/8. But i also overbuild everything and make E36 M3 WAY too heavy.
No concern, the inner tank to lid studs and the lid to can bolts are both 1/4-20 from Jazz so I have no doubt they are up to the task. There are 14 bolts in the perimeter and 12 studs in the tank to lid connection. Its more about spacing out force than outright failure strength in this case. The bolts for the filler plate and sender are both 10-32. The bolts from the cell cage to the chassis are 3/8, no concern there either.
The passenger manifold was slightly warped after quickly mig welding it together the first time. I went back over the sketchy looking spots with the tig while clamped to the table to straighten it out. Then quite awhile spent hand sanding to get the flange a bit more even.


Next up I upgraded the valve cover gaskets to the rubber type from the old leaking cork gaskets. Hopefully this helps stop the bay from getting covered in oil.
Then I trimmed some grade 8 fine thread bolts, with the correct shoulder length, down to mount the coilovers with.

I also found some pneumatic filter/mufflers at the hardware store that I am testing as vents.
The fuel cell vent:

The differential vent:

Then, the exhaust was reinstalled, lug nuts and axles torqued, antisiezed the coilovers, adjusted the ebrake, replaced the front fuel filter, rerouted the clutch cable, rerouted the speedo cable, rerouted the battery cable, installed seats, installed seatbelts...
...tested the battery that had been on the shelf for a year (it read 12.3V!)... put 2 gallons of gas in it...

Then I drove it around the block for the first time with independent rear suspension.
Awesome!!!!
Congratulations on around the block!
What did you think of tbe drive?
Thanks, initial impressions are very positive. Even with the ride height slammed in the rear and random shock settings, it handled speed bumps and drainage ditches impressively. It also leaves 2 black lines very easily now, likely needs a major alignment.
Also looks like the driveshaft yoke is leaking so I'll need to pull that and seal it up.
Shavarsh said:
It also leaves 2 black lines very easily now, likely needs a major alignment.
If you're getting those two black lines without a burnout, my guess is that your alignment might need adjustment.
After plugging the driveshaft yoke vent hole with JB water weld I've been putting some miles on the car. After raising the ride height slightly in the rear and adding a couple of clicks of compression I am impressed with the rear suspension.


The car is far from complete, or even sorted enough to be putting miles on, but its satisfying to be driving again.
The bean has always had hot start issues. The gas boils and its difficult to keep the car running for awhile until steady state is reached. This makes the car very difficult to drive in parking lots where extra effort is needed to operate the manual steering and brakes. This summit carb is known to have issues with heat, and the carb came with a thermal spacer/gasket. When completing the engine swap, I did not use this spacer due to hood clearance concerns. The fuel line feeding the carb was also a rubber line resting on the water pump and intake manifold.
In an effort to clean up some of the street manners of this car I decided to tackle both issues. With the carb spacer installed the air filter stud needed to be trimmed for the hood to close. After that, I was surprised to find there doesn't seem to be major hood interference! Next up the fuel line was rerouted with a piece of hard line. This routing keeps the line off the manifold and water pump.


The modifications have drastically improved the hot start conditions and drivability of the car.


