1 2 3 4 ... 52
Rodan
Rodan Reader
12/7/16 10:52 p.m.

Next step was the rubber seals. I had found a generic rubber seal that would work for the rear seal to the top of the body, and the front seal was part of the windshield frame, but the side window seals were proving difficult. They were no longer available from Snugtop, and I wasn't having much luck finding any that would work. While spelunking around the 'net, I found an old thread on ClubRoadster where a guy had used convertible top seals on a hard top, and that looked like it might just work.

Luckily, an NA had recently showed up at the local U-Pick-It, so I went over to take a look. SCORE! The top was trashed, but the seals were near new! I bought the whole frame, as I also had plans to use the header for a DiY 'bikini' top down the road. In all, it cost less than new soft top rubber would have cost for one side from Mazda. I disassembled the rails and seals from the soft top frame, and they fit perfectly on the hard top. Things were looking good.

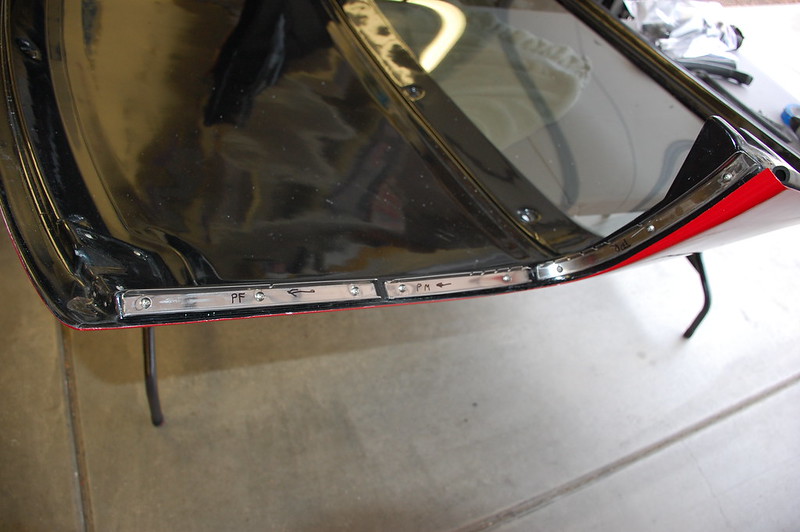
I started by carefully installing the rails to the hard top after fitting them with the seals installed and marking the position.

DSC_9442 by Rodan AZ, on Flickr

DSC_9447 by Rodan AZ, on Flickr

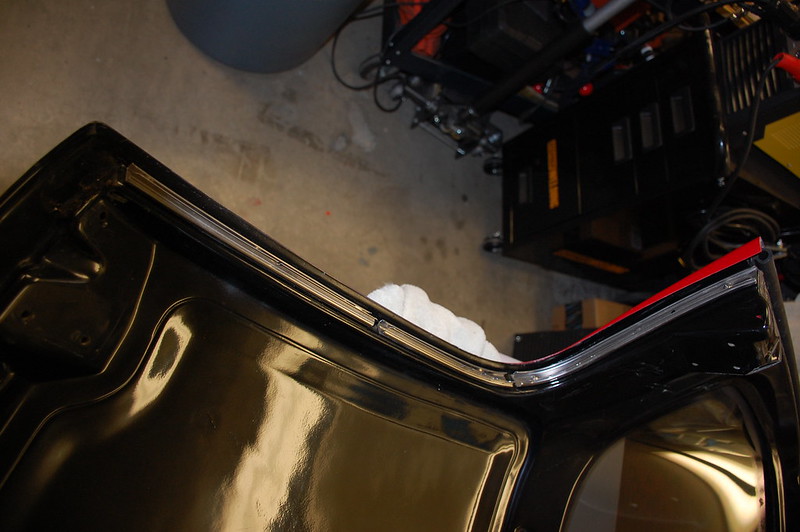
 Once the rails were on, snapping in the seals was, well, a snap!

DSC_9448 by Rodan AZ, on Flickr

DSC_9444 by Rodan AZ, on Flickr

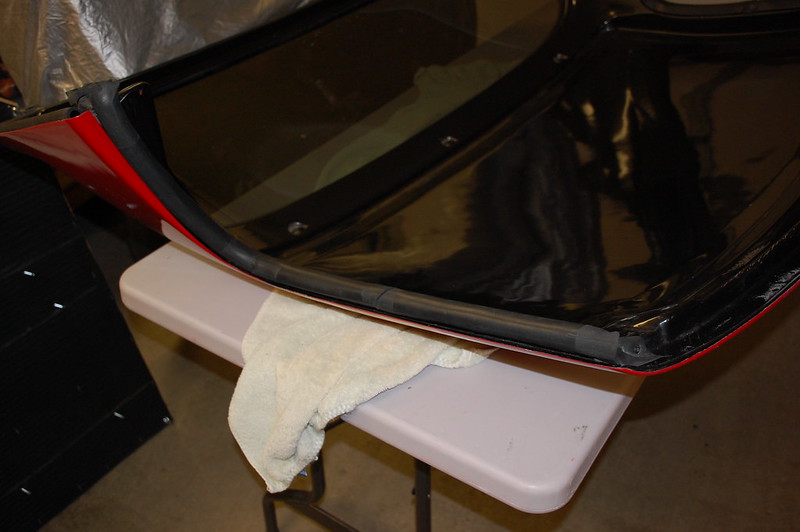
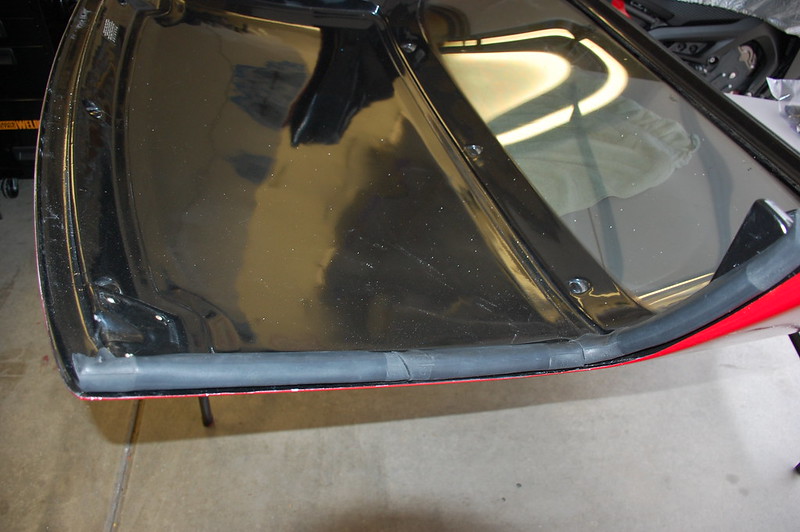
 It was a little tedious, as I had to shim the rails slightly to fit them properly to the windows, and that required the top coming off and on about a half dozen times. Once the seals were all done, it was time for a good color sanding and buffing...

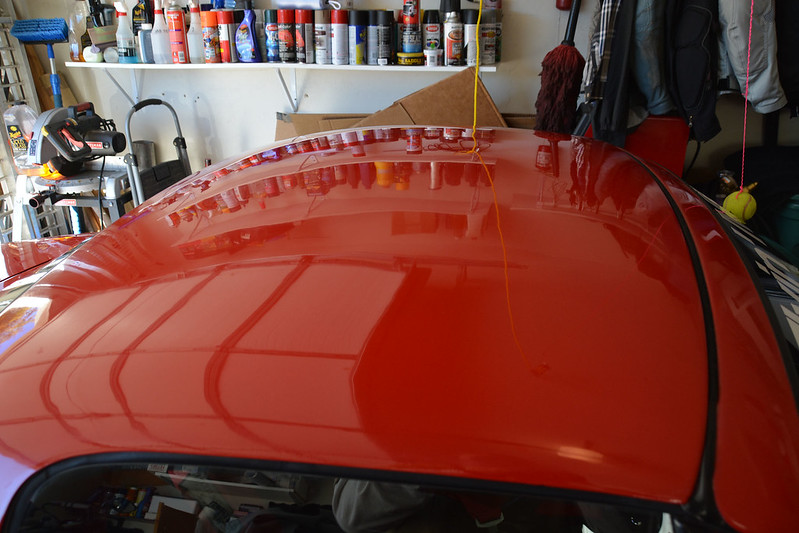
1st buff by Rodan AZ, on Flickr

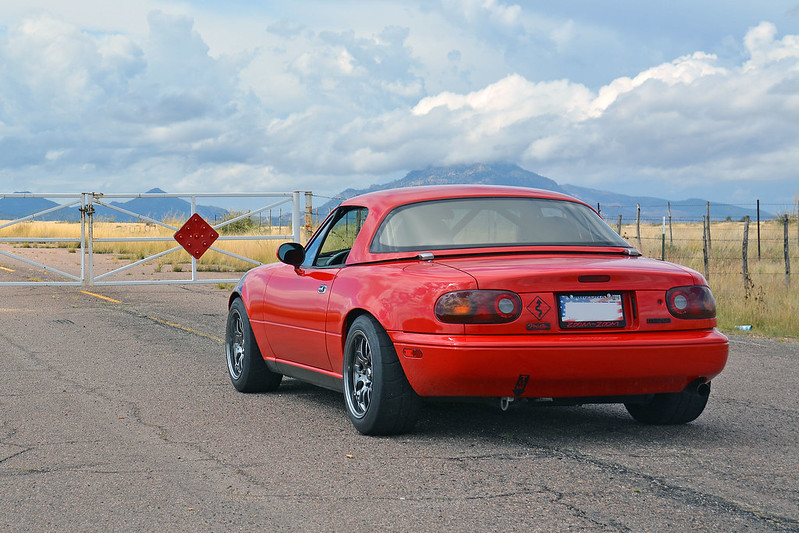
 And finally, some glamour shots.

Miata 10-17-15-3 by Rodan AZ, on Flickr

Miata 10-17-15-4 by Rodan AZ, on Flickr

 All in, I was still well under what an unpainted race top would have cost after shipping, or a nice condition factory top. As long as I don't count my labor, but here at GRM, who does?

Rodan
Rodan Reader
12/8/16 7:36 a.m.

The other thing that happened just before I found the hardtop was I bought a truck. Having decided that the NA was going to be the 'track' car, I knew that eventually I was going to need a tow rig. I did trackdays on two wheels for around 5 years, going as far as Willow Springs, and even Laguna Seca, so I had an idea of where I wanted to go with my setup. I had also made the previous mistake of buying a trailer when I didn't have enough truck, then after buying a bigger truck, not having enough trailer. This time I had a pretty good idea what I wanted to do, so I wouldn't make the same mistakes. At the time, I had an E150, which did great for hauling people. When I bought it I could haul my 'Busa if I needed to...

DSC_6377 by Rodan AZ, on Flickr

 After building some custom shelving, it also worked really well for my other main hobby, RC flying...

DSCN0251 by Rodan AZ, on Flickr

 But, I had since sold the 'Busa and bought an FJ-09, which wouldn't fit, and I knew the E150 wasn't going to cut it for any serious towing duty. I also had some other ideas in mind for our 'traveling roadshow'... so the E150 needed to go. So, I started shopping for diesels. I knew I wanted either a 7.3 Ford, or a pre 2007 Dodge. I wanted a manual trans, and four doors. For a while, no likely suspects showed up... then one week, 3 Dodges show up on lots in town. A 2004, and two 2005s... all three manual crew dually 4x4s! So, I start with the 2004, which I thought to be the least likely candidate. It was the cheapest, but had 220k miles. It drove great, and was tight as a drum. One owner with 4 pages of Carfax service records... nothing bad, just regular servicing. I went on to the 2005... 125k miles, aftermarket leather seat covers (which I hated), and the AC didn't work. Then the other 2005... one owner, 70k miles and a matching topper. I knew this one would be pricey, but it looked like the best buy. One mile into the test drive, I lean into it in 5th, and the clutch slips... Nope. Back to the 2004... I couldn't believe that the nicest of the bunch was the truck with 200k, but I bought it anyway! The big deciding factors for me were the one owner history with good service records, and it was completely stock, except for a Mopar accessory exhaust brake (made by Jacobs).

2015-09-19_11-49-33_970 by Rodan AZ, on Flickr

2015-09-19_11-51-06_195 by Rodan AZ, on Flickr

Whatever came next, I was pretty sure I had enough truck.

Rodan
Rodan Reader
12/8/16 1:17 p.m.

One of our goals was to be able to travel to tracks away from home hauling the NA, and stay at the track. Or alternatively, take a couple weeks to travel, set up a 'base camp' and have fun in the area with the NC or our Bronco. So, some sort of living quarters were going to be part of the equation. Early on, I considered an E250/350 diesel based RV van conversion, but costs and rarity made that unlikely. I also ruled out a motorhome, as I didn't want an additional vehicle in the fleet with a drivetrain to maintain, plus registration and insurance, when it would not get regularly used. Thus the Ram 3500 above. Now it was time to figure out the rest of the package.

First, I considered fifth wheel/gooseneck trailers with living quarters. I discovered they are very expensive, even used. And to have any significant space, you end up with a rig about as long as the average city block. I looked at typical toy haulers, which are easy to find, and reasonable used, but none are really designed for actual cars... they have high floors and are not designed for the weight. Some of the rock crawler/ 4x4 crowd were doing some cool stuff with mounting truck campers and even smaller travel trailers on gooseneck flatbeds...

 While very cool, and definitely "GRM" in the budget sense, I didn't really want another project, and I wanted the trailer enclosed. But it did get me thinking about truck campers and a box trailer as a solution.

After doing a bunch of research, I decided that was the way to go, and started looking for a trailer, planning to pick up a camper down the road a ways. I originally wanted something that would fit either of the Miatae or the Bronco, but quickly discovered the height and weight requirements for the Bronco were going to blow the budget. It would be cheaper to buy an enclosed trailer for the car, and a flat trailer for the Bronco down the road! I also discovered prices on clean used trailers were very high, and just decided to order one new, so I could get it exactly the way I wanted it. So I did... unfortunately, it was going to take 12-16 weeks to build...

More on the trailer later...

Not much happened with the NA or NC over the holidays in 2015. I baselined maintenance and did all the little things with the Ram that you always do when acquiring a new to you vehicle, and we drove it to CA to visit family for Christmas.

In January '16, things started to get interesting...

DSC_1842 by Rodan AZ, on Flickr

Sky_Render
Sky_Render SuperDork
12/8/16 2:39 p.m.

MOAR.

Rodan
Rodan Reader
12/9/16 8:33 a.m.

Over the 2nd half of 2015 it was becoming more and more apparent the stock 1.6 in the NA was getting tired. Mercilessly beating on it like I had hadn't really helped. A compression test confirmed things were going south, with all four cylinders down in the 130s dry. It was time to do something...

I had been considering swaps since purchasing the car: tried and true 5.0 Ford, LS Chevy, and an intriguing new swap, the LFX (V6) Chevy. Also in development were J and K series Honda swaps, and even Ecotec. I was really interested in the LFX... 300hp stock fit right into my goals for a reliable, but still fast HPDE ride. At the end of 2015, however, there were only a couple completed swaps running, and not a lot of detailed information available. I'm not afraid of doing the work, but I'm not really a trailblazer or beta tester, so I decided to hold off.

For the short term, I decided to go with a 1.8VVT swap (stock '01-05 Miata engine) and base my build around 949s Supermiata pattern. That would provide a good reliable platform, and it would also mesh better with my wife's learning curve.   These engines are well documented to put down 140-150whp with bolt ons, which would be a huge improvement over the worn out 1.6 that was probably putting a whopping 80hp to the wheels.  Phase 2 (whenever that happens) could involve a Rotrex, turbo, or non-native swap. So, I picked up a 70k mile NB2 engine from Mike's Miata Mecca in Phoenix that had good compression numbers....

DSC_1845 by Rodan AZ, on Flickr

 Then I drug out the engine hoist.

DSC_1833 by Rodan AZ, on Flickr

 Now, I've had this engine hoist since the late 80's. It help with my first ever motor RnR, removing a blown motor from a Chevy swapped 240Z I'd bought to fix and flip...

Z 006 by Rodan AZ, on Flickr

 It later performed an engine RnR in my Mustang in 1992 when we pulled the motor and repainted the engine compartment over a weekend for a Muscle Mustangs and Fast Fords photo shoot on Monday... ahh... the things you do when you're young!

Engine pull by Rodan AZ, on Flickr

Underhood Painting 2 by Rodan AZ, on Flickr

Underhood Painting 4 by Rodan AZ, on Flickr

Underhood Painting 5 by Rodan AZ, on Flickr

 I brought it with me when I moved to AZ from CA, and in the late 90s it helped move said Mustang around after I foolishly cut it up and back halved the car in preparation for a big block swap that never happened. I moved it three times in AZ, and it was finally getting used again. I did have to cut off the original casters (because the steel wheels were rusted in place) and weld on some new ones from HF. But it still worked fine, and had no issues yanking the 1.6 and trans out of the NA. I got the 1.8 out of the truck and put it on a stand...

DSC_1852 by Rodan AZ, on Flickr

Time for the real work to begin.

Rodan
Rodan Reader
12/10/16 9:19 a.m.

January 2016... old 1.6 is out and gone. 1.8VVT motor on stand in garage, transmission on the floor, and engine compartment empty...

My original plan was just a quick and simple swap, following well established 1.8 swap guidelines, and leaving the VVT inactive, running on the 1.6 ECU. Later, I would add an aftermarket ECU, ditch the MAF and have the VVT running. Early on, I realized it would be stupid to do the work twice and decided to add Megasquirt to the parts list.

Speaking of the 'parts list', it was getting longer by the minute...

I had always intended to baseline the engine while it was out of the car... new seals and gaskets throughout, timing belt and water pump, and since it was getting a coolant re-route, it would need an NA 1.8 head gasket. So, I already had a long list of parts. How to keep track of all this stuff? Initially, I kept a file on the computer with everything, but I'm more of a pen/paper kind of guy when it comes to a lot of this stuff. Also, it's nice to be able to jot down or sketch an idea to save it for later. I went to WalMart and picked up a couple of composition books:

DSC_0078 by Rodan AZ, on Flickr

About $1 each, and 200 pages of blank slate for all my project notes, doodles and parts lists. I have found it to be extremely handy during this project, and now have one for each vehicle in the fleet. It's also a lot easier to cart into the garage than the computer...

Once I had a start on my (ever growing) list of parts, I started ordering a few things here and there, and building up a pile. I tried to go in the order things would be needed, but when I would get some overtime, or sell off some old stuff, I'd order a big ticket item. The pile started growing, and it was time to get started.

Rodan
Rodan Reader
12/10/16 9:28 a.m.

First things first... cleaning. The 'new' engine was pretty clean, thankfully. The old transmission, not so much. The NA had a CAS o-ring leak when I got it, and I had repaired it, but it looked like it was also leaking from the rear main.

DSC_1866 by Rodan AZ, on Flickr

DSC_1867 by Rodan AZ, on Flickr

 A couple of hours with engine degreaser, simple green, and a variety of brushes got it to the point where I wouldn't need gloves to move it around the garage.

DSC_1868 by Rodan AZ, on Flickr

DSC_1869 by Rodan AZ, on Flickr

 The engine compartment wasn't much better...

DSC_9572 by Rodan AZ, on Flickr

Again, apply elbow grease, and...

DSC_9577 by Rodan AZ, on Flickr

Working with clean parts is so nice...

Rodan
Rodan Reader
12/10/16 9:35 a.m.

Now, the cleaning occurred over a few weeks, with lots of other, non-Miata stuff going on. Meanwhile, parts kept showing up...

Reroute parts by Rodan AZ, on Flickr

DSC_1890 by Rodan AZ, on Flickr

DSC_1919 by Rodan AZ, on Flickr

 And, in early February, I got a call that something big had showed up... a month early.

Rodan
Rodan Reader
12/11/16 11:44 a.m.

Yup, my trailer had arrived...

DSC_1903 by Rodan AZ, on Flickr

2016 Look Ignite, 8.5x24... bigger than really necessary for a Miata, but big enough for my overall plan, and big enough for a larger car if I ever need the capability.

DSC_1904 by Rodan AZ, on Flickr

One of the reasons I had decided to buy new was I wanted a finished interior, and was having trouble finding something used in nice condition at a reasonable price. For the prices I was seeing, I didn't mind spending a little more and not dealing with updating maintenance, sketchy wiring, etc. And I got it exactly how I wanted it. The NC fits nicely!

DSC_1910 by Rodan AZ, on Flickr

The extra length will allow me to build a bench in the front, and install a winch for loading. I didn't like the pre-built benches, so I'll make my own with an integrated tool chest. I also have room to load my bike sideways, in front of a loaded car, so on trips I can take both toys. Also handy for transport at a track destination without having to move the tow rig.

DSC_1908 by Rodan AZ, on Flickr

DSC_1911 by Rodan AZ, on Flickr

Of course, in true GRM fashion, it got parked at the house and immediately turned into a storage shed...

DSC_1917 by Rodan AZ, on Flickr

Rodan
Rodan Reader
12/11/16 11:58 a.m.

Meanwhile, work continued on the VVT swap. I started by tearing down the motor... first off was the cam cover. Happily, things looked pretty nice inside.

DSC_1887 by Rodan AZ, on Flickr

Even the plugs looked decent, if well worn...

DSC_1885 by Rodan AZ, on Flickr

Next... off with it's head!

DSC_1893 by Rodan AZ, on Flickr

Pistons had some carbon buildup, but looked good, and the bores looked really nice.

DSC_1894 by Rodan AZ, on Flickr

DSC_1896 by Rodan AZ, on Flickr

Everything got a good cleaning while it was apart.

DSC_1897 by Rodan AZ, on Flickr

DSC_1898 by Rodan AZ, on Flickr

I debated long and hard over sending the head off to be gone through. I knew if I did, I would want better valve springs, and a nice valve grind, and if I was doing that, it might as well get new and oversized valves, and if I was doing that... etc... Next thing I knew, I would be $3k into the head. Project creep was already rearing it's head, so I decided to keep the VVT head as is for now.

I did give the cam cover a nice coat of wrinkle black, and some red for the lettering...

DSC_1924 by Rodan AZ, on Flickr

And then the head went back on, with the NA 1.8 headgasket required for the coolant re-route.

Rodan
Rodan Reader
12/18/16 2:40 p.m.

Apologies for the lack of posts over the last week... lots going on this time of year! While the head was off, I pulled the VTCS butterflies, and plugged the necessary holes in the manifold. Also made block-off plates for the EGR valve and fittings.

DSC_1928 by Rodan AZ, on Flickr

The front water neck is also eliminated as part of the coolant re-route...

DSC_1925 by Rodan AZ, on Flickr

For those who aren't familiar, the 1.6/1.8L Miata engine was originally a FWD design, turned 90 degrees to drive the rear wheels in a Miata. As such, the cooling system is compromised in the Miata, and can lead to unequal cooling in hard use. A 'coolant re-route' is a common modification for tracked or high HP Miatas and restores the coolant flow throughout the engine. In addition to the block off plate at the front, a thermostat cover is added to the rear of the cylinder head.

DSC_1926 by Rodan AZ, on Flickr

Before the head came off, I had run the valves, and several were out of spec. 1.8VVT Miata engines have mechanical lifters, shim over bucket. While I was doing the other work, I ordered the necessary shims, and it all went back together with new seals, gaskets, water pump and timing belt. It also got an FM timing wheel for better resolution with the MS3.

DSC_1951 by Rodan AZ, on Flickr

Rodan
Rodan Reader
12/18/16 3:16 p.m.

The other thing that happened in March was we found the final piece to our traveling roadshow puzzle... a 2007 Lance 981 camper.

Lance 3-11-16 2 by Rodan AZ, on Flickr

Lance 3-11-16 1 by Rodan AZ, on Flickr

I had been researching campers for months, and we had looked at several. New was out of the question due to cost... even at 9 years old, it wasn't cheap! But it looked brand new, had pretty much everything I was looking for, and with a slide out dinette, was plenty roomy. On the downside, it's heavy. Like, almost two Miatas heavy... over 4k lbs loaded and wet...

So, I spent a while ignoring the Miatas in order get the truck up to snuff. A installed a monster Helwig sway bar, and Torklift Stableloads, which allow the lower override springs to be engaged immediately. I also made some 2" square stock extensions for the upper override pads, so they would engage immediately as well. Having the overrides engaged immediately saved almost four inches of suspension compression with the camper loaded! Combined with the swaybar, the handling was vastly improved.

A Torklift hitch was installed and I use a Torklift extention with the camper mounted, and a weight distributing hitch. I did a lot of research to ensure I was within the rated axle and wheel weights with both the camper loaded and the tongue weight of the trailer before signing on the dotted line. I can tell you if you don't do the research yourself, the RV dealer will screw you, 'cause they have no idea what they're talking about when it comes to this kind of loading, and they don't really care. Any SRW truck you see with a camper loaded is probably over the rated weights. Even one ton trucks may be over. My Dodge weighs over 8k with me, my dog, and a full tank of gas. The camper is 4k+. My factory spec'd GVWR is 12,300... you can see the problem. Like I said, I'm under the axle and tire ratings, and I feel perfectly safe in how I set things up, but it took a lot of research time, and a lot of $$.

Here's a great site for truck/camper research and calculations: Truck camper calculator

All hooked up, it's a lot going down the road!

DSC_2122 by Rodan AZ, on Flickr

The camper got its first real test later in March when we drove it to CA. My parents were moving to a retirement home in WI, and we were helping them pack, and supervising the loading of the moving truck. It was an effort of several days, as they had lived in that house for almost 50 years! We stayed in the camper since most of the house was packed, and it worked perfectly. Driving it in SoCal traffic was quite an experience...

Random pic from the trip...

Lance 4-8-16 1 by Rodan AZ, on Flickr

Rodan
Rodan Reader
12/29/16 6:57 p.m.

Apologies for the lack of recent updates... holidays and all.

So, now it was April 2016... 4 months to FM Summer Camp, and the motor was close to being ready to go back in the car, but the car wasn't ready. I had been thinking a lot about safety equipment, and debating where to go with the car. I had originally intended it to be a street car with HPDE in mind, but I was leaning more and more to track car with full safety equipment that would occasionally be street driven. Also, a bit of project creep had set in... instead of just 'getting it running' on Megasquirt, I was going to eliminate the MAF, run sequential injection and utilize the VVT. The likelihood of having everything done in time for Summer Camp was decreasing daily, unless I shortcut a few things, and I didn't want to do that.  I decided it was going to be just the NC for Summer Camp again, and the NA was going full retard...

So, out came the dash and interior!

DSC_2013 by Rodan AZ, on Flickr

DSC_2014 by Rodan AZ, on Flickr

DSC_2028 by Rodan AZ, on Flickr

DSC_2029 by Rodan AZ, on Flickr

DSC_2030 by Rodan AZ, on Flickr

Now I'd done it!

Rodan
Rodan Reader
12/29/16 7:14 p.m.

Meanwhile, since the NC was going to represent at Summer Camp, it needed a few things.... The Progress springs had been a good start, but the fronts had sagged over two years, and I wanted more spring rate, so I ordered up a set of springs from FM. Progress on left, FM on right...

Springs Front by Rodan AZ, on Flickr

Springs rear by Rodan AZ, on Flickr

I would love to have gone with adjustable coilovers, but it just wasn't in the budget... since the NC also needed some track shoes. No half measures this year... 17x9 Enkeis and Re-71Rs...

RPF1 quarter F by Rodan AZ, on Flickr

RPF1 side by Rodan AZ, on Flickr

RPF1 quarter R by Rodan AZ, on Flickr

RPF1 rear by Rodan AZ, on Flickr


thatsnowinnebago
thatsnowinnebago GRM+ Memberand SuperDork
12/29/16 7:35 p.m.

Your NC is looking sharp. A little drop and some nice wheels makes a big difference on those cars.

Rodan
Rodan Reader
12/31/16 9:29 a.m.

My original idea for engine management on the NA had been to wire a universal MS3 to a DiYBOB, which would plug into the factory harness. I didn't want to use a PnP MS3, as there's a strong likelihood that the NA will get a non-native engine swap (LFX, Honda K, or ?) down the road, and I was thinking of moving the MS3 to my Bronco project at that point. My plan was to re-purpose some of the existing harness wiring for non-needed features (AFM) to new features (VVT).

While stripping the interior out, I realized that this was going to become primarily a track car, and while I was at it, I might as well strip unneeded wiring out of the harness. This would remove some weight, as well as cleaning up the engine compartment and under dash, and simplify trouble shooting and maintenance down the road. The first to go was airbag wiring. The car had not had a working airbag in some time, as I had replaced the steering wheel early on with aftermarket. Also, I'm not all that trusting of 25 year old explosive parts...

How much airbag wiring is there? A lot! Here's about half of it:

DSC_9580 by Rodan AZ, on Flickr

It's a good thing I was diving into the whole harness, because the airbag wiring was woven through almost the entire harness under the dash and in the engine compartment... Things were a total mess at first...

DSC_9584 by Rodan AZ, on Flickr

DSC_9583 by Rodan AZ, on Flickr

But it started to come together over time. Here's the driver's side of the engine compartment, before and after:

DSC_1864 by Rodan AZ, on Flickr

DSC_2044 by Rodan AZ, on Flickr

Note that the wire looming had not been installed at that point. I'm using braided sleeving, with silicone self fusing tape for the looming.

Rodan
Rodan Reader
12/31/16 9:58 a.m.

Progress was slow on the wiring, and Summer Camp was approaching. We took the camper out for another test run, a weekend in the mountains near Flagstaff. We stayed at a nice campground and did some hiking, but discovered an issue with the refrigerator. It would run about 8 hours on propane, then shut off. It had done this on one overnight test run I did, but I thought it was a leveling issue. When I pulled into the local RV store after returning home to dump the tanks, I just happened to pull in behind another Dodge truck, with the same year and model camper. We got to talking, and he had had the same issue with the 'fridge. Turns out there's an issue with the propane line to the 'fridge, and if the slide is all the way out it causes problems with the gas flow. The fix is involved as it requires removal of the 'fridge to get at the line, but simply pulling the slide back a few inches solves the problem. Since then, when running the 'fridge on propane we've just pulled the slide in a bit, and not had any further problems. Eventually, I'll get around to a permanent fix...

I mentioned earlier that we had moved my parents to Wisconsin... which seems like a strange choice, but the retirement complex they moved to is only a couple miles from my sister's place, so all the grandkids and great-grandkids are there. It's a longer trip for me to visit them, but it was a great move for them. The place they moved into was brand new, and my mom was loving it, but my dad had been in/out of the hospital since they'd been there. He was about to turn 91, and I was worried about him. I knew if I didn't visit in early summer, I wouldn't be able to get up there until the following spring, so I took a quick trip from AZ to WI on my bike.

My bike is a '15 Yamaha FJ-09, and I absolutely love it! I've had lots of bikes over the years, and have drag and road raced bikes. I've been coast to coast and border to border on two wheels, and I think this is the best all 'round bike I've ever owned. It can run with the sportbikes in the twisties and it's an excellent light touring mount, and still under 500lbs with hard luggage.

2015-07-07_06-48-55_757 by Rodan AZ, on Flickr

 A quick 3 day ride up, through UT, CO, WY and SD...

Utah1 by Rodan AZ, on Flickr

MB2 by Rodan AZ, on Flickr

Spent a great 4 days in WI visiting family, and checking out my parents' new digs. On the return trip, my brother-in-law decided to join me. He got me into bikes in the first place, but it had been a long time since we'd ridden together... a Keith Code school at Laguna Seca in 2007. He rode his trusty Yamaha FJR...

Brad by Rodan AZ, on Flickr

3 days on the return with only the occasional delay for construction...

Construction1 by Rodan AZ, on Flickr

Coming through Rapid City, I spotted a B1 making touch and goes at Ellsworth AFB... love this big, loud and fast relic from the Cold War!   Managed to snap a shot from the highway...

B1B by Rodan AZ, on Flickr

My BiL continued on to CA to visit family, and I got back to work getting ready for Summer Camp...

Rodan
Rodan Reader
12/31/16 2:38 p.m.

Next, we were off to Grand Junction for FM Summer Camp 2016.

Since we were forced into an afternoon start by circumstances beyond our control (work), and it was the first time traveling with the camper and trailer, I planned an overnight in Blanding, UT. There's a nice little RV park there, and it would make for an easy morning run through Moab and into Grand Junction. Everything went well, and we arrived in Blanding and set up for the night...

Blanding by Rodan AZ, on Flickr

We were running the track two days this year, so we planned to stay at the track for two nights, and would move to FM's property on Friday. Our track time went really well. I had dialed in a more aggressive alignment to go with the larger tires and better rubber. Combined with the higher spring rates of the FM springs, the car was working really well. It was also a good bit cooler than the previous year, and though rain threatened throughout, we stayed dry at the track. We were busy racing, so I didn't get much in the way of pics at the track this year. I did get one of the view out our kitchen window in the morning. Nice to have your morning coffee right in the pits!

FM16 track view by Rodan AZ, on Flickr

Fortunately, FM has a pro photog on hand to get better pics!

FM track Thurs weather by Rodan AZ, on Flickr

FM16 Fri B 1 by Rodan AZ, on Flickr

Unfortunately, he was quick enough to catch my dirt excursion after overcooking turn one...

FM16 spin by Rodan AZ, on Flickr

Overall, we had a great couple of days on the track. SWMBO took almost 3 seconds out of her 2015 lap times, and I took just over 2 seconds out of mine.

Rodan
Rodan Reader
1/1/17 10:33 a.m.

OK, I left a whole 'nother post here yesterday and it disappeared...? Anyway, after two days at the track, we packed up our traveling roadshow and moved over to FM headquarters for the weekend. The NC got a bath, and I swapped back to street rubber. Early Saturday, it got to hang out with some FM shop cars...

NC 1 by Rodan AZ, on Flickr

On Saturday, FM holds seminars on everything from suspension tech to new products to tuning, so it didn't take long for the parking lot to fill up...

FM Lot 16 by Rodan AZ, on Flickr

One reason for good attendance this year was a Mazda rep showed up with the new ND RF, the 'power targa top' version of the ND...

FM RF 1 by Rodan AZ, on Flickr

ND RF 1 by Rodan AZ, on Flickr

Saturday night is the dinner party, and Sunday we went for a nice drive... with about 20 other Miatae...

Sunday drive by Rodan AZ, on Flickr

FM16Sun2 by Rodan AZ, on Flickr

Sunday afternoon we loaded the NC, and pulled out for home at zero dark thirty Monday morning. The tow rig ran like a champ, and returned 9-11mpg for the trip, depending on wind and grades.

Rodan
Rodan Reader
1/1/17 10:41 a.m.

I just realized that last pic reminds me of a pic from early in our Miata ownership.

36939598-021 by Rodan AZ, on Flickr

Both pretty much sum up the Miata experience: FUN!

Rodan
Rodan Reader
1/1/17 11:04 a.m.

Back home, work plodded along on the NA... Got the exhaust side of the engine back together. I debated buying a header (and still may!), but the stock NB2 header is considered pretty good, and usually comes in within a few HP of the acknowledged 'best choice', the Racing Beat header. It was also free, having come with the motor, so I bolted it back on with a new gasket. One of the possible future upgrade paths is a Rotrex supercharger, and if that happens, I'll spring for the header. If it goes turbo, or non-native swap, I saved some $$.

DSC_2011 by Rodan AZ, on Flickr

DSC_2012 by Rodan AZ, on Flickr

I also used an EGR block off cap from FM, as I won't be running EGR. Next up was some work on the intake side. I had already removed the VCTS butterflies from the intake runners and plugged the shaft holes, as well as making block off plates for the EGR. Now it was time to clean things up, and replace gaskets. The Miata manifold is split, which makes it a little easier to clean...

DSC_2296 by Rodan AZ, on Flickr

One mod I made while the intake was off was to the support bracket mounting flange. The bracket is generally considered unnecessary, and removing it improves access to the oil filter and alternator. Once removed, however, it leaves a nice sharp edge in the perfect location to filet your forearm while removing the filter. I took the grinder to it, so stitches will not be required.

DSC_2297 by Rodan AZ, on Flickr

The manifold got bolted back on the engine and we're getting close to having it ready to re-install...

DSC_2299 by Rodan AZ, on Flickr

SHAKESBEARD
SHAKESBEARD New Reader
1/1/17 6:21 p.m.

Inspiring. I'm a muscle car guy from way back too but thinking Miata for my next track car. You're making this look easy, and fun. The easy to fun ratio is outstanding! Keep up the good work.

jakebrewer
jakebrewer New Reader
1/2/17 7:18 a.m.

This is a great read. Ive been itching to get into a miata and this just makes me want one more.

Cant wait to see where this goes.

Rodan
Rodan Reader
1/2/17 7:17 p.m.

Thanks, guys!

SHAKESBEARD wrote: Inspiring. I'm a muscle car guy from way back too but thinking Miata for my next track car. You're making this look easy, and fun. The easy to fun ratio is outstanding! Keep up the good work.

Well, it's not rocket science, but it does get tedious at times... wait 'till I get into the wiring harness...

One thing I do like about the NA/NB Miatas, and even the NCs to a degree, is that they are still 'analog' cars and don't require a computer science degree (and specialized equipment) to work on. I was recently looking at a 2011 M3 'vert, but I'm terrified of owning one out of warranty...

Rodan
Rodan Reader
1/7/17 8:05 a.m.

So... wiring...

Since I was removing the AFM, cruise, AC and some other unnecessary stuff, I eventually decided not to use the DiYBOB, and just create a dedicated harness for the MS3, only tapping into a few circuits as necessary. I also decided to use the NB2 harness that was still on the engine, modified slightly for the MS3. In the pic above, you can see that harness was simply cut off when the engine was pulled from whatever car it came out of. It also had a few issues, like the wiring to the cam position sensor:

DSC_2302 by Rodan AZ, on Flickr

I ordered up a replacement connector, some silicone self adhering tape, and some wire loom and got to work.

DSC_2308 by Rodan AZ, on Flickr

Fortunately, wiring diagrams for both 1.6 NA and 1.8 NB are available, so I spent hours checking wire colors and routing, with the diagrams, my MS3 manual, and a magnifying glass...

DSC_2303 by Rodan AZ, on Flickr

Eventually, the engine harness was finished up and re-loomed.

DSC_2309 by Rodan AZ, on Flickr

And actually, we're backing up just a bit, as the harness had to be in place before the intake manifold was installed. I just have to wire the GM IAT, once I get one in hand.

1 2 3 4 ... 52

You'll need to log in to post.

Our Preferred Partners
OJeASfdSAwZuNpNJcAavdDx4HMTYQClDxZLXEX0YEMcZWxioQvKpcQyXyvfVmV7F