1 ... 13 14 15 16 17 ... 43
wae
wae UberDork
12/31/21 5:35 p.m.

Out of town visiting the outlaws, but a quick recap of what I got done before we left:

I ordered up some tools and some valve lapping compound.  It has all arrived and is waiting for me when we get home.

The left head is apart and just absolutely nasty.  I can't believe there was enough space to get sufficient fuel and air into the cylinders for it to actually run.  I put it in the heated parts washer before we left so it should be pretty good when I get back.

The right head is looking better:

I ordered a new piston for #2 as well as a new oil pump.  Those should arrive sometime in the first week of January, in theory.

Once I get back I need to examine the pistons to see how many clyinders' worth of valves I need to replace and order those us.  I know I'll need at least 1 more set of 4.

Things are kind of moving right along now, which is nice.

wae
wae PowerDork
1/6/22 8:25 a.m.

The parts washer with the heated Oil Eater did a really good job of getting dissolving and softening up the carbon and sludge, but the parts still weren't "clean".  I don't really have a utility tub at the shop, so I can't hose things down when they come out of the washer and the solution in the washer is so contaminated at this point, everything sort of comes out with a grime film anyway.

Off to the hardware store, then, and I came back with some brushes, a couple spray bottles, and a gallon of Simple Green.

This is the left head that was fresh out of the parts washer.  It had been in there the whole time I was gone which meant that the carbon was either already gone or able to be wiped off with a rag:

After a little bit of manual cleanup:

I actually started with the right head and got it a bit farther already:

Once I'm done scrubbing, I will bring both heads back to the house where I can spray them down in my utility tub in the basement to be sure that there aren't any broken bristles, abrasives, or chemicals left in any of the passages.  I am absolutely amazed at how well the Simple Green works.

I also was able to get the #6 piston cleaned up and re-installed.  For some reason, the ring lands on that piston were particularly crud-filled so I took the rings off to get in there and clean it up real well.  Due to the breaker bar plus angle gauge plus 1/2-to-3/8 adapter plus the socket, I got a little bit of wobble on one of the rod bolts which monkyed up the stupid e-torx head so the final turn in the sequence might not have been the full 90 degrees.

The replacement #2 piston should arrive today and the oil pump is scheduled for Monday.  When the oil pump arrives, I'll need to tear it down and inspect it to make sure it isn't all boogered up.  The piston is a brand new Kolbenschmidt with rings installed, so that'll be easy enough - just have to fight the little circlip to get the wristpin on the rod.

Still haven't inspected the pistons to see how many more cylinders' worth of valves I need, so that's on the to-do list.

This project is going to need to take a minor backseat to the motorhome, however, since the Rolex is coming up at the end of the month and I need to get it ready to roll out to Florida.  But that's outside in the cold while der Scheißwagen is inside the heated shop.  Next to the Scotch.

eastsideTim
eastsideTim PowerDork
1/6/22 11:58 a.m.

I seem to recall leaving any Simple Green residue on aluminum is a very bad thing.  Not sure how fast acting it is, but I'd prioritize hosing off the cylinder heads.  

dculberson
dculberson MegaDork
1/6/22 12:23 p.m.

In reply to eastsideTim :

Today I Learned; thanks for the tip.

https://simplegreen.com/faqs/15/

wae
wae PowerDork
1/6/22 3:48 p.m.

I specifically bought the gallon of Simple Green because the label indicates that it's safe for all metals while every other degreaser in the store read "not for use on aluminum".  And I've used this stuff on bike parts before with no ill effect, so I wasn't too worried about it.  I used it without dilution, but also was spraying it down with tap water after scrubbing it.  I'm guessing that the real problem would be if you used it for a long-term soak.  I went ahead and finished up this afternoon while I was on a call and gave 'em a good rinsing.  So, I don't know about anything else, but I'd say Simple Green is just fine for this use case.  Maybe don't fill the parts washer, but for spray-and-scrub it's better than brake cleaner.

wae
wae PowerDork
1/7/22 8:51 p.m.

I had a couple minutes to run over the shop and now the #2 piston is installed and a bullet was dodged. 

Other than screwing around with the stupid circlips for the wrist pin, the piston went in with no drama or anything.  But once it was in, I noticed that the oil squirter was contacting the piston skirt.  Apparently when the bearing went out and things got loose, the squirter got bent.  I managed to snake it out of there, bend it back, and snake it back in.

Also, I need valves for the other two pistons on the right side so I'm going to go order those now.

wae
wae PowerDork
1/8/22 7:25 p.m.

Intake valves were pretty nasty.  The right head is getting all new valves, but I don't have any evidence of the valves making contact with the pistons on the left side, so they needed to be cleaned up and reinstalled.  After spinning it around in the drill with some steel wool, they're looking more like this:

One by one, I put the valve grind compound on and gave it a good twist:

I rinsed it all off again, sprayed it down with WD40, and broke out the valve spring compressor.  Everything went back in and I didn't lose any of the keepers!

That was an incredibly tedious part of the project.  Just cleaning, grinding, cleaning, grinding, cleaning, grinding over and over.  At least with the other head, I can skip the cleaning step since the valves will all be brand new TRW units.  I wonder if the valve grinding will take a longer time, though since those new valves have never met the seats before.  While I wait on that, though, I've got more parts to scrub.

wae
wae PowerDork
1/8/22 10:14 p.m.

....and I just realized that I'm a berkeleying moron.

I forgot to put the new valve seals in before I installed the valves.

Guess I know what I'm doing tomorrow.

Pete. (l33t FS)
Pete. (l33t FS) GRM+ Memberand MegaDork
1/8/22 10:21 p.m.

In reply to wae :

Valve seals go on after the valves go in, not before.  Gotta use the little valve seal protector sleeve so they don't shred on the keeper grooves.

So, I mean, you have 24 more chances to lose a keeper still, but it's not all THAT bad.  I guess.

wae
wae PowerDork
1/12/22 8:21 a.m.

Good news!  I didn't lose any of the keepers again!  Honestly, I think I really had more like 36 opportunities to lose them:  Once when taking them off, once when putting them back on, and then once when I put them on the other head.

While I sat on conference calls yesterday, I went ahead and got the seals installed on the left head.  Interestingly, Rock Auto sent me 28 seals instead of 24, so I guess if I booger one up, I've got a spare.  Still waiting on idparts to ship the valves for the right head, but I suppose I can go ahead and lap the four that I already have.

At home, I've had the intake manifolds and valave covers in the tub, scrubbing away with the Simple Green.  One of the intake manifolds is complete and it's actually made of metal.  I thought it was just carboned-up oil all the way down....


FJ40Jim
FJ40Jim New Reader
1/13/22 1:20 a.m.

Big progress, Wae!

Recipe for cleaning the TDI or similar sludged up manifolds & heads at home:

Ingredients: 1 large stew/roasting pot from the Salvation Army store, 1 bottle of degreaser of choice (spic& span, pine-sol, purple power, etc), water as needed, outdoor heating source, i.e. camping stove or sideburner on BBQ grill.

Procedure:

Dump the bottle of degreaser in large pot. Light the stove and set to MAX POWER. Place pot on stove, fill most of the way with water.

Place nasty parts in soon to be hot water.  Simmer parts on low for 20min.

Brush loosened sludge off parts, spray off with clean water. If more cleaning is required, drop it back in the hot tank. Large parts can be dunked 1 end at a time (I'm looking at you, Audi 5cyl head). Lather, rinse, repeat until clean enough.

Hope this helps somebody dealing with the epic levels of sludge & carbon found on modern, emission controlled diesmals.

FJ40Jim
FJ40Jim New Reader
1/13/22 2:04 a.m.

Quick update on mine:

Spent almost 2 days stripping the harness and ancillaries off the engine, just to get down to having the long block and only the long block on the stand.

Got the pan off and was pleasantly surprised to find no sludge & no metal.


Next, pulled off the front cover to find it was clean, the chain guides showed almost no wear, gears all looked good.

Pulled the injectors, cam covers, cams & chain. The only issue there was one injector that reguired an hour of slidehammering to remove. Finally got to the intake manifolds. Were they sludged? Oh heck yes! Here's part of the reason this trucklet was slow compared to a couple others I had driven.

Heads were just as bad, though it's hard to see in the pic.

Enough for now. More to come soon.

Azryael
Azryael HalfDork
1/13/22 12:34 p.m.
FJ40Jim said:

Quick update on mine:

Spent almost 2 days stripping the harness and ancillaries off the engine, just to get down to having the long block and only the long block on the stand.

Got the pan off and was pleasantly surprised to find no sludge & no metal.


Next, pulled off the front cover to find it was clean, the chain guides showed almost no wear, gears all looked good.

Pulled the injectors, cam covers, cams & chain. The only issue there was one injector that reguired an hour of slidehammering to remove. Finally got to the intake manifolds. Were they sludged? Oh heck yes! Here's part of the reason this trucklet was slow compared to a couple others I had driven.

Heads were just as bad, though it's hard to see in the pic.

Enough for now. More to come soon.

What's the age on those guides? They're normally a bright, bone white (unless MB has opted for a darker materical this time around, in which case they may be just fine). They may show no physical wear, but they may be brittle with age (ask me how I know), especially with how dark they've become. If they're around the 10-year mark, I'd look into just getting them done now for the peace of mind knowing they're nice and fresh.

All it takes at that point is a little slap from a loose chain if the tensioner stops doing its job and you've got guide plastic getting crunched up by the cam gears causing possible chain jump and your valves sharing their first kiss with your pistons.


FJ40Jim
FJ40Jim New Reader
1/14/22 12:50 a.m.

Hey Azrael, thanks for the tip on the plastic chain guides. These are made of a black resin honeycomb structure with a (formerly white) nylon? HDPE? chain surface. IIRC, I read there are earlier versions that aren't as good, and there are chicomm whitebox parts to avoid. I'll get these degreased in solvent tank and poke them with a sharp tool to see if they are hard/ brittle.

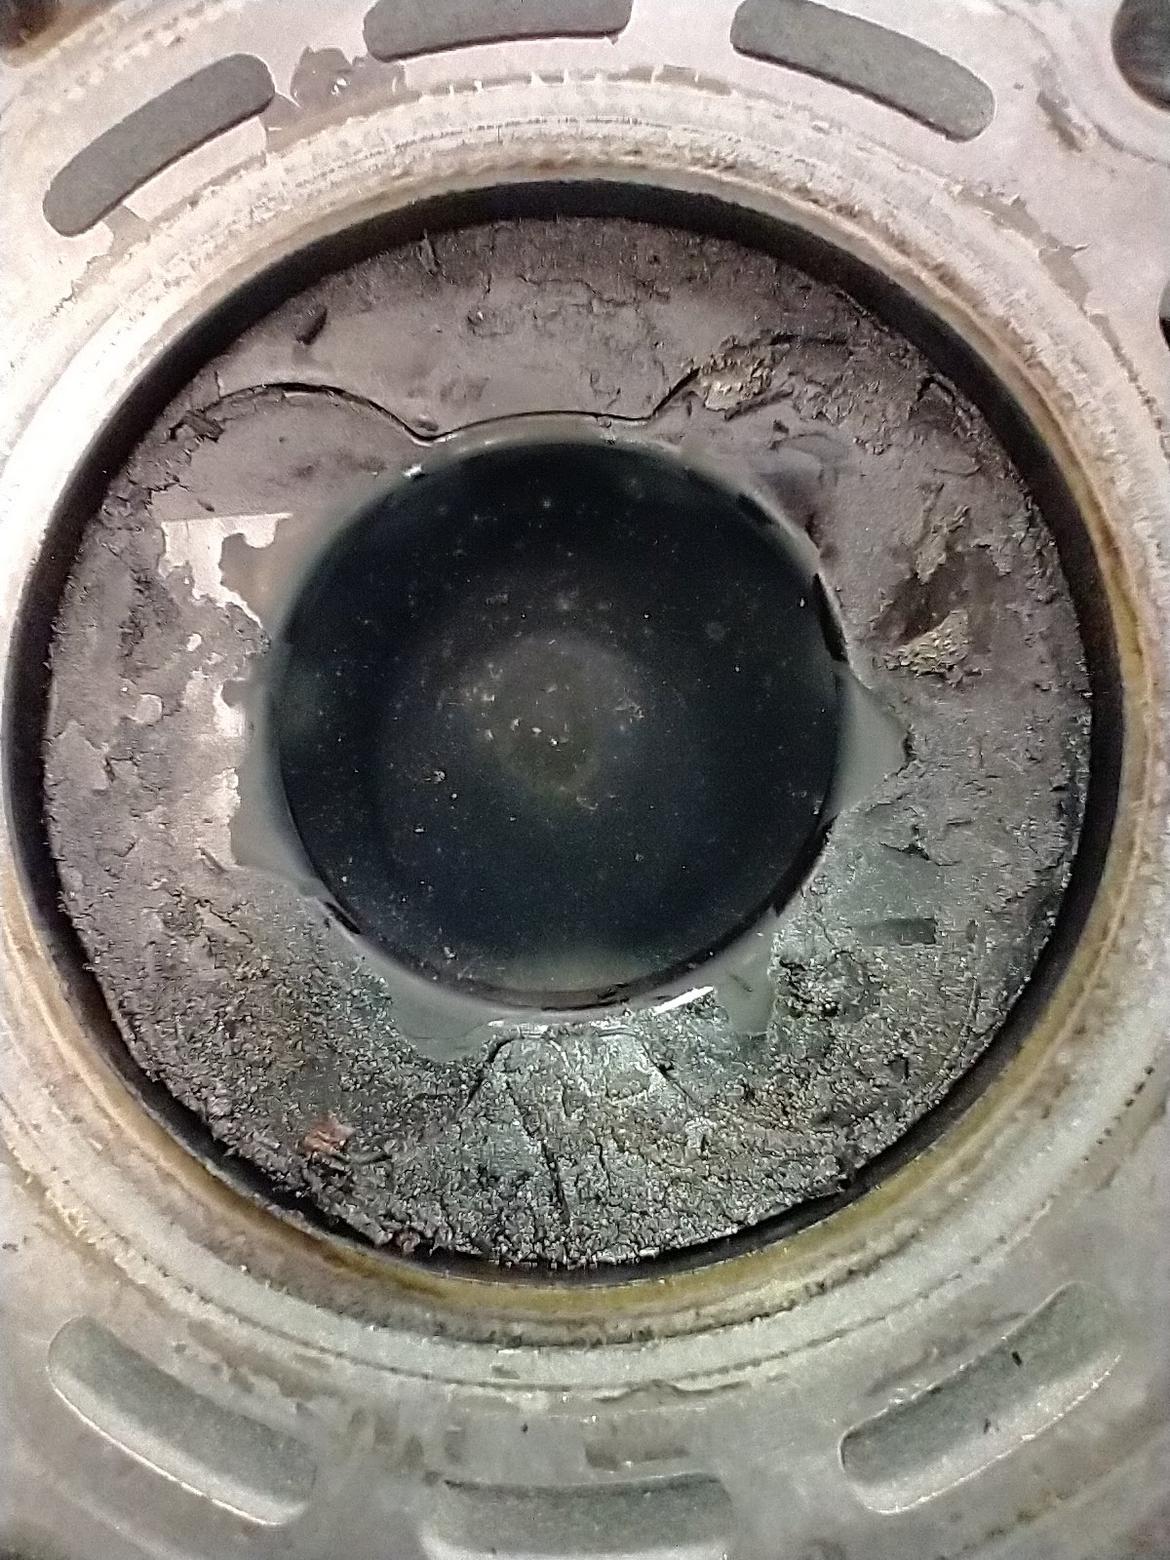
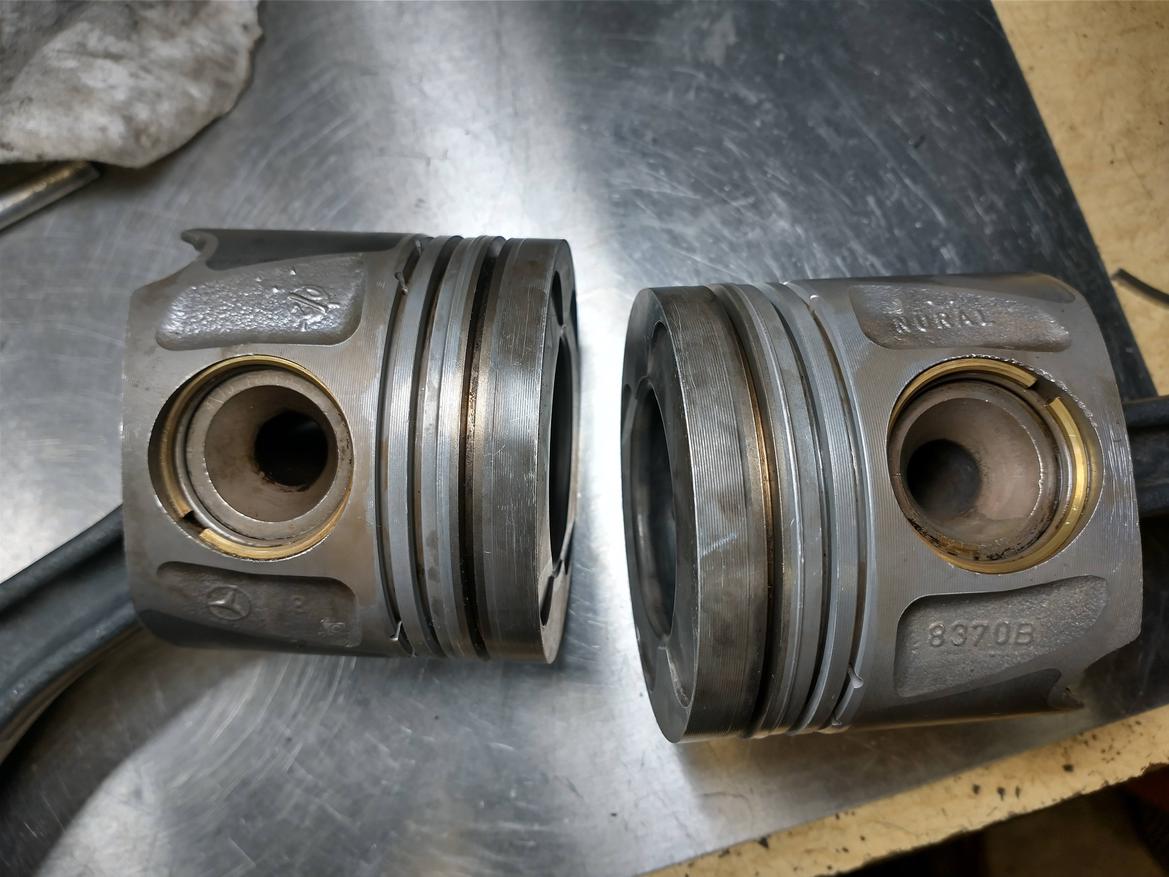
So we got everything off the outside of engine, time to pull off heads. The head deck looked good, but the pistons were crusty on top, no doubt due to burning engine oil.


Time to flip the engine back over and remove the alloy oil pan and pump to access conn rods. Again, bottom of engine is surprisingly clean inside.

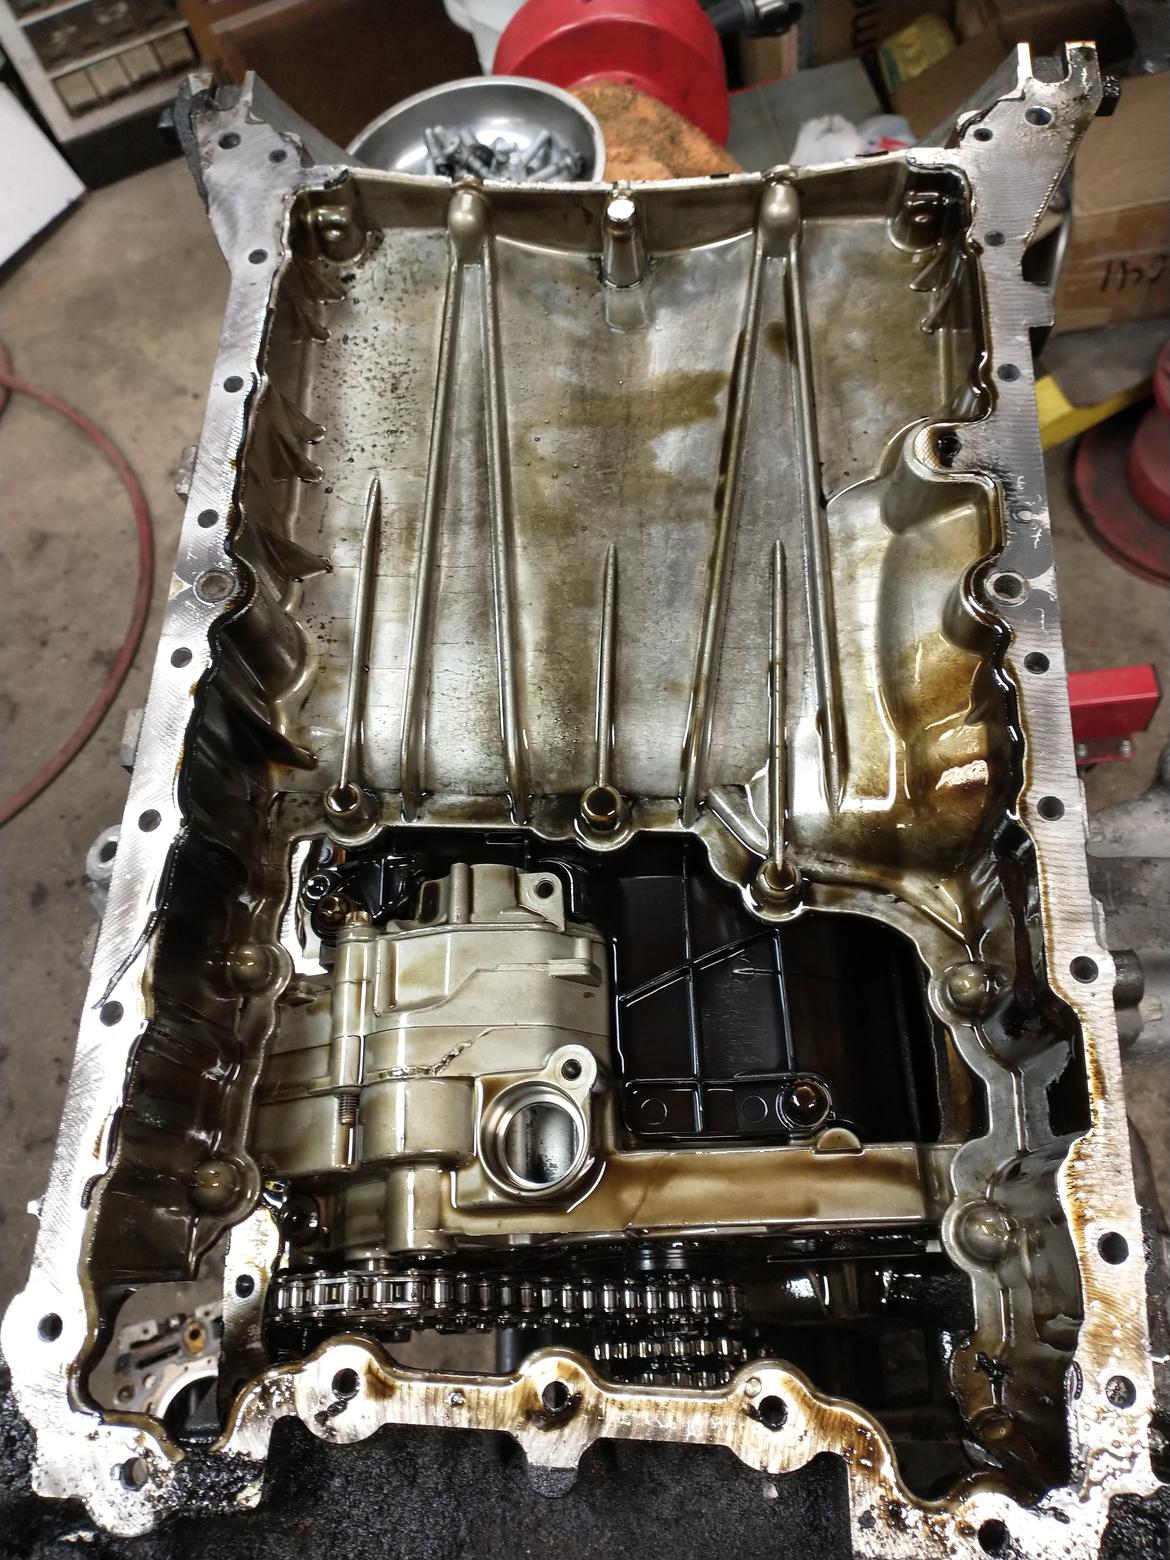
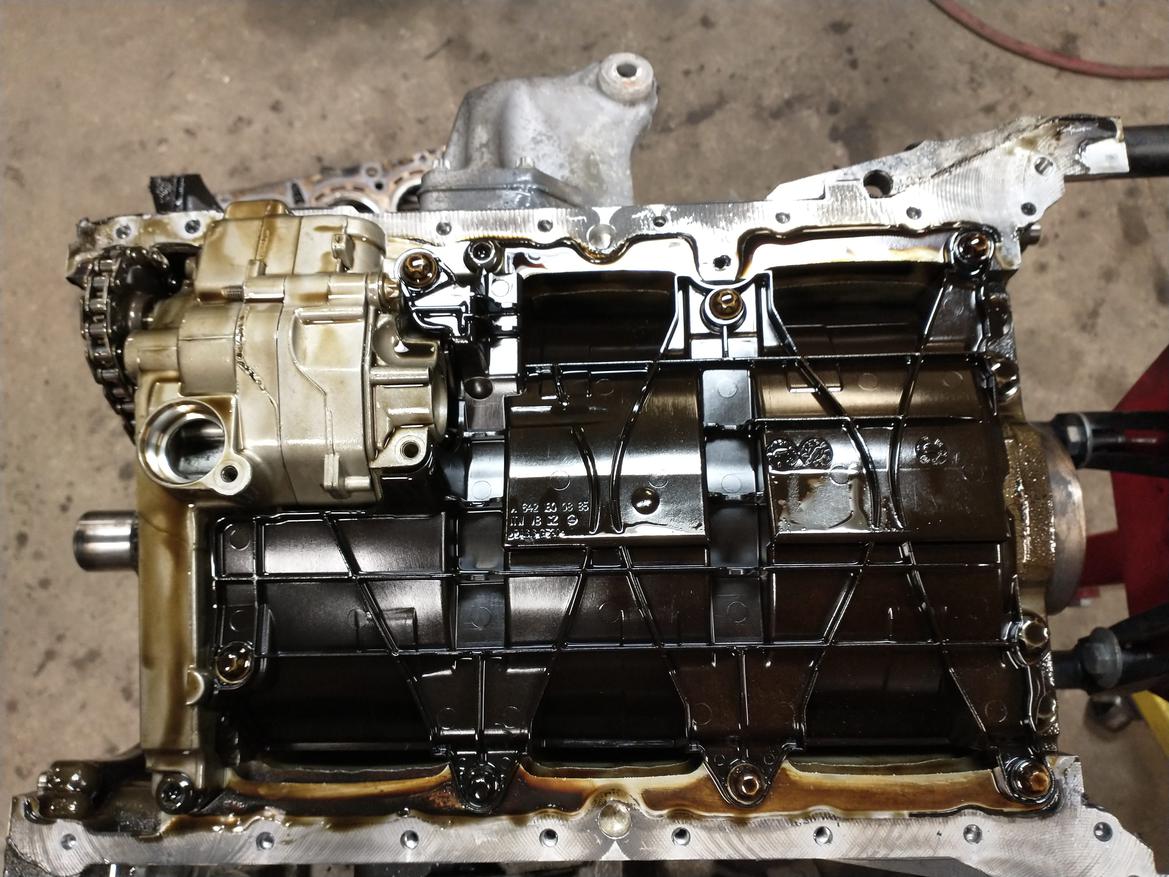
Note the nice windage tray to minimize oil sling from the 8qt pan.

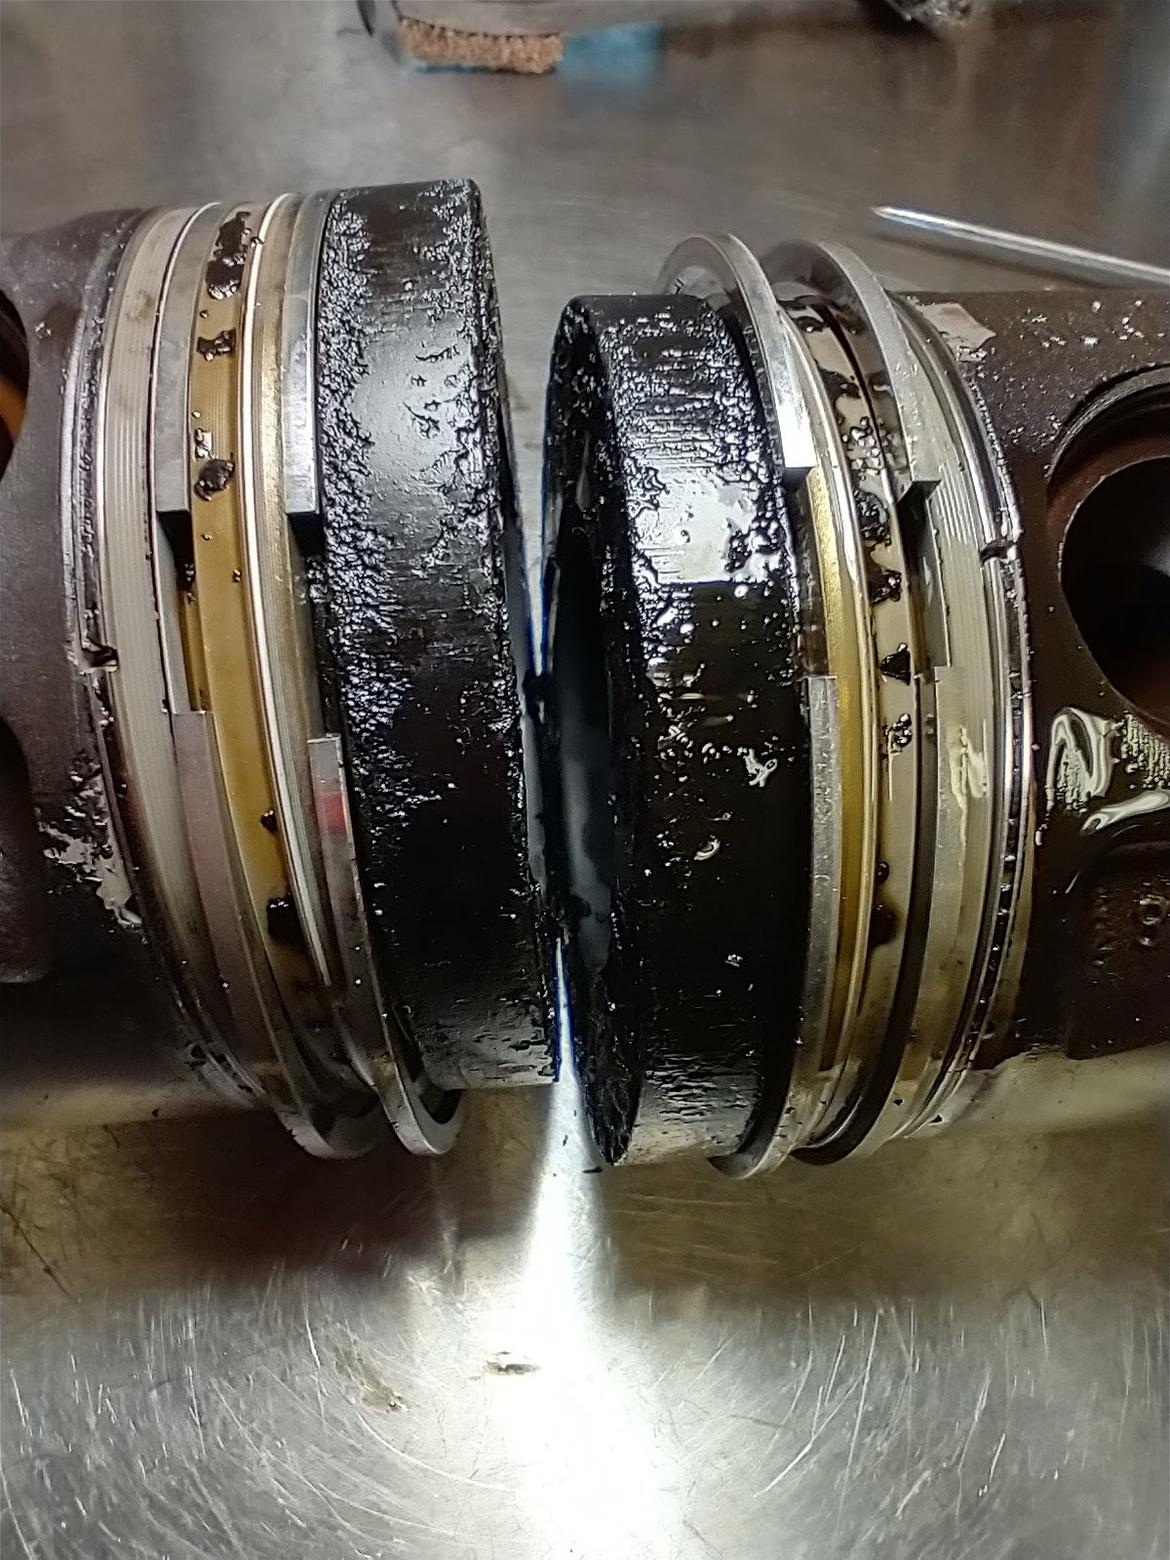
Knocking out pistons shows the source of the oil burning. Severe carboning of all the rings, & stuck oil control rings.

After soaking pistons in carb-dip and removing old rings, they look much better than I expected they would.

Piston & rod assemblies are washed in solvent tank, blown dry, new Hastings std. size rings installed.  Block is tidied up, gaskets scraped, oil cooler removed to replace seals, mounts removed to scoop out remaining acoustic grease. acoustic grease seems to be a silicon based substance, because parts solvent has little effect on it. Mechanical removal is the only way to get it out, and that is difficult when it is cold as it becomes less like grease and more like silly putty. This is the inside of one mount after scraping & digging inside for a few minutes.


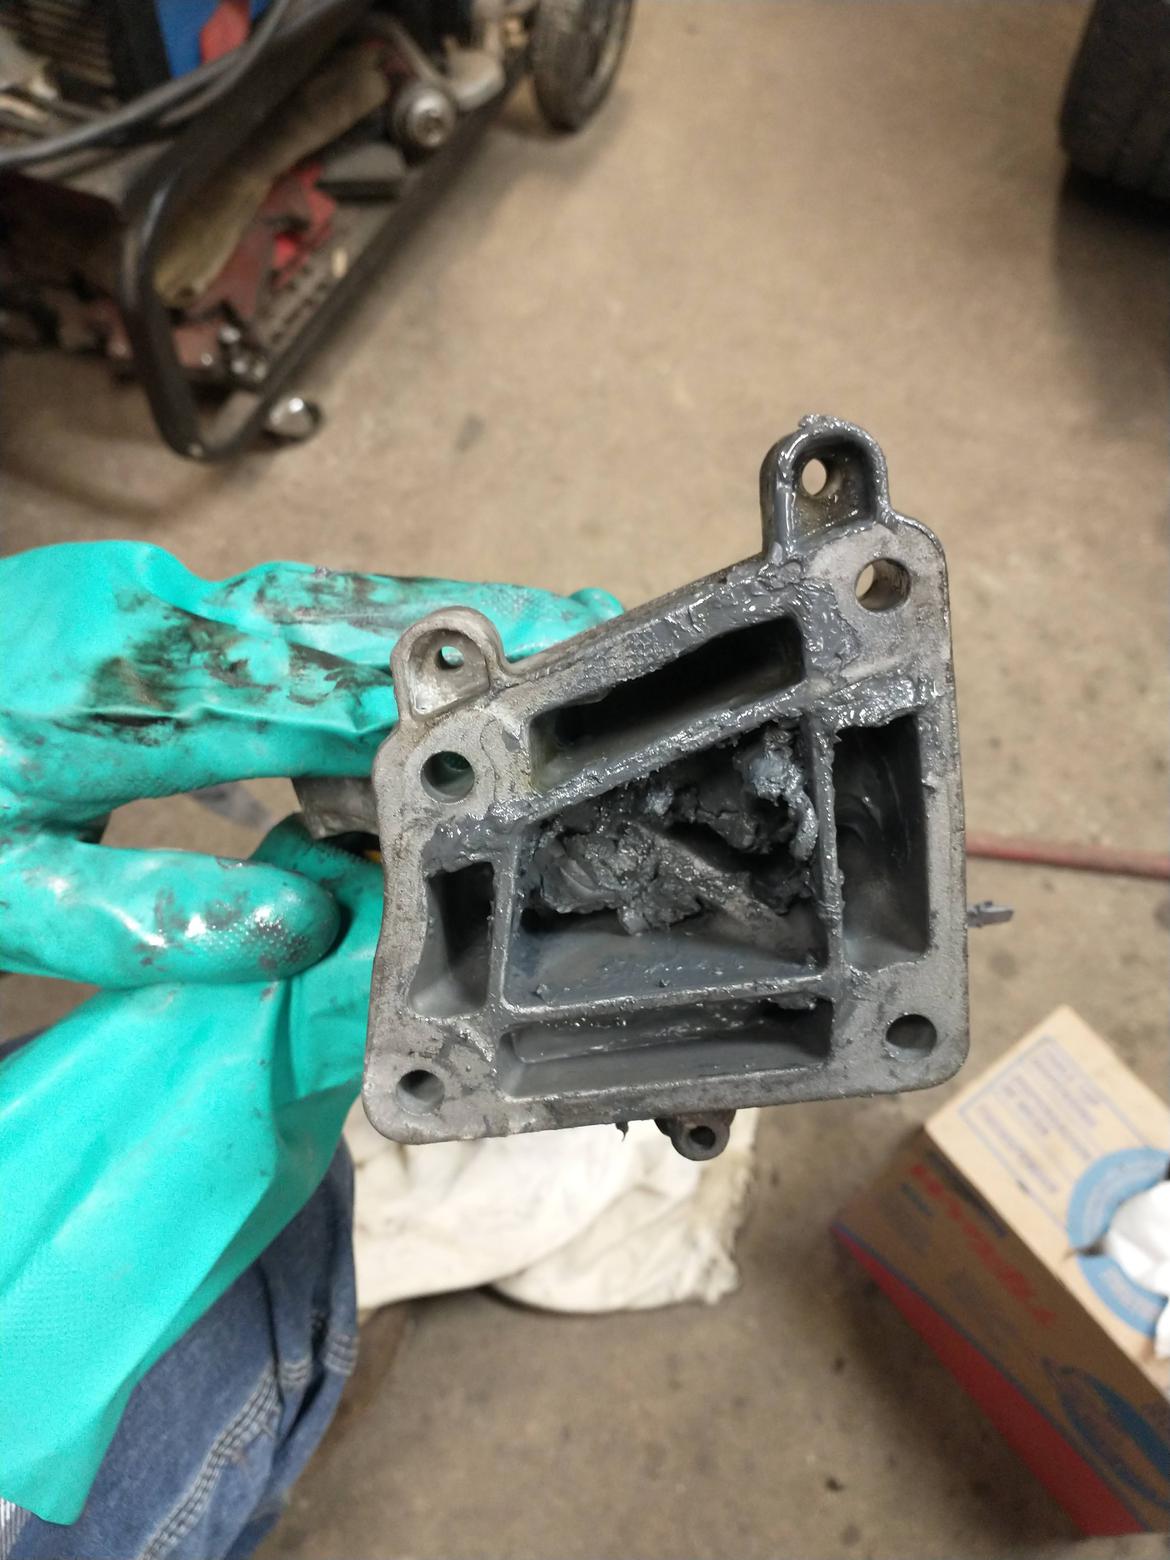
The mounts were reinstalled with hi-tork gray RTV sealing the cavity against the block to prevent anymore gray acoustic shmegma from oozing out & dripping on front frame.

Bores are lightly cleaned with green scotchbrite & WD40, then sprayed & wiped, sprayed, wiped until towel comes out white.  Piston & rod bearing is lubed up, then piston is whacked into the hole. Rod bolts snugged up & crank turned thru a rotation to be sure nothing is stuck or interfering. Lather, rinse repeat 5 more times.

And here's where I screwed up. The tork spec for the rod bolt is 20, 30, 40 N*m, then 90º and another 90º.  I got in a hurry and did bolt 1 90, bolt 2 90, bolt 1 90, bolt 2 90, bolt 1 90. As I finished the 3rd 90 on bolt 1, it got much easier, indicating the stretch bolt was stretched way too far and about to break. Thats when I realized I was back on bolt 1 for the 3rd time. angry

So now I wait for a full set of OEM Assembly Locking Elements to come in the mail. Still plenty of parts to clean while waiting.

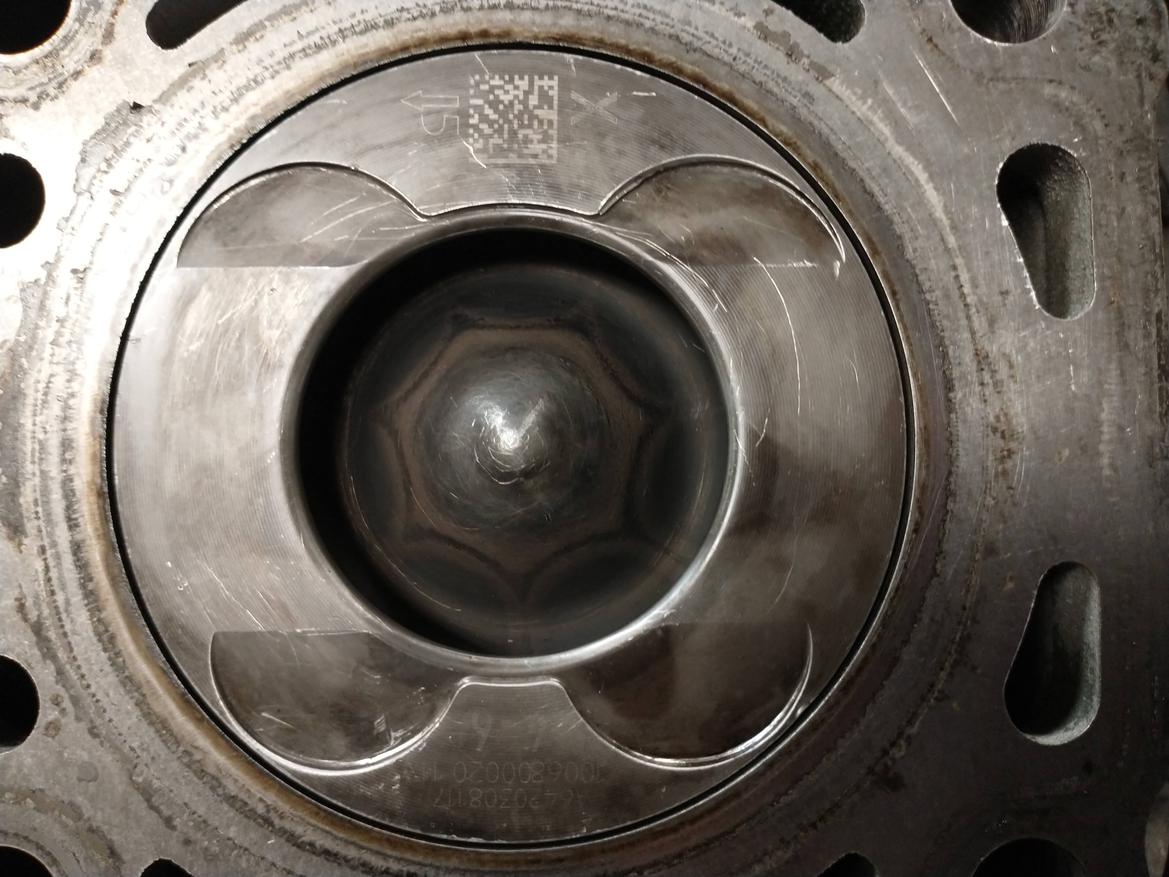
One last cool pic, note the excellent injector patterns still printing on the piston bowls. A bad injector will leave a lopsided pattern or even burn the piston.


Next project, attempting cyl head and manifold sludge removal.


wae
wae PowerDork
1/18/22 8:54 a.m.

Looks like you're making great progress!

Tell me more about those motor mounts, though.  Of course, mine are oozing that goo all over the place and my assumption was that I'd just need to replace them because of that.  Is that grease available in a tube somewhere that they can just be re-filled and re-sealed?

Mine didn't get a lot of progress over the long weekend, unfortunately, due to a very hefty schedule of family-related things.  I do need to get after it, though, because I'm guessing that my AEM is going to be available soon, if not already.  According to the daily email from the post office, this is coming today:

wae
wae PowerDork
1/19/22 6:54 a.m.

I'm officially on a clock now: The "Authorized Emissions Modification" is now available and I have until October 21, 2022 to get that modification completed and submit my claim in the settlement.

I got the valves installed on the right head last night.  I remembered to install the valve seals this time.


wae
wae PowerDork
1/19/22 10:00 a.m.

*ring*

"Hello?"

"Hi, this is [some dude] from the Mercedes Benz recall center [blah blah blah].  Can I speak with William?"

"Yep, that's me"

"Oh great.  I was calling about the active recall for the Takata airbags on your 2012 Mercedes Benz GL350.  Do you still have that vehicle, sir?"

"Regrettably, yes"

"Oh.  Uh, well, I wanted to make you aware of the open recall on the..."

"Yep, I know about that!"

"Ah, I see.  Could I help you in setting up an appointment to bring your Mercedes in for this free replacement?"

"Oh, no, I don't think so."

"[pause] Uh.  Er, why not, sir?"

"Long story short, it's because you guys can't make a diesel engine that's worth a damn anymore."

"I'm sorry?"

"Me too.  Look, at 125,000 miles the thing spun a bearing so I've been spending the last couple years rebuilding the engine.  So, I'm not quite ready to have that airbag replaced unless you're going to come to my garage to do it".

"Oh.  Gee, I'm sorry you're having to go through that.  Uhm, I'll take your name off the list so that we don't call you anymore."

---

Okay, maybe not a word-for-word transcription of the phone call I just had, but it's pretty close.  The local dealer advertises that they'll come get your car for service so you don't have to take it in.  I've been sorely tempted on more than one occasion to have them come on out to pick up der Scheißwagen for the recall just for the laughs....

Pete. (l33t FS)
Pete. (l33t FS) GRM+ Memberand MegaDork
1/19/22 10:25 a.m.

In reply to wae :

I honestly hope the R53's airbag gets recalled, so we can tow it to the Mini dealer and see their reaction.

Agent98
Agent98 Reader
1/19/22 10:39 a.m.

Great progress on an impossibly complex job...any ideas why this engine sludged up so badly? I guess that's why you didn't buy a JY engine, they'd all be the same way....

wae
wae PowerDork
1/19/22 10:50 a.m.

In reply to Pete. (l33t FS) :

I have also considered doing that!  If it fit on the trailer, I probably would have already....

wae
wae PowerDork
1/19/22 11:11 a.m.

In reply to Agent98 :

Okay, so I'm the guy that they tell people to avoid at parties because I'll look for any excuse to bring up the OM642 and talk about how awful it is.  Well, that's not the only reason, but it's a big one.  So, basically, this is your fault....

I don't have any scientific information or testing methodology to back this up, but I think it's primarily caused by the ancillary equipment that they needed to put on to this engine in order to meet the diesel particulate and NoX emissions regulations.  To respond to your second statement first, I do not believe that there is any such thing as a "good used engine" when it comes to the OM642; they're all like that.  They all tend to suffer from lubrication failures and premature wear of the rod and main bearings.  Anecdotally, it seems like the #2 rod bearing has a higher rate of failure, but it seems relatively common to find these engines with ruined crankshafts.  One theory that I have is that the oil formulation that they require makes compromises between longevity and lubrication abilities versus what it breaks down to when it gets burned and sneaks into the exhaust.  That's exacerbated by the 10,000 mile oil change interval as well as the prone-to-leakage seals that they use throughout the engine and the way they burn oil.

Which brings me to your second question: why did my engine sludge up?  Again, this is something that happens to all of them I think.  And I think it is primarily because of the EGR.  That soot gets pushed through the intake and starts clogging things up everywhere.  It obstructs the intake valves which allows more oil to burn which causes more soot and so on.  Then you also have the PCV system that is prone to pushing fairly large amounts of oil into the turbo which then gets mixed with the EGR soot.  That goo clogs up the intake passages and then the intake manifolds themselves.  The intake manifold has these little butterfly valves which the computer opens and closes to improve emissions.  That's the M55 swirl motor that breaks and puts them into limp mode all the time.  That motor breaks because the butterfly valves get clogged up with the soot and sludge and can't open and close any more.

Anyway, I'll get down off my soapbox now.  That may all be terribly misguided and wrong, but that's just like my opinion, man.

FJ40Jim
FJ40Jim New Reader
1/26/22 11:31 p.m.
wae said:

Tell me more about those motor mounts, though.  Of course, mine are oozing that goo all over the place and my assumption was that I'd just need to replace them because of that.  Is that grease available in a tube somewhere that they can just be re-filled and re-sealed?

IDK if the special schmegma can be stuffed back in the mounts. I doubt that it makes that much difference for NVH. The mounts are not sealed, and they don't fit perfectly against the engine block, so the goo is able to ooze out over time. Hopefully the Hi-Tork RTV will seal the reinstalled mounts to the engine block so no more of the goo will drip on the front differential on hot days.

Here's a silicon acoustic grease, if one is really into that sort of thing.

We haven't received AEM paper in mail yet, but are signed up on both websites.


FJ40Jim
FJ40Jim New Reader
2/5/22 12:51 p.m.

Update time:

The active intake manifolds have been cleaned of layers of sludge. In the process, a 3 gal turkey bucket of hot soapy water was fouled (slung the black soapy residue in the deep weeds), the solvent wash tank was fouled (drained & refilled solvent, replaced spin on filter), and the 5 gal bucket of Chem-Dip is noticeably funkier. The only tool that wasn't used to clean these things was the heated ultrasonic tank, because they wouldn't fit.

The swirl valve linkage on one mani had quite a bit of wear on the main arm where motion is transmitted to the 3-point link bar. I found a guy selling the OEM replacement arms on ebay, which are unavailable from MBUSA. Turns out, they are not available anywhere. What showed up in the mail was chicomm copy of poor quality with a counterfeit MB parts sticker on baggie. The one real bad arm was replaced, and we will revisit (discard?) the swirl linkage when the engine is desmogged someday.

The "Assembly Locking Elements" showed up from MBUSA. Swapped all those in, using the beam pointer type torque wrench so it wasn't necessary to reset the digital wrench 4 times on every rod. Here's a comparison pic between one of the bolts that I overtorqued and a new bolt. There was 2mm of permanent deformation on the old rod bolts.

There is a mysterious Crankcase vent valve on the back of the RH cylinder head. It is often blamed for oil consumption problems. Before spending $150 to replace the whole assembly, it was opened up to see what failed. Turns out nothing was failed in this one, it was just a little sludged. There is a red silicon diaphragm with a light spring pushing it open. Under high manifold vacuum it should suck closed, and under high crankcase pressure it should be pushed open. The default position is open. After cleaning it, an on the fly design change was initiated. Half a wind was cut off the spring, making it easier for turbo inlet suction to close the valve under high boost conditions. It was reassembled & tested, works fine.


Today we finally get to teardown a cylinder head & start cleaning those intake ports (Oh goody).

wae
wae PowerDork
2/15/22 1:13 p.m.

I've been stupid busy with all sorts of dumb stuff, but I did give the oil pump a good examination and got a consult from eastsideTim.  I've settled on using my original pump since it's got some scratching but it isn't "that" bad.  I also decided that I need to replace two of the new conrod bolts.  I think it was cylinder 3 that got a little munged and I'm not sure it made it through its final 90 degree angle cycle.  Having to use the breaker bar plus the angle gauge plus the 1/2" to 3/8" adapter plus the e-torx socket didn't give me a good solid connection to the bolt head and I didn't notice until it was too late.  So I'm going to go over to the local Merc dealer and pick up a couple conrod bolts.

Another part that I decided I didn't want to re-use was the timing chain guides.  I measured the chain itself when it was all assembled and it was in spec.  The tensioner is already brand new.  But one of the guides had a little bit of a chunk taken out of it, and they were all discolored, so I was worried about how brittle they'd be.  This came today:


I also got the timing cover prepped for reinstallation.  It was pretty nasty:

I didn't get it absolutely perfect, but the sealing surfaces are all cleaned off and the gunk is removed.

I was preparing to put that cover on, actually, as I was reading the "installation is reverse of disassembly" part of WIS, but it's a good thing I didn't.  I wasn't planning on cracking apart the timing chain for two reasons:  #1 I don't have the tool and #2 I'm a lazy son of a gun.  Once the timing cover is on, though, the timing chain has to be fished through and I don't know that you'd be able to do it without breaking it open.  I don't know, maybe you can - I didn't look real close - but it looked a bit challenging.

The crank timing & oil pump sprocket went in the wash tank to try to break up some of the carbonized crud that's on it.  It looks like getting the oil pump chain on is also easier if it's done before the timing cover goes on.

When I started this week out, my plan was to do some working from the shop to be able to get some of this assembly work done.  But today I've got a sick kid home from school, a car just showed up that either needs a new axle or had its brakes go out (I got both stories from the owner, so I have no idea wtf is up with that yet), my car and my wife's car both need oil changes pretty desperately, and a friend needs some rear shocks and a little more exhaust work.  Plus I need to work on the motorhome's 454 a little bit so I can get it ready to be put up for sale.

All that said, I'm going to try to make as much progress as I can.  The nice lady from the local Merc dealer did call me late last week though.  She asked if I still had my 2012 GL350 to which I replied "regrettably".  After a moment, she recovered and told me that I'm overdue to have my airbag recall done and that my emission modification was ready to be done.  I asked her if they would come and get it on a flatbed along with the boxes of parts and then flatbed it back to me.  Apparently that's a no.

BerryBeazly
BerryBeazly
2/15/22 6:20 p.m.

This post is insane. I purchased A '14 GL350 almost 2 years ago and now youve got me worried...

Is there a decent mechanic worth his beans that you guys can rely upon?

1 ... 13 14 15 16 17 ... 43

You'll need to log in to post.

Our Preferred Partners
5gEJB4vPMArH11X4EQcOzDAv0axNLJ7qjtVSlaNTNc5afa3ouCatcuqppYJjyrzI