dculberson (Forum Supporter)
dculberson (Forum Supporter) MegaDork
4/21/20 9:19 p.m.

I've had a pair of Superex 916 headphones for as long as I can remember. I'm not even sure where they came from, but for at least 25 years they've been kicking around providing me what I consider to be good sound. They're old school, with individual volume controls for each ear, have a stereo/mono switch on the side and are even marked "Property of the Library of Congress." They look about like this:

I say "about" like this, because I had begun this project before I started taking photos. That photo is of a pair of Telex 815 headphones, but as far as I can tell they are identical other than the brand. I don't know if Superex bought or was bought by Telex or if it's a government contract thing.

At any rate, I've found myself using them less and less in recent years, and hadn't touched them at all since my latest phone doesn't even have a headphone jack. Using them with my iPod was ungainly given the massive 1/4" connector compared to the tiny iPod nano that I have. I decided to see what I could do about making them more usable with modern equipment. Enter the coolest little module I've seen in a while:

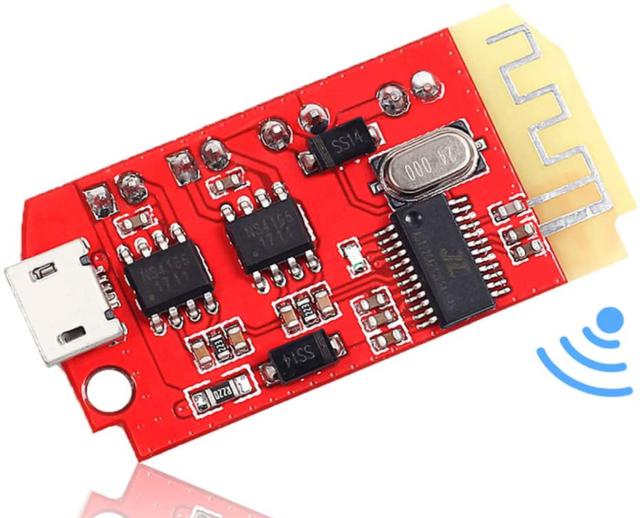
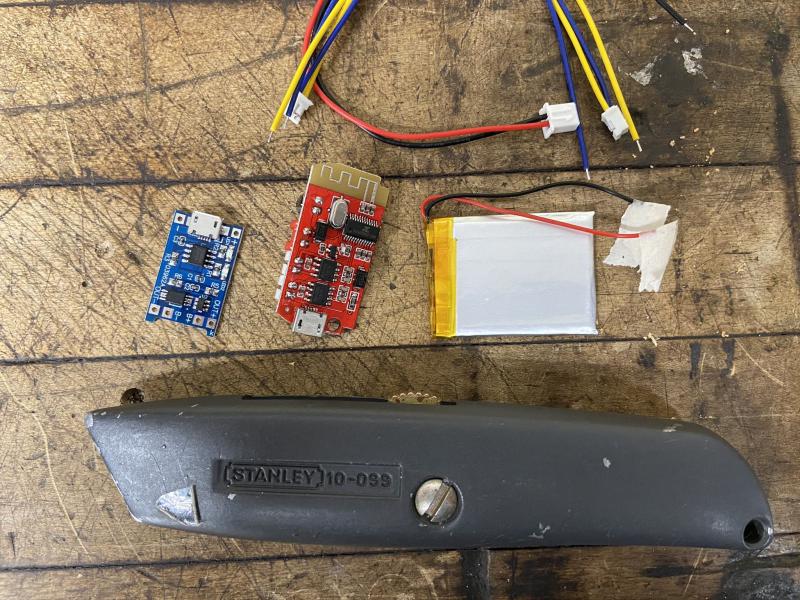
This little thing is less than 2" x 1". It's actually 40mm x 20mm. It takes in 5v power and has a bluetooth stack and outputs speaker level audio. It costs a whopping $11 or so. I remembered that I had an extra little Lithium Polymer battery pack from a dashcam repair I did previously. It's very compact and 400mah so would be perfect for this project. What the bluetooth module doesn't do, though, is charge or manage batteries in any way. To tend the battery you need a battery charger board. Enter this little wonder:

This is a lithium battery charger/protect circuit, and is even smaller than the bluetooth module, at 25mmx19mm according to the product page. They cost a whopping $1/ea or so and are sold in 5- or 10- packs. I really started to feel like this could work once I found those pieces, so I placed an order and they came in the other day. Here's the collection sitting on my bench with a utility knife for scale.

SO COOL. I had to test the bluetooth module out just to make sure I was happy with it prior to getting down to it. It has both a wire connection for 5V in and a micro USB connection, so I went ahead and hooked up USB and then put the speaker outs into some old bookshelf speakers I had lying around. I turned it on, paired it with my phone, and BAM it was playing music. Completely painlessly and so amazingly compact it makes my Minimus speakers look like giants:

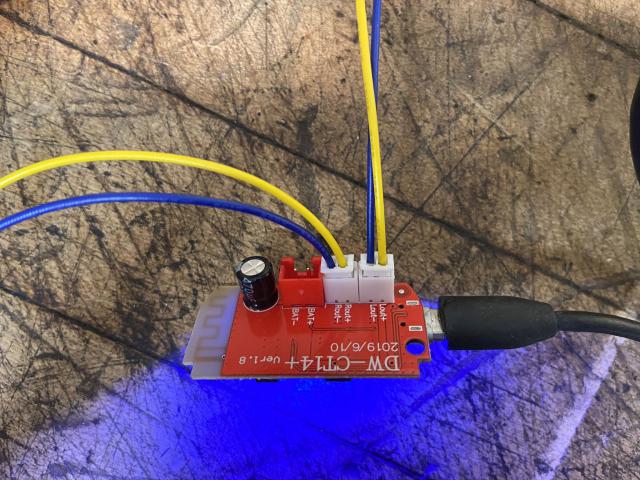
It sounded good, and after letting it run for the better part of an hour the electronics were still completely room temperature to the touch. Amazing. I think this might work!

dculberson (Forum Supporter)
dculberson (Forum Supporter) MegaDork
4/21/20 9:42 p.m.

Next I had to nail down the battery part of the project. Keep in mind while I've done a lot with electronics over the years, I've never used a lithium battery in a project. I had some quick learning to do! I read up on the charger module I bought and it's a TP4046 chip based module like any of a hundred different clones of it. They're all 1-amp boards, which mean they provide a charge current of 1 amp to the battery being charged. My LiPo battery is a 400mah unit and lithium batteries do not like to be charged faster than 37% (.37C in the parlance of our times) so it would be quickly cooked being charged at 1 amp. Fortunately these TP4046 modules have a current limiting resistor in the circuit that sets the charge rate. It's visible in this picture marked R3:

The astute among you might note that this is a sub-grain-of-rice sized small format surface mount resistor. Not a lot of fun for a home hobbyist to work with. Fortunately I do have a good soldering iron and what I lack in skill and experience I make up for in confidence. My soldering setup:

I looked up the resistor I needed and it was 10k ohms for a 130ma rate which is almost perfect for a 400ma battery (400ma x .37 = 148ma so it leaves a little safety factor on the table). However, while I have a large and very organized through-hole resistor assortment (who doesn't?), I don't have much in the way of surface mount resistors. OR SO I THOUGHT. I've got a ridiculous quantity of electronic components from years of tinkering and holding on to every surplus part that came my way and wasn't worth enough to sell. And I am not one to stop and wait for more parts to come in if I can possibly help it. I dug through drawers and boxes and boxes in drawers and BLAM:

A whole sleeve of new 10k ohm surface mount resistors. There! My hoarding - err - organized storing of hundreds (actually thousands) of electronic components for decades is totally justified by my being able to use this part that LITERALLY costs fractions of a cent new. (Digikey has them now, 13 million in stock, for $0.00134/ea. I don't think I've seen a part with 5 digits of precision in the price before.)

A few very fiddly moments with 3S wick desoldering the old resistor, put some dabs of solder on the board, then tin the new part, and then solder it to the board, then accidentally pull it back off with the soldering iron, then figure out a way to hold the resistor on with tweezers while also soldering it on, and booya:

You can see R3 is now a little sloppier, and a little bigger! Now for the moment of truth. Solder in the battery and fire up the charger is it gonna work??

Unlike most cars, in this case a red light is VERY GOOD! It's charging and I'm quite pleased. It can take some time to charge so at this point I cleaned up as much as I could and with quite a lot of hesitation left it charging for the night. I had visions of the amateur modified $1 charging board melting down and setting the LiPo battery on fire and burning down my workshop in the night, but all anxiety was for nothing because the next day a beautiful site was waiting for me:

The blue light means "fully charged!" And the battery wasn't swollen or warm or anything. Success! So I put everything together on the bench and fired it up:

Success again! As soon as I plugged the battery board output to the power in on the bluetooth module it powered up, paired to my phone, and automatically started playing music. I'm in love. At this point I essentially have a caseless bluetooth boombox and it's only cost me about $12 and a couple hours of my time. Next I get to try to shoehorn it into a pair of 40 (or is it 50?) year old headphones and make it so I can charge them and make it all look nicely finished.

dculberson (Forum Supporter)
dculberson (Forum Supporter) MegaDork
4/21/20 9:54 p.m.

Interesting side note, at least to me: I'm just now realizing that my amazing soldering iron (Metcal SP200), Panavice circuit board vice, AND the 10K ohm surface mount resistors all came from the same source. It was a liquidation auction for a local company called Welcome To The Future (WTTF) that was, in-house in Columbus Ohio, designing and producing prototypes of a 2-way interactive television set top box. When they went under, I attended the final liquidation auction and snagged two of the Metal SP-200 soldering irons and any electronic components that went for cheap. I sold all the components I could and hung on to whatever wasn't worth selling. Like resistors that are apparently worth 1/10th of a cent each.

The Metcal SP200 uses "smartheat" tips to set the temperature so there's no adjusting the temp with a specific tip. You swap it out for one that has the temperature range you want. The amazing thing about it is that it can sink a ton of current into a small tip without ever overheating and it can get up to temperature FAST, like less than 20 seconds and you're at full operating temp. They're made for production environments and honestly it's the one tool that has made my soldering a million times better. I'm never fighting the tool. New they were like a thousand dollars apiece or so, but I got them for $75/ea. Knowing what I know now, I would totally pay more but fortunately didn't have to.

Years later, I bought a huge lot of military surplus (like, 2-3 3' cube gaylord boxes full of small misc parts) and bizarrely there was like 25 or 30 of the tips for the SP200 in it. So I have as many tips as I could ever need, everything from small surface mount tips to wide chisels in a range of heat levels. Has anyone else ever been so pleased by a serendipitous find for their soldering iron??

Run_Away (Wears Clogs)
Run_Away (Wears Clogs) GRM+ Memberand Dork
4/21/20 10:52 p.m.

Slick!

Aaron_King
Aaron_King GRM+ Memberand PowerDork
4/22/20 8:34 a.m.

In reply to dculberson (Forum Supporter) :

Where did you find the BT module?  I have some speakers in the basement and need a new garage "radio", this would do the trick I think.

dculberson (Forum Supporter)
dculberson (Forum Supporter) MegaDork
4/22/20 2:39 p.m.

Oops! I meant to include links to the modules. The Bluetooth module I used was this one:

https://www.amazon.com/dp/B0796TJ9FT

i hope that link works. Make sure it's the 5w x 2 version. There are a couple more powerful variants listed as different "colors."

wheelsmithy (Joe-with-an-L)
wheelsmithy (Joe-with-an-L) GRM+ Memberand UltraDork
4/22/20 3:48 p.m.

Sweet build. So, these will be cordless bluetooth, old school headphones, yes? Nice.

barefootskater
barefootskater SuperDork
4/22/20 5:19 p.m.

This is awesome. I've been really wanting to build a BT speaker but too lazy to find out how on my own. Now I can just shamelessly copy your work! Fantastic!

stuart in mn
stuart in mn MegaDork
4/22/20 5:20 p.m.

Neat idea, I'll be following.   I have a pair of Pioneer headphones that were top of the line when I bought them in 1972.  They still work fine but it would be nice to get rid of the cord.

Aaron_King
Aaron_King GRM+ Memberand PowerDork
4/22/20 10:19 p.m.

Thanks for the link. Now I just need to decide which one to order and how to mount it. 

RichardNZ
RichardNZ New Reader
4/22/20 10:26 p.m.

I'm impressed ...  wil you please post a link for the charger board as well.

I have a little project on one of my trials bikes where an "on bike" charger would be really, really useful :-)

paranoid_android (Forum Enabler)
paranoid_android (Forum Enabler) UberDork
4/23/20 7:20 a.m.

So much good information here!

**Removed dumb question because I mixed up which board was which here**

I'm very impressed with what you did with the SMD resistor.  That is not an easy task.  In fact I've been thinking of testing a home brew method for reflowing SMD boards, but haven't found the time yet.

dculberson (Forum Supporter)
dculberson (Forum Supporter) MegaDork
4/23/20 8:18 a.m.

Dude, I'm so glad you guys get it. I was a little afraid the build would be scoffed at. I am, after all, modding headphones likely older than I am, and not even name brand ones at that. I should have known since my brand of weird is average here.

@wheelsmithy: Yes, these will be totally cordless old school cans. No external bits or bobs, they'll have a micro USB plug to charge and in addition to missing the cord those will be the only exterior changes.

@RichardNZ: This is the charger board I used:

https://www.amazon.com/gp/product/B082XJXQS6

There are literally dozens of different "brands" of the same board out there, though. Just look at the board visually and check for the "TP4056" chip in the description. The charger board is frankly kind of the coolest part to me, it lets you use any cheap Lithium batteries to power projects and handles all the charging and cell protection part of it for you. That is assuming you can run your project on the 5v output.

@Paranoid_Android: Thanks, I don't consider myself a soldering master but I do have a solid amount of experience and very good tools. Without the Metcal I don't know if I could have done it. Certainly the average pencil iron would not work, you would cook the board or the resistor. A nice Weller temperature controlled setup might work if you had the right tip. The tip I used looked about like this one:

clutchsmoke
clutchsmoke UltraDork
4/23/20 3:47 p.m.

I'm pretty sure in elementary school I wore those same headphones when it was time for listening/hearing tests.

Can confirm that is a nice soldering iron and good solder work! My work involves a lot of looking through a microscope and soldering tiny surface mount components. Several metcal solder stations here in the lab. 

dculberson (Forum Supporter)
dculberson (Forum Supporter) MegaDork
4/23/20 7:32 p.m.

Alright, so now it was time to tear down the headphones and see where I could cram this stuff. Oh, I also got to buy a new tool: Needle files. I figured that was probably my best bet for putting the micro USB sized hole cleanly into the headphone case. I would usually pick something like that up at Harbor Freight, but ordering is best right now. Amazon had them for just a few dollars more, same brand and all. The headphone cord entered on the left earpiece, and that's where the "amp" switch was (which turns the headphones from stereo to mono). So I figured I'd start on the left and hope to get everything in that one earpiece. The earpad is kind of stretched on vinyl with foam inside it and it came off easily enough:

There you see my files too. Then the case revealed itself to be two pieces of what looks like very thin vacuum formed plastic - the outer shell and an inner shell that serves as the speaker back plate. The two halves are held together with little metal spring clips. The headphones have also had a hard life, so have a few cracks in the outer housing that were hidden by the ear pads. No matter, that doesn't affect the sound and they're still structurally intact.

Spring clips off and the headphones came open easily enough revealing a very clean and simple interior:

Inside the can is the headphone cord entry on the left, followed by the volume slider, then "amp" switch, then the wires leading to the other earpiece. Looks easy enough to adapt for my needs! The speaker having a housing cuts down on the interior space quite a bit more than I expected, but it should still work. Next was pulling out what I didn't need any more like the cord and disconnecting the wiring between the earpieces and the amp switch:

Next I wired it up to the components while they were spread out on the bench, just to make sure I wasn't crazy and they worked OK with the headphones.

Success again! Sounds came out of the earpieces and all seemed good. So I decided to try making the micro USB hole where I pictured the charger living. I kind of fly by the seat of my pants when it comes to stuff like this. I probably should have used some modeling clay or something to check clearances but I decided to just eyeball it. A small drill bit and some time with a needle file and I had this:

A roughly micro USB sized hole where I wanted it. Test fit went well:

At this point one of the very fine wires on the little LiPo battery pack broke off at the charger board, right where it was soldered to the board! Fortunately it didn't short against the negative terminal, just broke clean off and fell clear.

dculberson (Forum Supporter)
dculberson (Forum Supporter) MegaDork
4/23/20 7:41 p.m.

To prevent more problems with the battery, I decided to put a leader and connector on it which would have the side effect of making the headphones easier to assemble and service. I dug out a monster 4-pin molex connector you might recognize as the female power connector for a 3.5" floppy drive. I figured out the hole spacing on the charger board was just right to line up with those pins. I didn't have any of the male connectors, but I did have this:

That's right, a wire wrap IC socket. ALSO from the Welcome to the Future auction, and ALSO something I've hoarded for way too long. The pins were the right size and were long enough to gently bend into a 90 and solder to the board like so:

and the battery (totally not floppy) connector:

It worked!! I soldered everything into the final config and crammed all the components into the case using foam double stick tape for the circuit boards and electrical tape for the LiPo battery. The coolest part, I thought, was that I reused the "AMP" switch to turn the bluetooth module on and off. The "on/off" legend even works great for it. View of the components:

Time to reassemble the case ... and tragedy struck. Like I said, I tend to wing it on measurements. The molex connector was too thick and kept the speaker from fully fitting into the housing now, so there was a gap between the outer and inner housing. Whoops! I had to give up at that point as it was super late, but not before resting the two halves together and trying them on without ear pads on the left headphone. They worked!! And they sounded pretty good!

dculberson (Forum Supporter)
dculberson (Forum Supporter) MegaDork
4/23/20 7:52 p.m.

The battery connector problem chewed at me the next day and I realized I had the perfect thing in the form of individual pin connectors from AT case drive activity LEDs that I'd amassed during my years as a PC Tech. Man, all these hoarded parts are actually useful! Suck it world, I shouldn't throw anything out! I had to cut off the molex connector and solder on the new connectors, again with leaders to keep from straining the tiny battery wires again. Unfortunately in my haste to get them buttoned up I neglected to take pictures of the new connectors. But they looked about like this:

Only with LEDs at one end instead of connectors at both ends. The new battery connectors did the trick and, while it was tight reassembling, it all went together! Glamor shots:

Now for the critical test... charging and listening. Charging is painless and worked great. The micro USB is solid and plugs right in and charges. I think the speaker housing wedging against it worked in my favor on that front - I was worried the double stick tape would give me some play on connecting the USB plug but it's solid. I switched on the power and it paired with my phone and started playing. It sounded good, EXCEPT there was an annoying hiss! The amp seemed great with speakers but when listening to headphones any nastiness is very noticeable. However, they were WAY TOO LOUD even with the phone turned all the way down. Turns out 5 watts is massive overkill for headphones. I realized I could just turn the headphone volume sliders all the way down and that did the trick - the volume was reasonable and the hiss was gone.

Oh, another super cool thing I discovered: the bluetooth module does bluetooth 5.0 and somehow it gets battery charge level info from the charger module and reports it to the phone, so my phone shows the charge level of the battery. Two hours of listening and it wasn't even down 1/4. My back of the envelope math suggested a 10 hour runtime with this battery and this amp, and it seems possible based on what I see so far.

Now for more extended listening and use to work out any bugs and see how I feel about the sound quality! More on that front soon.

paranoid_android (Forum Enabler)
paranoid_android (Forum Enabler) UberDork
4/24/20 9:01 p.m.

Nice job getting it all to fit in there, it looked like it was going to be a good challenge to fit it all in.

I really honestly love projects like this, and can relate to not posting them.  More frequently though I get myself stuck in a project and don't know enough to figure out the next step.

cmcgregor (Forum Supporter)
cmcgregor (Forum Supporter) Dork
4/24/20 11:23 p.m.

Awesome! Those came out really great.

You could probably sell those on Etsy and make $1/hour for your time! It would be a good use of hoarded electronics parts though.

RichardNZ
RichardNZ New Reader
4/25/20 2:45 a.m.

Outstanding job... I love being able to use up all the old e36m3 that I've got lying around to do cool things smiley

I looked up the amazon link (thanks for that) but they don't send south of the equator so I'll search on Alibaba direct...

KaraPelosi
KaraPelosi New Reader
1/29/21 10:18 a.m.

Hi...I had a couple of Superex TL-3 earphones back in the last part of the 70's mid 80's. At the time I got them I worked in the parts division of a mid to top of the line sound and gadgets store in Sunnyvale CA. We sold Superex, Koss, Sennheiser, Pioneer and numerous different brands of earphones. I attempted them all and of the pack, the TL-3s were the best sounding to my ear. I wish I actually had them yet the froth elastic ear cushions deteriorated and one channel built up a clatter. For quite a while I saved the cardboard support for the ear cushions however then during a move quite a long while back I lost them and afterward some time later threw the earphones. I have a couple of vintage Koss Pro 4As currently however couldn't imagine anything better than to discover a couple of the Superex TL-3s. I would gobble them up in a heart beat.

turnkey prototype assembly

You'll need to log in to post.

Our Preferred Partners
QYuUPEheZd9yQ0QCTbuwNyqdLR0aYp0L6OlycqDLXTdUDlokZLypwiP1gsYlw7ra