1 2 3 4
mccrimmon
mccrimmon New Reader
11/23/16 11:48 p.m.

Hello all.

New to the forum. Fellow co-worker is always talking about the GRM forum and you guys in general. He's even done the $2000 build challenge. Anyways, He's part of the reason I registered on the forum.

Now to my build. I've been wanting to convert my M3 over to V8 / 6 speed for a while and finally this year the right donor car just popped up at the right time.

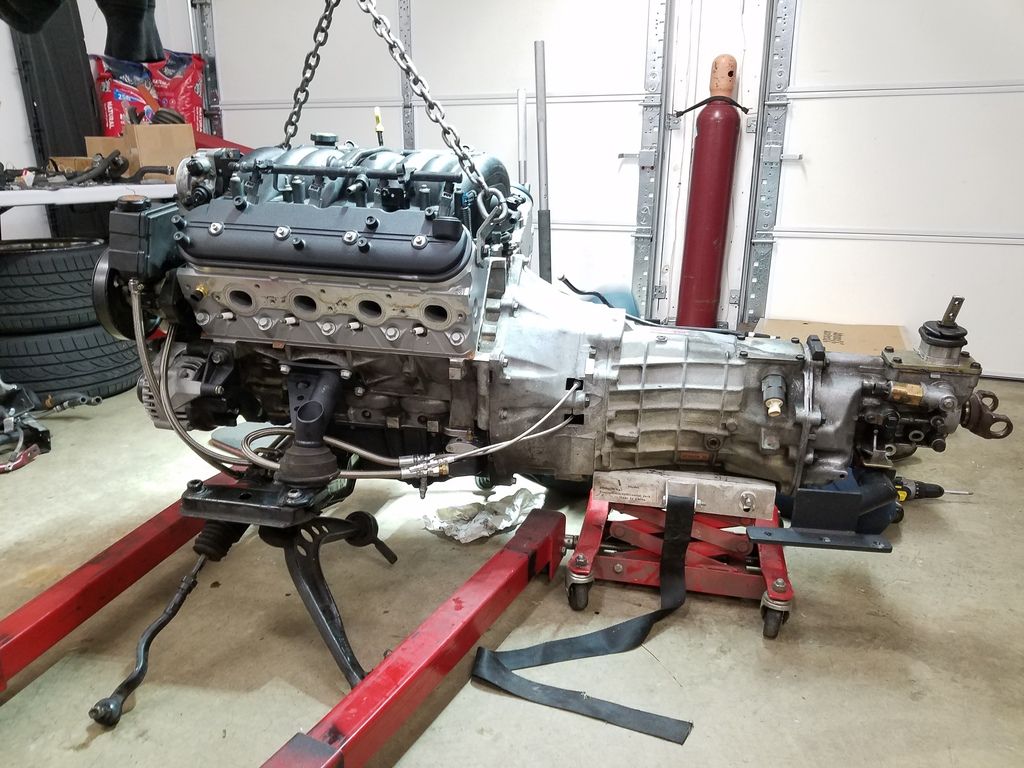
So, I bought it. 2001 F-Body Z28 with a T56 ... Bought it Aug 27th. Drove it for a few days. Beat on it like you should to make sure it was swap worthy. Good shifting T56. LS1 ran strong. So, Out the LS1 and T56 came about 6 days later.

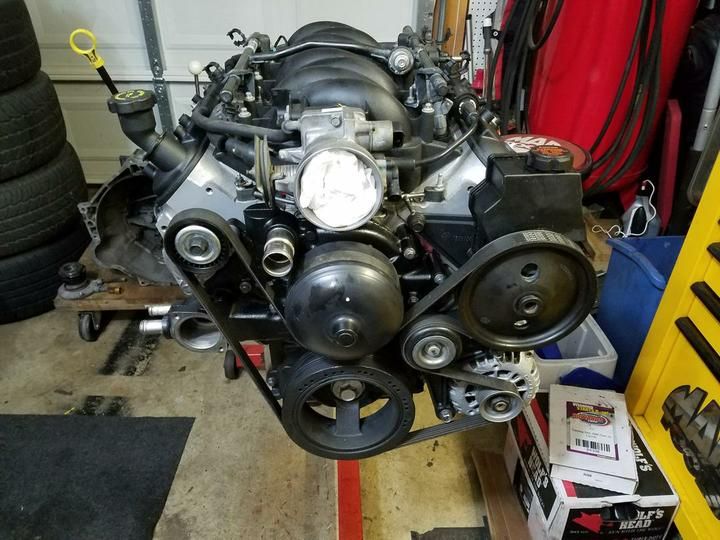
Pulled the LS1 down for inspection and the only thing I found wrong were oil control rings sticking. Scratch honed the cylinders. Cleaned up the pistons and installed a new set of rings and put it back together with ARP rod bolts. Three angle valve job on the heads. Cut them .015"...Howards Racing Components camshaft (.551/.551 lift, 216/224 duration, 114 lobe sep), beehive springs (.625 lift), retainers and pushrods along with LS6 lifters went in. Double roller timing chain as well. New lifter trays and LS6 head gaskets. LS6 oil pump. LS6 valley cover. Little bit of machining required inside the LS1 valley to clear the LS6 valley cover. Also installed an Improved Racing F-Body oil pan baffle to keep oil at the pick up tube. Also running comp cams 1.8 ratio full roller rockers with screw in studs and guide plates. Had to clearance the valve covers so the rockers would clear. Running a Fidanza LS7 flywheel and a GM LS7 clutch kit. Slave and release bearing set up is a Vorshlag kit.

Officially parked the M3 Nov 3rd and we started the swap that Friday Nov 4th.

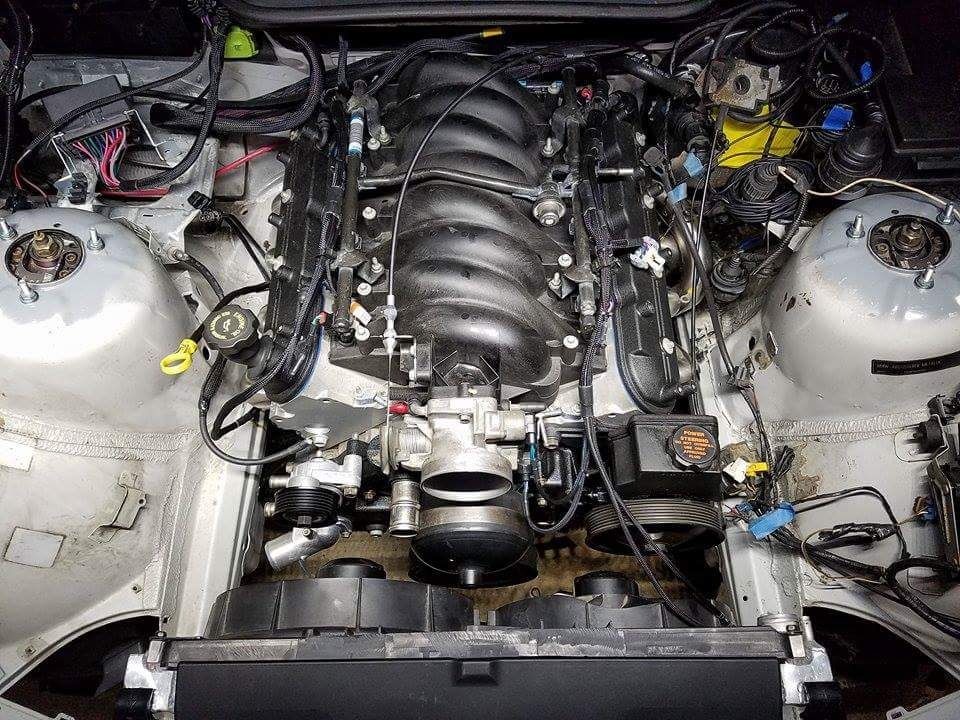
I will post progress as we go but so far so good. Using a new design swap kit the allows the engine to use stock S52 engine mounts. I upgraded my mounts to the Bimmerworld Group N mounts. The trans crossmember uses a standard T56 Prothane Motion mount. Shouldn't have much NVH from the V8 with this set up vrs the other kits on the market that use small urethane bushings.

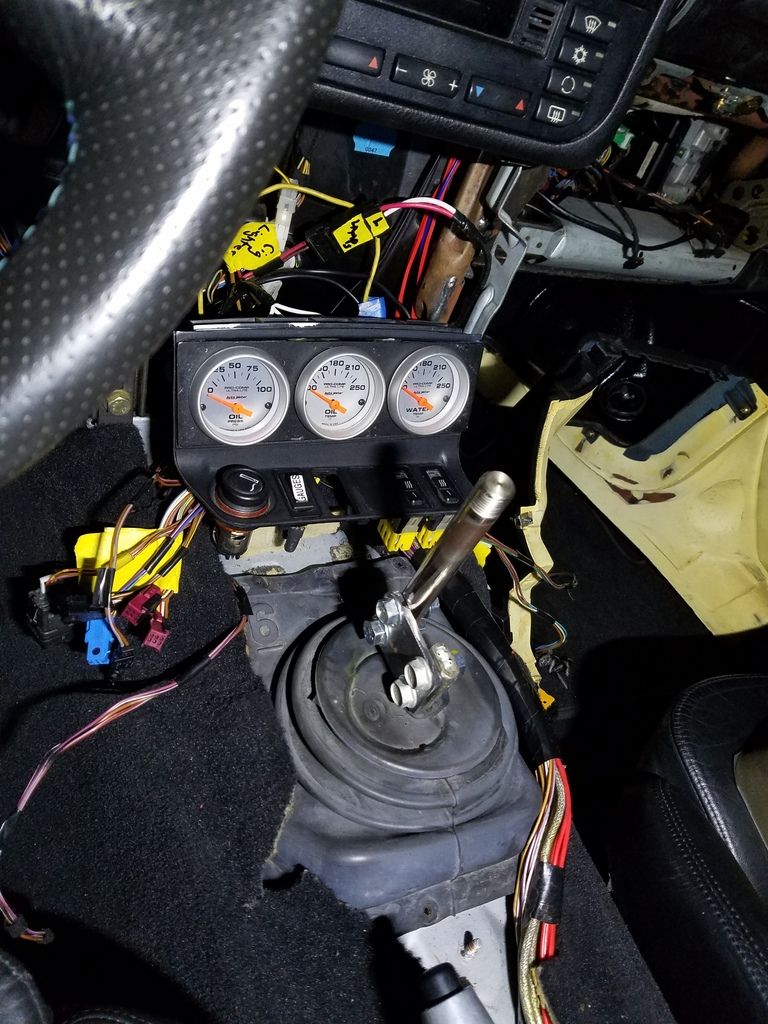
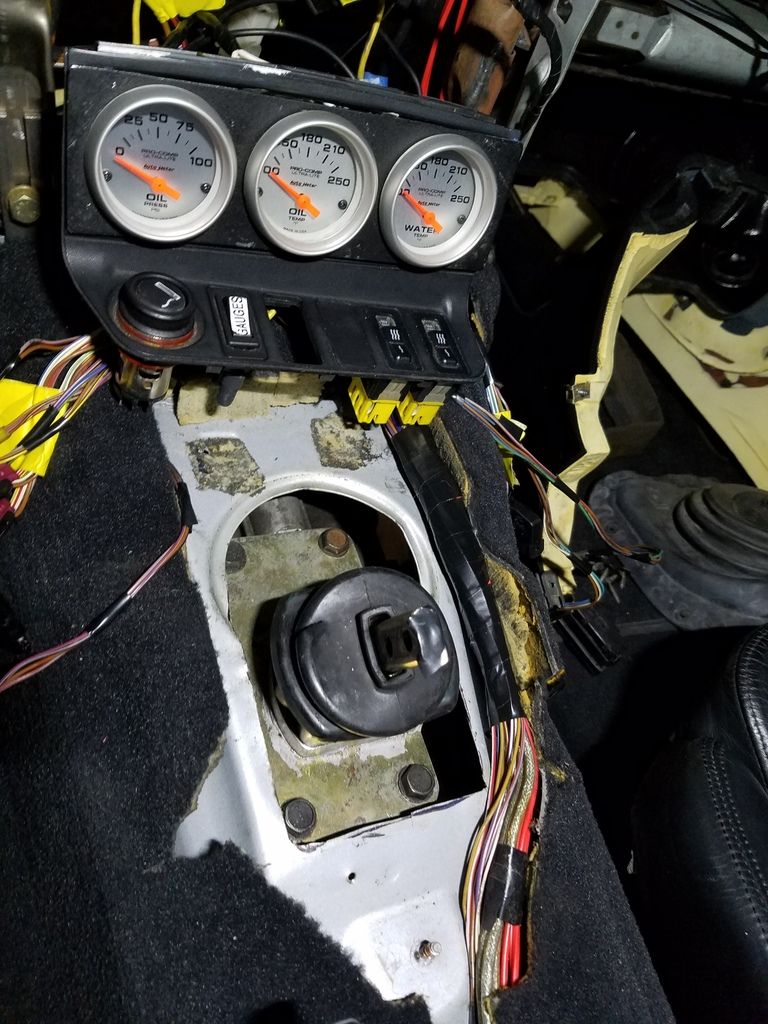
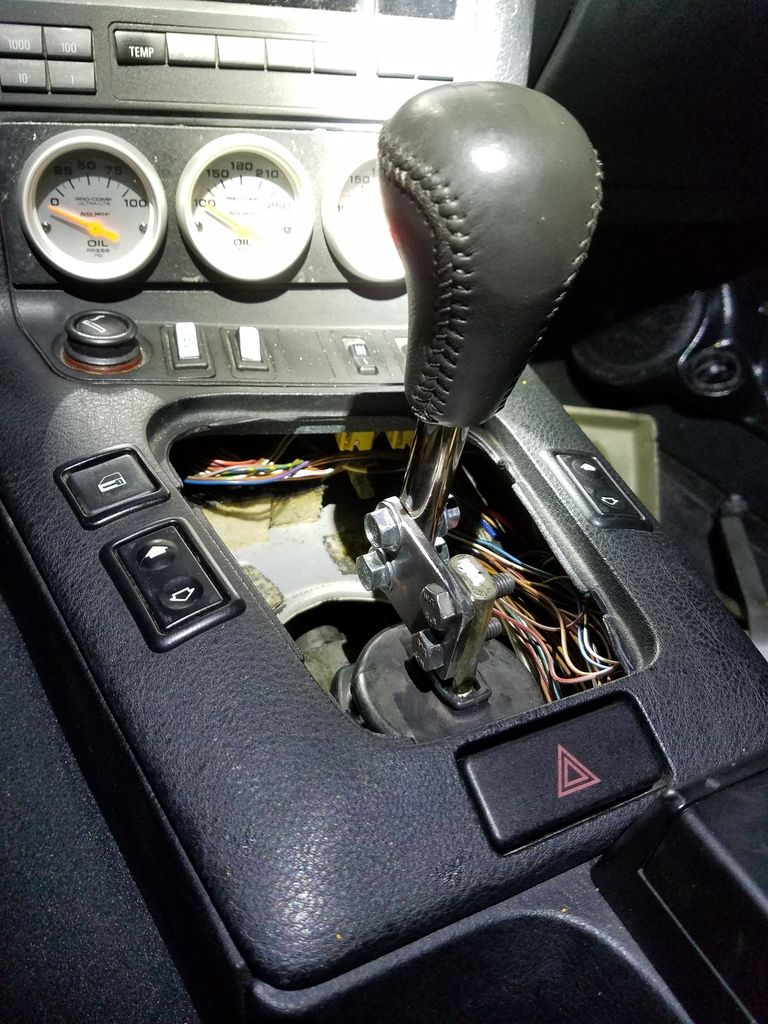
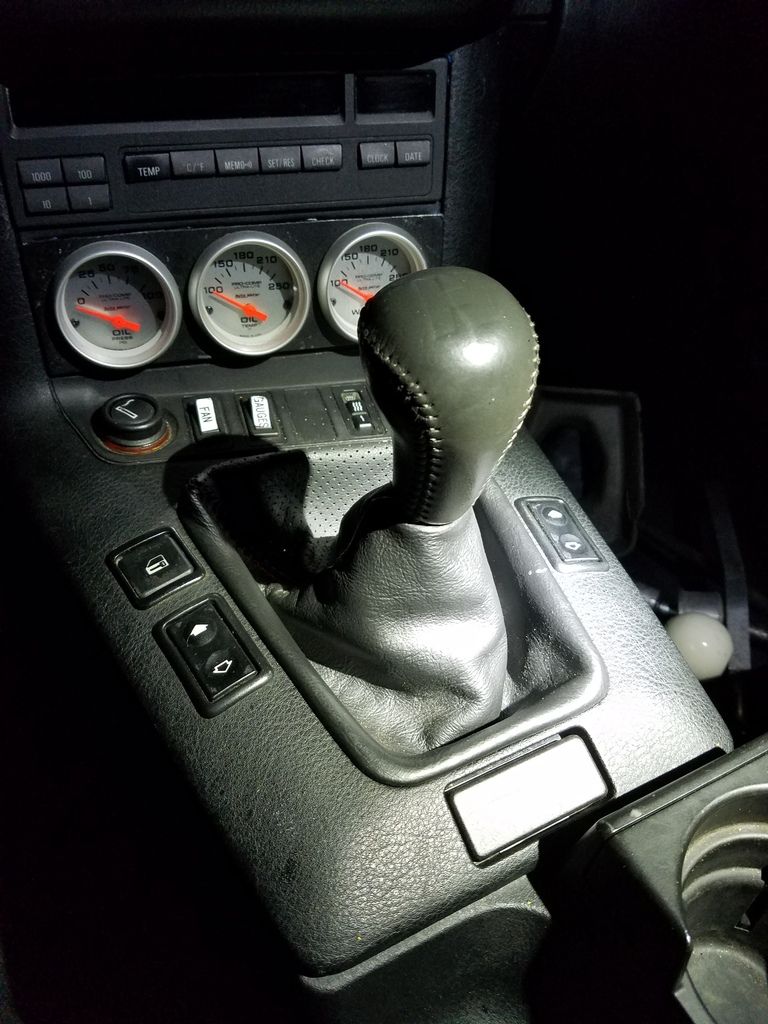
Trans tunnel shifter hole required very little changes to make the T56 Hurst short throw shifter come through the hole. Made a small bracket to move the shifter handle 1 3/8" forward and trimmed 1 1/4" off the handle height. The 6 speed shifter now looks like it was supposed to be there.

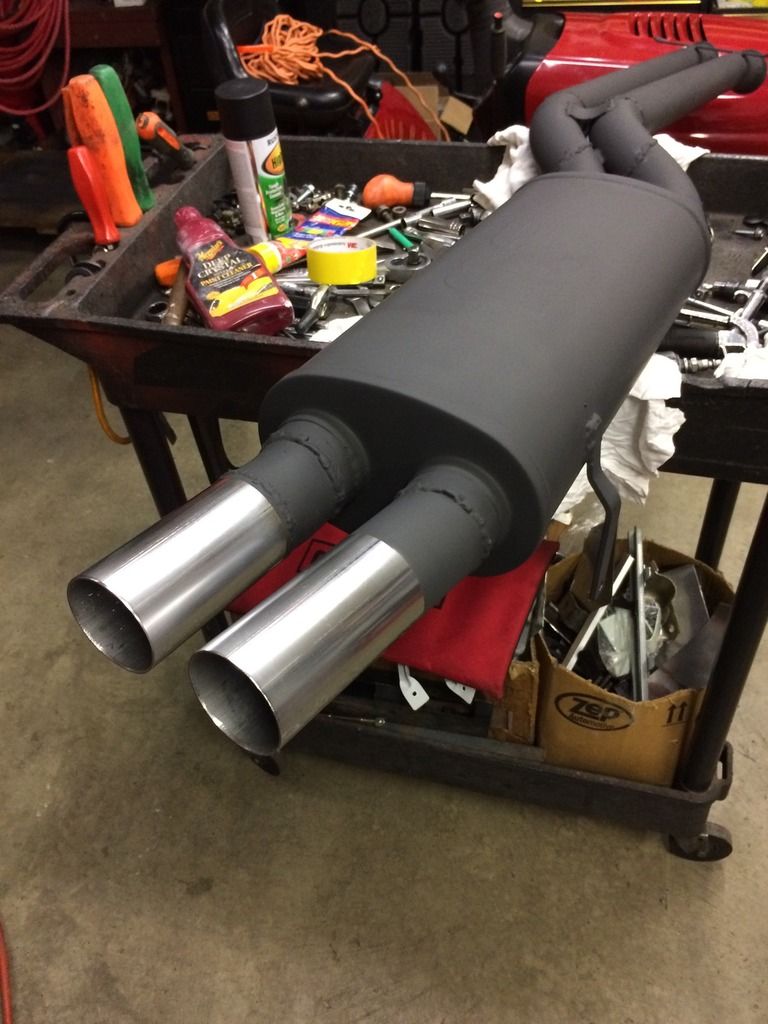
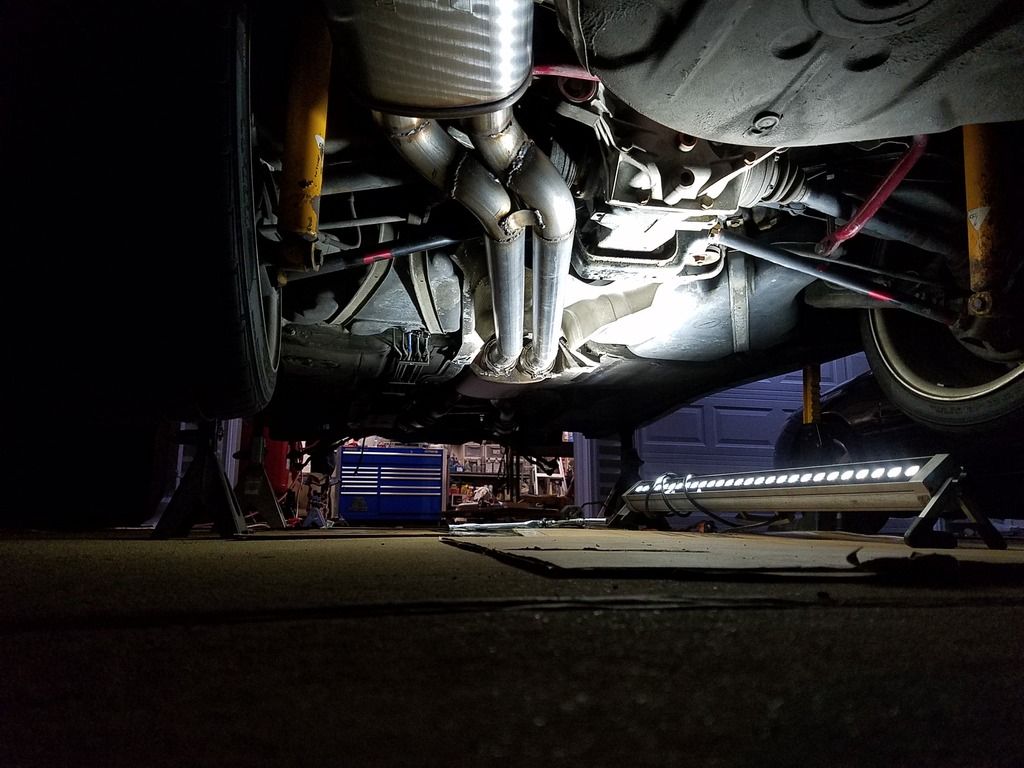
Using a pair of Sikky headers but I will say now I haven't been very happy with them. Wish I had the time to make my own headers. Their headers have required a good amount of modifying to work and I am going to have to change #7 primary a little to make for better plug wire clearance as well as spark plug service.

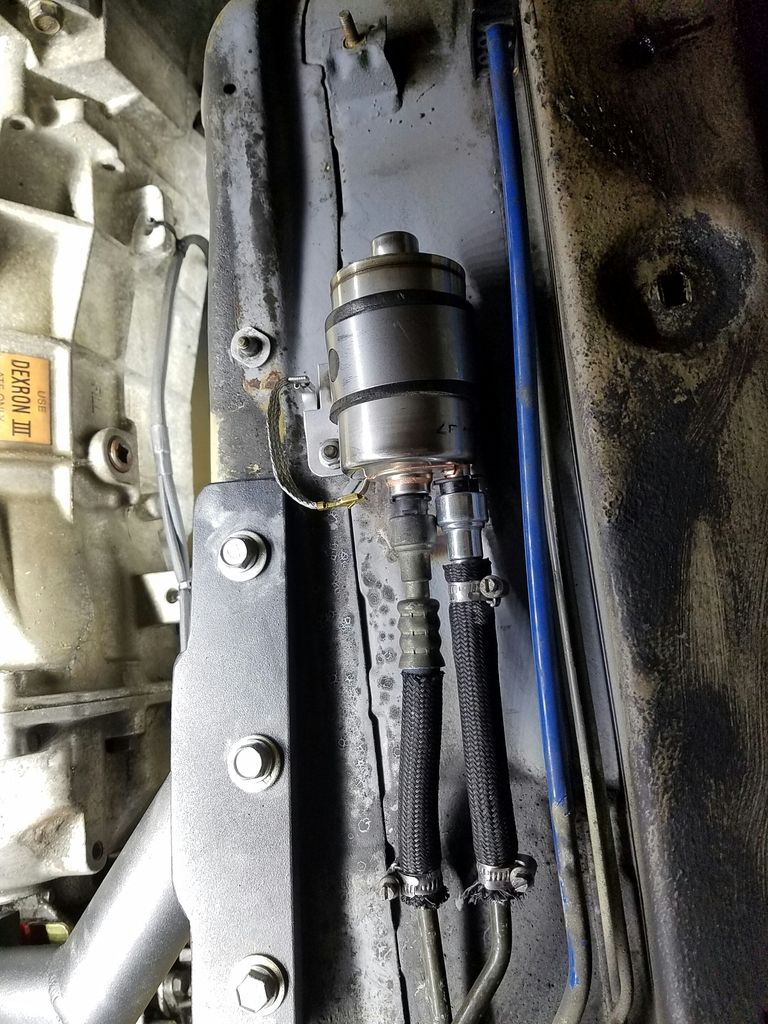
Using Vorshlag P/S kit and will be using their ABS pump relocation bracket. Will be making my own new brake lines though.

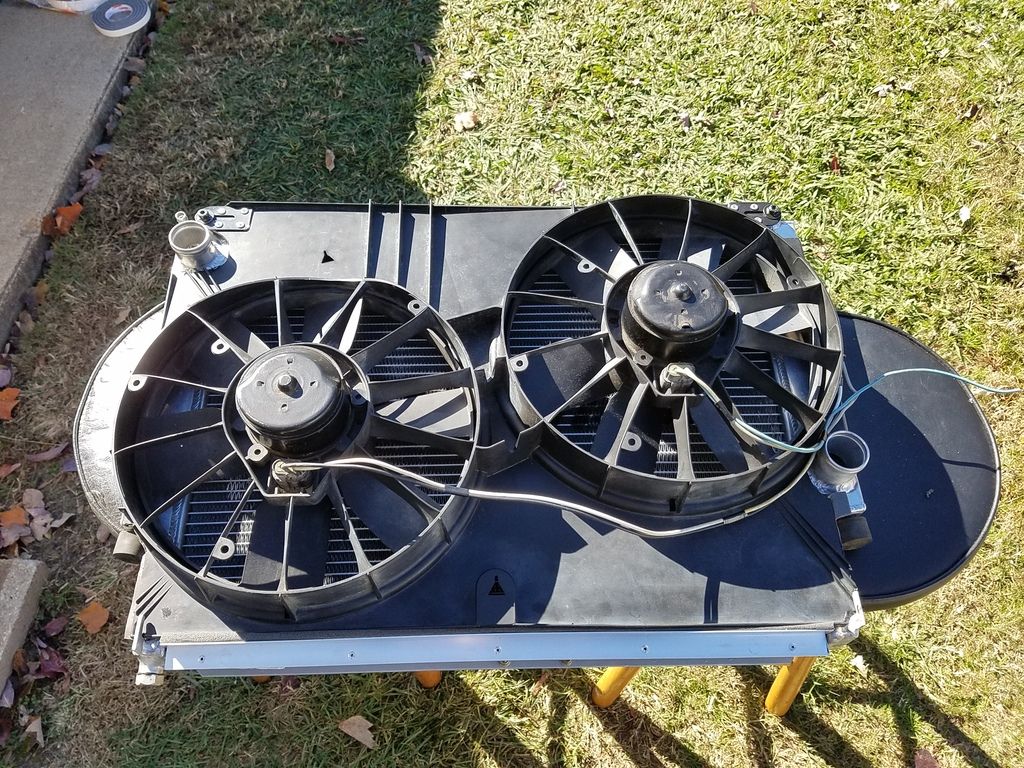
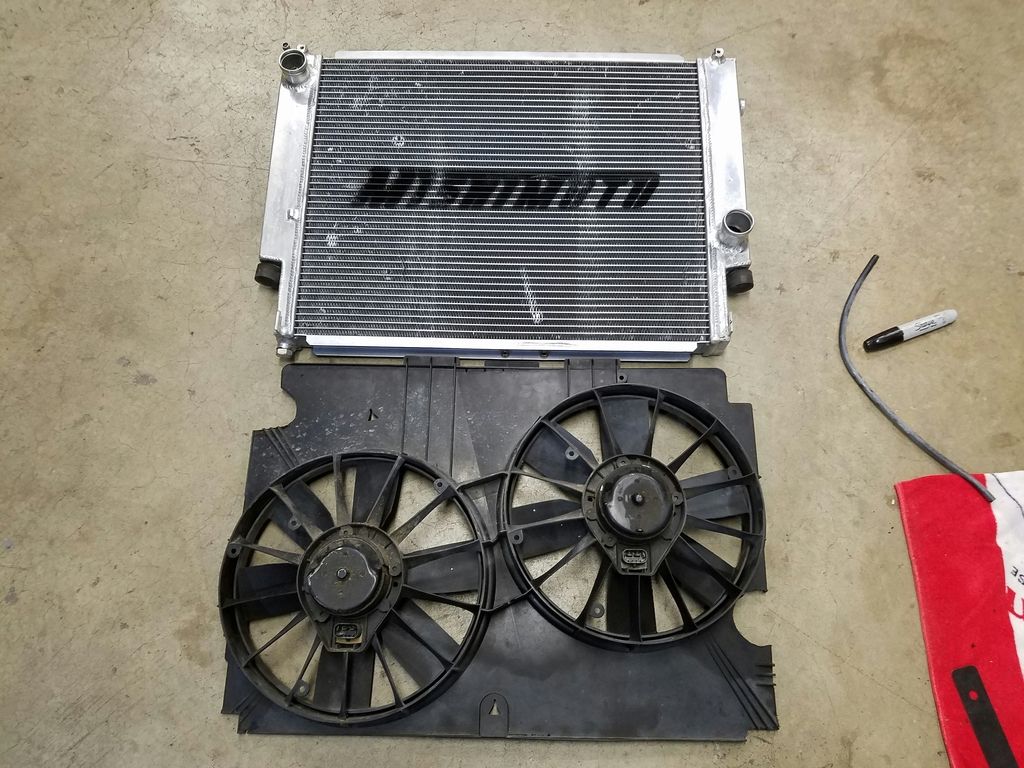
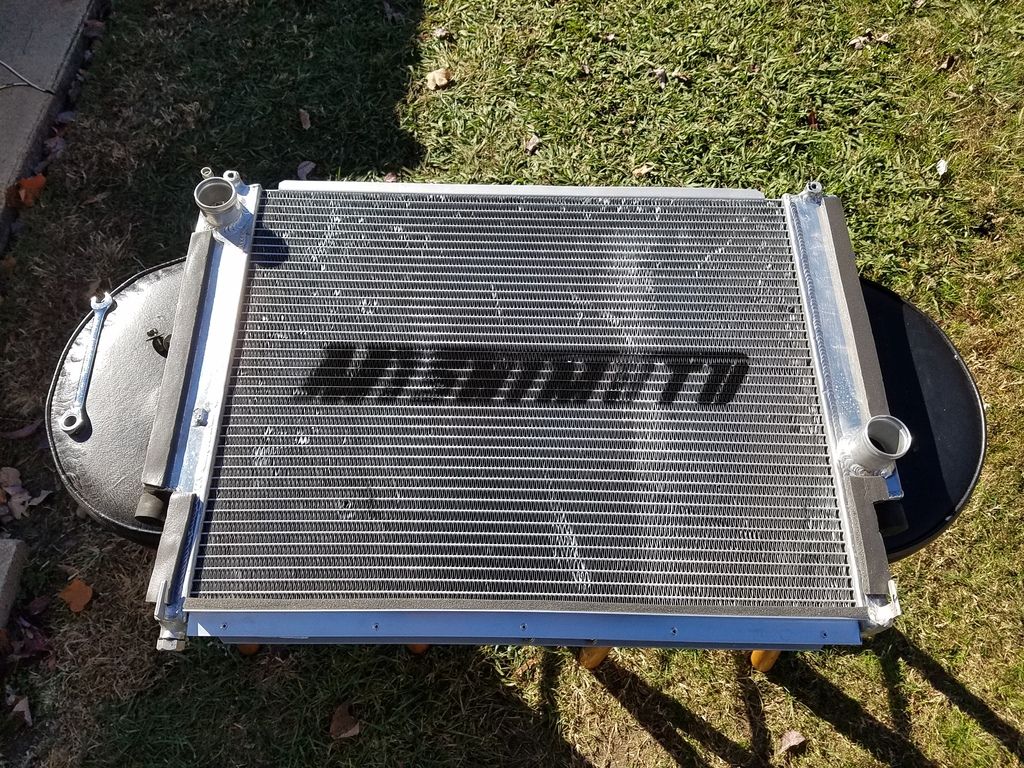
Used the F-Body cooling fans also. Modified the shroud to fit my Mishimoto Radiator. Used the F-Body shifter boot to seal up the trans tunnel as well.

Went with Wiring Specialties for their harness. Great deal at the right time with that as well and so far I'm very happy with it.

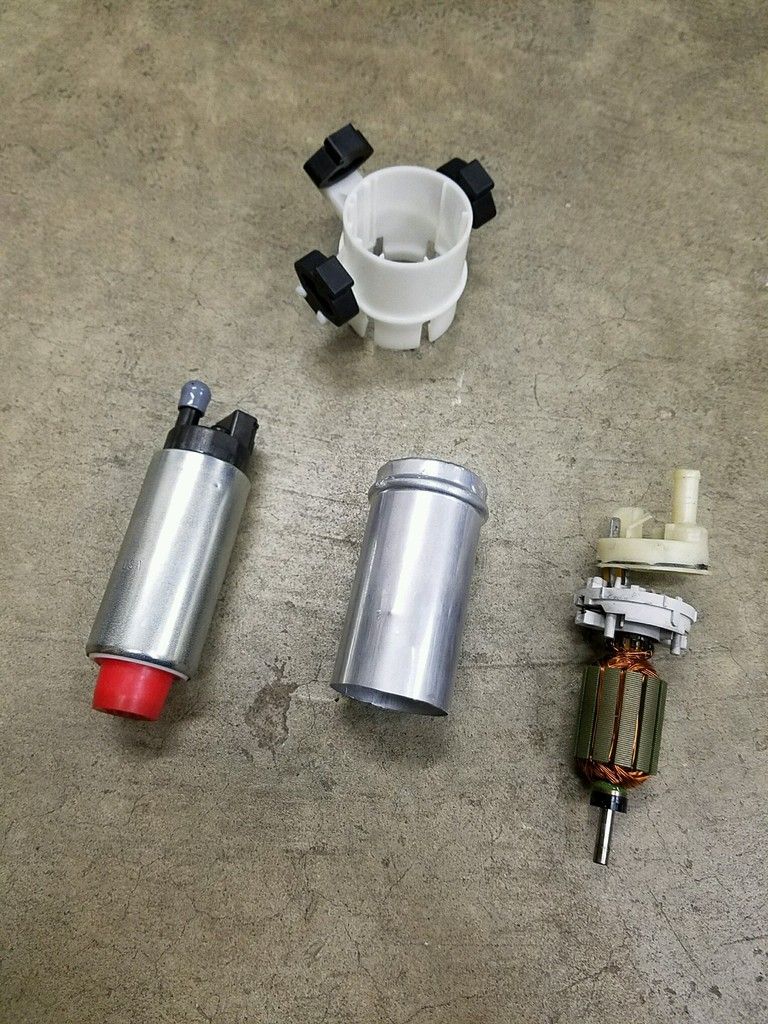
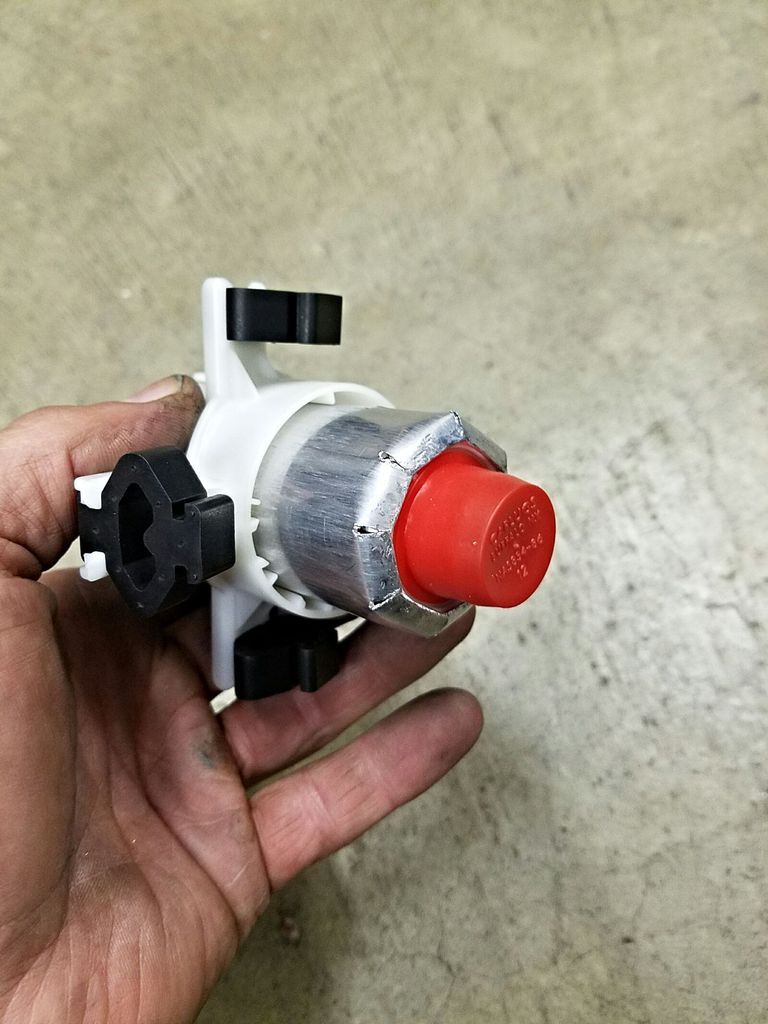
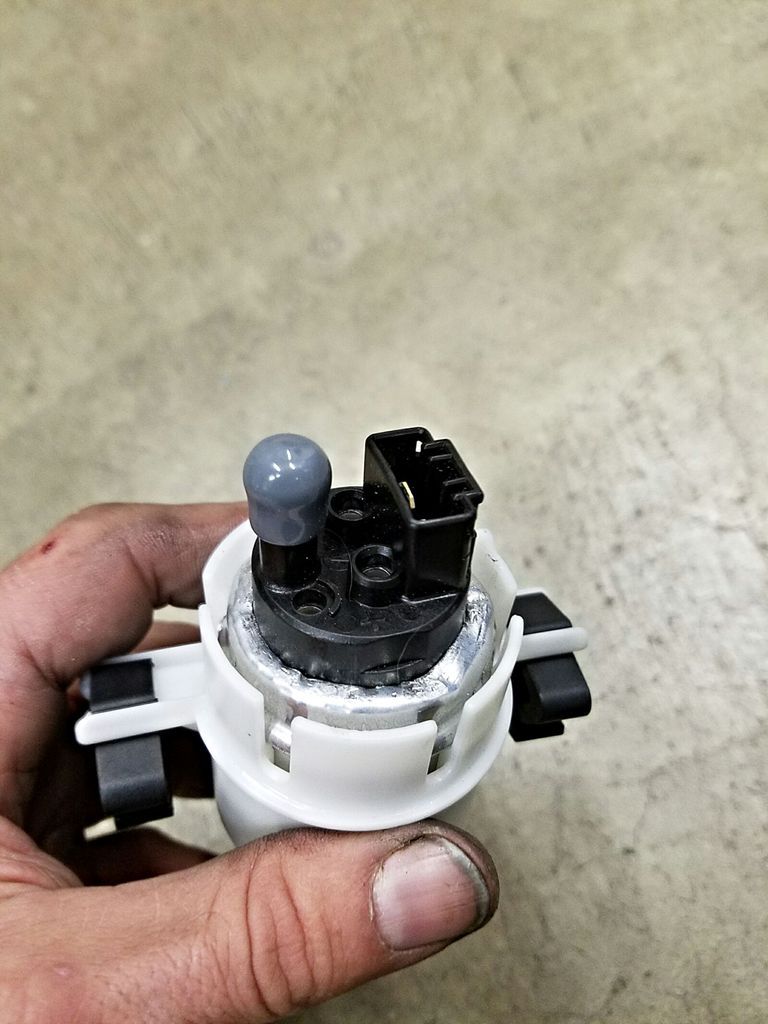
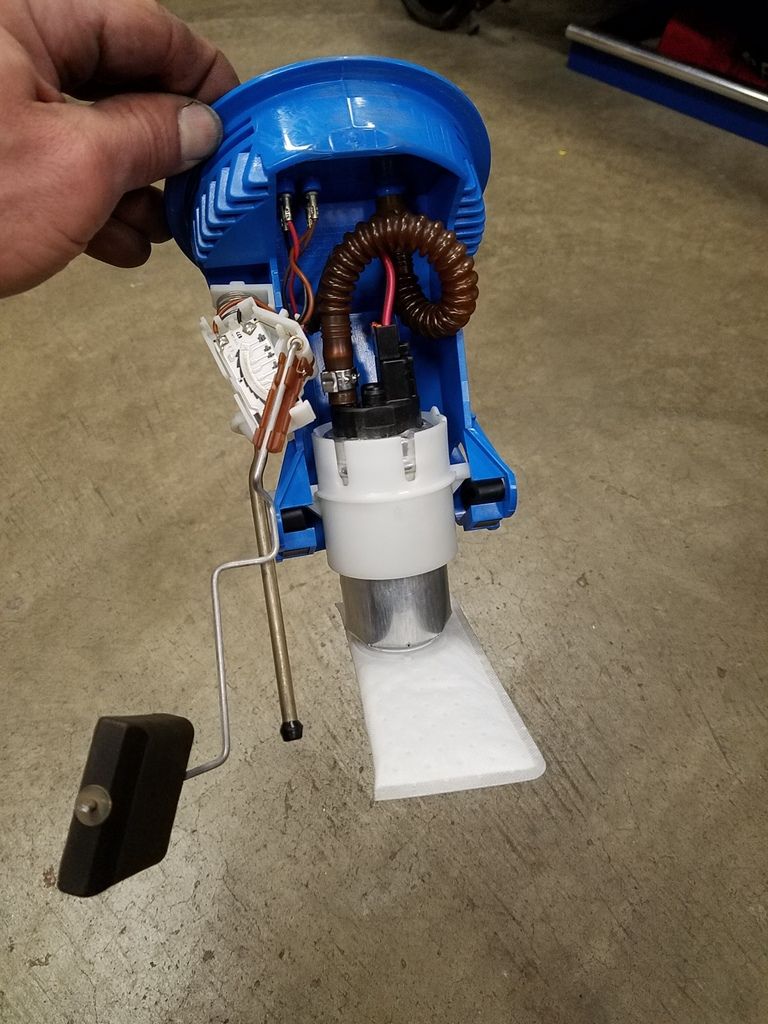
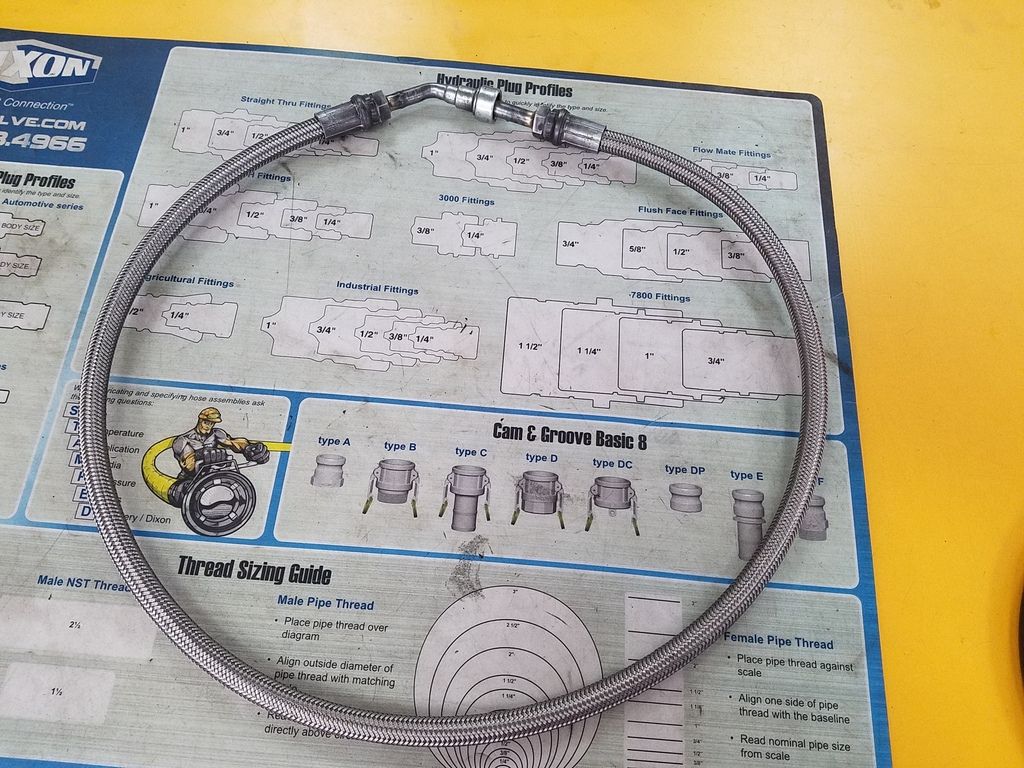
Used your basic C5 corvette fuel filter and cut, flared and knurled my feed line and installed the filter. Running a Walbro 255 lbhr pump and used the stock fuel pump case to hold it in place. Gutted the pump and the Walbro pump slid right into it. Rolled the top of the case and slit the bottom of the case in 8 places to fold those ends down to secure the pump but also be able to remove it down the road if needed. Saved the fuel line ends from the F-Body hard line as well as the fuel rail line and had a custom steel braided line made to run from the filter to my rail.

Anyways, I'll update the thread as I go. That's about where we are at with it now.

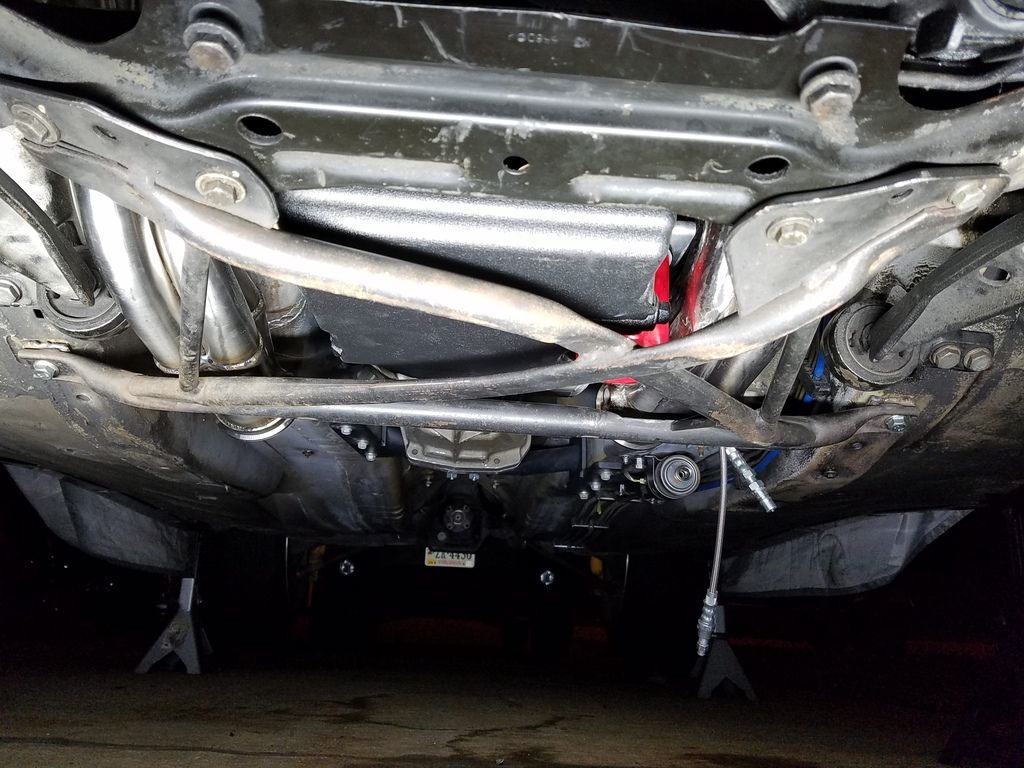
Modified the X-Brace to clear the header collectors. Sectioned it for clearance then welded 1/4" thick plate to close the section back up and also added 1/4" spacer at the 2 rear bolts. It's all painted now. This is mock up photo

F-body fans modified to fit the Mishimoto. Added a small "L" bracket at the bottom so I could seal that area up with foam.

mccrimmon
mccrimmon New Reader
11/24/16 9:30 a.m.

Fuel pump install into my assembly

Cut, flared and knurled my feed line so hose clamp had something to grab. Also saved the fuel rail quick connect ends from the F-Body and cut a section of the fuel supply hard line from the car as well and had the ends braised onto h/p crimp fittings and crimped onto 3/8" steel braided line to finish it up. Will find that picture and share it later

Custom made steel braided fuel supply line. Used the female quick connect fitting from the F-body fuel rail line and the male metal hard line and had them braised onto h/p crimp fittings for the braided line

mccrimmon
mccrimmon New Reader
11/24/16 9:34 a.m.

F-Body Fans to e36 Mishimoto Radiator

mccrimmon
mccrimmon New Reader
11/24/16 9:51 a.m.

Trans tunnel modification to allow access to the Hurst

F-Body trans tunnel boot fitted to my tunnel

Bracket we made to move shifter 1 3/8" forward. Also cut the lever down 1 1/4"

Mock up for shifter throw and boot fitment

dculberson
dculberson PowerDork
11/24/16 10:06 a.m.

Awesome! You're making great progress.

Huckleberry
Huckleberry MegaDork
11/24/16 10:24 a.m.

Very cool.

What headers are you using?

Will you be interfacing to the E36 dash or going with a tablet type or ... other?

docwyte
docwyte Dork
11/24/16 12:45 p.m.

That's a baby cam. I'd go with something larger. I ran a 226/230 .601/.601 in mine, made 400rwhp with a FAST 92/92 and shorty headers in my 951. Stock 241 heads...

mccrimmon
mccrimmon New Reader
11/24/16 5:01 p.m.
dculberson wrote: Awesome! You're making great progress.

Thanks!

mccrimmon
mccrimmon New Reader
11/24/16 5:03 p.m.
Huckleberry wrote: Very cool. What headers are you using? Will you be interfacing to the E36 dash or going with a tablet type or ... other?

Running Sikky Headers but I do not recommend them. Lots of fitment issues.

Harness I'm using is a direct link between the LS1 PCM and the 25 pin BMW chassis connector. Running BMW senders for water and oil. My cluster will work as designed once the PCM is flashed.

mccrimmon
mccrimmon New Reader
11/24/16 5:07 p.m.
docwyte wrote: That's a baby cam. I'd go with something larger. I ran a 226/230 .601/.601 in mine, made 400rwhp with a FAST 92/92 and shorty headers in my 951. Stock 241 heads...

Cool. Everyone has different goals in mind when they build their LSX. You never mentioned your lobe separation or intake centerline. Both affect idle quality and cam surge.

My 241 heads are cut .015" with 3 angle valve job and I'm also running large ratio 1.8 full roller rockers and stock length 7.400 chromoly pushrods. My lift is around .583 lift now. Didn't go crazy with the lobe separation as I don't care to have cam surge cruising down the highway in 6th gear.

My combo once tuned should be 375-385 hp and trq at the tire.

ebonyandivory
ebonyandivory UltraDork
11/24/16 8:36 p.m.

It's hard for me to find a more matched pair of car/engine. Especially ones that started life so far apart.

mccrimmon
mccrimmon New Reader
11/25/16 9:00 a.m.
ebonyandivory wrote: It's hard for me to find a more matched pair of car/engine. Especially ones that started life so far apart.

I agree with you 100% !! I love my M and once my LSX combo is all sorted it will be even more fun

docwyte
docwyte Dork
11/25/16 10:41 a.m.

Found a pic of my old cam card, it was a 230/234 .600/.601 111 center line, 115 lobe seperation.

This idled very well, passed emissions and pulled all the way to 7000rpm. Peak HP was peak RPM.

The Vorshlag headers are expensive but from what I understand, fit perfectly.

84FSP
84FSP Dork
11/25/16 2:20 p.m.

This looks like a very well thought out swap! Looks like you spent more on some quality swap parts up front, but bet it pays off for you. Some of us are merely human, not the super fabrication geniuses that some folks on the forums are.

You'll have to set up a bit of a rough running tally with dollars if it isn't too much hassle. Doing one of these into an RX8 is on my list of bad ideas....

mccrimmon
mccrimmon New Reader
11/25/16 6:08 p.m.
84FSP wrote: This looks like a very well thought out swap! Looks like you spent more on some quality swap parts up front, but bet it pays off for you. Some of us are merely human, not the super fabrication geniuses that some folks on the forums are. You'll have to set up a bit of a rough running tally with dollars if it isn't too much hassle. Doing one of these into an RX8 is on my list of bad ideas....

Thanks. I have been keeping track of cost. I made back a little over $2k on the donor car in parts. Paid $3500 for the whole car. So engine and trans wasn't terribly expensive. Also selling all the S52 parts that have been removed as well. Still have the built S52 to sell but rest of stuff is almost gone.

Yes, I bought a nice set of custom mounts from a guy in PA. Inexpensive too compared to other options. His mounts are the only ones I've seen that utilize the stock BMW S52 engine isolator mounts. His trans cross member is also one of a kind and extremely strong. It also uses a common tail shaft isolator mount that can be had at many speed shops. I did buy headers and a harness as well but the rest of the stuff I'm doing myself.

We should be starting the header back exhaust build this weekend. That we are also doing ourselves. High flow cats, dual 2.5" exhaust all the way back breathing through one Magnaflow X-Core muffler in the center and one more X-Core muffler in the back. Uses V-Band flanges at header collectors and another set just before the rear diff so the mid pipe can be removed easily down the road

docwyte
docwyte Dork
11/26/16 6:14 p.m.

Make sure to have an X pipe in your exhaust somewhere up near the front

mccrimmon
mccrimmon New Reader
11/27/16 6:26 a.m.
docwyte wrote: Make sure to have an X pipe in your exhaust somewhere up near the front

No worries. That's what the X-Core center muffler is for. Provides the cross flow to equal out the scavenging from both banks and provides an extra muffler to keep interior noise down.

mccrimmon
mccrimmon New Reader
11/27/16 6:46 a.m.

We started the header back exhaust build last night. I was originally going to build dual 3" all the way out since the header collector flanges and the cats I'm using are 3" but decided to go down to 2.5" for better fit and clearance. We could've made 3" work but the 2.5" will still breath plenty and fitment isn't as time consuming.

I bought two 4' sections and six "U" bend pieces along with the 3" cats to build the header back exhaust. The U-bends give me plenty of options for the small turns needed and extra straight sections as well. Also bought two 2.5" v-band clamps so I could make the mid pipe a removable section for ease of installation and removal down the road for service.

I was originally going to use your standard X-pipe after the trans where the pipes come back side by side and run 2 short resonator pipes after that to reduce inside noise but decided to just go with a smaller X-Core Magnaflow instead. Takes care of the X-pipe needed in the center as well as reducing the sound like your traditional resonator would.

Not finished yet but the mid pipe is almost complete.

Cut small pieces of 3/4" thick wood trim from some left over home projects and taped them to the muffler for proper clearance away from the undercarriage. Also still using the stock heat shield that separates the exhaust from the driveshaft tunnel. It's tucking up nicely so far.

84FSP
84FSP Dork
11/27/16 10:22 a.m.

Tricky setup to allow the crossover I'n a muffler. You'll appreciate a bit quiter drive as well.

mccrimmon
mccrimmon New Reader
11/27/16 7:51 p.m.
84FSP wrote: Tricky setup to allow the crossover I'n a muffler. You'll appreciate a bit quiter drive as well.

Yep! The car is a daily driver mostly for me. Love the car and it's a blast and will be even better when the conversion I finished. It's killing me not to be driving now as it is.

Exhaust 90% complete. Have to correct an issue with the driver side header, finish the center hangers and ad tips to the rear muffler.

Couldn't be happier with the fit. We tried to keep the bends and transitions to a minimum. The V-Band flanges are working out nicely as well. It all comes apart great!

Bought two 4 foot sections, six U bends, two more v-band flanges, the 3" cats and the two X-core mufflers

We ran out of daylight. Will get a better picture once complete during the day

Will be out of town for this week so not much happening with the build till we get back.

docwyte
docwyte Dork
11/28/16 8:47 a.m.

No flex joints? Also, I needed far larger cats on mine to pass emissions here in Colorado. I used the largest 3" Magnaflow cats I could find. I also V banded them as I dropped them out when I was on the track. The aftermarket cats burn out quickly.

mccrimmon
mccrimmon New Reader
11/28/16 9:45 p.m.
docwyte wrote: No flex joints? Also, I needed far larger cats on mine to pass emissions here in Colorado. I used the largest 3" Magnaflow cats I could find. I also V banded them as I dropped them out when I was on the track. The aftermarket cats burn out quickly.

It will be fine as is, thanks. Current exhaust had no flex joints. F-body had no flex joints. Good friend of mines 448/472 to the wheels LS6 powered 1st Gen Miata had no flex joints and he drove it 5 years with zero issues and hurt a lot of feelings in the process. My exhaust is supported by the same hangers as the S52 and my engine mounts are the Group N Mounts. Will also be running an engine torque arm with a hyme joint too. All will be fine

mccrimmon
mccrimmon New Reader
12/15/16 6:53 p.m.

Few more things sorted on the swap. Progress has slowed a little due to holidays and cold weather.

I went over last Sunday when we got back from a short vacation and I mocked up the intake and got it pretty much done. Last thing I'm going to do is build an enclosure for the air filter. The MAF will bolt directly to the enclosure box and the filter will attach to the other side inside the box. Used my Dinan CAI from the S52 as my intake.

The elbows came from intakehoses.com and worked well. 
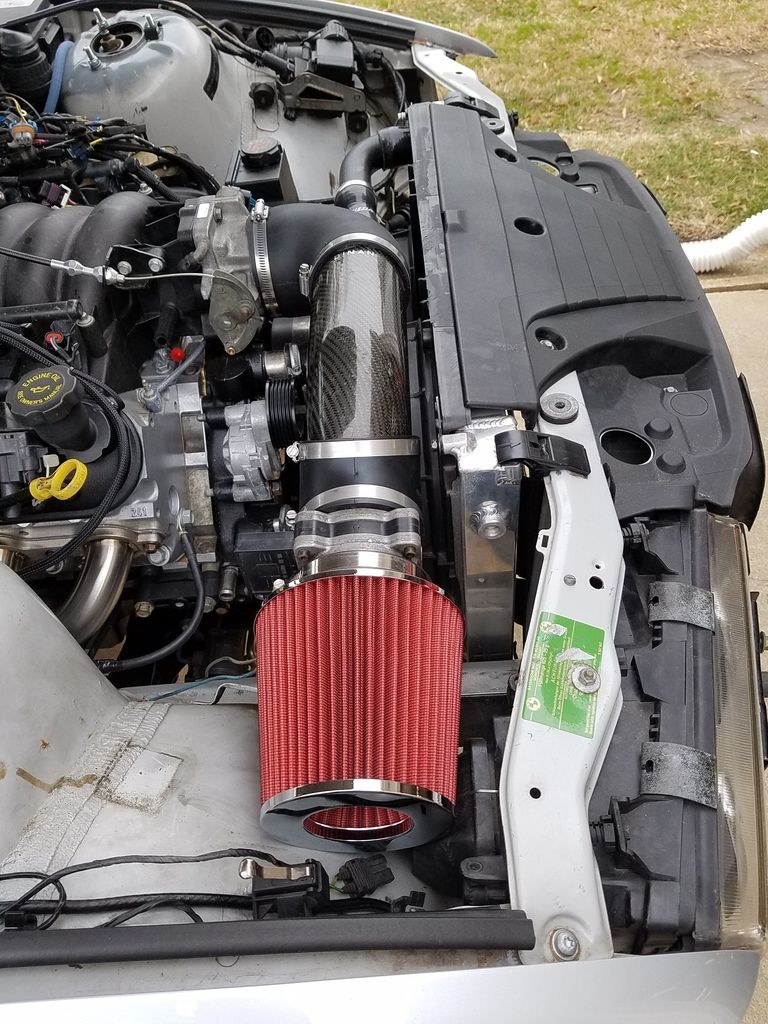
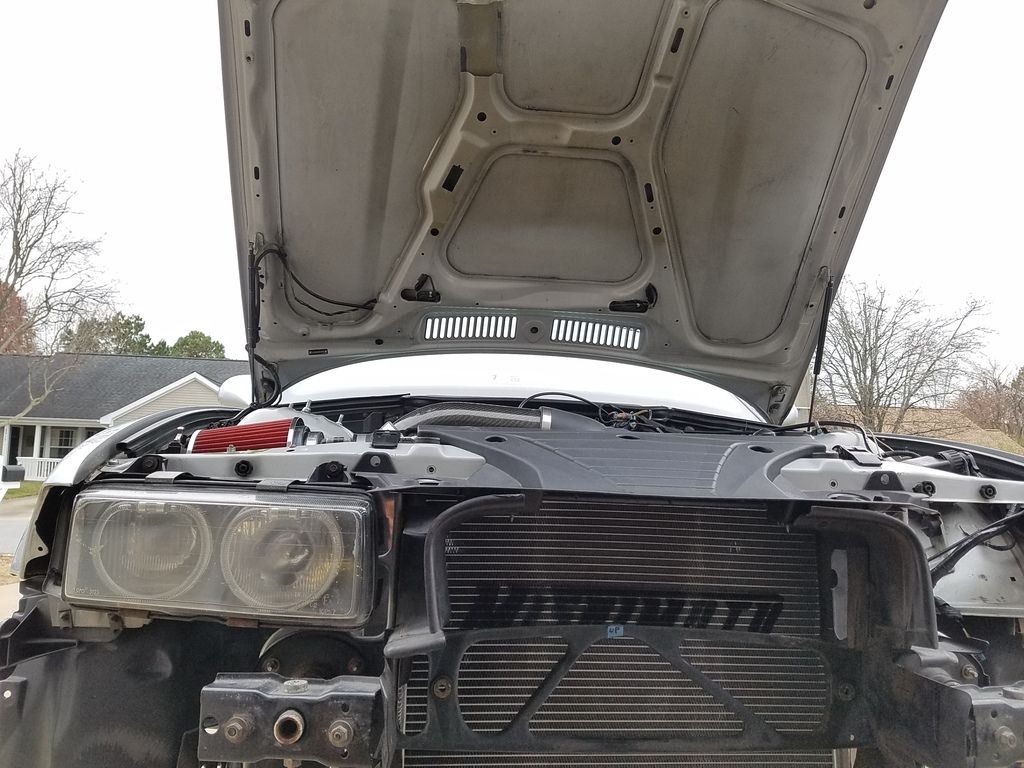
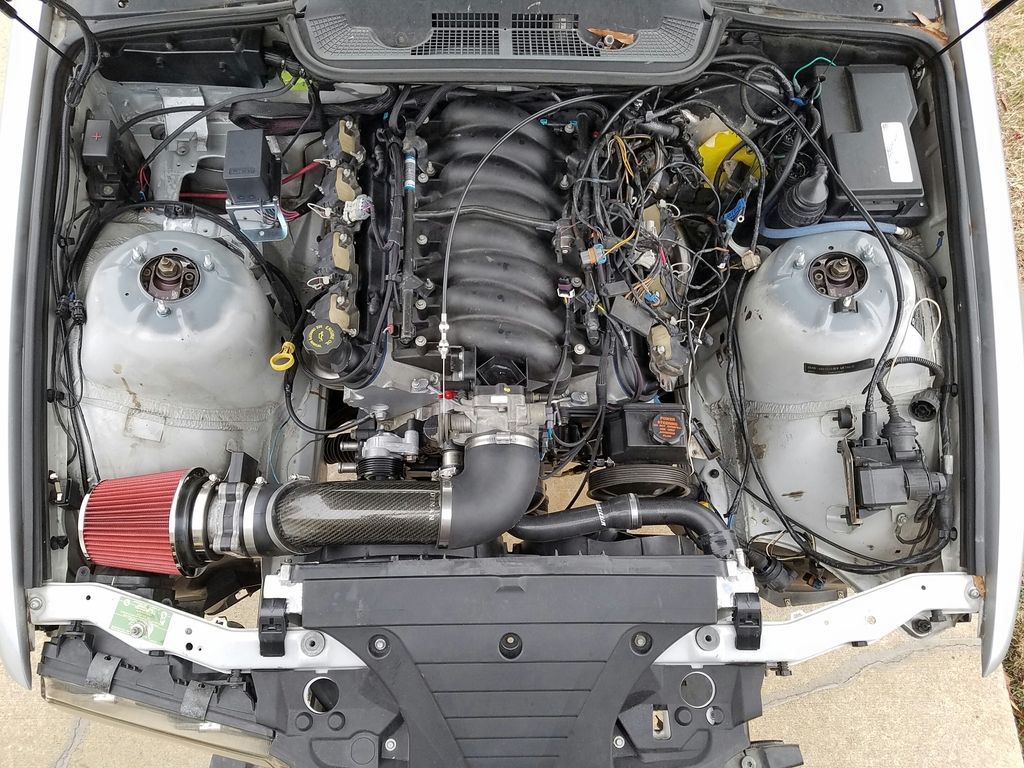
The hood closes fine and the intake has room to spare after I clearanced the hood

Got the tail section exhaust finished with tips and painted. I couldn't get over much this week to work on the car so my good friend finished it up for me. Used some spare stainless and welded on for tips then sanded them a few times to shine them up. We may shine them up more. The fitment looks great. Almost looks like stock.

NOHOME
NOHOME PowerDork
12/16/16 5:07 a.m.

Great job on the exhaust. It is an approaching task on my project, and one that I have no experience doing.

mccrimmon
mccrimmon New Reader
12/16/16 7:54 a.m.
Great job on the exhaust. It is an approaching task on my project, and one that I have no experience doing.

Thank you. We are very happy with how it turned out and even more eager to hear it come to life.

1 2 3 4

You'll need to log in to post.

Our Preferred Partners
JnmHkvchwwbXih0KdtFCqtUcCb4Vw9BuYPcHg4tSKlb4xDCL0YHm8EzuJhj2Ft3a