
We are poking along with our Ford F100 build and I need to mate the OM617 diesel I picked up to the ford ranger transmission we are using. It is a Mazda build M50DR1. I can buy an adapter for $400.00 US, which is about a Google or so up here in Canadian Pesos right now. But it is just a plate and the only tough part is ensuring the thing is centered. So how do I do that?
I am thinking to cut the plate for the bellhousing, punch out a cardboard template to transfer the bolt pattern, and then use a caliper to find the center and drill a center pilot hole. The bellhousing at least is circular, unlike the engine bolt pattern. Then I can use the caliper to transfer two or three of the engine block bolt holes to the other side, and from there I can punch out another pattern and overlay it onto my pilot holes and transfer the rest of the holes.
Is this going to give me enough accuracy? I sure don't want any vibration, which seems pretty common in these swaps. I am not convinced that spending $400.00 US on a custom adaptor will give me a better result anyway.
I've nothing to add, but this is of interest to me with respect to my Challenge build.
ive always thought about this since hearing johnny cashs one piece at a time as a teen.
your plan sounds pretty plausible, and about what I was thinking. but ill wait to hear from the gurus on here.

I think you can achieve far better results by working directly on the plate, rather than trusting cardboard.
You can achieve remarkable accuracy manually, it's the way most of our existing infrastructure was created.
Get some spray-on layout fluid (Dykem, etc.) to help make things visible.
If you don't have one, a digital vernier caliper helps a lot.
Get a precision divider (like a school compass for grown-ups) for capturing and transferring dimensions.
A magnifying headset works wonders for seeing fine detail.
Finally, a method of capturing hole center locations.
For smooth holes, you can insert tight fitting drill shanks, and measure across the
shanks,
subtracting shank diameter to get center-center distance.
For threaded holes, use a bolt with a smooth shank above the threads, and measure as above.
Having the center-center distance, you can use locations of two holes to determine the third,
by lightly scribing the arcs in the metal, where they intersect is the location of the third.
Lot's of help on the webz for this sort of thing.
http://www.cnccookbook.com/MTLayout.htm
http://www.micro-machine-shop.com/layout_tools.htm#transfer_screws
http://www.amazon.com/Electronic-Digital-Vernier-Caliper-Micrometer/dp/B014ZYWL7G/ref=sr_1_4?s=industrial&ie=UTF8&qid=1453816185&sr=1-4&refinements=p_n_feature_keywords_two_browse-bin%3A7024155011

tuna55
MegaDork
1/26/16 8:48 a.m.
So how does one account for the thickness of the plate as far as engaging the input shaft?
By the way, the number is a googol, not a google.

The making of these has never been an issue for me what has always stopped me is dealing with the offset and shimming and what not that is needed to make things work when you bolt everything together. If you are dealing with a situation where you need to add offset between the trans and the motor then this is relatively simple but if you are trying to mate things and you have the same as stock or actually need to loose some offset (while adding the plate between the trans and the block) then I can see this being a PITA. Then there is the whole dealing with the starter alignment. Probably that big an issue as you would want to keep it in plain with the flywheel so it gets shimmed (or not) as needed. Just a boat load of measuring and figuring. If you time is free then go for it. If not or even if you value your time at $10/hour I bet you spend more then 40 hours measuring, calculating and making this. This is a case in my book where if some one has figured it out it may actually make sense to pay the $$$$$.
However I personally enjoy the Engineering challenge of things like this so I would probably at least try it on paper. I would model it in 3D AutoCAD. Who knows maybe some one down the road will want to do the same thing and pay you. Send the cad drawing to a machine shop and it could be cut out in a matter of hours I bet. Sell 3-4 of them and you are off and running. Or at least you get yours for free.
Good info erohsic, thank you. And dean, I plan to use the ford flywheel so starter issues should be limited to accounting for the depth of the adaptor which I expect will be 1/4 inch. I expect I can shim the flywheel out that much, or machine the starter housing a bit....or something.
I did an adaptor once before, but I was a kid and if I recall I used a torch and not much else. it must have worked because I drove that truck for a few years.
I'm in the process of figuring out a bellhousing to trans case adapter. If you can figure out a trans option you like w/ a removable bell, I feel like I've seen removable bells that bolt to that engine, and I think it would be a lot simpler. Probably still want to drop it at a shop for milling, but a .75" plate of aluminum is fairly inexpensive.
Alternately, you can do a lot with these: http://www.harborfreight.com/28-piece-transfer-punch-set-3577.html

I read a write-up years ago on how a guy did it. He machined bolts with points on the end, screwed them into the block, put the motor nose down, put a steel plate on top of the back of the block and whapped it with a sledge hammer. The points transferred the center of the bolt holes to the plate. Then he centered this on the transmission bell housing and did the same thing. Drill out the holes, cut off what's not needed, done.
Seems to me like the hardest part would be centering on the bell housing. Probably cut a hole in the middle first to find the center for the motor. Or use that for the center of the bell housing with the input shaft sticking through it. Dunno. I think he used 1/4" plate. Should be plenty strong, as I think that's in shear.

NOHOME
PowerDork
1/26/16 10:02 a.m.
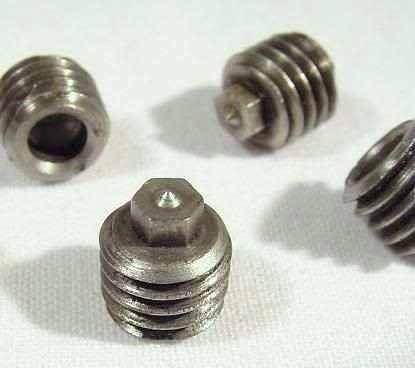
The tools of the trade are the transfer punches shown above and transfer screws like these.
 If doing this by standing the engine on its rear end on top of the plate, the challenge is to find the center of the crankshaft projected to your plate.
If you have access to a mill, this job is easy. All you do is locate the block under the head and using reading the digital readout, develop a set of Cartesian (x,y) coordinates for each bolt hole. Remove engine and replace with adapter plate. Go back to each hole coordinate and you are good.
At $400 I would have my wallet our already cause it always takes me two tries to get stuff right.
This thread has some kick-ass DIY info in it. I love this place!
this looks relevant: http://www.yotatech.com/f162/dmarsh4x4s-om617-swap-1988-4runner-244857/
edit: also relevant: http://www.yotatech.com/f162/r150-bell-housing-pattern-making-adapter-plates-such-279125/
bluej wrote:
this looks relevant: http://www.yotatech.com/f162/dmarsh4x4s-om617-swap-1988-4runner-244857/
edit: also relevant: http://www.yotatech.com/f162/r150-bell-housing-pattern-making-adapter-plates-such-279125/
Those are excellent, thank you. Looked at a few conversions but did not search specifically for adaptors and did not see them.
Yeah, the 'transfer screws' in link I posted.
Easy to make if you have a lathe available.
If you do have a lathe, then here's a shadetree method:
Turn a long shaft to tightly fit into the crank pilot hole.
Drill shaft size hole into the plate to center it.
Insert transfer screws, so points are exposed.
Sit engine on it's nose, fit the pilot and then slide the plate down.
Hold or clamp the plate to prevent rotation, firmly tap with a hammer to mark each hole location from transfer screw points.
Remove plate and drill holes at marks.

chiodos
HalfDork
1/26/16 12:15 p.m.
Easiest way to quickly do it without many tools is CAD (cardboard aided design) make a template out of thick paper or cardboard, then you can lay that out on your steel/aluminum for final cutting, it's cheaper to scrap cardboard than metal. Do some simple measuring to determine what thickness and what shims are needed or if the spline/whatever has enough engagement.
Edit, for easy transfer use the peen side of a ball peen hammer and with the paper still, tap along the edges of the metal underneath and it will cut though the paper. You know like how you cut out a paper gasket, I'm not good at explaining things.
Thin plywood of the same thickness as the steel you plan to use works better than cardboard
It'll also absorb layout dye or poster paint for your locations
If you use a transmission with a removable bell that centers itself on the bearing retainer (eg, every 4 speed ever, the T5 5 speed and a couple others, I think the 90s mustangs trans is like that too) you can make the adapter rather sloppy, assuming all the mating surfaces are kept parallel. Install the clutch, then the bell loosely, then, preferably with the assistance of small hands, mount a magnet base dial indicator to the flywheel, adjust bell location until things are centered (when you rotate the engine the indicator needle won't move), then torque the bellhousing bolts.
DOnt tell the wife, but a schmear of lipstick about every inch around the mating surface of any object will make a great transfer layout in a pinch (just dont let it shift once the surfaces are mated). I use this for everything from transfering outlet locations onto drywall, to laying out items for pattern work
Here's a link documenting the process i used to make an adapter bellhousing...
Homemade Bellhousing Fabrication
The profiles on the plate were cut by hand, then sanded back to the scribed line with a flap wheel. I did use my lathe to make the pilot hole for the transmission, as well as the pilot bushings for alignment. Lathe, drill press, 4-1/2" grinder, and a MIG welder.
I laid the hole pattern out by hand, but a set of transfer punches/screws would have made the job easier.
chiodos wrote:
Easiest way to quickly do it without many tools is CAD (cardboard aided design) make a template out of thick paper or cardboard, then you can lay that out on your steel/aluminum for final cutting, it's cheaper to scrap cardboard than metal. Do some simple measuring to determine what thickness and what shims are needed or if the spline/whatever has enough engagement.
Edit, for easy transfer use the peen side of a ball peen hammer and with the paper still, tap along the edges of the metal underneath and it will cut though the paper. You know like how you cut out a paper gasket, I'm not good at explaining things.
Yeah, just make sure you work fast, since paper (including cardboard) changes dimensions with humidity.


