1 2
sevenracer
sevenracer Reader
3/25/22 3:11 p.m.

Well, not great luck at the Hydraulic Supply Co. The counter guy gave me the closest thing he had to the piston seals - which are same OD and ID, but 5/16" thick vs 1/4". I didn't know the exact dimensions at the time - he was not very helpful, but they appeared to be a press fit to the groove, so I bought them. They also have an o-ring in the u channel.  It's removable if need be, so I think the issue real issue is the thickness. He gave me new backer rings to replace the broken one, that are thinner than the original. He also, looked over the piston and said it must be pressed on - indicated there is usually a set screw for screw on types - which this does not have.

Almost correct seal:

hobiercr
hobiercr GRM+ Memberand UltraDork
3/25/22 5:17 p.m.

In reply to sevenracer :

If the groove is tall enough that won't be an issue. You need at least 1/16" free space in the groove for the seal. If the groove is 5/16" that seal will be too tight.

The "loaded" u-cup was originally designed by Parker but has been copied by other manufacturers (Polyseal, etc.). They were designed to enable the NBR loader (which has better memory) to help the PU seal (less memory), seal in low-pressure situations. If you are replacing both of the piston u-seals you may want to remove the o-ring from the air side.

I wish I was still in that industry. I'd build you a kit. If these seals don't work, let me know and I'll contact some of my old business associates and see if we can find the correct ones.

sevenracer
sevenracer Reader
3/25/22 7:57 p.m.

I really appreciate your help on this. Yeah, the 5/16" seal is too tight for the groove.

I am struggling to find a seal with the right dimensions through Mcmaster or Grainger, oring store, etc. I found one on Amazon that is correct dimensions, but no idea if it's rated for the application. Also found another site based out of Europe woith the correct dimensions, but very expensive shipping.

dimensions are 1.5" OD 1.125" ID and .25" Width

sevenracer
sevenracer Reader
3/26/22 10:46 a.m.

Ok, found one candidate that looks promising:

https://www.hydraulicszone.com/ro-asymmetrical-piston-seal-dpi-1500x1125x0250u3000.html

Material is Disogrin which is a brand of urethane.

hobiercr
hobiercr GRM+ Memberand UltraDork
3/26/22 12:20 p.m.

In reply to sevenracer :

Have you tried calling any of the other hydraulic places in Charlotte with the seal dimensions? One of them may have what you need on the shelf. 

When you got the parts from HSC, did you just get the u-cups and the ptfe back-up or did you also get a new o-ring for the head? What was the size/part # of the back-up ring?

sevenracer
sevenracer Reader
3/26/22 1:15 p.m.

In reply to hobiercr :

I went to Wyatt Seal first - they don't have a retail counter, just do account sales, maybe could have helped but the guy that matches parts was out and they have a $50 minimum order. Then went to Hydraulic Supply. That's all the time I could spare. I'm out of town for the next few days, so online order is my fastest route if I can find the right part. I looked at 12-15 different sites online, and only one in the US had an offering in the size I need. Was hoping to confirm the material was suitable for the option I did find.

I did get the new o-ring for the head - OD1.5, W3/32 per the invoice.

hobiercr
hobiercr GRM+ Memberand UltraDork
3/26/22 1:44 p.m.

In reply to sevenracer :

The Disogrin u-cup you found will work with no issues. It is an asymmetric design (not symmetrical like your original part, I think. HTT from pictures). 

MFP Seals is both a manufacturer and distributor of seals. They are based in MI but also have a Tampa office and I know most of the guys that work there. They show that u-cup size 187-01.125-250 in their symmetrical unloaded style, their symmetrical loaded X-pac style, their symmetrical  X-pac (polyseal brand) style, and their asymmetric PUC style. 

For the ptfe back up ring, if they sold you a solid ring you are going to have a really tough time getting it over the piston and on to the head. PTFE doesn't have much memory and doesn't pop back into shape. If they sold you a split ring you are good to go. HERE are specs on split rings with industry standard part numbers if you ever need to source again. If the o-ring you bought has a part number, the BU ring usually uses a corresponding -PN.

sevenracer
sevenracer Reader
4/2/22 10:27 p.m.

Sort of a non-update. I ordered parts (including spit backer rings for the cap o-ring) earlier this week from hydraulicszone. No ETA yet - actually no email or nothin' from them yet regarding the order.

Hoping the parts show soon, the QJ is a whole lot better than floor jacks and jack stands, and I have a couple of cars that need hoisted up for maintenance/repairs.

My plan is to rebuild one cylinder with just the new piston seals and cap o-ring/backer once I get the parts and get the QJ functional, then try to do a full disassembly (get the piston off) on the second failed unit to source and replace the shaft seal and wiper in the cap for the second rebuild. This would let me have one on the shelf in case there is another failure.

DattoJon
DattoJon New Reader
4/7/22 8:03 p.m.

Found this thread when looking to save the $200 USD for a new hydraulic cylinder for my quickjack, potentially 2, since I have to imagine that the side that has not yet failed may sometime soon.

Joined up on CM to share what I found.

The hydraulic seal end of the piston, as debated earlier is indeed threaded on, not press fit. It was a bit of a bear to get it off, and I certainly marred up the bottom collar of the seal holder a bit to do so, but since it is not a part that comes in contact with any machined surfaces, I don't see that being a long term problem.

Getting that off allowed me to tap off the cap to clean, inspect and de-rust it. In my case, the cylinder was leaking air, and it was not ATF getting past the 'green' seals.

It may very well be worth taking the time to go the extra step and take it apart, since there was a fair bit of grot between the piston and the set of air seals. Enough so, and there is so little tolerance between them that the hat had to driven down (gently) with a drift and a hammer while constantly trying to get some cleaner in and a bit of lubricant.

I can put up some photos when everything comes out of the evaporust bucket if anyone is interested. Thought it would be worth adding a little further info to the thread, since there was precious little information on it that my searching could turn up.  In my case the seals actually look pretty good, and I suspect it was the dirt on the inside that was allowing a bit of an air leak to happen. Hopefully the bath in evaporust followed by an ultrasonic cleaning session will set things right.

First go will likely be to clean, polish and re-assemble with all the parts that it came with. Waiting for a response from Bandpak on the availability of a rebuild kit, rather than their default reply of 'buy a new cylinder'.

Hope that helps someone out.


californiamilleghia
californiamilleghia UltraDork
4/7/22 8:21 p.m.

Please post some pictures , I think we all have something that needs seals now or in the future , 

how did you take the bottom collar off without squishing it out of round .

thanks

DattoJon
DattoJon New Reader
4/7/22 9:03 p.m.

In reply to californiamilleghia :

I will do my best to get some photos up when the cleaning process is done. Clunky for me, and I have no idea where my 'shop' camera is as the moment... However, I think it will be useful to illustrate what I'm talking about.

As far as removing the collar, I put a 24" 3/8 drive extension through the bolt tube welded to the bottom of the piston, and stood on it to prevent it from turning. Then used some channel pliers on the smallest diameter part of the seal coller and leaned into it with as much of my 65kg body weight as I could manage without falling over. Eventually it came loose. It's threaded all the way down, so it's pretty stiff, but not impossible. If I can do it with the tools I had to hand, I expect pretty much anyone else could.

No real chance to squish the collar, the whole seal carrier is solid steel, and when really torquing on it, the threaded end of the piston is still captive inside of it. You'd have to be some kind of super-human to crush it. (That is, unless I've misunderstood what it is you were describing.)

sevenracer
sevenracer Reader
4/8/22 3:38 p.m.

In reply to DattoJon :

Welcome to the conversation, and thanks for the info. Any pics you have would be great to see. I may take another crack at unscrewing the piston this weekend. I didn't get too aggressive with it for fear of damaging the unit, but I agree if you mar the end of the piston, it seems it shouldn't create a problem since the OD is smaller than the main OD.

Interesting that there was a lot of rust in the cap seal area. Everything on mine seemed really clean - but I didn't inspect that area since I did remove the cap.

DattoJon
DattoJon New Reader
4/10/22 9:01 p.m.

Sorry about the image sizing, this is just cut and paste from my phone, best I could do for the moment.... You can clearly see how the end of the piston is threaded along the full length of the 'seal carrier'. (I am not a hydraulics expert, sorry for the terminology, I just want to fix a thing, hah!) The threading is standard direction, although I couldn't imagine why it would need to be reverse.

Inside of the 'hat'. There is the outer wiper, a plastic (teflon?) seal below that, and a plastic friction guide. In my case, the bad cylinder had clearly gotten some moisture inside of it, as there was a little bit of scoring on the inside of the cylinder body and some rusty grot floating around inside. What was causing my greif was that there was a little bit of corrosion between the plastic guide (grey in this image) and the groove in the cylinger where it sits. I mentioned before having to tap the hat off the cylinder once I had things apart. For reference I dismantled the good cylinder to see what everything should look like, and the hat slide down the piston with just light hand pressure. The final clue was that the plastic guide on the good cylinder would rotate freely in it's groove. The same part in the bad cylinder didn't move at all.

So, 45 minutes, a broken dental tool and a few very small screwdrivers later, I was able to get that guide out of it's home and could feel the rough layer of corrosion inside the hat that was causing the guide to be pressed hard against the piston and preventing it from moving freely. I quick bath in the ultrasonic cleaner followed by an overnight in evaporust and the groove was a great deal smoother. I lubed the whole thing up with some silicon grease to hopefully prevent future moisture intrusion from causing the same problems, but we shall see.

At very least, that did seem to solve my problem. There was a little bit of evidence of atf having gotten past the hydraulic seals, but very little. So I just lubed and reassembled everything with the exisiting parts, and added a little bit of fluid film to the inside of the air chambers as well as inside the dry side of the cylinder body. Figure it can't hurt, and certianly isn't anything strong enough to compromise the seals. Might just help out if any moisture happens to get inside again. I think the silicon grease in the hats will be the most likely to prevent that, but time will tell.....

Really do hope the helps someone. It wasn't the worst repair ever, but it came at an inconvenient time, and I found almost no information on anyone else having stripped one of these thigns.


Last photo of it all lined up. They must have changed the seals they use at some point since mine are definitely not green, but white/clear and stained red from the atf. You can see where I scored the small OD of the bottom of the seal carrier, but I can confirm that it doesn't touch anything but the atf that surrounds it.... Maybe someone has a more elegant way of getting those off, but it worked for me. Worth noting that there was a bunch of thread sealant holding those together as provided from quickjack, and they spun back on relatively easily once broken loose, so I used a pretty good dose of threadlocker when reassembling. I can only imagine that it's unlikely they'd spin themselves off somehow, but I would think the results wouldn't be pretty if they did!

Cheers!

sevenracer
sevenracer Reader
4/11/22 1:35 p.m.

Hey, thanks but the pictures don't seem to be showing for me.

DattoJon
DattoJon New Reader
4/11/22 3:52 p.m.

In reply to sevenracer :

Ah... They come up fine on both my work and home PC? Let me see if I can attach them as a file attachment? Sorry. Total newbie to the forum and this is forum software I am not at all familiar with.

I'll have a go when I get a few minutes free in an evening.

sevenracer
sevenracer Reader
5/15/22 12:58 p.m.

Update: Set this project aside for a while, but got back to it yesterday.

Re-cap/Cliff's notes:

The issue with this cylinder was that fluid was leaking past the piston to the dry side. It stopped shortly into the lift because fluid was getting past the seals and not moving the piston. My plan was only to replace the piston seals and not bother with the cap seals since they were not leaking.

The piston seal is apparently not a common part. I only found one online seller who had a part number for the correct size, but the p/n was obsolete and he had to chase 4 or 5 cross reference part numbers before he found one that was available. When I got the parts they were the correct dimensions but made of a MUCH stiffer material. I quickly tried to put one on cold, and didn't see how it was possible. So, I set it aside to do actual car stuff.


Yesterday, I did some you tube searches and came up with two ideas to try. One, I put the seals in hot oil, and two, I put a couple of strings through the seal to have a way to pull it down into place.

The biggest challenge was I needed to pull the lower seal past 2 other grooves to get it into place.

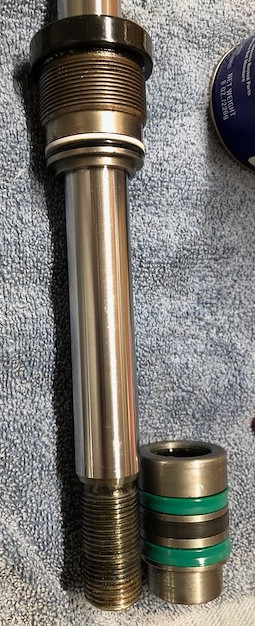
No before pics, but here is the new lower seal in place in it's groove. Soaking in hot oil made the seal a good bit more pliable. I had a couple of pick tools, but the strings seemed to work the best to pry it past the lip for each groove. I would use one string to pull the seal down, with the other string right near it, but then pulling the second string down and around the circumference of the piston to get the seal into the groove. This was not easy! The part was not very stretchy. Probably would help to tie the strings to "handles" for better grip.

First seal in place

The middle groove holds a "slide ring" that is split and simple to install later and the top groove holds the same piston seal in the opposite orientation.


BUT, the bottom seal was stretched out and not tight to the piston. Noticeably looser than the top seal

I had bought extras, so I wound up cutting the loose seal off and taking the piston off, thinking I could install the bottom seal from the other end and not stretch it out so much. The piston is threaded on with a lower strength loc-tite. There are no flats for a wrench, so out came the Vice Grips (the wrong tool for every job laugh). I filed down the marks from the vice grips afterwards.

That didn't really work out, the bottom of the piston is larger and there is nothing really to lever against to get the seal started. I also found it was far easier to work my string method with the piston still on the shaft vs having just the piston clamped in a vise.

So I went back to the original method and installed the lower and upper seals. It went a bit quicker this time, and the bottom seal didn't seem to be stretched and loose on the piston. No real explanation why it was different - it was still a struggle to get it in place with lots of stretching to get it past the first two grooves.

One other thing - there was one o-ring seal on the cap that was accessible, so I did replace that. From the factory it has a backer ring, that was damaged - a section of the ring was torn off. I bought the o-ring and 3 different sizes of backer rings. None of the backer rings were quite right. So, I would up taking 2 of the closest fit and installing them 180 out so the o-ring was supported all the way around. Ugly, and probably a bad idea, but it seemed worth a shot.

I was a little gentler when I re-installed the piston with some blue loctite

No other assembly pics, but I installed the rehabbed cylinder, and gave it a test run. Worked great!


DattoJon
DattoJon New Reader
7/1/22 6:35 p.m.


Sorry for taking forever. Maybe the photo upload will be better this time when I'm doing it on a PC and not from a tablet on my lunch break.

Day late and a buck short, I know, but it may still add to the info pool on the thread.

Seeing the OPs recent posts that the job is done is encouraging, but I'll repeat that the bearing carriers were reasonably easy to take off, and the scoring I caused with the channel locks irrelevant to their proper function. The long 3/8" extention through the small bolt holder on the end of the piston completely prevented it from rotating, and putting it on the floor on a towel prevented any damage... Meant I could just lean into it, really using body weight and not a whole lot of muscle.

Hope the photos are useful and maybe help someone out down the road.

Cheers!


PS - I don't know if you're car needs to be *old* for you to be into grassroots/garage built motorsports, but this seems like a great site with lots of info, so I'll try to make an effort to check it out a little more thoroughly.

exar50
exar50
7/19/23 12:31 p.m.

I attempted to order the seal from https://www.hydraulicszone.com/ro-asymmetrical-piston-seal-dpi-1500x1125x0250u3000.html but they wanted over $50 shipping.  Spent a couple months trying to get them to adjust the shipping charge, but I never got them to do it.  I gave up and found an alternate source:

The O-Ring Store

https://www.theoringstore.com/store/index.php?main_page=product_info&cPath=371_1738_405_966&products_id=43769

https://www.theoringstore.com/store/index.php?main_page=product_info&cPath=367_23_24&products_id=1148

To pull the o-rings down into place I used ribbon (the stuff used to wrap a gift).  It's plenty strong and a lot thinner than string.

I've only used my QuickJack one time after rebuilding the cylinder, but it worked fine.

-Brian

pacobeagle
pacobeagle New Reader
8/13/23 8:45 p.m.

In reply to exar50 :

Just saw this after almost experiencing certain disaster. Was lifting up an STi and it went sideways, as in it didn't lift evenly (driver's side wasn't lifting or holding as the passenger side) . Luckily I lowered quickly and opted for floor jack and jackstands. 
 

I'm certain the cylinders need rebuilding. I've owned my QJ since summer of 2015. How many total seals are needed to do both cylinders?  This thread has been extremely helpful.

Thanks,

J.Martinez

exar50
exar50 New Reader
8/19/23 8:20 p.m.

For each cylinder you will need the following:

(2) U-cup seals, https://www.theoringstore.com/store/index.php?main_page=product_info&cPath=371_1738_405_966&products_id=43769

(1) 0-ring, https://www.theoringstore.com/store/index.php?main_page=product_info&cPath=367_23_24&products_id=1148

I would recommend buying a couple spares of each in case you accidently ruin a seal during installation.

The u-cup seals are difficult to install, they are very stiff.  I purchased a cheap cooking pan from Walmart and added some ATF along with a seal, and warmed it up to make it more flexible.  It helps to have a thermometer to monitor the temp.  I took it to about 150°F.  I'm not sure that it helps much, because the seal cools down rather quickly during installation.  But it's better than nothing.  While at Walmart I also purchased some ribbon from the craft section.  The same type of ribbon used to make bows and to wrap gifts.  It's strong and very thin.  Use it to help pull the seal down into position.  I watched a couple videos on Youtube to get an idea as to the technique for doing that.

The only other thing to note is the orientation of the u-cups.  They have a lip on one end.  After disassembling your cylinder, take a picture of how they are oriented.  Or look at some of the pictures in this thread.

Lastly, I don't know if it is worth trying to unscrew the end of the rod as some other users in this thread have done.  You can try, but I could not budge mine.  I chewed up the end of the rod in trying.  It didn't hurt anything, but I had to smooth-out the chew marks and then clean up any traces of metal bits.  Extra work for nothing. 


pacobeagle
pacobeagle New Reader
8/21/23 7:11 a.m.

In reply to exar50 :

Thank you for the reply.  I did purchase those exact "U-Cup" seals and they are extremely small.  For example, when measuring external diameter, the difference between OEM seal and the new replacement was 44mm vs 36mm (roundabout numbers).  Is that similar to what you experienced?  If not, then I got sent the wrong seals.

J. Martinez


VGK36
VGK36 New Reader
9/14/23 4:31 p.m.

In reply to pacobeagle :

So they sent you the wrong seals? any update?

tvs1320
tvs1320 GRM+ Memberand New Reader
11/2/23 11:24 a.m.

First off - thanks to everyone for posting the info in this thread.

I have 1 (maybe 2) bad cylinders on my QuickJack BL-5000.  Seals ordered to do the repair...

What's the cause of the failure typically?  dirt/etc getting into the fluid?  Just seal wear and age?  In a former life I worked on a farm and I don't remember having cylinder failures very often even when the hydraulic ram was operated hundreds of times a day.  My QJ gets used a few times a year...

If it's dirt or other debris - would fitting an in-line filter on the cylinder hose be a good idea?  

Something like this maybe : https://www.pneumaticplus.com/hif-series-hydraulic-inline-filter-pack-of-2/

Thanks,

Jim

tvs1320
tvs1320 GRM+ Memberand New Reader
11/17/23 7:19 p.m.

A follow on:

Got the seals for one cylinder installed. Ended up making a set of cone/pusher tools to make it easier. Thought maybe someone else might get some use out of them, so : https://www.thingiverse.com/thing:6320138

The cone threads into the 7/8"-14 threads of the piston and buts up agains the large diameter part of the piston from either side to install the 2 seals. The small pusher tool gets the seal expanded most of the way, then the larger one takes over to get it to snap in.

Worked well for me in a previous iteration - this one has a few tweaks that should make it better. STL files for printing, and Fusion360 file in case changes are needed.

Sanding the cone smooth and coating with oil, as well as heating the seals is recommended.

Jim


1 2

You'll need to log in to post.

Our Preferred Partners
89u83C8jqIZ2ZwqJa4Z1td3s2IKbkWtmroRJ8RVXwLAYpmm2etHwAEnMlYBjsYnQ