
Just got an AEM wideband gauge for our LeMons car (I know, I know, $500 my a$$! - BUT! Gauges are exempt from the budget) and reading the instructions it says to mount the bunghole for the sensor at least 18" from the exhaust port, or at least 36" in "sustained high RPM or turbo" applications. So I'm thinking we should mount it at least 36", to be safe. The engine is a Volvo B20 and the exhaust manifold has a dual downpipe that is routed to a stamped steel X-pipe and out through twin 1-3/4" exhausts, exiting the side of the car. I'm thinking about mounting the sensor in the side of the X-pipe, where all the exhausts will be swirling and mixing. Anyone think that might be an issue? Or have an idea for a better mounting location?
The engine has two carburetors, one feeding cylinders 1 & 2, the other feeding 3 & 4, but they are connected in the intake manifold with a balance tube (OEM Volvo manifold). The dual exhausts combine 1 & 4 and 2 & 3 each into their own pipes. The X pipe is about 4 feet downstream of the exhaust ports.
Thanks for the input!
IMHO, you are better off putting it at ~ 3 diameters down from the Y junction. So you can see each cylinder reasonably equally. That should give any biased flow (toward the side of a wall or not) the chance to mix.
This diagram might make it clearer what the current exhaust layout is, as opposed to me trying to describe it in words.
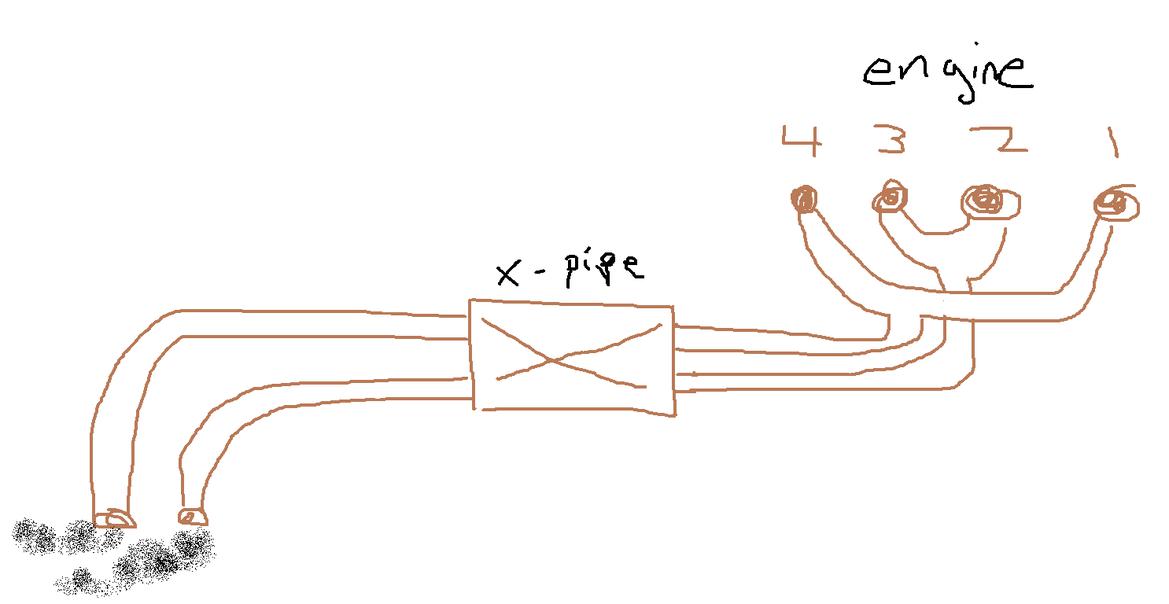
Ah- then you have just one spot where all 4 cylinders are seen.
alfadriver said:
Ah- then you have just one spot where all 4 cylinders are seen.
Correct. Which is why I was thinking of mounting the sensor there- that, and it meets the MFRs requirement of distance downstream of the exhaust port.
In reply to volvoclearinghouse :
Seems like your only choice, and it should work well enough. For sure farther than OEM's run them.
alfadriver said:
In reply to volvoclearinghouse :
Seems like your only choice, and it should work well enough. For sure farther than OEM's run them.
Either that or mount it 6 or so inches downstream of the X, after all 4 cylinders of exhaust have mixed, in one of the two outlet pipes. Like you said, to ensure a well-mixed gas flow.
In reply to volvoclearinghouse :
They won't mix enough- the pulses will shoot through the X far more than actually mixing. The pulses are too far apart to force real mixing there. In the X will see both paths equally.
Really all you want to know is are you rich or lean. Since you don't have to tell the computer anything ( since you don't have one of those ) it's not hyper critical.
alfadriver said:
In reply to volvoclearinghouse :
They won't mix enough- the pulses will shoot through the X far more than actually mixing. The pulses are too far apart to force real mixing there. In the X will see both paths equally.
Understood, thanks. I understand this exhaust setup isn't optimal; it was more of an experiment to see how well a simple X-pipe would do at reducing exhaust volume. As a bonus, I think the final result sounds really good. It certainly wasn't the loudest car at the track, not by a long shot.
Since the exhaust combines cylinders 1 & 4 into one pipe, and 2 & 3 into the other....but, the intake combines the carbs into 1 & 2 and 3 & 4, either exhaust pipe should give me a "look" at what each carb is doing. But I think I'll start with the X-pipe mounted sensor and go from there. Thank you.
Carburettors are stock twin SU HS6, right now they have the SM needle in them (which was OEM for the Volvo B18); I want to get a baseline AFR reading. I suspect it may be a little lean, especially on WOT, and require a richer needle, but I want to get some data first before swapping parts around.
Not mine, but same setup:

frenchyd said:
Really all you want to know is are you rich or lean. Since you don't have to tell the computer anything ( since you don't have one of those ) it's not hyper critical.
Correct. If it's 10:1 on WOT, that's probably too rich, if it's 15:1, then I also have a problem. Swapping needles and springs it's never going to be exact, but it doesn't need to be. 12-13 should be the sweet spot for power.
You do know how to modify the stock needles to meet your needs perfectly don't you?
I'll gladly go over it if not or you need a refresher.
volvoclearinghouse said:
frenchyd said:
Really all you want to know is are you rich or lean. Since you don't have to tell the computer anything ( since you don't have one of those ) it's not hyper critical.
Correct. If it's 10:1 on WOT, that's probably too rich, if it's 15:1, then I also have a problem. Swapping needles and springs it's never going to be exact, but it doesn't need to be. 12-13 should be the sweet spot for power.
A friend of mine really knew SU's incredibly well, so when we saw areas that were out, he trimmed to needle to get it right. Pretty interesting discussing it- but I really don't remember other than he had a mid mixture lean spot that he was able to deal with.
In reply to alfadriver :
In reply to frenchyd :
I understand it (I think) in concept; basically remove a tiny bit of material from the needle where it's running lean. In practise I've never done it, so I'm not sure exactly how it's done (fine sandpaper?) and swapping needles is simple enough that I should be able to get it pretty close with a stock profile needle. But, I am open to learning.
I did find a website that has tons of needle profiles in it: http://needle.sumidel.com/
Spring swapping is a bit more of a mystery to me; as I understand it the dashpot controls the rate of rise of the piston, giving more or less of an 'accelerator pump' effect, and the spring controls the ultimate height of the piston for a given engine vacuum signal, and thus the air flow and needle/ jet position. I've tested different viscosity fluids in the dashpot to "cure" (or maybe just "mask") throttle tip-in stumbling issues, but never experimented with different springs.
As you've pointed out, due to the differences between the intake and exhaust pairings you can't get carb specific information from a single O2 sensor. I'd put the O2 sensor in the x pipe and if I really wanted to get carb specific tuning information I'd use EGTs in the exhaust manifolds.

kb58
UltraDork
1/26/23 10:29 a.m.
See what an O2 sensor mfg recommends, rather than the seller. Bosch has a ton of helpful info online and very likely has detailed installation instructions. They may allow you to mount it closer. It's a trade off between temperature, accuracy, and sensor life. That last bit depends upon where the sensor is located on the tube (in a "clock" orientation). From memory, I think it's something like "between 10am-2pm" to keep condensation out of it.
Lastly, is this a heated sensor? It probably is, and if so, it can go a long way from the engine since it doesn't need engine heat to get up to temperature.
kb58
UltraDork
1/26/23 10:36 a.m.
I just noticed that each carburetor feeds two cylinders where each exhaust is fed into separate Y pipes. That means it doesn't matter which branch of the Y the sensor is in, because each carb will have the same effect. I do agree though that overall, it's usually best to have in the common pipe. Hmm, since instrumentation is free, you could always have two to give you precise info on how balanced the carbs are. I has an SU setup on my Datsun 1200 for awhile and always struggled with balancing them, even with the proper flow tool.

volvoclearinghouse said:
In reply to alfadriver :
In reply to frenchyd :
I understand it (I think) in concept; basically remove a tiny bit of material from the needle where it's running lean. In practise I've never done it, so I'm not sure exactly how it's done (fine sandpaper?) and swapping needles is simple enough that I should be able to get it pretty close with a stock profile needle. But, I am open to learning.
I did find a website that has tons of needle profiles in it: http://needle.sumidel.com/
Spring swapping is a bit more of a mystery to me; as I understand it the dashpot controls the rate of rise of the piston, giving more or less of an 'accelerator pump' effect, and the spring controls the ultimate height of the piston for a given engine vacuum signal, and thus the air flow and needle/ jet position. I've tested different viscosity fluids in the dashpot to "cure" (or maybe just "mask") throttle tip-in stumbling issues, but never experimented with different springs.
You have the right idea. I use 300 grit wet or dry sprayed with WD40 just for easy repeatability. I chuck the needle in an electric drill and pinch the emery paper for a second or so. Then check if I've removed the scratch mark. Part of the "trick" is to "measure" where on the needle you go lean. I use a pointed Exacto and scratch the needle at the bottom where it comes out of the jet.
Then I polish the scratch mark off.
Here's where a chassis Dyno saves a lot of time. Because you can just reach in and make your mark. It's not RPM specific because load/no load so you can't just sit there and rev it to where it's lean then make your mark.
With regard to springs. Remember it's a spring/ oil combination. My small bottle of SU oil is roughly 20 years old so the idea of using ATF or WD 40 or motor oil of various weights doesn't make sense. I always work with a constant. Moss Motors has it. And the SU guy That Advertises in GRM.
Typically a stumble is caused by the needle not rising fast enough to give it enough fuel.
One of the easy solutions is the jet itself. Rather than try to get needles right, deal with the Jet.
I assume your jet is .090?
2% richer is the next ream size. ( my reams are numbered not sized) That's the size to use to offset 10% ethanol in unleaded fuel
5% bigger is what to use for 15% ethanol. And I start at 40% larger for E85.
That much ethanol is extremely tolerant of rich/ lean. Because of the extra Oxygen in ethanol you can be running as rich as 5-1 and still make good power. I think ( not at home) 7-1 is where you'll want to be. And you can go as lean as 8.5-1 and not hurt anything because of the cooling effect of alcohol. The exhaust will just sound like barking ducks.
Now there is some real power in E85. A 100 horsepower engine will typically make 110 horsepower unless you have a high compression or big cam. Then you're up around 120 hp. with no other changes.
Yes you use more E85 than gasoline. But it costs you less. Right now the local gas station has non oxygenated 91 octane st $4.49/9 while they are selling E85 for $2.39/9
Extra power, cooler running, and few deposits in the combustion chamber. I can't understand not using it. It's a lot more available than you image. There is a free website that will tell you where to buy it.
You need two O2 sensors because you have 2 carbs, one for each carb.
bentwrench said:
You need two O2 sensors because you have 2 carbs, one for each carb.
Because the intake and exhaust manifolds are split differently he'd need four O2 sensors and they'd have to be in the exhaust manifolds.
In reply to APEowner :
Right. So as long as I keep the carburettor configurations the same, it should be close. Or, as my high school math teacher used to say, "what you do unto one side, do unto the other. NO BIGOTRY!"
kb58 said:
See what an O2 sensor mfg recommends, rather than the seller. Bosch has a ton of helpful info online and very likely has detailed installation instructions. They may allow you to mount it closer. It's a trade off between temperature, accuracy, and sensor life. That last bit depends upon where the sensor is located on the tube (in a "clock" orientation). From memory, I think it's something like "between 10am-2pm" to keep condensation out of it.
Lastly, is this a heated sensor? It probably is, and if so, it can go a long way from the engine since it doesn't need engine heat to get up to temperature.
The AEM manual does indicate the sensor needs to be at least 10 degrees above horizontal - so 10 and 2 o clock is a good rule to go by. And it is a heated sensor.
I have had to put it in an X pipe before and it works just fine.
One of the biggest concerns for O2 sensor placement is condensate in the exhaust.
The sensor must be placed so that condensate is not directed at the sensor.
If condensate hits the sensor, the thermal shock will destroy the sensor.
Moving the sensor away from the valve increases that likelihood.
For high temps, high performance, it is best to use a long bung, so the sensor is not directly in the stream.
Place the sensor above center and avoid the outside of a bend.
I'm 8 to 10" from turbo outlet.
In this instance a single sensor in one of the primary tubes will be fine.


