NOHOME
NOHOME UltimaDork
8/11/14 4:52 p.m.

I know a few of you suffer the indignity of rust repair, so thought I would post this up as an easy way to do a sill where you need to make your own part.

Since measuring shaped objects is not easy, this method does a lot of the work for you.

First step is to use tape to mark off the bad zone. Be generous so that you get all of the rot. I guarantee its worse than you think

Now, dont go cutting right away. Take some time to fill in the bad zone with masking tape. I do a layer horizontal and vertical so that it holds together. Mark the bend flange and any other features.

What this gives you is a nice paper template to lay over your sheet-metal so that you don't have to bother with that pesky tape measure and all those silly fractions; just trace and slice with the grinder.

You can then slice out the suspected rusty bit to confirm your worst suspicions. Note that at this point I had to extend by rot zone because the rust went all the way to the B-post. Good thing I did not cut the tin yet!

Now, I hear a lot about fancy spot weld cutters but never found the need for them. A 1/8" drill bit drilled into the first layer and follow with a 5/16" bit till it bottoms out in the small blind hole works just fine.

The trick is to take your 5/16" bit over to the grinder and put a shallow tip on it. This is actually easier and more forgiving than most people think. Hard to screw up. Little beating with a wood chisel and she comes right apart leaving the lower sheet good for welding back on to.

I like to be generous with the Chassis Saver or POR when doing this stuff. Since these paints are so hard to clean off after the fact, I tape the weld seams before I apply the stuff. Note that the back of the panel is taped off since these areas are a pain to get clean after the fact and paint on the backside of a seam WILL affect the weld bead.

Repair piece fitted. Made to shape with the CO2 bottle and the jaws in the vice to make the pinch weld flange. I like to use 18 gauge tin cause it keeps distortion to a minimum. For a truck, this could have just been painted after the weld was ground down.

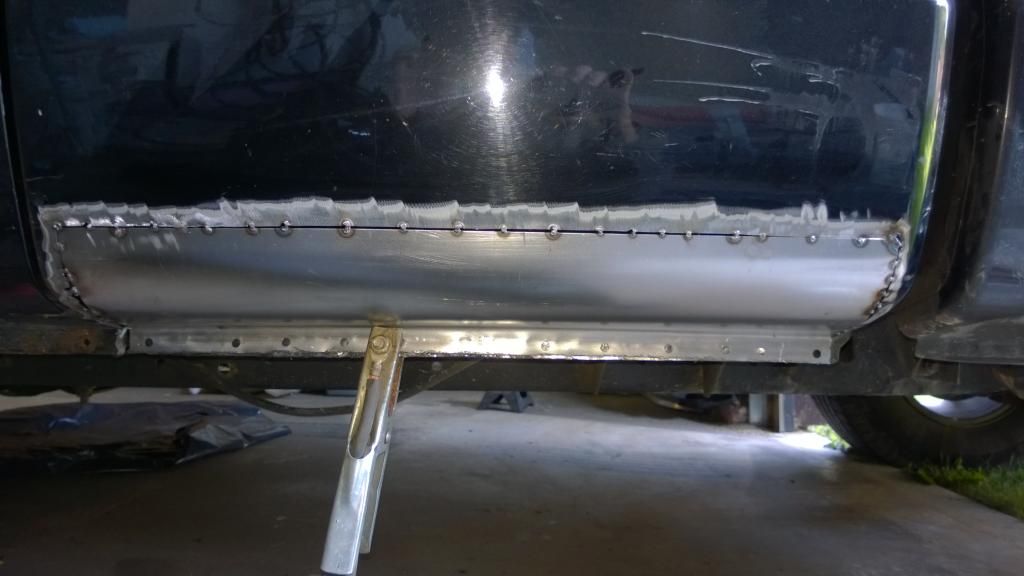
When welding thin sheet, I see a lot of people trying to chase the gap. What I find works best is to aim the wire at the leading slope of the tack weld. Just give it a short zap to make a new BB size pool, and let the capillary action guide the molten steel into the gap between the panels. Advance the gun slightly and repeat just as the bead loses the red glow. Keep repeating to make a 1-2" series of beads, then take a break and let cool.

That's where the phone ran out of batteries, but the job was pretty much done. A cheap panel that took no special tools other than the welder and a few Stellas. I use the tape template to make a lot of parts where a measurement is hard to do.

aircooled
aircooled UltimaDork
8/11/14 5:32 p.m.

I like it.

One thing that someone pointed out to me once that is also useful if you don't use your tape method (or even if you do), is to cut to create the replacement piece first THEN lay it over the bad area and mark and cut to that.

Appleseed
Appleseed MegaDork
8/11/14 5:38 p.m.

Nice thread.

I'd really like to see (hint, hint GRM) dealing with bodywork involving a character line. You see scores of DIY stuff, but its always a flat panel. I've never been lucky enough to have a dent in a something flat.

noddaz
noddaz GRM+ Memberand Dork
8/11/14 6:00 p.m.

Very nice. Thank you for showing us this. Now how do you spray Por-15 inside the panel to prevent the rust from coming back? And yes, it would be great if GRM did an article on grassroots body work like this...

NOHOME
NOHOME SuperDork
8/11/14 6:30 p.m.

I don't spray the POR, I brush it on with foam brushes. If need be I get in with the foam in my hand and slather the stuff on. Do wear gloves cause this stuff does not come off!

What is important if you want rust repairs to last is to get at the back of the bead with the paint. The molten metal reacts with oxygen and is essentially a bead of rust waiting to grow.

If you need to form a moulding along a fender, then your best bet is to make a die from a block of steel that you carve out with the angle grinder and use a hydraulic press to mold the part. You cant really go too far wrong since if you screw up on the mold, its just a matter of laying in some weld and try again.

You can get shape into a panel quite easy by shrinking the edge if you can create a "tuck"; use a stump if need be (Italians used to build cars this way) or steal a purse out of the wife's collection, fill with kitty litter and beat some shape into the part.

Woody
Woody GRM+ Memberand MegaDork
8/11/14 6:43 p.m.

Lots of good tips here. Thanks!

Sometimes, I use aluminum foil to make odd shaped patterns, but I like the tape idea too.

Swank Force One
Swank Force One MegaDork
8/11/14 7:57 p.m.

Looks awesome! Wanna come and fix my E36 M3?

NOHOME
NOHOME SuperDork
8/11/14 9:47 p.m.
Swank Force One wrote: Looks awesome! Wanna come and fix my E36 M3?

Nope...Need to keep moving on the P1800 project. This was a favour for a friend. I could use fewer friends when it comes to "You like to do bodywork, will you do my car for a case of beer?"

motomoron
motomoron SuperDork
8/11/14 9:51 p.m.

All good advice. But if you're truly lazy and cheap, as in you value your time, I'd advocate strongly for the purchase of a pneumatic flanger/punch tool. I've done lots and lots of butt-welding sheet metal. Then if you peen the welds at all it stretches the panel and you get buckling, oil-canning and all manner of distortion you need to shrink and dolly back into shape before filling. With the flanger you end up with an easy lap weld which is much stronger and easier to deal with.

Fifty bucks from amazon. Pays for itself in no time. Seriously.

NOHOME
NOHOME SuperDork
8/12/14 5:52 a.m.
motomoron wrote: All good advice. But if you're truly lazy and cheap, as in you value your time, I'd advocate strongly for the purchase of a pneumatic flanger/punch tool. I've done lots and lots of butt-welding sheet metal. Then if you peen the welds at all it stretches the panel and you get buckling, oil-canning and all manner of distortion you need to shrink and dolly back into shape before filling. With the flanger you end up with an easy lap weld which is much stronger and easier to deal with. Fifty bucks from amazon. Pays for itself in no time. Seriously.

You sir are what my wife calls a "Bad Influence" As if I need any encouragement to buy tools!

How do you think I made the holes in the lower pinch weld flange?

The thing with the lap is that if is a rust trap.The bacckside of any weld is by definition "rusty" since the molten metal is not shielded and reacts with oxygen. With a lap joint there is no way to clean the backside or get a cooat of POR over into the lap. This particular sill application seems to be a bad zone where it will be exposed to salty water.

Besides, most of my work is more of a restoration nature, so I keep trying to up my game for a butt welded filler free seam, so this is just practice.

EdHigginbotham
EdHigginbotham Editorial Assistant
8/12/14 8:48 a.m.

Excellent thread. Moving this over to the Tech Tips section.

tuna55
tuna55 UltimaDork
8/12/14 9:13 a.m.
noddaz wrote: Very nice. Thank you for showing us this. Now how do you spray Por-15 inside the panel to prevent the rust from coming back? And yes, it would be great if GRM did an article on grassroots body work like this...

You don't use POR15 or Chassis Saver on the inside, you use this stuff:

http://3mcollision.com/3m-rust-fighter-i-08892.html

NOHOME
NOHOME SuperDork
8/12/14 2:29 p.m.

What Grassroots needs to do is haul one of the unwashed masses from their readership who has never done any such work (but wants to learn) down to the world headquarters and document the learning curve. Make a nice article and advertizing sales pitch to Lincoln and all the other people who sell welding stuff to us.Seriously, Chassis saver needs to advertize in the Mag cause there is a serious need for their product.

Make it a contest or some sort where after this home-schooling session they get to go to Lincoln's welding school and actually learn something.

tjbell
tjbell Reader
8/13/14 2:07 p.m.

Question regaurding this how to, I have a saab 9-5 and it has the usual "dog leg" rot that goes into the rocker a few inches. any suggestions on how to repair this. all i have is a HF mig welder with some lincoln cored wire...

tuna55
tuna55 UltimaDork
8/13/14 2:31 p.m.
tjbell wrote: Question regaurding this how to, I have a saab 9-5 and it has the usual "dog leg" rot that goes into the rocker a few inches. any suggestions on how to repair this. all i have is a HF mig welder with some lincoln cored wire...

Get a MIG setup and ditch the flux core for this.

I did it like this

https://grassrootsmotorsports.com/forum/build-projects-and-project-cars/build-thread-for-the-72-gmc-finally-thanks-john/59103/page23/

But others have done it better.

digdug18
digdug18 Dork
9/9/14 5:04 p.m.

Your welds on sheet metal look so much nicer on mine. My panel is so thin that i'm welding onto, it keep blowing right through, i'm resorting to a huge bead, and hours of gringing ahead of me. Glad it's a truck, so if it happens to look like E36 M3, then that's fine...

Good write up though.

Andrew

You'll need to log in to post.

Our Preferred Partners
aiEbuZg8XkpkRyZsCiVCUpYhiQch8fBAyxL33tce8E0SIbhVXtfj2PusmTJBxOdt