


Excellent job, neatly tucked in! A professional exhaust shop couldn't have done better.


story and photos by Tom Suddard
By the end of our last update, we’d completed our mission and added two cylinders to our 350Z. Magic? No, we used just basic tools along with an LOJ swap kit, a true engineering marvel. Then we put the car back onto the trailer and drug it back to our Florida home.
The biggest item left on our to-do list? An exhaust system. Though LOJ now offers complete exhaust systems to accompany their kits, at the time they didn’t, instead stopping at a beautiful set of custom headers.
That posed a bit of a problem, since we didn’t have a trusted exhaust shop nearby. However, we do have a TIG welder as well the willingness to use it.

First step in fabbing up our own exhaust: Diving into the Summit Racing catalog, where we found nearly 1000 exhaust-related parts sold under their own house brand. Our LOJ headers sport 3-inch collectors, so we ordered a cart full of 3-inch exhaust parts: mufflers, tubes, bends, clamps and mounts, all totaling more than $900. That’s a lot of money, yes, but it’s less than we would have paid a competent exhaust shop to do the work. We planned to build a dual 3-inch system. While a 3-inch system is overkill for our mild LS1, we didn’t want to fabricate a second exhaust system once we started modifying the engine. LOJ says that a 2.5-inch system performs just as well as a 3-inch system until the engine reaches 600 horsepower; after that point, the 3-inch tubes help.
Step One: Make Room
Before we could start building our exhaust system, we needed to clear some space. We unbolted our stock setup and threw it away. Then we turned back to the hole left in the floor pan and investigated our workspace. The stock 350Z features an interesting exhaust layout: Two manifolds lead to two downpipes, which then T into a single midpipe that runs back to the rear of the differential; while that single pipe enters the muffler, two separate exhaust tips provide the exist. Since only that single midpipe passes the rear anti-roll bar, the factory bar only features clearance for one pipe. We needed room for a true dual exhaust system.
Fortunately LOJ posts a chart detailing every Nissan and Infiniti rear anti-roll bar that sports clearance for two exhaust pipes. A 370Z bar would provide the necessary clearance, so we ordered a used stock one via eBay for $75. It bolted right in place.


Step Two: Find a Starting Point
We had room for our exhaust, so now we needed to start building it. We started by tack welding V-band clamps to the collectors.
We could have welded our exhaust directly to the headers or used more-forgiving band clamps, but we love the security offered by V-band clamps. Plus they have another advantage: They’re very repeatable, clamping in the exact same position every time.
We knew that we’d be installing and removing the pipes dozens of time as we assembled our custom exhaust–all that measuring, fitting, tacking and welding–so we saw the repeatability as a huge plus.

Step Three: Build an Exhaust
Piece by piece, we started to put together an exhaust system. We measured the angle needed, cut a section from our pre-bent Summit Racing pipes, trimmed to fit and, finally, tacked it in place. After piecing together two or three sections, we’d do our finish welds since that step can cause things to move around a bit.


Wait a Second! Those Welds are Terrible!
Yeah, we know–but we can explain! Honest!
LOJ’s swap kit included beautiful stainless steel headers, so we decided to build the rest of the exhaust system out of stainless as well. Although thin stainless pipe can be MIG welded, it’s more common to use a TIG welder for this type of work. Why? It’s easier to control the heat, and TIG doesn’t require the expensive tri-mix gas necessary for MIG welding stainless. Plus, TIG makes beautiful, strong welds. Or at least it does in theory.
Us? We used the exhaust to introduce ourselves to the joy that is TIG work. So while we had a nice Lincoln Precision TIG 225 at the ready, this was our first TIG experience. Our first attempt was not beautiful, but that’s how the learning process works. (We should note that we used a MIG welder for most of the tack welds since TIG welding while upside-down and holding pipes is an advanced technique.)
Fortunately we had some coaches at the ready. After making a weld, we’d send photos to two friends who are great welders: Wayne Presley of Very Cool Parts and Steve Eckerich of Stampco Metal Products. Then the abuse/feedback would flow.
The criticisms were plenty:
"Was your foot drunk when it was modulating the pedal?"
"Did you clean that in your septic tank?"
"Are you using the exhaust of a running vehicle as shielding gas?"
But that’s what friends are for, right? These are basics that Carl Heideman has been teaching us for years: You can’t weld dirt, air or dirt–and, yes, we listed dirt twice since it’s so critical.
By the end of this project, we were looking at passable welds. We learned a few things, too:
• Comfort Matters. Each weld takes a while and wearing a heat shield on the left hand definitely improved comfort. A respirator, too, also helps keep the welder comfortable.
• Cleanliness Matters. Wiping down every pipe–inside and out–with acetone helps produce better welds. We wiped down our filler rods, too.
• Shielding Matters. Stainless requires shielding on both sides of the weld. We started the project using Solar Flux as it claims to replace shielding gas on the backside of the weld. It didn’t work as promised, so we bought an extra bottle and regulator to fill each pipe with gas. On the topside of the weld, we switched our standard TIG cup for a gas lens, which helped us properly shield the weld.
• Fit Matters. You cannot weld air. Carl Heideman has been beating that line into our heads for decades. How do you remove air from your joints? By making each connection spot-on. Fire up the belt sander and make everything fit perfectly.
By the end of this project, we were producing passable welds. Nothing like what a pro would make, of course, but we were pretty happy with our progress after one exhaust system:


Step Four: Keep Building the Exhaust
The exhaust project covered a few weeks of evenings and Saturday mornings, but once we got moving, the rest of it came together pretty simply. We included an X-pipe, too, to improve scavenging and thus make more power.


Since we’re building a track car and our local venues don’t have sound requirements, we chose the lightest free-flowing mufflers that we could find, ordering a set of Summit Racing-branded glasspacks that feature a straight-through design.
Our initial test revealed that this setup was obnoxiously loud, but we’re hoping that a pair of turndowns tones down things a bit.

Once we had rest of the entire system mocked up and figured out, we removed it and did the finish welding on the bench.

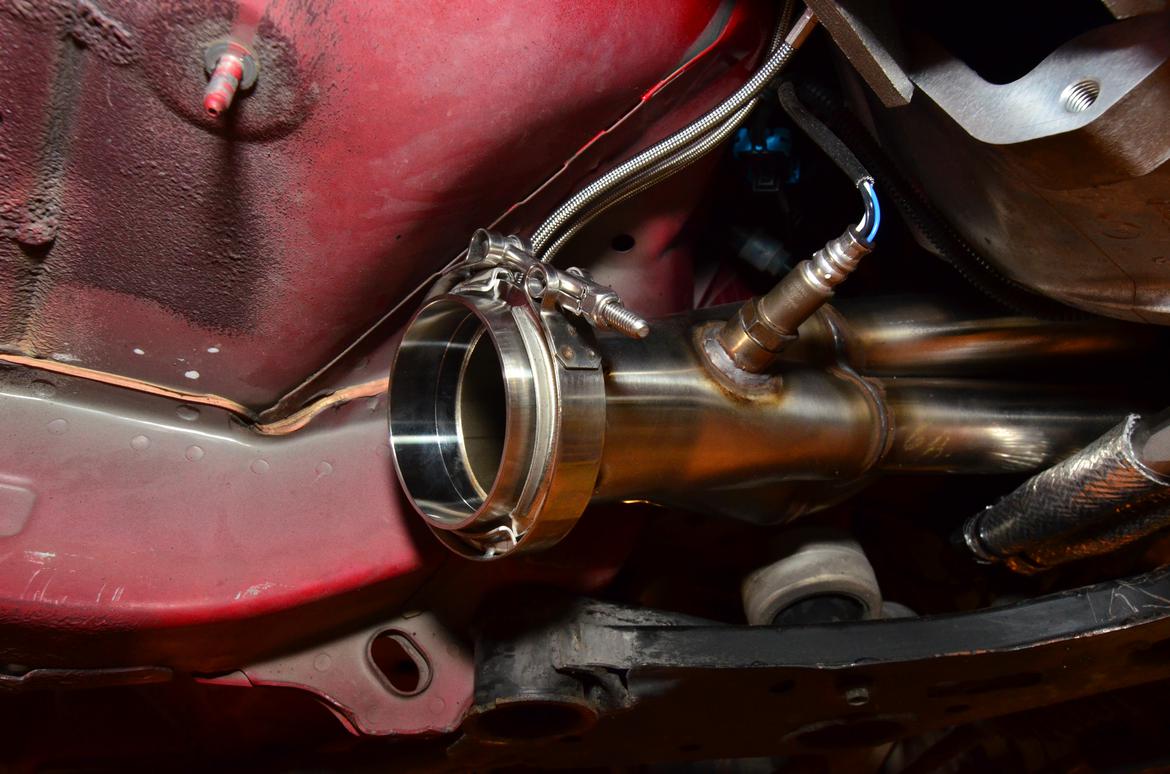
After installing an AEM Wideband Oxygen Sensor, we could hang our home-built exhaust system using some Summit-sourced hardware. What did we learn through all of this? If working slowly and methodically, an amateur can build a TIG-welded stainless exhaust system at home.
Now to finish the rest of the car.


Excellent job, neatly tucked in! A professional exhaust shop couldn't have done better.

Thanks! For a first attempt, I'm pretty happy with it.

No street driving for it? I don't see catalytic convertors...
In reply to docwyte :
Nope. We'll cover the cage and such soon.
Awesome! I've been building my own exhausts for a while now. Not because I'm any kind of expert, just got sick of shops charging too much and not doing what I want. They usually only want to bolt on a system for you, or make a crappy system with crinkle bends and still charge too much. If you do find a good shop to do what you want, its thousands to get anything done.
I know you already built your exhaust, but don't discount a single pipe for a V8. My LS6 has headers running into a single 3.5" pipe with a giant Magnaflow 12909 straight thru muffler and sounds amazing, also dropped a decent amount of weight. Smooth and quiet idling and cruising, no drone, but screams when it opens up down the straight. And tunnels!! Also when I went from a crappy true dual to the single, I picked up 14 rwhp on the dyno. I also went from Hooker headers to ARH, 400 count cats to 200, but I'm sure most of the gains were the cat back.
Displaying 1-5 of 5 commentsView all comments on the GRM forums
You'll need to log in to post.

![]()
![]()


