


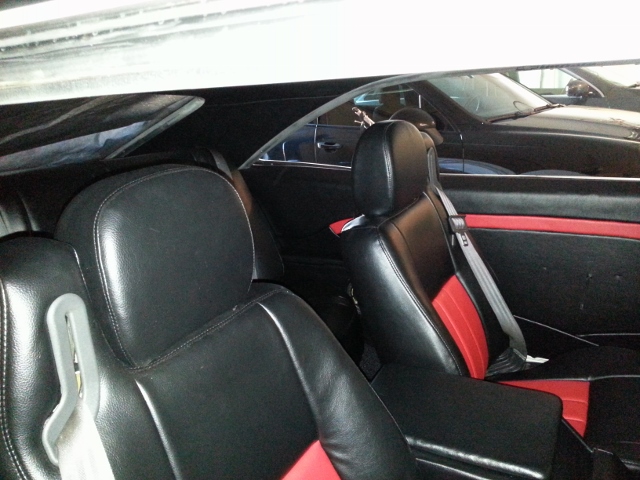

This spring, a project that was 15+ years in the making is coming to fruition. It’s a 1965 Chevy Impala 2 door hardtop I bought when I was 15 and have owned for nearly 25 years. I did some work when I was in high school; rebuilding the engine, converting from an automatic to a manual transmission, rebuilding the rear end, rebuilding the suspension, including some interior work. Phase 2 of the Impala restoration project started just after college; I started with a theme and component selection. My primary goal was to build a street friendly hot rod that stayed true to the original design roots, maintaining the factory sheet metal and body lines, while updating to more modern technology. The secondary focus was to squeeze the most out of a naturally aspirated small block, build a nice car that is NOT too nice to drive, and generate a sound like no other American muscle V8. The majority of the planning was spent on how to fit a set of 180 degree headers into the car without significant sheet metal modification. In college a good friend of mine found an article Honda published on header tuning. We used it for the college Formula SAE car. I used the same equation to determine the proper header lengths for the Impala; including the primary, secondary, and tertiary header tube sections. In order to fit the headers into the car, I converted the engine to a dry sump oiling system and modified a shallow pan to clear the 4” stroke. This allowed the headers to pass underneath the oil pan; 1 in front of the steering linkage and 3 behind the steering linkage. The dry sump pump sits where the mechanical fuel pump used to sit. The oil tank now occupies the space where the battery once was. In the same excel file as the header calculation, I was also looking at manual transmission gear ratios. My old T10 4-speed had a terrible 2-3 shift for RPM drop. After some research, I selected the TKO500. It had the best first gear ratio, rpm drop between gears, and highway gear for cruising. The brakes were also a known problem. The drum brakes faded after one hard stop. With the added horsepower, extra braking capacity would be necessary. A set of Baer brakes were chosen for the quality, brake size, and integrated parking brake in the rear caliper (very clean). A large car that will be driven on the street requires a large flat torque curve. As such, the motor was designed around a 4” stroke, dual plenum intake manifold, and aluminum heads. The intake manifold was ported to allow for better air flow and was matched to a set of AFR heads. In order to help the engine rev quickly, low tension rings were used along with an aluminum flywheel and lightened crank. Once I was married, some additional requirements were added to the car. Shoulder restraints were required as was air conditioning. The car did not originally come with air conditioning; an aftermarket unit that fits under the dash saved on space. Sebring seats out of a convertible were chosen for the front and Chevrolet cobalt seat belts were fabricated to mount underneath the rear deck lid. When I finally got around to migrating from the planning phase to execution my son was 18 month old. He is now 10 and I have two girls that are 7 and 4. My older two kids love the car and look forward to riding in it. About 3 years ago, I heard of this cute little circuit board called “raspberry pi”. I wondered what I could do with it. Then it hit me, I could use it to control the doors and trunk in the impala. The raspberry pi had too much computing capacity, so I purchased an IOIO board. After consulting with some EE friends, I soldered up a board with FETs, resistors, and capacitors to control the door locks, trunk, and ignition. This is all completed and controlled through an App I wrote. I can lock, unlock, open the trunk, and check the status of my doors (locked or unlocked). The App also has to be running to start the car. If the phone does crash or the app is closed while driving, I integrated a latching circuit to prevent the car from dying when the phone dies. Just before getting the car painted, I was quoted $7K+ to do a complete interior for the car. This seemed excessive. After some YouTube research and finding a supplier for upholstery materials, I took it upon myself to do the majority of the upholstery. I did the trunk, headliner, headliner console, rear deck lid, rear door panels, kick panels, door panels, and center console. The center console housed several components from different vehicles (Ford F150, Volvo, Audi A3, Hyundai elantra, and even including a poker table). All components were painted to match. I had someone else do the seats and visor since I did not have a sewing machine. The dash panel followed a similar theme that I started in high school. I created an aluminum dash that replaced the stock gauge cluster and allowed me to use Autometer gauges. For this build, I integrated a steel panel into the dash to hold onto the gauges. All instruments have black letters on a white face with red background lighting. To maintain the theme, the climate control face was modified to match. I used a sheet of acrylic, had the letters cut backwards, filled with black model paint to prevent crazing, and painted white for background. I use red LED’s to match the other gauges. The original “PRNDL” selector now contains the high beam, e-brake, as well as left and right indicators. Now that the project is completed, I would like to share my build story with as many people as possible with the hopes that I might inspire others to start their own project. The grandest visions can be achieved with patience and perseverance—nothing is out of reach. There are a lot of firsts in this project for me; including several mistakes. The build has covered several areas: Engine • 402 small block (world products block) • 4” stroke lightweight crank (SCAT, q-lite connecting rods) • Harland roller rockers • Lunatic roller lifters • Comp cams custom camshaft • Edelbrock RPM air gap ported and port matched to the cylinder heads • 227cc AFR heads with 2.1” intake valve, 1.6” exhaust valve • Barry Grant 850 Mechanical secondary double pump carb • Cowl induction • Dry sump • Low tension oil rings • Aluminum flywheel • MSD ignition Exhaust • Custom headers (180 degree configuration) o 39 inch long 1-7/8” primary (measured from back of exhaust valve) o 25 inch long 2-1/4” secondary o 16 inch long 3” tertiary • 2 Magnaflow 18” long mufflers (#12259) + 2 Magnaflow 14” long mufflers (#12867) (4 total) • Custom exhaust tips with 5 degree expansion to help scavenge exhaust gases Transmission • Tremec TKO500 selected over TKO600 due better (gear ratio spacing (rpm drop between gears) • Borg and Beck style RAM clutch Rear end • Strange Axles (28 spline) • Posi rear diff (chevy 12 bolt) • 3.90:1 • Welded tubes Suspension • Poly urethane bushings • Addco large anti-roll bars • Bilstein shocks Brakes • Dual 9” vacuum booster • Baer 13” front disc brakes with dual piston calibers • Baer 13” rear disc brakes with integrated parking brake Interior • Chrysler sebring front seats (for the integrated seat restraint) • Cadillac deville rear bench • Chevy cobalt rear seat belts (mechanism underneath deck lid) • Center console o F150 air vents (2 in the front of the console and 2 in the back for the rear passengers) o Volvo storage tray (coin holder hogged out to hold cruise controls) o Aftermarket ebrake o Audi A3 shifter book o Hyundai elantra hazard and A/C switch o Autometer oil temp gauge o Poker table cup holders • Headliner console o Headlight switch o Trunk switch o Garage door opener o Sunglass holders o Storage tray o 4 independently operated LED lights • Dash is a custom metal insert to upgrade to Autometer gauges • Climate control face has been changed to match the autometer black on white theme with red backlighting Trunk • Relocated batter to trunk with 200amp continuous use solenoid • Moved spare tire • Created trunk panels to clean up the trunk Keys • Eliminated all keys in car (kept stock handles) o No door or trunk key holes o No ignition key (just a lever) • Phone App controls door locks and trunk • Phone App is the key to start the car Pictures and videos Build overview https://www.youtube.com/watch?v=TRy8-q62e3Y Exhaust video https://www.youtube.com/watch?v=31AlHeQYRyg Door app video https://www.youtube.com/watch?v=o2wZQxIB9BU Road test https://www.youtube.com/watch?v=Dk8WW9FixGY NOTE: There is a lot of wind noise in this video. After the first few seconds, skip ahead to 2:10 and then again for 4:30. Walk around https://www.youtube.com/watch?v=IroDICO5BIs Photo library https://www.dropbox.com/sh/3lmcvvpta0awqcc/AABymWFRPIe80gJDjNfshRbea?dl=0
Build overview https://www.youtube.com/watch?v=TRy8-q62e3Y Exhaust video https://www.youtube.com/watch?v=31AlHeQYRyg Door app video https://www.youtube.com/watch?v=o2wZQxIB9BU Road test https://www.youtube.com/watch?v=Dk8WW9FixGY NOTE: There …
You'll need to log in to post.


